Search the Community
Showing results for tags 'Dragon'.
-
Hi boys. Looks like another project has come to an end. This time it's Willys Armoured Truck from Dragon. The model was fun to build, had few problematic issues with the manual and parts numbering, but nothing that could affect all the joy I had building it. Model is built straight form the box, no additions and aftermarket were used. Only sold portion of weathering Enjoy.
- 21 replies
-
- 25
-

-
 Hi all, This is the latest diorama that I have just finished entitled "Blitzkreig in the West" and is based on a German unit in May 1940 advancing through the outskirts of a ruined village, rounding up POW's and preparing for their next encounter. It has been on the go for over a year although it has sat idle at times whilst I worked on other kits and projects. It's by far the biggest diorama that I've attempted and I'm pleased with the outcome as well as pleased that it's finally (99.9%) finished. Below is a list of the kits used: Building: Miniart 36028 Tank: Hobbyboss 83813 Motorbike and sidecar: Zvezda 3607 Figures: Dragon 6478, 6347, 6196; Tahk T-35023; Stalingrad S-3534; Soga Miniatures 3531 All figures were hand painted including the insignia on the collars and sleeves and on some I added the improvised camouflage grass on their helmets that I've seen on photos from the period (very fiddly!) as well as making all the slings from scratch using lead foil and finally they all received a light dusting with Mig pigments to blend in with their environment. The Hobbyboss tank is my first proper attempt at air brushing as this is a new skill to me as well as the weathering. In keeping with the storyline behind the diorama, I wanted the tank to have a used and dirty look but keep the damage minimal. The scene is based around the Miniart kit with the added collapsed wooden floor scratch built using balsa wood and coffee stirrers and the strewn debris is a mixture of different sands, rubble and scale bricks. The burnt area is made up of white metal corrugated sheets and Mig pigments - Black Smoke and Ashes White. The slate wall was built one piece at a time. Thanks for looking and all feedback is welcome. Regards, Lee
- 16 replies
-
- 14
-
-
We've got some great 1/35 scale tank kits in stock now from one of our favourite manufacturers: Dragon Models. This release includes: A Panther II, Panther Ausf.D V2, a M4A4 Sherman with 60lb Rocket and more! https://www.wonderlandmodels.com/blog/article/new-dragon-tank-kits-oct-2016/
-
de Havilland DH.84 Dragon G-ECAN, pics thanks to Mark Mills.
- 1 reply
-
- 1
-
-
- de Havilland
- DH-84
- (and 1 more)
-
-
While my P-40 reaches the stage of decalling and weathering, I thought I'd start something else off while I wait for parts to dry etc. Although I was planning originally to build a Zvezda Pe-2, following some armour builds here (especially PlaStix's IS-2 dual build) made me turn to my small armour stash. I feel that there ought to be a representative in the GB of the 4,000-odd Shermans that went to the Red Army, so I pulled out the Dragon 1/35 M4A2(76) kit. The box holds plenty of sprues, a small sheet of photo-etch, a metal barrel, a tiny decal sheet, and a dead spider. Couldn't say when I last built a vehicle. I guess it'll be a learning experience, just hope it's interesting, and I get a reasonable outcome before the end of the GB.
-
The finished SU-76I More about the tank and the build is here: http://www.britmodeller.com/forums/index.php?/topic/235005847-the-russian-way-of-beutepanzer-su-76i-135/
-
Hello all. Well, as they say, a picture paints a thousand words, and since I can't think of any words, I'll start with pictures..... Base plan with makeshift road... Probably use some sort of putty to smooth out cardboard. Thinking of putting PVA glue with fine sand for bitumen. I dunno how accurate that would be, but eh... With panther and figures for a test fit. Ground work will be painted a different colour, it was just left over from a desert base, so I used it More info on the panther will be posted when it is finished 100%, will be up in AFV RFI. The plan is to have a dead hedge behind the panther, some ruined building or equipment near the figures. Stuff I was going to use for a dead hedge. Dead grass btw. Stuff I was going to use a grass. Once removed of... err... 'impurities' I will have to apply it somehow.... hmm All for now, and thanks for looking
-
Hi, i'm new here, this is My first post 1/48 Bf-110 D, ZG76, North Sea, 1941 built this myself recently from a Dragon kit with a Eduard cockpit PE.
- 26 replies
-
- 30
-
-
Hello, I'll start my appearance on this forum with my most recent build. The most complicated build I've done so far. It took me about 8 months to finish but that's due to moving house and then I didn't know where to start again:) Anyways, It's done. Had problems with painting as I wanted to do the hair laquer method for scratches and stuff. I was crying when after applying paint the next day, it was coming off and looked like a mess. Painted again and again. Finally I've managed to make it. There was a problem with the so called "magic tracks" made by Dragon. They not workable at all. If you assemble them without glue it falls apart If you use some glue, it's too stiff. Had to build it in sections like tracks in 1/72 scale models. I hope you like it:)
-
This small tank I've been working on for half a year or so. While Dragon's plastic parts fit nicely, the photo etch side skirts need a lot of tender-love-and-care to get them positioned correctly (something I've not entierly achieved). However I feel they look much better than the kit's oversized plastic parts and you can add some 'battle-damage' with a pen. The vehicle was painted with Gunze/Mr.Hobby acrylics and weathered with pastel chalks and artists' oils. It represents a tank from 6. Panzerdivision at Kursk, 1943. Photographs taken by Mr. Wolfgang Rabel of IGM Cars & Bikes.
- 14 replies
-
- 16
-
-
- Dragon
- Panzer III
- (and 2 more)
-
 Hello, this is my long-winded Panther with Pz IV turret (for those that don't know German!) This particular tank is from the s.Pz.Abt.653 in Russia, 1944. Kit built OOB, except for some wire replacing an attachment for the turret spaced armour, as the original part was lost to the carpet monster... And I'll have to resist turning the turret, as the turret was welded on, and used as a command vehicle on the real thing The kit is what you'd usually expect from Dragon, nice detail and small parts. It was Airbrushed with Tamiya XF-59 Desert yellow then I brush painted the camo. It's a bit messy, so I'll use the excuse that it was painted on by the crew (Even though it probably wasn't ) For any more info, just ask Bit cloudy today, so photos aren't great. http://i628.photobucket.com/albums/uu7/SJLR_1/P1390559_zpsn3ipxgef.jpg Ooh, what do we have here?? Turns out the Kit also supplies parts for a 'normal' panther, so why not make it?! I will be using this tank for my 'Somewhere in France' Diorama too
 -
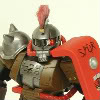
Hiya. I decided to start my new project. It is fifth on here. I got one finished (Quad), 2 under contruction (Sd.Kfz. 222, and a plane Ki-46) and one... let's say it's finished. As 222 is waiting for decals, which I hope will happen soon, I wanted to start new, small thingie. The choice was obvious - 1/4 Ton 4x4 Truck made by Dragon. It's armored - a little field invention and it's got lovele .50 cal Machine Gun. It is my first Dragon model. I've got a little inbox for you, lads. The box. Too bad the model doesn't include figures. But it's not gonna be just that. The armor. I've decided to make a little vignette also. Never done vignettes - this'll be a first one. Hope you'll help me. That's the body... Chasis and stuff... The biggest sprue in the box. Aaand the nicest one - .50 cal MG. That is it for now. Enjoy.
-
Please help me, I'm lost! I need to get a king tiger before I go mad. I've been inspired by PlaStix to build a king tiger (tiger II) but I am not sure which kit and aftermarket parts to go for. Should I go with the Eduard kit and PE/resin or Tamiya and PE/resin? So let your wisdom guide me!
-
Hello, here's my Dragon's Churchill Mk.IV...built from the box. It didn't go together as well as other kits from this manufacturer; there's some tension along the fenders that causes them to slightly bend inwards. I did not use Dragon's decal option (only one included) as a quick online search revealed that "Castlerobin IV" had actually a different type of gun. So out came the spares box, and a turret number from another Churchill (Matchbox' AVRE if I remeber correctly). Only the "4" (identifying North Irish Horse Regiment) from Dragon's decal sheet was used. Photographs by Wolfgang Rabel of IGM Cars & Bikes, Vienna. The model was painted with Gunze/Mr.Hobby acrylics, according to Dragon's instructions. Weathering with Artists Olis and Pastels. Hollowed out the exhaust stacks: Thanks for looking! Cheers from Vienna.
-
As I said right at the start of this GB, Imma gonna do the Gnat and this bad girl. <insert obligatory box shot, c/w parts and aftermarket> There's a Pavla nose cone, Master metal pitots (because they were cheap) and a new pilot's seat from High Planes - the observer gets to sit on the undersized seat as supplied by Mr Cyber-Hobby (because I'm cheap). I'll use the kit decals, probably the one with the shark's mouth, although that may be subject to change. I'm heading out to work for at least 7 days, so I was casting around for something to do to keep my modelling mojo motoring, and decided that this was a good candidate, seeing as everything I'm currently doing for GBs is pretty well at the stage of not being portable. I'm hoping to get this thing's internals done and the the whole airframe ready for paint before I get back, then I can have a big airbrush session and cover everything in jam. Seeing as I'll be modelling in a small room that's not mine, I've decided to do this'un in acrylics instead of enamels - not so much for the smell, as thinner doesn't overly worry me, but for the ease of cleaning brushes and mopping up any spills that may happen; management get shirty if we make a mess of the accommodations. I'll do the whole thing in acrylics I think, even the outside, just to keep it easy. As I'm using acrylics, I'll throw a coat of rattle can primer over the whole sprue before I start, to help the paint stick a bit better. Hopefully I'll have time to do that and let it dry before I hit the road tomorrow... I've got the sprues washed and have made a short list of the paints I need to pick up on my way out of town, so here's hoping I can make it through 12 hr days with a bit of energy left over! Photos as progress progresses.
-
Well I have been away for a few months and the urge to file, glue, paint, etc can not be left Hungry any longer. So to satisfy my hunger I have decided to give myself a quick modeling snack in the form of yet another dragon vulcan. I love these little vulcans small though it maybe they make into a gorgeous little platic triangle. This one I started in may and stalled after my last 4 I built. One I still have not posted in RFI xm606. This one will be XL426 as seen at the end of her flying days with the vdf very badly faded in what was dark sea grey and dark green but what at the time 1983-86 looked decidedly chocolate brown and med sea grey. For this I will be using humbrol 155 olive drab and 165 med sea grey and should give a scale effect once weathered a bit. So far I have done the intakes and engine faces and glued then in place and fitted the two fuselage halfs. The biggest job will be blue taking the camo but I find this relaxing (good job that!) Here's were I'm at
-
Here is my Bachem Natter from Dragon with the 43cm's tall launch tower. The Natter itself was an easy build but the tower was a different story, glad I did managed to finish it and not tossed it away! Dragon did not made a 100% correct representation of the real M17 prototype inside the box but for me it was not important, I wanted to build something different and I'm very happy with it. Looks good in the display cabinet Erik
- 11 replies
-
- 28
-
-
 #8/2016 Birthday posting! Today I celebrate my second last b-day in my thirties... Falls together with my dad´s finished dual Me163 build. Dragon kit with kit decals and additional ones from Revell and Testors, the RLM red was a selfmix. The model shows an a/c of Erprobungskommando 16 at Bad Zwischenahn in May 1944. This aircraft made the first operational Me163 sortie with Wolfgang Späte on the rudders. For good luck, his groundcrew painted the plane red like the Richthofen one.
- 10 replies
-
- 18
-
-
If you're really mad, perhaps you'd like to try one of these. Due out in the next month or so the completed model is over 1m long, over 500mm wide and 430mm high.
-
OK, a very late start for this one but I do have an excuse... It was an eBay bargain and I only got it in the post on Monday! I know it's 90% built and in primer but it's so well engineered that I had it together in under half an hour! This is truly an amazing kit! Barely any seams to deal with, it helped that the fuselage is split as upper and lower rather than left and right, and absolutely no need for filler. I had so much fun putting it together I really did forget to take some photos, I promise I'll get some as I paint it.
-
German Z-32 Destroyer Eduard 1:350 Eduard haven’t forgotten the Dragon Z-32 kit, even though it’s been out for quite a while, with the release of these two sets of relief etched brass, absolutely filled with detail accessories. (53151) The single sheet contains a range of fittings for the turrets, several types of inclined ladders, torpedo launcher control positions, which are little kits in themselves, with a lot of detail included, right down to the control boxes and seat. There are a number of life rings, gratings for the square Carley type floats, funnel cap and railing for the funnel and new shields for the flak guns . For the ships boats there are a new set of oars, new rudder and propeller. There are a range of replacement deck hatches, which can all be posed open should you wish, whilst there are also replacement cable reels, for which the modeller will ahve to provided the drum out of plastic rod. The radar array is completely replaced with a very detailed unit which will make all the difference to the look of the ship along with the rope walks for the yardarms. (53152) This single sheet set contains a full ships complement of railings, which always help give the model a more accurate look. Along with the railings there are a set of replacement mine rails, which, once the kits details have been removed, will need to be carefully glued into place. Each rail consists of a base section, much like the sleepers of a railway track, and two separate rail sections, which will be quite demanding to get right in this scale, but well worth the effort. Conclusion Eduard continue to release superb sets for us maritime modellers, no matter what ship is released, they have a set or five for it. These sets will certainly help improve the look of the Dragon kit, but probably not good for the novice though, as there are some quite awkward parts to fit. Review sample courtesy of
-
A bit of cross-kitting here with a 1/72 Dragon M4A4 hull fitted with the Airfix 1/76 flail attachment with scratch-built stationing equipment
-
 This project was made as part of the D-Day Group Build and I had originally put it in the Armour Vignettes and Dioramas section. A key feature, though, was the Typhoon so, when I saw this new section I thought I could post it here as well. This was my first ever diorama and it's made up with a lot of other firsts. First Typhoon, Panther and Tiger kits, first tank(s) for many, many years, first plane kit in flight, first use of a Prop Blur, first use of aftermarket decals (for the Typhoon) and first 1/72 figures. Nearly everyone who contributed to the WIP thread helped with ideas for the building of various elements of the project so a big thank you to them all - it wouldn't have been possible without the help of the BM team. Also it was seeing Kallisti's Typhoon base that got me thinking about doing a diorama - so thank you to Kallisti for the idea. Typhoon: Airfix 1/72 Mk.IB Typhoon (new tool version) - MN526/TP-V - No.198 Sqn., 123 Wing, 84 Group, 2 TAF B10/Plumetot, France - July 1944. Panther: Dragon 1/72 Ausf G with Zimmerit, no. 135 of 12 SS Pz, Tiger I: Dragon 1/72 Ausf E with Zimmerit, no. 131 of sSSPzAbt 101 German and British troops from Ceasar Miniatures Baseboard: Softwood, Sundela, MDF, filler and various leftover scenic materials from model railway projects made a long time ago. The WIP can be found here The RFI for the Typhoon can be found here The RFI for the two tanks can be found here Time: early evening, July 1944 - Location: somewhere northwest of Normandy This last photo shows the actual diorama and the background I used to give it depth. The background is actually the display shelf I made for my Spitfire builds but it seemed to work well as a backdrop - I thought it would look better than just a plain wall. Although this project is finished as far as the D-Day Group Build is concerned I've still got some ideas for developing this diorama further but I'm going to make a couple of Spitfires first! Thank you for looking. Comments and suggestions welcome. Kind regards, Stix
- 38 replies
-
- 31
-
-
 Good evening all, First of all, apologies about the photos-they're not the best.... Secondly, being a rather large Vulcan fan I thought why not try the Cyberhobby 1:200 kit, I would have never thought of buying one, but it was on Ebay for £5. And oh, my. What a kit! The panel lines are crisp, the decals are outstanding and the options available (shrike, blue steel, gear up/down, open crew hatch, etc, are quite varied. It even includes parts for the instrument panel and ejection seats-which shockingly also include control columns!!! A brilliant kit- the one issue being that the pressure needed in order the keep the upper and lower wing sections mated together while gluing is fairly substantial-requiring a clamp to get a good fit. Furthemore, it doesn't come with a bomb bay, so I've scratchbuilt a fairly crude bomb bay and managed to squash that into the aircraft. -Painted using an airbrush and Vallejo "Model Air" colours. Scratchbuilt bomb bay- including hand painted VTTS logo and a sponsor's logo inside (very messy, i know!) So, that's pretty much it from me, Thanks for having a look around Sam