Search the Community
Showing results for tags 'Diorama'.
-
 Panther: 135 of 12 SS Pz, Tiger: 131 of sSSPzAbt 101 These are the first tanks I've built since who knows when. I'm pretty certain I must have built one or more when I was young (but I can't remember) and there's been none since. If I did make any they wouldn't have been made or painted properly. Both these German tanks were made as part of a diorama for the D-Day Group build. I need to say a big thank you to Sgt.Squarehead, Shermaniac and Brews for their assistance with choosing suitable tanks. Both tanks have some additions to what's provided in the box - the Panther has a spare wheel (mounted on the turret) plus an improved shovel and the Tiger has track links (mounted on the turret) both kindly sent me by Sgt.Squarehead. The Tiger also has the longer towing cable mounted on the side of the hull, which I fabricated from bits of left over cable from both Dragon kits and ends from the Panther kit. Both kits were really enjoyable to make and everything is brush painted with Humbrol and Revell acrylics applied with hairy sticks. The WIP can be found here Photos of the diorama they form part of can be found here Panther: Tiger: A few photos of them together: And a few from the diorama: The RFI of the Typhoon in the diorama can be found here. Thank you for looking. My RFI for another D-Day build, of Jerry Billing's Mk.IX Spitfire, can be found here. Comments and suggestions welcome. Kind regards, Stix
- 38 replies
-
- 12
-

-
- D-Day Group Build
- Diorama
- (and 4 more)
-
A little Diorama i tried out what do you think ????
- 7 replies
-
- 2
-
-
- 1/72
- Heavy Artillery
- (and 3 more)
-
The plan was to finish this within the D-Day GB timescale, but for want of a better excuse, I forgot the deadline and missed it! Anyway, this is the new Airfix C-47 kit and strangely, the first of the newer breed of Airfix kits I've got round to making following the review I did in June this year. It certainly won't be the last as it was largely a joy to build. Big thanks to Alistair (Mottlemaster) and Andy (Sgt Squarehead) for sending me some figures to use and pointing me in the direction to get some more. Also thanks to TonyOT for helping out on research for some of the finer details that I would of otherwise missed. I'm still planning to get some of the new figures that Dan Taylor is releasing to busy up the diorama more with Para's waiting to board Kilroy. You can see the build HERE, but the kit is largely out of the box, just a few inner details added such as seatbelts. Thanks for looking Neil
- 32 replies
-
- 20
-
-
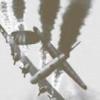
This is my first ever Typhoon and it was built as part of a diorama for the D-Day Group Build. After the D-Day landings 198 Squadron, flying out from Thorney Island, Funtingdon and Hurn, were involved with ground attacks on tanks (suitable for my diorama) and enemy emplacements around Caen. In July 1944 they moved to Plumetot and then followed the advancing troops into the Netherlands. To commemorate the 70th Anniversary of D-Day Eurofighter Typhoon, ZK308, was painted to represent Hawker Typhoon MN526. It's a lovely kit with nice detail - in fact the 'in-flight' version doesn't make use of a lot of the detail included in the kit so, at some point, I'm planning on making a version of it on the ground. It's all brush painted with Humbrol and Revell acrylic paints applied with hairy sticks. I have used a Prop Blur (another first for me) to make it look like it's in flight. The Typhoon itself is mounted on a clear acrylic rod. The WIP can be found here More photos of the diorama can be found here And a few photos of it on the diorama: My other D-Day aircraft build can be found here. Comments and suggestions welcome. Kind regards, Stix
- 51 replies
-
- 26
-
-
- D-Day Group Build
- Diorama
- (and 4 more)
-
Hello everyone, this is my first post on this lovely forum. I didn't know where to put this diorama with Hansa-brandenburg B.I by Legato kits so I decided to post it here, I hope it's OK. This model was a nightmare so Im not really happy with a result but Im happy that is finally behind me :-\. Diorama was built from scratch, The tree was made of a copper wire and putty, The bench, well and other wooden elements were made of balsa wood,the axe was made of shaving razor, I used a NOCH grass for rail models and for the leaves I used a home-grown dried spices. The Figures of mechanic and a civilian is by Preiser, also in scale 1:72. All in all it was a quite fun build Here's the result: CHEERS FROM SLOVENIA, regards Gašper Podbregar
- 17 replies
-
- 14
-
-
 HI there! I return after a break on the 1:35 vulcan I am doing to make a small a diorama which was based on a photo I found a long time ago, which can be viewed from the link that follows: https://fbcdn-sphotos-a-a.akamaihd.net/hphotos-ak-xap1/t1.0-9/10458751_10203908042248762_3892002888483155375_n.jpg Anyway, from that I had a go at my own which includes the missile cruiser Pyotr Velikiy made in what i like to call "SprueScale" which is a scale of 1:8400, with the models being made entirely from sprue and other bits. The base is a clear plasticard covered in a glue/ground sprinkle mixture and then painted the blue from the tin, the aircraft is from the 1:720 Italeri Admiral Kuznetsov aircraft carrier and everything has been secured with superglue to reduce the chance of it becoming displaced. That's all for today, Vulcan progress will be made tomorrow. Bye for now! Sam
- 4 replies
-
- 8
-
-
- sprue
- scratchbuilt
- (and 4 more)
-
Finished this a while ago. First completed 1/35th armour model in some time. Tamiya's Universal Carrier with Eduard etched set and Black Dog resin stowage. Thanks for looking!
- 23 replies
-
- 16
-
-
- Universal Carrier
- Tamiya
- (and 2 more)
-
Recently completed this one. If you ignore the thickness of the schurzen, moulded on tools and some heavy details I think these models make a nice change. Construction is quick, as you'd expect with kits designed for the wargame market but for me they provide a good excuse to practice some painting. The figures are Valiant Miniatures late war German infantry and although they are a little larger that 1/72 they don't look too out of scale, particularly when not mixed with other manufacturers' figures. Had some silvering with the Skytrex decals used for the turret numbers but this one was for practice. Thanks for looking!
- 4 replies
-
- 7
-
-
- plastic soldier company
- 1/72
- (and 1 more)
-
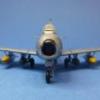
Greetings. My participation in this Group Build will serve little purpose other than to counterbalance the landslide of Eduard masterpieces taking part and to get rid of some loft insulation. The starting point is that old pony, OEZ Lethorad's MiG-21 MF/SMT/bis, which for years has been the only way to represent a late model Fishbed. For those unfamiliar with its appearance: (Clicking on the images above will lead you to a high-res version). The optional canopies: The surface detail: The external loads: Other than some well documented problems with the shape (wrong fuselage section, canopy size, and tail surfaces sweep) and fit (multiplied sevenfold if you're doing a bis or SMT), the kit has an odd feature in which all the mating surfaces of the wings and tail fin have an inner ridge that will prevent you from getting the right section. To my knowledge there is only one way to overcome this: Before and after: Before and after - the outcome: One of the MiGs will be all buttoned up, undercarriage included, so I did the wings as well: And that's all for today...
-
Have been celebrating my birthday tomorrow early this evening as my wife's working in the morning & the kids are at school. I've been a very lucky boy with some fantastic additions to my stash: My WWII airfield diorama is getting bigger by the minute! I'm very excited about all of them but I must admit the Eduard Phantom is particularly awe inspiring! Was also lucky enough to get a desk vice, a really cool razor saw, a pot of Humbrol weathering stuff, a teeny weeny paint brush and an extension for my man cave workbench LED lighting! What a lucky boy! Andrew
- 6 replies
-
- 5
-
-
- diorama
- good morning da nang
- (and 4 more)
-
 Hello everybody! i am back again with a 100% completed StugIV. i just finished painting it a few days ago, and finished my very first Diorama a couple minutes ago. I'm quite happy with it myself, and hope you will be too! enjoy! Here it is! Again, sorry for the bad quality of the pictures but you can see it atleast. You can also see my homemade woodstack i made cutting up a couple of sticks from a bush outside, and then gluing them together. it looks nice. Please share your opinions!!
 -
So in order to ensure that I make some progress on this build I am starting a thread, all encouragement and criticisms warmly received. The plan is based on this picture that I came across, the aim is to use the feel of the scene and not the exact event. The kit is a HobbyBoss 1/48 T34/85 with flattened turret. There is a full interior of which I will add photos later and the upper shell is held by magnets to the tub. There is a gloss coat on currently and the weathering is due to begin this weekend. The troops are the Tamiya 1/48 Russian Tank Infantry. These are fantastic models with around 10 pieces to each figure. A little filling is required on the odd joint before the painting begins. I shall update more as progress occurs and would be grateful for any thoughts or insights as I go. Thanks Pete
-
Morning all, I'm (slowly) working on a1/72 airfield diorama to house my Lanc BIII Dambusters Special which will include a control tower amongst other things. Does anyone know of a source of reasonably realistic generic maps that work roughly in 1/72 or 1/76 that can be printed off. I want them to go on the walls of control tower and on desks. Google's failed me so far, but I'm sure Britmodeller will come up with the goods! Thanks Andrew
-
 Hi folks well its my first Vulcan with the wheels down not including the lindy I made for my dad. This is her as she was on display at Telford this weekend. I have really enjoyed this build I hope you enjoy the photos of her. She is on a diorama base I made to represent the end QRA pan at waddington. Cheers Rob Comments good and bad welcome but I apologies in advance for being photo heavy... Many thanks to Precision Ice and Snow for letting me display this on their table. I absolutely Love their product its made this dio look quite magical with the frost. Also it was fantastic to meet so many people off Britmodeller at Telford this year. I was very good fun indeed. Cheers Rob
- 51 replies
-
- 13
-
-
Hi all this is my very first attempt at scenic modelling and my first ever diorama. It is the first result from my review of the new Precision Ice and Snow product that Steve at Precision Ice and Snow asked if I would do a review for him. I happily took him up on the offer It offered a great excuse to to a bit of much needed modelling as I have not had chance to do any the last few months. So enough waffle Here Is the result. Its wonderful stuff and highly recommended. For the build which is still ongoing go here : http://www.britmodeller.com/forums/index.php?/topic/234945975-precision-ice-and-snow-review-of-the-new-amazing-snow-effect/page-3#entry1416643 Buy Precision Ice and Snow at : http://precisioniceandsnow.com/Precisioniceandsnow/Home.html Cheers Rob Well that wraps up the first Dio pretty much now on with the others. Cheers Rob
- 26 replies
-
- 3
-
-
- precision ice and snow
- land rover
- (and 8 more)
-
The BASIC BOOK Filters, paints, diorama products Fresh from a company that's new to us, and uses a modeller (and environment) friendly water-based approach. Basic instructions about product use are available on the website www.true-earth.com The purpose of the new "The BASIC BOOK" is the completeness and the maximum density of topics. All aspects of weathering and shape enhancement are shown by complete step by step tutorials and explanations. From filters and washes, to the exclusive True Earth THREE STEPS METHOD, the way to easily do highlights, shadows and filters all in one, able to let you save time and products. You will have it explained and demonstrated on tank, aircraft, ship, mecha, railway car and earthmover, with complete tutorials. Brush and airbrush methods are extensively shown and explained. Easy methods for complex rust effects, the various methods and results possible for paint scratching with Run Off / Crystal Lock, and wood veins effects . Also included are diorama house building, terrain and concrete aircraft-strip tutorials too. Both beginners and more skillful modellers will be introduced into True Earth approach, to quickly and easily achieve pleasing models of new or worn machines. 100 pages of tutorials ! Plenty of explanations ! Printed in paperback Semi-rigid cover A4 size Bilingual text ENG / ita
-
 Been at this for about a month , had a lot of hair pulling and lot of FUN do-ing this , carpet monster struck a few times plus a couple of shortages with the kit (ebay) BUT, that said its done and here is the finished project please bear in mind its my first time trying something like this , if going to do again dont think i would use the 1/32 scale the storch is bloody big lol, I done it at first with a Tunisian house but ditched house as i felt it was to large and squezed up the figures and aircraft . Remember go easy on me .
 -
European Farmyard MiniArt 1:35 The latest release from MiniArt in their series of diorama kits is this large European Farmyard. Unlike some of the other kit this one does not come with a base. This is understandable as the completed farm is pretty large and the modeller has the option of building it either in an L shape or in a long I shape or any combination they can think of. The instructions actually show four variations and even though the kit comes in a large box to have a base that covered all options would make it much more expensive and require an even bigger box. As is usual the main building parts are produced on vacform moulds for which there are eleven sheets of vacform parts and an additional seven injection moulded sprues. All parts are in a medium grey styrene. As with other vacform kits, it’s not necessary to cut all the way through the styrene to remove the parts, just score with a sharp blade and snap apart. Care should be taken when scoring the corner parts of the building as these make up prominent joins and whilst it is a ruined building these corners are meant to be intact. Once the parts have been removed from the backing sheets they will require a good sanding on the mating surfaces to ensure a tight join, care and patience prevail here as it will mean a lot less work with filling and sanding later on. Once all the vac parts have been prepared they can be glued together and onto the base. It is up to the modeller how they proceed with this but I generally build the building first, fill any gaps as required, then give it a coat of primer before painting it in the basic colours. When this is done, then the injected parts can be built up, painted and attached to their relevant positions. The injected parts in this kit, comprise of the cart that is seen in a number of MiniArt kits along with the ladders, fences, gates and picnic tables. The kit specific items include a complete set of windows, window frames, shutters, the main barn doors with a smaller door inset into one. There are quite a few parts that aren’t mentioned in the instructions such as drain pipes, street lamps and there seems to be a surfeit of doors, both standard and Dutch type, thus giving even more options for the modeller. The key to making these kits is preparation. Taking time in cutting gout and sanding the edges will make for much better joints, but also take care when gluing. The plastic ready accepts liquid poly type glues but use sparingly as any spillage will melt the details away which is actually quite difficult to hide unless doing a damaged building, which these really aren’t. With the construction complete give the parts a coat of primer before adding any top coat, after which you can weather to match your specific scenario. Conclusion This is another great kit from MiniArt which gives the modeller so many options it will definitely be one to plan out before building. A good sized base will also be needed, which is actually quite useful in this instance as the scope of the diorama is huge. I will certainly be putting this kit to good use once I find a board big enough for my plans. Highly recommended. Review sample courtesy of
-
Academy's Stuka G-2 Tankbuster. Built awhile back, but never happy with how it was displayed. So a bit of fettling with the setting, and I'm much happier with the look. No idea if it's historically correct, but I feel it sets off the model nicely. Built straight from the box using kit decals. Tail markings from a generic decal sheet. Brush painted with Humbrol enamels as usual. Maintenance crew from a Prieser set and Kettenkrand from Academy's ground vehicle set. A nice enough kit, although the decals are the usual Academy type, i.e a pain, but got there in the end. Cheers, Sean
-
Found this on Hyperscale. All in French, But, A very impressive build article on using an ancient Leo 45 WW2 bomber model to make an underwater diorama. There are also similar diorama's from other builders. If you have a crap kit & a picture frame, This could be the thing to do. http://www.master194.com/forum/viewtopic.php?f=4&t=74692 Enjoy Pete
-
Hi all, As stated above, any ideas on the best thickness acrylic rod for an in-flight diorama in 1/72 scale? (single engine props and four engine props) Also, how do you cut the darn' stuff? Thanks in advance, Dermot
-
Ruined Factory, with base MiniArt 1:35 The latest release from MiniArt I their series of diorama bases is this on of a ruined factory. Contained within their standard top opening box, with a picture of the completed model on the front, are four sheets of grey vacformed styrene, five sprues of grey injected styrene and one small sprue of white injected styrene. The injected parts are nicely moulded with only a small amount of flash which can be easily and quickly removed with a sharp knife or a couple of swipes with a sanding stick. The vacformed parts are very well defined and the styrene is actually quite thick. I’m not quite sure why, unless it’s as a shortcoming of the vacforming process, but there are numerous polyps over the surface of the parts which will need to be removed, the base being particularly bad. This can sometimes result in small holes in the surface that will need to be filled and sanded down. The instructions for the injected parts and their sub-assembly are very clear, and whilst the building parts are clear, plenty of test fitting will be required to get everything square. As with other vacform kits, it’s not necessary to cut all the way through the styrene to remove the parts, just score with a sharp blade and snap apart. Care should be taken when scoring the corner parts of the building as these make up prominent joins and whilst it is a ruined building these corners are meant to be intact. Once the parts have been removed from the backing sheets they will require a good sanding on the mating surfaces to ensure a tight join, care and patience prevail here as it will mean a lot less work with filling and sanding later on. Once all the vac parts have been prepared they can be glued together and onto the base. It is up to the modeller how they proceed with this but I generally build the building first, fill any gaps as required, give it a coat of primer before painting it in the basic colours. When this is done, then the injected parts can be built up, painted and attached to their relevant positions. The injected parts in this kit, comprise of the entrance door, which is raised off the ground and accessed by a set of stairs and a landing area, each surrounded by hand rails. The majority of the parts are generic and used in many MiniArt kits, so some alteration is required and the instructions clearly show this, particularly on the stair treads which need to be shortened by cutting the indented parts off. The nature of these generic parts means that you are left with quite a few spares which can be used as debris for the completed diorama. On the other side of the building there is a large window, to one side of which there is an angled ventilation trunk, one end attached to the wall of the building, the other is attached to a straight section of trunking held off the ground by two lattice towers. Inside the building there is another length of trunking that is attached to the internal wall corresponding to the external parts. Having made quite a few of these buildings I have found that the plastic is readily melted by liquid glue, which, whilst making gluing parts together easier, care must be taken to prevent glue getting over the surfaces of parts as it will show. Once construction is complete one can paint/weather to your hearts content, plus add any troops/vehicles as you desire. Conclusion This is another great building and base from MiniArt, giving the modeller a good starting point for their imagination to run riot with the weathering, adding of debris and creating a story through the diorama or vignette. Recommended. Review sample courtesy of
-
To go with the S-65 Tractor and ML-20 152mm Howitzer combo I'm going to build a diorama using the MiniArt Russian street base, which I got cheap from Creative Models as the box was damaged. First thing to do is to fill the underside of the base with tile grout for extra strength and stiffness. The woooden board it's lying on will be the base for the completed dio.
-

Generic Base Suggestions 1:35 scale rural (or slightly urban)
robw_uk posted a topic in Diorama Chat
hmmm after a generic base that I can use to pose finished kits for photography. Looked at the review of the Mini Art country road BUT think for smaller vehicles (my Pz1A for example) they would be lost on such a big base... Have looked at SB Models "Street Corner" but that has the opposite effect - perhaps too small for larger vehicles (not that I have anything larger than a StuG III or PzIV at the moment. any suggestions I could look at (making my own is not an option just yet)... after something for 1/35 WWII that can be used for France, Germany, Russia (as I said generic)... preferably rural but all suggestions considered thanks all -
 Eduard Photo Etched Diorama Accessories – Wild Flowers and Butterflies 1:72 Eduard December sees the release of another handy set of 1:72 scale pre-painted photo etched diorama accessories from Eduard. This time we have a scaled down version of their 1:35 wild flowers and butterflies set, released in 1:35 scale in the summer. On the single, pre-painted fret you get a variety of different wild flowers, most of which are multi-part items. Some have separate petals whilst others have separate ground foliage and stalks. You can, of course, achieve a subtly realistic look by twisting the stalks and leaves into a more natural position than the flat effect caused by the choice of material. Both sides are painted too. I won’t attempt to tell you what kind of flowers are included as my knowledge of botany is even worse than Mikes! Also on the fret are a number of tiny butterflies, any of which can be posed with wings open or spread. They are seriously tiny though, so get your magnifying glass and tweezers out before you attempt this. Conclusion Eduard’s range of 1:72 diorama accessories is growing into an extremely useful asset for modellers of small-scale subjects. It would have been nice if they had identified the flowers included, but if, like me, you are an ignoramus when it comes to these matters, it will scarcely hold you back. Highly recommended. Review sample courtesy of