Search the Community
Showing results for tags 'Czechoslovakia'.
Found 11 results
-
 Aero Ab-11 L-BUCD (SH72471) Blue Bird on a Long Flight over Europe, Africa and Asia 1:72 Special Hobby Between the two World Wars, Czech company Aero created a number of aircraft for their own country’s use, many of which were biplanes. The A-11 was a light bomber and reconnaissance aircraft that was a development of the earlier and inconsistently named A-12, that reached production after flight tests and subsequent alterations that gave the airframe the look that became synonymous with the type. The Ab-11 was the bomber variant, and served with the Czech Air Force uneventfully, where they were well-respected by their crews, and when they were finally withdrawn from front-line service, many were refitted with dual controls so that they could be used as training aircraft. Most airframes were out of service or destroyed by the time WWII came around, and were considered too old to be used by the Germans, with just a few originals and replicas remaining today, one of which is at Kbely museum in Prague, so I might have some pictures somewhere. The aircraft’s performance and reliability were factors in choosing the type for a long-distance endurance journey around Europe, North Africa and parts of the Far East, with pilot General Vilem Stanovsky at the controls and mechanic Frantisek Simek in the second seat. The flight began in May 1926 and lasted until 23rd June of that year, travelling a total of over 15,000km. The aircraft was given a civilian registration of L-BUCD, and nicknamed Blue Bird with a light blue paint scheme reinforcing the theme. The reliability of the Breitfield-Danek Perun II straight-6 engine was a factor in their success, making the round trip from Czechoslovakia, Morocco, England, Finland, Turkey, Italy, and back to Czechoslovakia with a spare prop strapped to the underside, just in case. The Kit This is a new limited-edition tooling from Special Hobby, and the kit arrives in a small top-opening box, with two sprues of grey styrene, a small clear sprue, tiny Photo-Etch (PE) fret, instruction booklet and separately bagged decal sheet within. The instructions state that a floatplane version was created under the code A-29, and looking at the sprue diagrams there are some unused parts for this boxing, so shall we wonder if we’ll be seeing one of those later? Detail is good, especially the louvred engine cowlings and cockpit interior, as well as the fabric covered wooden wings, which have a subtle undulating surface moulded into them. Construction begins by making up the cockpit floor from two sections, adding a couple of detail parts on the starboard side, then fixing it and a small bulkhead to the starboard fuselage half after painting the details that are moulded into the interior of the fuselage and taking care of a few ejector-pin marks if necessary. A crib-like stowage area is made up from two parts plus an inverted A-frame, and that has a seat fixed to the front of the frame, installed just behind the cockpit floor, with another bucket seat added further forward for the pilot, using PE parts for the seatbelts, and fixing the controls into the front of the cockpit. A bulkhead with rudder bar is glued at an angle to the front of the cockpit, with radio gear applied to the centre of the port fuselage half along with a compass that has a decal applied to the top. The fuselage can be closed after adding a two-part exhaust insert from within the starboard half, and a bumper is inserted into the tail at the same time. The cockpit is wide open at this stage, with an insert provided to create the two oval openings for the crew. The instrument panel is glued inside the front of the insert and has a pair of decals supplied, one for the dials around the periphery, and a central decal with a good-sized map in colour. The completed insert is then slotted into place in the upper fuselage, with another insert beneath the engine cowling, and yet another rectangular insert that has a small window in it. There are also three holes to be drilled into the underside, with a scrap diagram to guide you in locating the correct sized holes accurately. The front-mounted radiator is then attached to the fuselage to close it up. With the fuselage completed, the two lower wings, which are each single parts, are inserted into slots in the fuselage, and a scrap diagram shows that there is zero dihedral to them, as do the elevators, which are each inserted into the rear fuselage on pins and given their separate flying surfaces, with the rudder pushed into a slot in the rear to complete the empennage. The crew are in open cockpits, so a pair of tiny windscreens are added to the coaming in front of the opening, both of which are minute, but also crystal clear. The upper wings are moulded as a single span part, with an insert placed over the narrow centre section to achieve the semi-circular scooped section over the crew. A pair of cabane struts are installed in the underside of the wing, with four more added slightly outboard, and finally a pair of interplane stuts are fixed to the outer wings on each side. A see-through impression of the upper wing is shown above the rest of the model to show it being installed from above, and the following two diagrams show the location of the rigging lines, which you’ll need to supply yourself, using your preferred method to complete the job. An additional strut joins the upper wing to the fuselage near the pilot’s position, which is best inserted after the wings are joined. The model still needs its landing gear, but the spare prop is under/between the legs, so is best built first, folding up a PE pocket for it that is glued to the underside of the cowling to accommodate the tip of one blade, with the prop’s axle sliding into the larger hole drilled previously. The two V-shaped gear supports and their interlinking axle are then inserted into holes in the underside, and have their wheels added to the ends. The prop that’s currently in use has a tiny PE boss glued to the centre, and the axle at the rear slides into the hole under the radiator at the front. Markings This is a special limited edition, so only has one decal option is present on the included sheet, which is of course the Blue Bird. From the box you can build the following aircraft: The decals appear to be printed by Eduard and are in good registration, sharpness, and colour density, with a thin gloss carrier film cut close to the printed areas. I mention Eduard because from 2021, the carrier film on their decals can be coaxed away from the printed part of the decal after they have been applied, effectively rendering them carrier film free, making the completed decals much thinner and more realistic, and obviating the need to apply successive coats of clear varnish to hide the edges of the carrier film. It’s a great step further in realism from my point of view, and saves a good quantity of time into the bargain. Conclusion The Ab-11 is an interesting and quirky aircraft from Aero, and this special scheme is rather attractive, and a change from the usual camouflaged aircraft of WWII, or the gaudy schemes sometimes applied to WWI aircraft. The detail is good, and should appeal to a broad range of modellers, so I hope they moulded sufficient copies. Highly recommended. Review sample courtesy of
 -
 The Spitfire MK.VB in 1/72 scale by Směr (old Heller form) with a small vignette depicting Karel Pošta taking a cigarette break during flights. The build was quite fun as well as the sculpt. I had to fix the rudder, which was badly pressed (see last photo). The figure is a modified German tanker from Orion set. This is my return to modeling after 10 years or so. Photos are taken by a mobile phone, so I am sorry for the lower quality. Cheers, Thomas Vintage filter: Original photos of Karel Pošta and Ladislav Světlík, who flew on the aircraft in contrast with the model in the lower right corner. Correction of the rudder:
- 17 replies
-
- 33
-

-
- RAF
- Czech Spitfire
- (and 1 more)
-
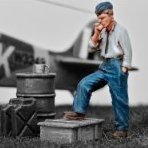
Luftwaffe WWII/CS post-war Aircraft Mechanic (F48367) 1:48 Special Hobby Pretty much any aircraft in history would soon become unusable without mechanics to repair and maintain them, and this figure portrays one of those unsung, and often oily folks going about their business. He seems to be on his way to or from a job, walking with a toolbox in his right hand, balanced out by his left leg and arm swinging forward. The set arrives in a Special Hobby yellow-themed clamshell box, with a single pour block containing three resin parts, the main figure, his right arm, and finally the toolbox, which has a number of well-detailed tools scattered over the bottom. You will need to add a length of wire to depict the carry handle that runs through the holes in the top of the toolbox’s end-caps, and the wafer-thin flash between the man’s legs and under his chin should scrape off in seconds with a sharp blade. The attachment points for the figure are on the bottom of his feet, and the toolbox and arm also have their connections in sensible locations to ease removal and preparation. The CS part of the product description seems to refer to Czechoslovakia, who dressed their military mechanics similarly just after WWII. Resin usually comes still attached to its pour block, which is where the resin is poured into the mould and acts as an overflow and also as bubble-catcher for more rustic manufacturers that don’t have access to pressure casting methods. These will have to be removed before you can assemble or paint the parts, so there will be a little extra time needed to prepare the model for construction. With resin, you should take the precaution of wearing a mask when cutting or sanding it, as the tiny particles are harmful to your health if breathed in. Washing the parts in warm water will also improve the adhesion of paint, as there may still be some moulding release agent on the parts when you receive them. Take care not to use water that is too hot, as this may cause deformation to more delicate parts, and this technique can conversely be used to fix warped parts, using cold water to “freeze” the changes in the parts. Conclusion An expertly sculpted, highly realistic figure for your next diorama or vignette. He’s a tall guy that scales out to about 6’3”, but that’s not unheard of, especially as he has a suitable stature for that height. Highly recommended. Review sample courtesy of
-
T-34/85 Czechoslovak Prod. Early Type 1:35 MiniArt via Creative Models Ltd The T-34 was Stalin's mainstay medium tank that was produced in incredible volume by sometimes crude methods, and thrown into the fray against the numerically inferior German tanks on the Eastern Front. The designers combined a number of important advances in design such as sloped frontal armour, wide tracks to spread the load, and the ability to cope with the harsh Russian winters without grinding to a halt, which was a problem that affected the Germans badly after the successes in the summer of Operation Barbarossa. The part count and cost of the tank was continuously reduced during production, with plants turning out up to 1,300 per month at the height of WWII. The initial welded turret was replaced by a cast turret with more room, and later the 76mm gun was replaced by a more powerful 85mm main gun in the T-34/85 with an enlarged turret, giving even the Tiger pause for thought. Czechoslovakia was subsumed by the Nazi war machine in a two-stage operation just prior to the outbreak of WWII that began with the Sudetenland, and it stayed under the Nazi jackboot until the beginning of 1945 as the Soviet juggernaut rolled back the Germans to their old borders and beyond. The incoming Soviet influence provided the Czechs with T-34/85s to jump-start the Czech army, and once they themselves had completed their integration of the area within the Soviet Bloc, Czech factories began making their own under license, with over 1,800 made, some of which were exported abroad to Soviet friendly allies in either new or used condition. The tank itself was a kind of Frankenstein made using moulds and specifications from different factories, and occasionally adding in a soupçon of other people’s technology, such as some knock-off German Notek convoy lights in the very early issue. They stayed in Czech service a lot longer that they perhaps otherwise would, had the Czech soldiers in exile not been already familiar with them, but by 1954 production was ceased and geared up for license building of the T-54 to replace it. The tanks sold abroad often had very short, violent lives, passing through the hands of various Middle Eastern and South African nations, with losses heavy when they were faced with a more modern enemy. The Kit This is a boxing of MiniArt’s new T-34 line, and as well as being of an early type with the larger gun and turret, it is also a full interior kit, so the box is loaded with sprues of all shapes and sizes. In total there are seventy eight sprues in grey styrene, two in clear, a good-sized Photo-Etch (PE) brass fret, a decal sheet and instruction booklet with colour profiles inside each of the front and back covers. Many of the sprues will be seen in various other boxings of the T-34, which is the reason for their use of smaller sprues that make their kits so eminently modular. It makes the process easier and cheaper for them, and makes the likelihood of receiving many different options to choose from very much more promising for us. As always with MiniArt, the design, detail and crispness of moulding is excellent, and the inclusion of Photo-Etch (PE) brass in the box is one less thing you need to fork out for. Unsurprisingly, construction begins with the lower hull and suspension. The floor is fitted with four tubular fittings for the suspension on each side and a lower escape hatch, then the engine firewall near the rear, and many of the interior parts are fitted into the front of the floor, joined by ammo stowage below the turret location, plus ammo cans for the bow machine gun, driver controls that include foot pedals and linkages, with the driver’s and machine gunner’s seat completing his area, each of which have generous side bolsters to prevent them from being tipped out of their seats on rough ground. The lower hull walls are next, with their Christie-style suspension springs contained in channels up the inside wall, and numerous equipment attached in between, including fire extinguishers, ready-rounds and some small PE parts. These are joined to the floor and the engine is begun, complete with the whole block, twin banks of pistons and rocker covers, exhaust manifolds, ancillaries and a sturdy trestle mount on which the engine rests. Radiator panels, first-motion shaft and clutch are fitted next as the block is inserted into the rear hull along with the radiators, fuel tank on the sponson, then another bulkhead behind the engine, with a cut-out that surrounds the clutch that in turn mates to the transfer box and brake drums that fit up against the final drive housing at the very rear of the vehicle. Various brake and transfer linkages are added on top with the generator for the electrics and two air intake boxes and hoses, one on each side of the bay. The exhausts pass over the top and are later covered with external armoured tail pipes, but in the meantime the upper hull is begun. The upper hull begins with the ball-mount and DT Machine gun for the bow, complete with light-weight sliding stock for the gunner’s comfort. The gun is left to swivel inside the port, so be sparing with the glue when you complete this assembly. The glacis plate accepts the gun from inside after fitting of the armoured protection, hinge for the driver’s door, convoy light with cable, and a set of five spare track links attached to the lower area. Inside a small instrument panel with decals for the dials is installed below the lip of the hatch. A light interlude of making the additional fuel tanks for the sides of the hull, complete with carry-handles on each end then takes us to the upper hull. The top and sides are moulded as one, and the sides have a myriad of holes drilled out before they are applied to the hull, with a few nubs cut from the exterior on the way, and this is then joined by the glacis plate with PE stiffener plates at the sides. At the rear the engine is still exposed, which is next to be addressed, by adding a frame around the rear bulkhead before attaching this large panel that can be fitted closed or hinged down for maintenance, and has a number of holes drilled out, depending on which decal option you are building. The bulkhead has a circular inspection panel in the centre that can also be open or closed, with a pair of armoured exhaust covers to the sides. The engine deck is covered with vents and louvers that are added with a central inspection hatch, then dropped over the engine bay. Additional armoured covers are fitted over the basic louvers, then the suspension swing-arms and stub axles are installed under the sponsons, and the mudguards with PE detail parts are glued into place at the front, with more simplified flaps to the rear, again with the PE details. Small parts and various pioneer tools or stowage boxes are made up and fitted onto the sloped sides of the hull, with racks of winter track grousers attached to the flat portions of the side and fuel tank supports behind them. At this stage the driver’s hatch is also built with twin clear periscopes, hatch closures and external armoured cowls for the ‘scopes and hinges. By installing a gas-strut part inside the hatch rim earlier, you can set the hatch open to expose some of the interior, and fitting the bow-wave deflector half way up the glacis you can ensure his knees don’t get wet. For the fifth decal variant an additional pair of tanks are installed on the rear bulkhead by using two curved brackets and four-piece tanks with PE shackles holding them in place. Going back to main construction, ten pairs of wheels with separate hub caps are built with two drive sprockets and idler wheels to complete the rolling part of the tracks. At the same time the main towing cables are made from styrene towing eyes, but you will need to supply three lengths of 100mm braided cord or wire, so make sure you have some on hand when you begin. The side tanks are fitted to their frames with PE shackles on both sides with the short, ribbed containers having a styrene fitting that hooks to the frame with a PE hook. The headlight fits to the join between the sloped glacis and sides on a mixed styrene/PE bracket with styrene rear housing and clear lens at the front, which is protected by a complex sloped cage. Clever folks that they are, MiniArt have tooled a jig to help you accomplish this easily, so you take the delicate PE part and bend it to shape around the jig, attaching it to a PE ring that you have pre-rolled, and fitting it onto the bracket on two pins for ease. Now for the tracks. The T-34’s wide tracks were simple and easy to produce, as well as great at spreading the tank’s weight and helping prevent freezing of the drivetrain in cold weather, of which Russia has more than its fair share. There are two track parts, one flat, the other with a guide horn in the centre, and both have exquisite casting details that includes the ID numbers on both parts and indeed both faces. They have four sprue gates on each link, attached on the curved hinge-points, making them easy to cut back flush and then sand smooth with a sanding stick, to ease assembly and gluing. I made up a short length as a test, and was finished in a few minutes with a little liquid glue thanks to their close tolerances that keep them together while you glue. Each side needs 72 links, which equates to 36 of each piece, and once you get into a rhythm, it won’t take too long to complete the task, wrapping the still flexible links around the curved sections and holding them in place with tape and other clamps etc. to obtain the correct sag on the top run once the glue has cured. The detail is so good it’s almost a shame to weather them once painted. The turret starts as a C-shaped part with three sides moulded into it, which has inserts within for the interior skin, with ready-rounds, radio gear, spare periscope glass and other equipment needed for fighting. The roof is separate and has a large cupola with clear vision blocks and binoculars built into the bi-fold hatch, plus a more simple hatch for the gunner, both of which can be fitted open or closed. The roof also has two more periscopes under armoured shrouds, and two vents on the rear, which are covered by a linked armoured mushroom cover. A few small nubs are removed from the turret sides again, as they won’t be needed for this variant. The gun breech is made up from a substantial number of parts with another 7.62mm DT machine gun mounted coaxially in the mantlet, before it is set to one side while the busy turret floor is completed. The floor part first has a lip inserted within the ring, then is detailed with seats, traversing equipment, plus a stack of sixteen accessible rounds in a frame that is mounted in the rear of the bustle for easy access. The inner mantlet is prepared with the main gun’s mount, plus elevation hardware and sight, which is glued to the turret floor and has the breech slid in from behind and joined by the coax DT with its mount. Another seat with PE leather strap suspension is strung between the turret side and the breech, then the turret top is fitted over it and joined by the gun tube, which is a single part, and has an outer mantlet slid over it once inserted. An aerial, some grab handles, stowage loops and lugs are dotted around the turret and a folded canvas sheet (of your own making) can be lashed to the bustle with some PE straps that are included on the fret. Dropping the turret into place in the hull completes the build. Markings There are six decal options in the box, and due to the length of service of the Czech produced T-34s, there are a number of more attractive camouflage schemes, rather than just green or winter distemper white. From the box you can build one of the following: Czechoslovak People’s Army, late 1950s Czechoslovak People’s Army on winter manoeuvres, late 1950s Czechoslovak People’s Army, late 1950s National People’s Army (NVA) German Democratic Republic (DDR), late 1950s Palestine Liberation Organisation (PLO) Tank Platoon, Lebanon, early 1980s Palestine Liberation Organisation (PLO) Tank Platoon, Lebanon, early 1980s The decal sheet isn’t huge because this is a tank, but the sheet is printed by DecoGraph, which is a guarantee of good registration, sharpness and colour density, with a thin matt carrier film cut close to the printed areas. The markings and decals have been developed with assistance from Samer Kassis Archive, a prolific photographer of Soviet armour. Conclusion The T-34 played a huge part in the Soviet response to Operation Barbarossa, albeit after a substantial delay caused by Stalin’s apparent indecision. It was a stalwart of their defence then offense, sweeping the Germans aside thanks to its sloped armour and weight of numbers. This kit shows the internal workings of the vehicle in extreme detail, and gives a good idea of just how cramped and claustrophobia-inducing it was. If interiors aren’t your thing though, hold on and an exterior kit will no doubt be along shortly. Very highly recommended. Review sample courtesy of
-
Hi! I would like to present my new project. I choosed model of Aero C-3A (Siebel Si204) from czech producer SpecialHobby in 1/48 scale. This will be a very long project because I don't have much free time, but I would like update this topic every week. This will be my first model after five years break. So lets go! With model I bought resin pilot´s seats from CMK and photo etched parts from Eduard (photo etched parts are for model Siebel Si204 so i will use only a few parts).
- 6 replies
-
- 7
-
-
- SpecialHobby
- czechoslovakia
- (and 1 more)
-
 Hi Guys, I will be building the Scud B missile on the 2P19 tracked launcher from Trumpeter. It will be build out of the box. Here are some pictures of the box and content. There will be loads of parts to glue. There will be around 750 parts on it. It also has some etch parts and some die cut masks for the windows. the box top The content This is a leaflet with it of what is possible. and the two decal options. I think both are from a parade?! Now we need to wait till Saturday for the start. Cheers,
- 47 replies
-
- 11
-
-
 Hey guys, my first build for this gb (though it ll be more complicated one so i wont finish it first probably ) ll be post war Czechoslovakia spitfire, flown by Karel Pošta, who fought at WW2 as a member of 312 (Czechoslovak) squadron. Awarded by many honours (5x Czechoslovakian War Cross, 3x Czechoslovakian Medal of Valor, Czechoslovakian 1st Class Medal of Merit, CS Commemorative Medal Army, French Croix de Guerre, British DFC, The 1939-1945 Star with Battle of Britain Clasp, Air Crew Europe Star with France Germany Clasp, Atlantic Star, Defence Medal and War Medal - though i m not sure in which order), he came back to home after the war. Because of his amazing pilot skills he was flying acrobatics on his Spitfire on Airshows (also on his all around NMF spitfire with red lightning on fuselage - that one i ll try to make ). Then the year 1948 and the f...ing comunists came to Czechoslovakia (sorry for swearing but i hate them from my deepest heart!). The pilots who were fighting for liberation of their country during the war at United Kingdom, France and such were persecuted, jailed, put to forced labor camps (some of these were in fact extermination camps, uranium mines and such) or killed.. (Dark blue world movie shows in few minutes how the comunists goverment acted to these brave guys and it is nice movie overall). Sure it was not only the pilots who were persecuted, it was quite dark age and just reading about it is bringing tears to my eyes and fills me with anger and hate to all who were standing behind this injustice.. Back to Karel Pošta - knowing what would happen to him if he stayed in Czechoslovakia, he sent his british wife and their daughter back to UK as fast as he could and he also escaped and joined them there later. He then rejoined the RAF, in lower rank (Sergeant), but thanks to his pilot skills he was promoted over time up to Flight Lieutenant - they say it was also thanks to his brilliant display flying on Spitfire XVI at Farnborough Airshow at 1950. One of his home airfields during the next years was Acklington, at the time home of some Tempests, Masters, Oxfords, every now and then Meteors and Vampires, .. and also one Spitfire, which (by witnesses) was flown probably only by K.Pošta (if by any chance anyone had some info about code letters and such of this only home Spitfire at Acklington during 1950-51, it would be great! ). One of the members of the crew back then there said, everytime they did hear the sound of starting engine of that Spitfire, it was like signal for everyone to take the best spots and watch the exhibition Well, i m sorry, i did let my thoughts go on free, but i think it is good to know who were the guys who fought for us all. So i would like to build this Spitfire as a memory to Karel Pošta and other Czechoslovakia pilots, who had to fight, even against their own country... To the build - i m using Eduard´s Overtrees Spitfire Mk.IXe and a bit of goodies - brassin Spitfire radio set - brassin Spitfire IX cockpit set (i m not happy with this one at all as it is just replacing the kit parts and totaly ignoring the top half of the cockpit.. well, next time i ll go with Barracuda or Aires set) - brassin Spitfire IX engine set - Ultracast propeller + spinner - brassin wheels - rob taurus vacu canopy (at least the middle part) - quickboost doors (i have used these at the XVI and they look so much better than the plastic ones!) - i m also thinking about the PE flaps, but i ll see once i complete the fuselage together, if there is enough place under the brassin cockpit and radio well floor and also it depends how i ll be on it with time - also i ll be doing a bit of scratch building, mainly to the cockpit upper areas and to the radio hatch - the brassin set contains just the VHF radio but not the IFF, which i believe should be there too, + many more instruments and cables which i mostly dont even know for what they are Obviously i do not have photos of the exact Spitfire i m building (well, just few outside shots), so i m using random Spitfire IX shots found by mr. Google Some little progress so far, missing a lot of things yet and i have only just begun with the details painting. The green is a bit too much bright to me so i ll try to bring it down with some oils and filters. (blame me for not being patient, i have the Gunze H cockpit grey green which works quite good to me, mainly with some weathering, but i ran out of the thinner and i was lazy to go buy new one, so tried to make some mix of vallejo paints but i simply did bad job.. so hope the weathering ll help me to bring the tone down) I have weekend at work, so i ll get back to this baby probably at sunday night
- 51 replies
-
- 7
-
-
- Spitfire IX
- Eduard
- (and 2 more)
-
Soviet T-10M Heavy Tank 13th Guards Heavy Tank Division, 1st Guards Tank Army, Soviet Forces Germany 'Operation Danube 1968' Russian Invasion of Czechoslovakia. An absolute delight to build, no after-market parts were used during construction. A full build blog can be found here
-
 Okay.. This T plus build 8 since getting back into this modelling 'thing'. (and counting till I've done 12 ) This was supposed to be a quick build, and finished some weeks ago. It was going really well, but a little thing called life did something very unexpected in a manner I couldn't have even imagined.. so on the back-burner it went. Also kept me away from having a browse around here! The horror! So, this is the Eduard rendition of the Mig 15 in 1/72, recently reviewed right here on Britmodeller. This one being from the Dual Combo kit they do which I bought on a whim at a silly bargain price. A bit of PE in the box, some masks, and a few resin stores that are not used on this version. My first go with one of these Eduard things and golly! I'm impressed. Nicely engineered and the only area you really need to take extra care about is making sure the gun pack and nose all fit nice and snug. Oh, and stick some weight in the front where there is space fore of the cockpit tub. I had some liquid gravity on hand so it was the perfect test for it. Alclad Alu all over. Nose is painted Xtracolor high speed silver where apparently this aircaft had it's old code painted out. The blue bands were applied for wargame duties and I've done them using one of those nice Revell acrylics. So few markings this was the quickest decal session I've ever done! Thank you for your attention again. Next up after this one... I think it's back to something with familiar RAF roundels on. Which probably means I'll do an IAF Spitfire. I am so fickle. First, obligitory cockpit shot, because just for a change I had a pocket cam handy. Mig_15_150214_01 by IrritableRabbit, on Flickr Mig_15_150214_02 by IrritableRabbit, on Flickr Then my usual let's not even attempt to pretend it's not a model images. Mig_15_100314_04 by IrritableRabbit, on Flickr Mig_15_100314_08 by IrritableRabbit, on Flickr Mig_15_100314_09 by IrritableRabbit, on Flickr Mig_15_100314_05 by IrritableRabbit, on Flickr Mig_15_100314_11 by IrritableRabbit, on Flickr Mig_15_100314_13 by IrritableRabbit, on Flickr Mig_15_100314_07 by IrritableRabbit, on Flickr Mig_15_100314_16 by IrritableRabbit, on Flickr
- 32 replies
-
- 16
-
-
8 Z-142 primary trainers are operated by the Lom Praha company at their Flight Training Center in Czechoslovakia. Lom Praha conduct basic and advanced flight training for the Czech Air Force. I bought this months ago from Hannants on special offer for less than £3 as part of a big order. When it arrived I was surprised by the size of the box, I had to double check it was 1/72! I'd never heard of Hobby Boss, let alone seen one of their kits in the flesh but I must say I'm impressed with this little beauty. It's a bit hard to make out the detail with it being mostly clear but it does look rather good, the cockpit needs some attention but other than that it should be a nice easy OOB build.
-
I bought this on eBay a while ago, unfortunately one of the main gear legs was broken and the lower part of it was missing and the nose wheel leg was also AWOL. So I'm going to build this one in flight which means I'm going to have to make some pilots Should be interesting. Czechoslovakia operated nine S-92 fighters and three CS-92 fighter trainers, these equipped the 5th Fighter Flight 1948 - 1951.