Search the Community
Showing results for tags 'Crocodile'.
Found 1 result
-
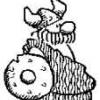
Hello, I have the models stored for a long time. The kit made by Special Hobby is a copy of the one made by Eduard but more beautiful... But it will be necessary to prepare the pieces with care. Some eduard photoetched parts are directly molded onto the parts of the Hobby Kit. Obviously it will be this one. With a dragon and a green crocodile (neither white nor gray). Only 2 images (windsock datafiles) showing the cockpit ... This one, CIII or B II ? https://argonnaute.parisnanterre.fr/ark:/14707/a011490872320IXYATY/829de1c3f0 https://argonnaute.parisnanterre.fr/ark:/14707/a0114908723207BqTFP/747d88c39a On the floor (SH) I added the four boards (0.5x0.4mm).All the wood is painted with Mr Hobby's color (sail) and oil. The reservoir is Eduard's. The case, the throttle are in photoetched folded except the interupteur added. The chair is modified by gluing strips of plastic in and sanding. The steering wheel is made of metal wire, the pulley and the inside of the steering wheel come from the eduard photoetch. https://farm5.staticflickr.com/4779/39810278445_11d52cbeac_b.jpg[/img] The opening of the cockpit is refined. Both slots are missing. I will try to refine the wall and cut them out but I think it will not work ... Maybe by sticking a plate with the gills cut out ? I used the plan of the Albatros BII (wingnutwings) to make my cockpit. I'm sure of nothing. I replaced the black dials with white dials. I added an oil pump in brass tube and below a tube with a faucet. I should have glued the dashboard to the other half of the fuselage because the throttle cables must enter two holes on this dashboard... The box that carries the throttle is a little too low. The leather armchair. Of course it was too easy to put the gunner's seat under the hole ... I do not see what it's used for where Sp. Hobby put it. I moved everything so that it was not below the chair armrest and the tingles in front of the dashboard holes. The painting was damaged, obviously... The gunner's seat was moved forward by 5 mm: Now he can use it! I tried to paint the dragon to see if it was easy. I painted it on the eduard fuselage. Oil paint on a matte varnish and a brown background. The engine is almost finished. It is cut in the front and below to get into the plane at the right place. with engine spark wires: The wires are made of metal wire to make baits for "fly fishing". It's very fine. The fuselage must be sanded to remove too thick details. Some are almost 1mm thick and are not beautiful.Il will redo them. I sanded the traps that are on the nose of the plane. Eduard gives it in photoetching. It is necessary to resize the opening of the bonnet (in black) so that the hoses of the engine leave in the good place. Note that the closures of the hoods are very ugly ... I made plastic wire around the opening of the hood. I also sanded the bindings of the hoods to try to remake them. The pellets are a bit big (0.5mm) but I have nothing smaller. It will be necessary to add the spring on some. I cut with the saw in the hood a slot for the synchronization system of the machine gun. The rod and the hooks to carry the bombs are installed. We do not see them anymore or almost with the turret. A rod is put in place, it leaves the controller on the right side. The fuselage is glued. A whole evening of work to get the engine in the right place. No studs to place the half fuselages. The hole to get the bomb sight out is drilled in the floor and the fuselage. The photo shows the location as well as the plan in the Aerophile.. No image of the bomb sight. Can be one like this, a "Goerz". https://www.flightglobal.com/pdfarchive/view/1917/1917%20-%200939.html The turret is too simplified and exceeds too much of the fuselage. So I filed down to try to have flanks more "bent". I wanted a base like the picture, unfortunately the base of the turret is not circular so impossible to resize on a turn. I pasted a profile 0.5x0.5 underneath. The height of the turret is reduced to the scalpel.Not enough yet, the leather protection is in greenstuff. The turret does not exceed the top of the fuselage. I cut a very thin band to pack the wall of the turret. Then I cut it all around with a razor blade. The interior must still be a little arranged..It remains to stick on the handles, the stuff that exceeds and to the slot in the front for the machine gun. The bumps on the hood are added, pity they are not molded original. Their shapes are difficult to apprehend on the photos of time. At the bottom of the hood (on both sides) I engraved and dug the notch in which a tensioner (cable) will be fixed. A dymo band pierced with a hole and cut out serves as a model to engrave the outline, then one digs with the scalpel. The foot market is dug, a photo-cut will surround it. A tip, do it before closing the fuselage ... The red engraving is deleted. The one in green added. I found only a photo of the back of the fuselage where we could distinguish panels of different colors or possible brands of "rivets". Same for the flanks. There are really not many exploitable images. A lot of putty and sanding but nothing insurmountable. The shape of the fuselage nose is too sharp in my opinion. I sanded a little to make it more "square". I redid fasteners for stretchers. Two on each side. A shot of surfacing with the airbrush and a layer of paint that will serve as a background for the oil painting. The panels are painted separately but without drying between each panel (too long). I use a piece of tape to limit the start of the panel. The paint is burnt sienna. The lower wing. It's not too transparent I think. I have too much beige paint and the cross has almost disappeared. On the pictures of the plane the central plate seems absent as well as the tank on the wing. We see the sky through the wing ... In addition there is a tank under the wing that I had not seen: As on this BII ? If anyone has any details about his form, I will be very happy ... That's it, it's dry and varnished. The covers are painted in light green XF76 (if not gray). I tried to paint white oil paint to make the dragon and the crocodile ... it does not work, the white is not opaque. It will be decals... I have no picture of gunner's cockpit, only this plan: https://gallica.bnf.fr/ark:/12148/bpt6k65518819/f14.double.mini.auto=2 On the plan (p14) there is a small dotted rectangle noted "CASIER". It is at the level of the bombshell on the right of the fuselage. This could indicate the position of the ammunition locker. I think the gunner was standing too. P21 Windsockdatafile, the gunner is standing (He breaks for the photographer. The plane is on the ground). The crocodile in white is made with a stencil. It is then varnished and the fine lines are painted with oil paint. I tried (and I made a mistake by cutting the stencil that's why it's upside down ...): The dragon is finished: It remains to remake the varnish that was damaged under the belly during sanding. The crocodile has been modified with large scales under the belly. The hind legs (only one here) I put them a bit like everyone more or less random because there is no picture to my knowledge ... Well ... that's not the best idea I had. I have all varnish gloss with AK varnish to be able to correct errors more easily. Alas the varnish reacts badly to the solvent, and the white becomes ... gray. I had a layer of Klir that actually resists solvent better but is not indestructible. I repeated several times each stroke and the Klir was therefore damaged (at the level of the crest and scales of the belly) where the black drips. It is much more difficult than expected. There is no landmark in the all-white crocodile to place the scales and all the folds. Some are therefore misplaced. Cracks have appeared in the varnish, we do not see them with the naked eye but the solvent takes the opportunity to get in and everything is gray. I think it's the thick-layer AK varnish that was not dry enough to support the Klir.
- 28 replies
-
- 10
-