Search the Community
Showing results for tags 'Corsair'.
-
The Vought Corsair at the Fleet Air Arm Museum KD431 is a Goodyear built FG1. The aircraft was the subject of a Groundbreaking project to strip the outer layers of later paint off to reveal the original FAA Paint. The details of this can be found here. Pics thanks to Merlin101.
-
 Chance Vought F4U-1A Corsair detail Sets Eduard 1:32 The Tamiya 1:32 Corsair F4U-1A is a fantastic model straight out of the box as are all of this series of 1:32 kits, but there are always more ways to gild the lily. This is Eduard come in with their range of update sets for it, six in fact if you include the zoom and mask sets, and there’ll probably be joined by others in the near future. Each set is held in the usual poly sleeve packaging with a card insert to prevent damage, and the instructions still leave a lot to be desired. Typically some of the kit details need to be removed before the brass parts can be added. Interior Set (32828) Contained on two sheets of relief etched brass, the larger one is unpainted whereas the smaller one is not only pre-painted but self adhesive as well. The unpainted sheet contains items such as the rudder pedal heel and toe plates, rudder cable attachments, side console inside faces, document pockets and additional fittings not included in the kit. On the engine bulkhead there is a pair of new cable runs and pipes, whilst the foot rests/”floor” troughs are fitted with more detailed bulkhead fittings complete with lightening holes. There are a large number of instrument boxes fitted around the cockpit, on the side consoles; coaming and side walls onto which the pre-painted faces are attached. The instrument panels are also pre-painted complete with the instrument faces on the backplate. A little dab of aqua clear will give them the appearance of glass fronts. The fire extinguisher and oxygen bottles receive new straps and supports and the canopy is fitted with new frames fore and aft and latching handle. Interior Zoom Set (33144) This zoom set contains only the above pre-painted sheet and allows the modeller to build a well detailed cockpit without the hassle of getting bogged down with detail that might otherwise be deemed superfluous. Engine Set (32365) To really enhance the details on the kits engine this set provides a wealth of additional and finer parts for the job. Quite a few areas need to be cut away before the etched parts can be added, particularly around the cowling mounting bulkhead between the cylinder banks. Holes need to be drilled into the cylinder banks ready to accept the new wiring harness which is pretty complex and care will be needed as whilst the instruction diagram is better than usual, it could have been clearer. The exhaust manifold receives new flanges and jubilee style clips. Another complex area of the build is the fitting of the individual cowl flaps and cowl flap ring. Each cowl flap is fitted with a three piece etched actuator which will need a very steady hand to assemble and fit. The front cowl mounting ring is also provided as are the interior rib detail for each of the opening cowling panels. Exterior (32366) This single sheet set contains some very nice additional detail for the exterior and open areas of the kit. There are quite a few parts dedicated to the interior of the tailwheel bay, especially on the mounting bulkhead which has new mounting fixtures and fittings for the tail oleo, whilst the foreward bulkhead is fitted with new fittings which include the rudder cable arm and mounting bracket. The tailwheel bay doors are fitted with new hinges panels and attachment links. The main wheel bays also get a dose of additional detail with the fitting of new panels around the bay walls and roof along with additional cabling and pipe work. If you’re building the model with wings folded then you have the option of adding new end plates to the flaps and ailerons along with replacement brackets and web pieces. The wing fold areas have a host of new hoses and pipework fitted which will really make the areas look not only more accurate but busy. Placards (32829) This small single sheet set contains much of what is already on the interior sets pre-painted sheet and naturally the zoom set, which is rather annoying to be honest. There are a few parts different that the modeller could use in the cockpit, but not nearly enough to make this set worth being separate to the interior sets. Masks (JX176) To complement the sets mentioned above, Eduard have also released a set of paint masks for the F4U-1A, which helps masking the clear areas a whole lot easier. Conclusion As with most of Eduards releases there are questions as to why some sets are so comprehensive yet still missing vital parts that are held back to make up other smaller sets. The placard set should be contained in the interior pack as should a set of seatbelts which will probably be released later. The quality of these sets is superb, and will certainly help to the making of a super detailed model. Highly recommended. Review sample courtesy of
 -
Chance Vought F4U-1 detail Set Mk1 Design 1:32 The Tamiya 1:32 Corsair is a beautiful model straight out of the box with perhaps the only real area that needing attention being the magnetos on the crank case, and yet there have been quite a few aftermarket sets released for it and this is yet another one. Mk1 Design are pretty new to the aircraft update scene having mostly concentrated on producing amazing sets for the maritime modellers. This fairly comprehensive set comes in a clear poly sleeve and contains three sheets of etched brass, one of which is pre-painted and a set of resin wheels. The relief etched sheets are nicely produced but not overly complicated. The instructions though are really clear and easy to decipher, unlike some other companies, and are printed in full colour. Areas that need removing or modification are shaded in red and the photographs are of the actual kit with the etched parts fitted. The cockpit is provided with a whole set of placards, console faces, auxiliary instrument panels and separate switches. The main instrument panel is painted in a black crackle finish, which although looking slightly overdone on the fret, it will probably look good in the cockpit. Each of the panels has a backing plate with the instrument faces painted onto it give the completed panels some depth, but could still do with a drop of Aqua Gloss or similar to represent the instrument glass. Also included in the package is a full set of seatbelts, each with separate buckles and clasps. The majority of the PE set is used for detailing the engine, (ignition wires), Cowl flaps, with the interiors and hinges, intakes, (grilles and baffles), Wing fold and undercarriage bays, (wiring and pipework). There are also panels for between the tailwheel legs, and the ends of the flaps at the wingfold join. The resin wheels are very nicely moulded with a well defined blockish tread pattern, but I think they are little too heavily bulged at the bottom, making them look like they are under inflated, and the tailwheel, which I believe is a solid rubber item, is also bulged when there is little deflection on the real tyres. The outer hub is separate, allowing the interior of the wheel to be detailed with the provided etched parts, which should look very good once assembled. Conclusion As mentioned above this is quite a comprehensive set that will go a long way to help set off the magnificence of the kit. There is nothing that needs complicated folding and there arent too many fiddly parts either, so would be good for an intermediate modeller to use. The tyres on the wheels are the only real fly in the ointment with their excessive bulges, which are not particularly easy to rectify. Highly recommended. Review sample courtesy of
-
My rendition of Revell's new tool Corsair. Painted with Gunze Sangyo acrylics and weathered with a variety of products. I didn't weather the drop tanks as I assumed that they would have been new on the original plane. ...and I broke and lost the antenna... Hope you like her.
-
 Windscreens Detail and Scale say no F4U-1s were delivered with a flat windscreen as per F4U-4s. However, from photo’s I have seen at the FAA museum and on line, it appears that some FAA Corsair Mark IV’s (FG-1Ds) of No. 1846 Squadron appear to have had flat windscreens. KD696 '111/D' and KD865 ‘112/D’ did but KD750 ‘117/D’ and KD780 ‘122/D’ didn’t (see http://www.thescale.info/news/publish/Corsairs-HMS-Collossus.shtml and http://www.thescale.info/news/publish/Royal-Navy-Corsairs-Capetown.shtml. I’ve seen KE serialled corsairs and they don’t either. Am I imagining things? In his article on Commonwealth Corsairs (Scale Aviation Modeller International August 2000), Richard Caruana thought some Corsairs had the flat windscreens too, although it appears he thought all the airframes with clear blown hoods had them. Tail wheel fairings With the gear down & doors open it was split in two with half on each door. It wouldn't be until the doors were closed that it would look like the one piece. It was only sheet aluminum and it was a fairing behind the exposed wheel to reduce aerodynamic drag. Previously the tail wheel fork was entirely in the fuselage when retracted. But later (because of the extension), part of the fork protruded outside the fuselage when retracted, prompting the aerodynamic fairing to the rear. Not all machines with the taller gear had the fairing and it is difficult to spot the fairings on the tail wheel doors when looking at machines with undercarriage down. Seems linked to a modification which lengthened the tail wheel gear by 6.48 inches to improve visibility. See http://masseyaero.org/projects/corsair/corsairbits.html for detail photos. This can also be seen on late USN and NZ machines. Exact serial of introduction not known but seen on F4U-1A JT505 (see p463 Air Britain FAA Aircraft 1939-45). 'Detail and Scale' say the taller gear was introduced on the F4U-1A from BuNo 50080 (so in batch JT195-JT564) but that the associated fairing was a feature found only on late FG-1Ds. However JT505 is an F4U-1A built by Vought and that has the fairing. The photo of JT565, a F4U-1D built by Vought (see http://forum.keypublishing.com/showthread.php?88114-F4U-Corsairs-RN-Photo-s) also clearly has the taller gear and fairing. Anyone throw any more light on these.
 -
Hi folks,another "saved" kit,it sat primed for nearly six months so I thought I would try another Maskol project.I wanted to show the state these Marine "mud movers" got into in the harsh Korean environment so sprayed the original dark blue then masked the recceses and panels then after a suggestion from Wolwe misted a light coat to break up the harsh edges.I then ran a white and earth wash into the panels and dry brushed the wheels etc.and toned down the markings.Thanks for looking hope you like.
-
 F4U-1 Corsair "Birdcage" Replacement Masks for Tamyia Kit Decals 1:32 Maketar These masks are direct replacements for the markings provided by Tamyia in the kit. In addition you get spare and additional code letters. A set of canopy masks are also included. The masks come on four main sheets for the markings and additional letters. They are available in either vinyl or yellow Kabuki tape. The advantage with the tape ones is that they are lower tack and much easier to reposition if you get things wrong. One word of note is that the small elements like nose and fuselage art are NOT included the modeller will need to use decals for those. There are no instructions but then they are not really needed. Recommended for those who don't like decals, or if you want the true painted on look for your large scale Corsair. Review sample courtesy of
 -
The latest one off the bench... This is Academy's 1/48 Corsair F4U-4B, a fantatsic plane and what an enjoyable build! As ever I like to add my own touch to my builds on this particular kit I have: scratch built some detail in the cockpit added some piping to the engine scratch built the lowered flaps added some plumbing to the wheel bays. It is pre shaded, painted with Tamiya paint, weathered with Flory's dark dirt wash and exhaust stains and gun smoke stains with Tamiya weathering pack. This was the first, I think successfull, attempt at pre shading and whilst there are some errors I can live with the finished kit. Thanks for looking, as ever comments welcome... Once again thanks for looking.... Leon
-
Here are a few of the better images of my 1/48 RNZAF Corsair. It is OOB Tamiya kit with Ventura Decals markings for 'Tutae Wera' NZ5416 used in both No 3 and No 30 Servicing units RNZAF. Here are my completed Corsairs so far.
-
Deciding to put Tamiya's Corsair on the bench was a no-brainer. Having built the Mustang and Spitfire, I expected top notch engineering etc, but this one somehow...unexplainably...was even better than expected. I'll say it every time I talk about one of Tamiya's super kits, but every modeler deserves to treat themselves to one of these kits at least once. Kit: Tamiya 1/32 Birdcage Corsair AM: Barracuda cockpit stencils and decals, Barracuda resin tires (If Barracuda makes items for a kit I'm building I buy it...stuff is that good. Paint: Tamiya custom mixes, airbrush and oil weathering
- 28 replies
-
- 31
-

-
F4U-1Corsair Cockpit Set Brassin 1:32 Cockpit Set (632039) Having reviewed a fair number of add-on sets from Eduard for he Tamiya 1:32 Corsair I thought they had done everything possible, but it turned out I was wrong, especially when this set arrived from them. The set is packaged in a pretty sturdy top opening cardboard box, inside of which are an amazing number of parts, including both resin and etched brass, surrounded by foam padding for complete protection. The larger than normal instruction sheet provides some of the clearest diagrams I’ve seen from Eduard/Brassin which will help greatly in getting the most out of this set. There are forty seven resin parts in a mixture of medium and dark greys, plus two clear resin parts, a sheet of pre-painted etched brass. The detail on the resin parts is nice and sharp, with good depth, although some parts have small sections of flash which need to be removed on top of the removal from the casting blocks. The cockpit is literally a tub made up of the front and rear bulkheads, what would be the fuselage side walls and the lower fuselage interior, which has the lower windows in the need of flash removal. The kits interior rib detail needs to be completely removed to allow the fitment of the tub, which shouldn’t take too long with a nice sharp curved blade and some sanding sponges. The moulded detail on the bulkheads and inner fuselage parts needs to be seen to be believed, add to this all the smaller sundry parts and you will have a truly amazing cockpit. Yet the modeller will still need to add their own small wire parts for which the dimensions and shape are provided in the instructions. When it comes to the instrument panel, Eduard have included both a full resin item as well as one that is made up of an etched sandwich, between which a decal is attached, whichever takes you fancy. Presonally I would use the etched one, but fit it out with Airscale decal instruments and some Clear Glaze. The resin is further enhanced with the addition of the two etched brass sheets, one of which contains the pre-painted seat belts which are quite complex, but with care and attention will build into a pretty amazing representation of the real things. Also included on the etched sheet are a number of levers, but the majority of these are taken from the kit, as even Eduard appear to realise they couldn’t improve on them. Conclusion The Tamiya F-4U Corsair is already an outstanding kit with very few problems or vices that haven’t already been fixed by other aftermarket companies. The kit already has a very nicely detailed cockpit so I do wonder whether this set will sell that well, but I’d imagine Eduard have thought of that. The level of detail and the superb moulding is really quite amazing, and with some careful painting and weathering it will look amazing. So, if you absolutely have to have every aftermarket release for your build then you will need this one. Highly recommended Review samples courtesy of
-
 The next HobbyBoss 1/48th Corsair variant is a F4U-5 - ref. 80389 Sources: http://scalemodels.ru/news/7594-anonsy-Hobby-Boss-avgust-2014.html http://www.hobbyboss.com/a/en/Preview/2014/0612/1125.html Box art V.P.
 -
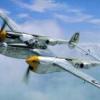
Vought F4U-1A Corsair 1:72 Revell The legendary Chance Vought Corsair was one of the most effective combat aircraft to see service during the Second World War. Famous for its 11:1 kill ratio in the hands of US Navy pilots, the Corsair was also notable for achieving a longer production run than any other piston-engined fighter in US history. For best performance, the Corsair was given the largest engine then available: the Pratt & Whitney Double Wasp. This 18-cylinder, 46 litre monster drove a huge three-bladed prop that was almost 14 feet across. In order to ensure the prop didn't strike the ground on take-off or landing, the wings had to be given their characteristic inverted gull shape. Initial trials of the aircraft revealed an unpleasant stall characteristic that would lead to one wing dropping suddenly. This had to be fixed with a small root mounted stall strip. The set-back cockpit, required due to the fuel tanks fitted in the forward fuselage, gave poor forward visibility on landing and take-off, with oil from the engine further obscuring the view. The top cowling flaps were replaced with a fixed panel, and the landing gear struts re-tuned, but this delayed its use as a carrier borne fighter until 1944. Despite these set-backs, the Corsair was used successfully as a land-based fighter and was used in large numbers by the US Marines. A number of aces got their kills in the Corsair, and many Japanese pilots considered it to be the most capable US-built fighter of the War. Due to its excellent low-level performance, the Corsair was also used for ground attack, firing unguided rockets and bombs from its wing pylons. The Royal Navy also used the Corsair from 1943, and despite its unforgiving deck handling characteristics it found favour with pilots. After WWII it went on to serve in many conflicts, with the production line finally closing in 1953, more than 10 years after it opened. As a testament to its longevity and usefulness, some foreign operators still had Corsairs in service in the 1970s. I think Revell's new Corsair is the first all-new 1:72 Aircraft from the home of the end-opening box since the Ju-88 hit the shelves a couple of years ago. Inside the small blue box are four sprues of white plastic, a single sprue of clear parts and the usual decal sheet and instructions. The colour of the plastic will be off-putting for some, but you can't deny that Revell have a rich history of using any colour other than grey if they can get away with it. If only they applied the same policy to the printing of their instruction books! Notwithstanding the dazzling albedo of the plastic, the parts are crisply moulded with very fine, engraved panel lines and plenty of detail. In common with other recent kits from Revell, there are tiny touches of flash here and there, but nothing too much to worry about. The layout of the sprues suggests that this kit has been designed to allow a number of different versions to be squeezed from the basic moulds. Although I dont know which other versions Revell are planning at this point in time, a birdcage canopy and an FAA clipped wing version are both possibilities. As usual, construction starts with the cockpit, where things get off to a good, well-detailed start. evell have laid on a real treat here. No fewer than ten parts make up this sub-assembly and each one is beautifully moulded. Detail on parts such as the side consoles and instrument panel is exquisite. The control column and rudder pedals are also nicely represented, as is the pilot's seat. A set of decals is provided to represent the seat harnesses too. The breakdown of the fuselage is quite complex, so a little care will have to be taken to make sure that everything lines up nicely and there arent any unsightly gaps or smudges of glue to spoil things. The wings are also quite complex, with separately moulded wingtips and fairings for the .50 cal machine guns and the supercharger intercooler intakes. The lower wing is moulded as a single span though, so achieving the characteristic anhedral angle won't be a problem. Landing flaps and ailerons are moulded as part of the upper wing. The tail planes and elevators are moulded as solid parts too, while the rudder is moulded separately. The engine is very nicely represented, with the two rows of cylinders moulded separately for maximum detail. The hydraulically operated cowling can be fitted in closed or open positions too. The fixed parts of the cowling have been moulded in three parts, which adds to the complexity but allows for a higher degree of accuracy. The exhaust pipes are also moulded separately, and although they look rather excellent for injection moulded items, I'm sure some even more excellent resin replacements will be available at some point. Once the major parts of the airframe have been assembled, attention turns to the undercarriage. The detail-fest continues here, with structures moulded into both the main and tail landing gear bays and complex and accurate landing gear legs. The inner hubs are moulded separately to the tyres, which means the spoked wheels have accurate depth (as well as being a little bit easier to paint). The landing gear bay doors are paper-thin, with nice moulded detail on the inner surfaces. They are moulded in the closed position, which is great if you want to build your model gear-up, but must be split if you wish to build it gear-down. Underwing ordnance is limited to a couple of drop tanks. The transparent parts are thin and clear, but there is a fair bit of distortion present. I've seen a lot worse in this scale, but I've also seen better (including from Revell themselves) Marking options are included for two aircraft: Vought F4U-1A Corsair, VMF-214 Squadron, US Marine Corps, Vella Lavella, Solomon Islands, December 1943; and Vought F4U-1A Corsair, VMF-17 Squadron, US Navy, Bougainville, Solomon Islands, February 1944; and The decals themselves have been produced to a high standard. They appear to be perfectly in register, detail is very sharp and they look nice and thin on the sheet. A selection of stencils is included too. Conclusion Although we already have a number of decent kits of the Corsair available in this scale, this is still a very welcome kit. It has been produced to a high standard, and although the breakdown of parts is fairly complex, it should be possible to build a very detailed kit straight from the box. The kit has clearly been designed to allow other variants to be produced from the same basic sprues, and hopefully it won't be long before we see one or more of these appear. Recommended. Revell model kits are available from all good toy and model retailers. For further information visit or
-
This is my first 'Kiwi' project since moving down here to NZ two-and-a-half years ago, so it's about time I got around to building something 'local'. Two months solid work has gone into this one, really pushed-up against my 'skills envelope' with the weathering effects, but I'm extremely happy with the outcome. Have to say this was one of the most, enjoyable and satisfying builds I have ever done. Loved every minute of it. Kit - Tamiya 1:48 Paint - Camouflage - Enamels mixed 'by eye'. Interior, tyres, prop blades - Tamiya acrylics. Landing gear, prop boss, cylinders - Alclad lacquers. Decals - Ventura (various sheets) Extras - Eduard Zoom set & Ultracast resin wheels. Vought F4U-1A Corsair 18 Squadron, RNZAF Green Island December 1944 [url=http://smg.photobucket.com/user/280163/media/Corsairs/64e98436-d501-45eb-a338-0b6ebf546491_zpsa6281341.jpg.html] Thanks for taking the time to look, if you're interested in the 'build thread', you can see it here at Kiwi Modeller http://www.kiwimodeller.com/index.php/forum/38-follow-as-i-build/29411-f4u-1a-f-i-n-i-s-h-e-d . In the meantime all comments, questions and criticisms are welcomed. AFN Ian
- 28 replies
-
- 20
-
-
My latest build , and its a big yin 1/32 corsair, went together reasonably ok , some really bad flash, and some intresting shapes (esp the rear wheel) was more a trial one for me.wanted to work on my shading/sun bleaching .am quiet happy with it , sorry my photograhpy is poor all picts took on a I phone for convinience.
-
Pics mine of the one at Duxford
-
Here are a few images of my fourth 1/48 Tamiya Corsair Mk II done OOB using Techmod decals. The build log is at the link below: http://www.britmodeller.com/forums/index.php?/topic/234958127-a-flight-of-148-faa-corsair-mk-iis/
- 13 replies
-
- 14
-
-
Kit: Tamiya Scale: 1/48 Type: F4U Corsair Extras used: Eduard cockpit and window masks, Aeromaster Decals Paints and colours used: Vallejo model air and Tamiya I Had to get a plane finished as ive spent most of the first part of the year on the McLaren F1 car, this was sat in the box in primer as I was waiting to come across some decals that I liked, so now I decided to finish it. Hope you like it. Ive spotted a hair!!!! Now, on with the sea vixen!!
-
In my personal group build of FAA Corsairs I have come to realise the distinct lack of stencil data for the FAA Corsairs as you can't use the minimal stuff provided by Tamiya and Xtradecal don't nprovide them. I have just bought the Techmod sets for the 1/48 Corsairs and Wildcats and they come with the stencil data. My question is - are there aftermarket stencil data for the Corsairs in FAA service in 1/48?
-
Whilst battling the AZ Models Firefly Mk 1 I thought I might knock together something a bit easier so I started the four Tamiya 1/48 Corsair F4U-1D's that I had sitting in the cupboard. All four are going to be FAA Corsairs using a variety of AM decals I have and are pretty much OOB. I have trimmed the wing tips and just given the interiors and engines a basic paint job as I am more interested in the exterior paint job as I did with my last FAA Corsair. I just love the Tamiya Corsairs as they are well engineered, easy and quick to build. You can also go to town on detailing them if you wish. Apart from airbrushing the interiors I only started these last night and have done a fair amount of work on them. At some stage I have to get more of them as I want to do two RNZAF Corsairs and maybe an FAA Corsair Mk IV at some stage.
-
Here is the third FAA Corsair I started not long ago. I found a small problem with the Tamiya kit in that the wings do not fold up to the correct position ie not close enough. I will be posting more of this one and the last of the four on Aussie Modeller in the near future. Here is the link to the other two I recently completed: http://www.britmodeller.com/forums/index.php?/topic/234961190-two-148-faa-corsair-mk-iis-completed/
-
Here are two of the four 1/48 FAA Corsairs that I have been working on recently. These two are completed but I have two more that I am making with the wings folded that are waiting the time available to work some more on them. One is done in FAA colours and the other is done in US equivalents. The link to the build is below: http://www.britmodeller.com/forums/index.php?/topic/234958127-a-flight-of-148-faa-corsair-mk-iis/
- 15 replies
-
- 21
-
-
Hello All, Here's my build, from my late Dad's stash, from I guess the 1970s or 80s. So it may have been under a quid! This is the original 1/72 Revell F4U Corsair, and it doesn't look too bad for its age: I am building more or less out of the box. The cockpit insert is reasonable (compared with the contemporary Airfix peg for the pilot to sit on) and I didn't want to spend too much effort because the canopy is pretty difficult to see through, so I just added a rough control panel and a harness for the pilot: And the pilot needs to see! Thanks for looking, Adrian
-
F4U-1 Corsair Engine Set Brassin 1:32 Engine Set (632032) It seems that now Brassin have just about done every conceivable upgrade for the Revell 1:32 Me109 they now have time to turn their attention to the Tamiya 1:32 Corsair, with the release of this engine set. As with the majority of larger Brassin sets, this one comes in a cardboard box inside of which are four bags of resin parts, with five of the larger resin parts loose and one sheets of etched brass/nickel. These are all very well protected by blocks of foam. The large instruction sheet is very well laid out clear, and certainly a big improvement on the standard instruction sheets. A lot of the parts are very fragile and care will be needed when removing them from the moulding blocks. The larger parts look pretty easy to remove and clean up as they are only attached to the moulding block on one edge. The detail on the completed engine is such that it could easily be assembled and displayed as a model in its own right, although a scratch built engine stand will be required. There are 81 resin parts, in a mixture of medium and dark greys. The detail on the resin parts is pin sharp, and with a good depth, which a dark wash will help bring out. The eighteen individual cylinders, nine for each bank, are attached to what I guess could be called the engine block ensuring that the cylinder fitted to the top centre of the front bank is the correct item. Each cylinder is then fitted with a spark plug on the forward face. The intake manifold is then attached to the rear, making sure that the ends meet the cylinder intakes correctly. The etched wiring harness is then attached from the front and the “leads” fixed each of the spark plugs. The fastener ring is then fitted, followed by the reduction gearbox case, which has been moulded with the two magnetos and spark advance unit fitted. In addition to the provided PE, a lot of the other pipework and wiring has to be provided by the modeller, but the instructions give detailed information of the thickness, length and position of each part. Once the wiring is complete the cooling gill part is affixed to the rear of the engine, followed by the exhaust manifolds, the lower two of which need to be sourced from the kit, whilst at the front, the cowling nose section is attached. Finally to display the engine off, the two resin cowling side panels are fitted out with strengthening/ fastener strips and either left off or attached at the hinge points and a suitable length of rod used to prop them open. As shown in the picture taken from the Eduard store below. Conclusion The Tamiya F-4U Corsair is already an outstanding kit with very few problems or vices that haven’t already been fixed by other aftermarket companies. The kit already has a beautifully detailed engine so I do wonder whether this engine set will sell that well, but I’d imagine Eduard have thought of that. It is a fantastic piece of moulding with an amazing level of detail which as stated above, might be better being shown off in its own right or as part of a diorama. Highly recommended Review sample courtesy of
-
 Build 7 Although I've already got a list of kits to build for this group I keep buying more models to build for it! This one is going to be hacked to bits and converted into a custom racer, with a longer cowling, tiny bubble canopy, clipped wings etc. I'm building it "in flight" because racers just look better that way Price: £1.99 from Antics Wow! I've not seen that much flash since this came out... Although I'm not using it, I thought I'd put a photo of the canopy up to show the kind of quality you get. You'd never guess that "thing" was for Corsair