Search the Community
Showing results for tags 'Classic'.
Found 19 results
-
Hello everybody, after some negotiations with the moderators I'm joining with one of the most primitive classic Airfix kits: I hope my sacrifice will instigate a retool appearing in next year Airfix announcements! This is a build I enthusiastically started a long time ago, certainly more than a quarter century. After discovering the many inaccuracies of the Airfix kit it stalled and never got to an end. Now it is just a matter of finishing what I started, because I always try to save my builds and the competition from the MPM kit is not really that strong. I know the builds seems quite advanced, having joined the fuselages and wings halves, though I actually postponed most of the work because I plan to do the following corrections: - correct the passenger door engraving - replace the engines with the Airwaves Wright resins - correct the bomb bay doors engraving - replace and adapt the transparencies with the Aeroclub acetate mouldings - modify the tailplane to make it a continuous surface with the cutout in the fuselage tail - change the exhaust arrangement - rework all the landing gear area: nacelles cut-outs are completely wrong. - rework the wing slots: position and shape are not correct. I planned to build a Photo Reconnaissance bird without turret, so I'm at least relieved from the hassle of correcting the abortion supplied in the kit: I even have an Almark decal sheet for this subject, though it seems to be a very obscure one and I couldn't find more than two very blurred images over the internet.
-
I currently have four ongoing builds in this groupbuild. Three are approaching the final furlong. It's a long groupbuild, so why not start another? This one is a true classic. The Hasegawa Mirage F1C, from 1983. I love this kit and have built numerous models from it over the years. It has been surpassed by the recent Special Hobby kit but in my opinion it is still very worthwhile and stands up well in comparison to the SH kit. A few years ago I had a number of these in The Stash (mostly the Revell boxing) but I have built them all. This is my last one. The kit is typical Hasegawa fare from that period, with raised panel lines and a very sparse cockpit. But it's a pure joy to build. This is gonna be fun!
- 8 replies
-
- 6
-

-

-
- Big In Japan
- Hasegawa
- (and 1 more)
-
This is Tamiya's Rover 7 Ambulance, I have fond memories of driving these things about when I was in the TA and then later an instructor in the ACF. The only drawback is that the driving seat was completely fixed and did not move whatsoever! I found this kit when I was perusing eBay one day, and for once it wasn't an arm or a leg, in reality I was more after the figures as they're the only real 1970's era British Army figures in injection plastic, and with a little bit of tweaking they can be altered, upgraded and used, however the Rover 7 was definitely on my modelling bucket list as well! The kit went together quite nicely considering it's age, I made some changes to add interest, namely cutting open the driver's side door. I also ditched most of the decals as they had yellowed with age. I painted the ambulance with Tamiya Acrylics and painted the Red crosses on as well, the rest of the decals are either the better ones from the kit or nicked from the spares box. I weathered the Rover eweathered with oils and pigments. Thanks for looking! Angelo 🙂
- 10 replies
-
- 34
-
-
-
With Airfix re-releasing the Beaver in Autumn 2022. Looking for information on military versions of the type. Colour schemes, available decals etc. Is a Turbo conversion possible. Thank you
-
(510x640)-Copy(95x120).thumb.jpg.33073138e01aa81779639a845926753e.jpg) Reserving my spot Waay back then, when I was a small alt-92 we could frequently hear the buzz of a Harvard (well, everything Texan we called a Harvard then) high up and see it writing advertisement in the sky: The plane in question was (rather - still is) an original WW2, 1942 built North American AT-6A Texan with C/N 78-6922, 41-16544. (stats: https://www.t6harvard.com/dutch-harvards/n13fy-t6-harvard-t6-texan/ ) Bought by an enterprising local business man, and registered as PH-NKD, the AT-6A was equipped with a Diesel tank in place of the rear seating from which the oil was injected into the stretched exhaust. The company, Skylight, was based at my local airfield Hilversum (EHHV) until the mid-1990s. A falling out with the Dutch CAA in 1993 resulted in the aircraft being re-registered as N13FY in the USA. What the FY stands for, I'll leave to the imagination She's still based at Hilversum airfield, albeit under different ownership. --- The kit: Monogram's classic 1979 original release. All raised detail, of course. But that's fine. Decals are totally shot - I might try and save some stencil data but not too worried.. I'm in the process of having custom decals printed for the Skylight logos and registration letters, so once they're in I'll start the build proper.
Reserving my spot Waay back then, when I was a small alt-92 we could frequently hear the buzz of a Harvard (well, everything Texan we called a Harvard then) high up and see it writing advertisement in the sky: The plane in question was (rather - still is) an original WW2, 1942 built North American AT-6A Texan with C/N 78-6922, 41-16544. (stats: https://www.t6harvard.com/dutch-harvards/n13fy-t6-harvard-t6-texan/ ) Bought by an enterprising local business man, and registered as PH-NKD, the AT-6A was equipped with a Diesel tank in place of the rear seating from which the oil was injected into the stretched exhaust. The company, Skylight, was based at my local airfield Hilversum (EHHV) until the mid-1990s. A falling out with the Dutch CAA in 1993 resulted in the aircraft being re-registered as N13FY in the USA. What the FY stands for, I'll leave to the imagination She's still based at Hilversum airfield, albeit under different ownership. --- The kit: Monogram's classic 1979 original release. All raised detail, of course. But that's fine. Decals are totally shot - I might try and save some stencil data but not too worried.. I'm in the process of having custom decals printed for the Skylight logos and registration letters, so once they're in I'll start the build proper.- 20 replies
-
- 10
-
-
Revell's old kit from the early 80s, rehabilitated with a modified Trumpeter cockpit and Wolfpack ejection seat, Reskit wheels and lots of scratchbuilt details. Painted with MRP lacquer paints (wasn't sure about the shades, but it looks better after the decals and gloss coat). The decals are all from the kit, Revell's recent releases have brilliant decals and take a lot of the fear factor out of that part of the build! The subject aircraft was a 20 Sqn wing commander's aircraft based at RAF Wildenrath in 1971. It was lost in an accident the same year. There's a great photo of it in the hangar looking ludicrously shiny, so I've tried to replicate the glossy finish without crossing into Toyland! Some of the added and modified details: intake shapes rebuilt with Milliput new cockpit and modified seat auxiliary doors cut out and modelled from plastic card nose camera port reshaped and enhanced airbrake bay built from scratch tail stinger remodelled and detailed all RCS ports and various vents opened and detailed fwd and aft canopy area remodelled and detail added gun pods remodelled and opened new resin wheel set from Reskit raised panel lines removed and rescribed with rivet detail I'm glad I went to the effort in the end, it's the only early Harrier in 1/32 and was worth it! Anyone interested in the build log should click here: All the best and thanks for looking, Alan
- 30 replies
-
- 47
-
-
-
Hello folks, Here will be my first GB, a nostalgic and hopefully not too embarrassing foray back into modelling 👍 (that doesn't involve n guage railway track). My first kit related memories are from the very late 70's. After moving house my Dad found a couple of boxes of kits including a bunch of made up ones he shared with me for my model railway layout. (I've rediscilovered them recently, albeit worse for wear). After he built a few more himself from his rediscovered stash we were visiting my grandparents in Bridlington and he went into a shop we later frequented often, Cropper's Models, who had numerous old stock items of Airfix, Novo and Frog. These were pretty cheap since I'd consider them with my £2 'holiday money', (especially the bagged Airfix Trackside kits). Dad would sometimes buy 1 or 2 kits as a bit of a nostalgia thing, partly getting me interested, and one day gave me an old battered Frog Skua to have a go at. I recall the canopy must have been hell for the pilot, fogged up and draughty at the same time! 🤣 I certainly developed an intetest in the aviation art from the older boxes over time, I can even recall being a tad dissapointed at getting a Heller-Humbrol Focke-Wulf 190 branded kit with a photo of the model on the box, nothing like the Bombs Away! artwork of Roy Cross 😁 Hopefully this explains the fond nostalgia for these older kits, treasured shared time with my Dad which cannot be re-visited. He's still with us, but after a stroke and wheel-chair bound things are more of a challenge. I'll be taking the kit to show him once I'm done though! ☺️. I've bought one in the gold token box which I remember and am researching the colour schemes at the moment before a foray to get paints! https://www.flickr.com/photos/188996048@N07/shares/3Lc987
- 53 replies
-
- 10
-
-
The latest AMW arrived today with next year’s Airfix catalogue. November 2019 is the classic box art of the BOAC Concorde. Does this mean a re-release of their early short-tail and heat-shield cockpit visor is on the cards? I assumed that the original moulds would have been doctored for the production type... Cheers Will
-
 Kit manufacture: Airfix Kit N°: A02067 Scale: 1/72 Type: Hawker Hurricane Mk.I Extras used: A masking set for the camouflage from AML Paints and colours used: AK Black Primer & Microfiller; MRP-111 Cockpit Grey-Green; Tamiya Paints XF-1 Flat Black, XF-2 Flat White, XF-52 Flat Earth, XF-81 Dark Green (RAF); Vallejo Metal Colour 77.703 Dark Aluminium; Abteilung Oils; Tamiya Weathering Powders Other info: This was built for the #RAF100inscale group build ran on facebook at British Aviation In Scale, the full build can be see here on the forum Overall this was a very enjoyable build, still far from perfect there are some very apparent mistakes but I’m pretty happy with the result. I would highly recommend this kit, there are some known issues surrounding fit of the wings and the fuselage and also the thick trailing edge and the fabric effect behind the gun gun access panels which should be metallic. But in the scale I think this is the best Hurricane you can buy. Here are the final reveal photos: 1-72 Airfix Hawker Hurricane Mk.1 10 by Neal, on Flickr 1-72 Airfix Hawker Hurricane Mk.1 01 by Neal, on Flickr 1-72 Airfix Hawker Hurricane Mk.1 02 by Neal, on Flickr 1-72 Airfix Hawker Hurricane Mk.1 03 by Neal, on Flickr 1-72 Airfix Hawker Hurricane Mk.1 04 by Neal, on Flickr 1-72 Airfix Hawker Hurricane Mk.1 05 by Neal, on Flickr 1-72 Airfix Hawker Hurricane Mk.1 06 by Neal, on Flickr 1-72 Airfix Hawker Hurricane Mk.1 07 by Neal, on Flickr 1-72 Airfix Hawker Hurricane Mk.1 08 by Neal, on Flickr 1-72 Airfix Hawker Hurricane Mk.1 09 by Neal, on Flickr Thanks for looking and as always please do not hesitate with feedback it won’t be taken badly! Neal forum
- 20 replies
-
- 43
-
-
This is an older build but I don't think I've posted these photos before. I did re-scribe the model and added a few bits from the Airfix B-26. MicroScale decals.
- 9 replies
-
- 29
-
-
- Revell 1/72
- Classic
- (and 1 more)
-
Ilyushin IL-62 NATO reporting name Classic. Pics taken at The Ukraine State Aviation Museum Zhulyany, Kiev. Pics thanks to Dave Haskell.
-
Hi guys, I've bitten the bullet as I'm pretty confident I'm going to finish my Yak-6M for the other GB so I'm getting on board with this one too. I have a few Tu-154's up in the loft and I've been itching to build one for some time, so this is the perfect excuse. Will be finished using 26Decals as Balkan Airlines, LZ-BTW.
- 9 replies
-
- 6
-
-
- 26Decals
- Balkan Airlines
- (and 4 more)
-
Hello glue-sniffers and ABS addicts. This thread is a split from http://www.britmodeller.com/forums/index.php?/topic/234999580-airfix-vampire-t11-x-2/ Images are spoiler tagged for ease of page loading. If you have any issues with the photos, blame RobG. If you have any issues with the model, don't blame me. If you would like a custom-built version for your mantelpiece then dream on. I haven't built a model for probably 18 years, so I began with a pre-emptive strike on the box.
-
Evening all. Welcome to my little corner of BritModeller; long time viewer, first time post(er). So... My MP4/4. I had previously built the MP4/23 that Degostini had released which went okay but was pretty giddy about this release. For anyone that loves F1, I think a part of us were all a fan of Senna and to be able to build this iconic machine was a must. Juggling a young family and starting design business meant I had the luxury of having ALL the pieces arrive month by month and no time to build it... Until now... Mwah ha ha! So, enough of the waffle, on to my attempt to build this 1:8th scale monster!
-
 Here's my first entry, if time permits I may go for a second one too, but will leave details of that until I know if it can be done in time. Here's the ubiquitous box shot: And the contents therein, I bought it second hand and the upper wing had been glued together, but it came apart fairly easily, the only other parts already assembled are the pilot pieces. The kit also includes a stand and a small roll of invisible thread for rigging, don't know if the thread was supplied with the kit originally or if the previous owner provided it. And this is the decal I'll be using: I'm intending to build it virtually out of the box, with just a little scratchbuilding to replace a couple of missing parts or to replace poor representations of certain parts. If I go down the detailing route I just know I'll get bogged down and never finish it in time. Thanks for looking. Ant
- 16 replies
-
- 7
-
-
- Fairey
- Flycatcher
- (and 3 more)
-
 A little something I finished earlier this Fall, but struggled with since Spring of 2014. Lost interest for awhile, then ran into many problems during the paint phase. Basic kit is the ancient FROG double offering of the Spit XIV with V-1 and the special 'double stand' to display them. The Buzz was somewhat heavily modified, as what FROG offered did not match drawings of the production/armed V-1's (more the unarmed prototypes) and had some shape errors especially around the pulse jet. The Spittie was not modified much other than scratching up a pit (populated with an Airfix Johnnie) with a vac'd canopy replacement, rescribing the entire airframe, and substituting the molded exhausts for a donated spare set from I believe a newer Airfix Spitfire XIX. Paints for both were Vallejo throughout. And with a little bit of prop action haha The biggest struggles were with paint and the decals. The Spit was painted THREE TIMES. First time I used the color call-outs that Vallejo gave with their 16-bottle RAF set....these, aside from the Dark Green and Sky, were dismally inaccurate. I'm mostly satisfied with my final mix of Ocean Grey, but still don't think it is 'correct'. The kit decals were a chore to use this time, unlike with a FROG Javelin I built a few years ago, and I did end up having to create masks to spray the Sky codes on the fuselage as the first one piece code/roundel/code decal I tried to apply strenuously objected to working whatsoever though I did manage to save the actual roundel. By the time I got to weathering, I had just about reached my wits end and only wanted it to be over, so stuck with a simple wing root chipping exercise and an oil wash/filter session. While most certainly not a very accurate rendition of a Spitfire, IMHO it still looks good and has the cachet of being a good old nostalgia build. Not completely unhappy with the outcome, but not overjoyed either. Cheers, and Happy Holidays! Erik the H in sunny Florida
- 26 replies
-
- 42
-
-
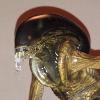 Hi Britmodellers, A quick intro - I'm Peter, I'm new here, and this is my first post. I've been around plastic and glue for 20+ years, and by far my favourite subjects to depict are Movies and Sci-Fi. I've built Batmobiles, USS Enterprises, Deloreans and Aliens. I have a strange pull towards the 1990s kits from AMT/Ertl and Halcyon. They're not the best moulds, or even the best plastics, but they were the things I lusted after when I was 15 - especially the Halcyon PVC kits like the Facehuggers and Chestbursters. In the last few years, I've dabbled in 28mm figures - Warhammer 40k and Fantasy, and I'd like to think I take the skills and techniques I've learned in painting tiny scales across to 'giant' models of 1/9th and 1/24th scales. I found this site via Twitter, and Rob's Aoshima Back to the Future build, which is coming along really nicely - I'm looking forward to seeing the final result! So - onto my own ambitious project! A few weeks ago I found a couple of my old Halcyon kits in the stash. A 1/9th Attacking Alien, and a 1/9th Predator from Predator 2 (the Danny Glover one in the city). My favourite moment in that film is a throwaway piece of scenery: in the Predator's trophy cabinet on the spacecraft is an Alien skull - a perfect universe connector, and one that has spawned the whole AvP franchise - but how can I get both of these kits to interact with each other? I started with the Predator. It's an awesome kit - standard brittle styrene, with soooo many mould lines and ejection pin marks to clean up. There are 43 separate dreadlocks, and when I fit them, they have to go in a specific order, and have a very small tolerance in angle. I'll be painting them well before I glue them on! The Alien will be involved as well, although at this point, I'm not sure quite how. There are two heads on the sprues, though, so that opens up some options. I'll be writing up the build here, and eventually on my own blog, with on-the-fly photo updates on Twitter. Please feel free to leave comments, advice and even criticism! See you next time.
 -
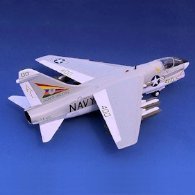
 Progress has stalled on the stuff I've been working on. I stare with trepidation at masking tape and the last thing I want to do these days is spend hours sawing through resin parts. So I haven't gotten anything done at all! That's what this build is for. It will be built out of the box. No aftermarket parts. No PE. No resin. No vacform canopy. No obscure decals from South African or European sellers on eBay. It's time make some actual progress and finish a kit. This is so I can prove to myself I can do it. Plenty of time to agonize over paint shades, which PE set is best, and all the rest of the AMM issues that I really shouldn't have yet because I'm a beginning modeller. So I cracked this baby open today - And a shot of the sprues. Decals haven't yellowed a bit, but this kit was on someone's shelf for a long time. Marking choices are USN VF153, USMC Korea 1952, and USN Blue Angels Pensacola 1949. I have chosen the Blue Angels scheme for a couple reasons - I'm a Floridian (although I saw the Blue Angels as a kid when they flew F/A-18s), and it's the easiest scheme. No camo, single color aircraft besides the silver wing leading edge panels, nice clean canopy with minimal framing. Everything about this kit says fast. In fact, the only thing I will be buying for this kit that I don't currently have is the paint color - "gloss sea blue" according to Hasegawa's 1970s Japanglish instruction manual. I'm not going to spend three days research exact shades. I'm not even going to solicit opinions on which is the best and most accurate (although they are most welcome!). I've ordered a pot of Vallejo Model Color "Dark Sea Blue". Simple as that! If Tamiya does a clearly superior Sea Blue, please mention it. I can always swing by Hobbytown and pick up a pot of that after work. I'm just trying to keep all my ducks in a row because I want this build finished, including all paintwork, before the end of the week! I will probably put the pilot in on this one. I spent the time with my new UMM bow sander to clean him up (did that ever work a treat!), and I also received some 0.4mm and 0.2mm lead wire, a UMM "20th Anniversary" saw kit, and a few other things. It should all come in fairly useful on this build. I'm not going to try any sort of "super detailing" but I may try my hand at running brake lines with the lead wire here. The wheels and tires are exceptionally simple on this kit and I would probably replace those if I was going for a more accurate build. Fit and finish has been startlingly good so far. The wings did require clamping and didn't want to stay together at first, but the wingtip tanks had much less of a gap than I ever expected and once I got part of each wing section "tacked" with Tamiya Extra Thin I was able to put more glue in the middle where it needed it and get the wings to settle down as they should with no gaps to fill. Primer may reveal me to be over-optimistic but so far it honestly does not appear that I have any gaps to fill on the wings yet. We'll see when the fuselage is fitted. I've left the wings clamped and drying for about 90 minutes while I wrote up this post, ordered paint, etc. So I think I'll get back to work on it and hopefully make two posts on this thread, with photos and actual progress, this Sunday!
 -
hi this is going to be my first real kit in 1/144 (my last, I did 4 years ago, when I was 13, so not very good) I read the great report from the other forum-user that did assembled the same kit. BAe ATP, from Welsh 1/144. however, some things have changed in the kit: gears are assembled, all wings (front, rear and rudder) are already cut out, as well as the props, which are even made of metal. those are all so great, that only need to be painted (and adjusted to the fuselage, where the wing/fuselage are coming together, the "well known problems" pictures will follow soon