
Search the Community
Showing results for tags 'Challenger'.
Found 16 results
-
 Big Planes Kits (BPK) is to release 1/72nd and 1/144 Bombardier Challenger kits. Source: https://www.facebook.com/BigPlanesKits/photos/a.1510613519216386.1073741829.1509837872627284/1664192343858502/ V.P.
- 79 replies
-
- 2
-

-
- Big Planes Kits
- Bombardier
- (and 1 more)
-
 Hi all together, I've seen great Real Space Modeling projects in your forum. Therefore I want to point out you on my major project. I decided for the STS-6-Mission with the Challenger (04.04.1983) as guidance version for my build, as you can see here in the following image of the Launch Pad 39A with the Challenger before the start to the STS-6 mission. Source: retrospaceimages.com To be built is the Launch Pad 39A with Launch tower, Shuttle stack, as well as Mobile launcher platform (MLP) and Crawler transporter (CT). Basic module for my project is the old Revell kit 4911 in 1:144. In addition of the launch tower FSS I will use the Detail kits of LVM Studios. The LVM kits contain photo etched parts (PE) from thin brass sheet metal, with which very finely detailed structures can be produced as well known. For building MLP and Crawler I use the cardboard-model kits by David Maier from EDU-Craft Deversions in scale 1:144. The kits consist in each case of 13 colored building sheets of cardboard (27.5 cm x 42.5 cm) as well as a building guidance on CD-ROM. If you are interested in the beginning of my progress report you can look here in the ARC Discussion Forums. Manfred
- 2,528 replies
-
- 9
-
-

-
- Space Shuttle
- Launch Pad 39A
- (and 4 more)
-
Hi guys, It's been some months (Years?) I'm trying to come back to modelling. I've lost count of opened boxes left aside after a few days... But I'm still trying! As my lattest attempt is this very British Chally 1 from Tamiya (intended for a Desert Storm GB on Warpaints forum), I thought it might be nice to share the WIP with you all, benefits for me being to learn a thing or two about this tank, and get tips, advices and guidance toward online documentations. Here we go!
- 18 replies
-
- 5
-
-
- Challenger
- Chally 1 Mk.3
- (and 1 more)
-
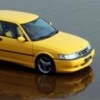 Hi Since I decided to ditch a load of my aircraft kits and build mostly Muscle car kits, I thought I’d best start one. For this I picked probably the worst first, 1 of 3 Dodge Challengers I bought, of which there is no good kit available really, all have their faults The AMT 70 R/T has been out in many boxes, this is a standard one with no extra bits. The main problem with this is the roof. It’s marketed as either a convertible or hardtop and does neither correctly. I’ve gone the hardtop route which has required a bit of filler Not anywhere near perfect but as good as it gets. I have also added the front far too early but to get a clean join, I’ll have to force some engine bay parts in later on Colour wise, I think I’m going with yellow and black, I’ve sprayed up a spare charger shell to try some old aerosols as I can’t go out for more paint Think I will go with the yellow and black bonnet but this one won’t be showroom finish. I’m thinking a rolling restoration, might leave a front wing in grey primer as if it’s been replaced, ratty but running. Once I’ve got the body pretty much sorted, I’ll start on the rest of it. Typical AMT, a box of loose bits More soon as I have some more days off soon Cheers Chris
- 36 replies
-
- 9
-

-
-
- Challenger
- Worst first
- (and 1 more)
-
'70 Dodge Challenger T/A (2'n1) Streetburner Revell - Nr. 85-2596 - 1:24 https://www.scalemates.com/kits/158534-revell-85-2596-70-dodge-challenger-t-a-2-n1 We will call this one done. It was a pleasure to build. Top quality in every way. Paint used was acrylic and waxed with Pledge Furniture Wax aerosol. Challenger Album google+
-
Hi folk's sad but my aircraft mojo has gone on vacation I get a project out,stare at it and put it back so as I,m building the last subject in my other armour thread I thought as a companion to the Chieftain next up would be it's replacement. The kit comes in a sturdy box with lid. And the box is packed with sprue's. Must get a bigger table! Some beautifully molded parts,vinyl track's which actually bend with each link and a little fret of PE.There are a lot of extra parts in the box including a dozer blade and fitting's. Should get started soon.
-
Hi All - Merry Christmas and a Happy New Year to all. Here's my Tamiya Challenger 2. Its straight out of the box bar some limited PE (I really struggle with any complex PE) and the anti slip made from spraying on Mr Surfacer 500 at 40psi. The kit goes together superbly and the tracks are fine for what you can see. For the time and effort I don't think you can really see the anti slip but each to his own i guess. Colour is just a mixture of Tamiya Desert Yellow and Flat Yellow. The direction of the Chevron marking on one side is wrong but I only noticed after Microsol,Microset and Flat Clear so just left it. Any comments questions welcomed - Thanks for looking
- 5 replies
-
- 11
-
-
- challenger
- tamiya
- (and 1 more)
-
Hi all. Newest project has come to an end. Revell CL-604 Challenger. Great kit, added a few antennas, and an acrylic stand. Chuffed with the result. Painted with Humbrol, Alclad, and Mercedes rattle can clear coat. Robin
- 7 replies
-
- 16
-
-
- Challenger
- Revell
- (and 1 more)
-
Here is my build of Revells 1/72 Challenger 1. The fit of the kit was pretty good except I messed up a bit with the tracks, but nothing major. I built it OOB except I thougt it would look good if I cut out the turret baskets and put netting in it, which turned out -well- bad so i left it after the first one and glued the netting just onto the basket. I also filled the baskets with stowage made out of tissues and white glue as i added a thread to the winch(?) at the rear and I also made the manlet of the barrel out of tissue. Here are the pics: IMG_2149 by nivelnnamkcurts, auf Flickr IMG_2153 by nivelnnamkcurts, auf Flickr IMG_2154 by nivelnnamkcurts, auf Flickr IMG_2157 by nivelnnamkcurts, auf Flickr IMG_2159 by nivelnnamkcurts, auf Flickr IMG_2160 by nivelnnamkcurts, auf Flickr IMG_2161 by nivelnnamkcurts, auf Flickr And the comparsion to a 1 coin and an 1/72 esci figure... IMG_2156 by nivelnnamkcurts, auf Flickr ... and Revells Merkava IMG_2166 by nivelnnamkcurts, auf Flickr (All pictures were taken with my phone as my camera doesn't work right at the moment) I hope you like it Comments and critics are welcome Regards Levin EDIT: The one IFOR marking is angled as i put it down but also put tge tank on its tracked so it was slightly pulled down
-
Canadair Challenger CL-604 / C-143 MRC2A 1:72 BPK (Big Planes Kits) The Bombardier Challenger 600 is a business jet family originally developed by Bombardier following acquisition of the concept LearStar 600 from Bill Lear. Lear had really no influence on the design and development and thus Canadair took on the Challenger name for the aircraft. The prototype first flew in 1978. Following the acquisition of Canadair by Bombardier in 1986 the aircraft became known as the Bombarider Challenger. The aircraft can be distinguished by use of Fowler Flaps normally seen on airliners. Following The CL-601 is a newer version featuring winglets to reduce drag. As well as civilian operator many air arms acquired the aircraft for VIP and other duties. This was later followed by the CL-604, this incorperated new GE CF34-3B engines, new avionics from Rockwell Collins, an increased fuel capacity, and structuaral improvements to the wings and tail. As more fuel is carried the undercarrige has been replced by unit which can carry the increased weight. The US Coastguard has purchased a single aircraft which they have designated C-143A for the role of Medium Range Command & control (MRC2A). The Kit The kit arrives with 8 sprues of injected plastic, 2 of clear plastic, a photo-etched fret, 4 strips of resin parts, 6 resin parts for the engines, a decal sheet, and a sheet of masks. Panel lines are very lightly recessed, BPK have this exactly right as they are just deep enough to be visible, rather than the heavy 'trenches' that some manufacturers seem to favour. Unlike some of their larger airliner kits the clear area for the cockpit is only half of the fuselage not a complete round section. Like the bigger kits the main cabin windows come as a strip to fit into the fuselage. The lower wing is a single full span piece, the advantage of which is that the dihedral is perfectly set for you. The uppers are separate pieces for each side. Construction begins with the interior of the jet. Here BPK provide a full interior front and back. The rear cabin has an executive/VIP fit with a couch and 8 seats, though I am pretty sure the Rega Air ambulance fit, and the Coastguard fit will be different. The cockpit has 2 seats and the control columns. Rudder pedals are moulded to the floor. the galley area between the front and rear is also built up here with bulkheads to separate everything. The overheads are provided for the rear section but the instructions are a little vague as to their exact location! Once the interior is complete it can be added into the main fuselage. As note here that the main cabin deck will need to be chamfered to match the fuselage profile for a good fit. Once the main fuselage is closed up the clear window parts can be added to their recesses. Now its time to concentrate on the wings. The wheel wells need to be fitted into these first. The instructions would have you fit the lower wing part first (again the rear fuselage part needs to be chamfered), and then add the upper wing parts. For some structural stability I think I would be tempted to add the top of the wings first. The cockpit glazing can then be added at this time. I would be tempted to add this before adding the wings as it will be easier to work on just the fuselage. Once the wings are added the winglets can be added to their tips. The engines are the next sub assembly to be done. The resin pats are sandwiched between the plastic cowlings and the engine pod is then attached to its mounting pylon. The main landing gear units are next up; the nose leg has four parts to the leg, a retraction strut and wheels. There are plastic two part wheels or resin 3 part wheels depending how the modeller want to approach this. The main gear units have two part leg, retraction strut an wheels. There are plastic two part wheels + a photo etch part, or resin 3 part wheels + a photo etch part depending how the modeller want to approach this Given the good looking resin units it would be a shame not to use them. The vertical tail is added next along with the horizontal flying surfaces which attach at its top. The rear tailcone is then added under the vertical fin. This is followed by attaching both engines. There are some PE parts to add to the fuselage at this point also. The distinctive hinges for the Fowler Flaps are added along with the undercarriage. The last thing to be added is a fully detailed plastic and PE air stair for the aircraft. Markings In addition to the decals masks are provided form the USGC Strips, and the Reaga Checks. The decal sheet allows for two schemes; C-143A US Coastguard, Tennessee, USA 2007. CL-604 Rega Swiss Air Ambulance HB-JRA. Conclusion This is a great kit from BPK. They make the best use of the various material to bring you a great looking kit. Highly recommended. Review sample courtesy of
-
Hey Guys, Brand new to all this forum stuff and all the etiquette behind it all, so here we go, jump in at the deep end. Used to build kits with my dad when I was 9/10 years old, didnt care about the finish of the model, just wanted to build, paint, then play with it and take it to school show and tell. 10 years on, a random trip to Hobbycraft and my eyes lit up with delight when I saw the model section. So off I went and picked up several models and paints including Airfix's Operation Herrick range (hoping to do a diorama eventually when I get my new house sorted), a few basic 1/72 planes, and then this Challenger. I remember building this kit with my dad when I was a boy so memories came flooding back whilst building. So anyway, I built the kit up and left all the small parts off til the end. Used a rattlecan from Humbrol for the tan, and then a mixture of tamiya acrylics and humbrol enamel for the small parts. Hope you guys enjoy the finish product, let me know how to improve, and hopefully this is the first of many posts! Cheers, Ollie
- 4 replies
-
- 8
-
-
- Tamiya
- challenger
- (and 5 more)
-
Canadair Challenger CL-601 1:72 BPK (Big Planes Kits) The Bombardier Challenger 600 is a business jet family originally developed by Bombardier following acquisition of the concept LearStar 600 from Bill Lear. Lear had really no influence on the design and development and thus Canadair took on the Challenger name for the aircraft. The prototype first flew in 1978. Following the acquisition of Canadair by Bombardier in 1986 the aircraft became known as the Bombarider Challenger. The aircraft can be distinguished by use of Fowler Flaps normally seen on airliners. Following The CL-601 is a newer version featuring winglets to reduce drag. As well as civilian operator many air arms acquired the aircraft for VIP and other duties. The Canadian Armed Forces procured 6 of these aircraft designating them CC-144B. The Luftwaffe also operated 7 aircraft, retiring them in 2011. The Kit The kit arrives with 8 sprues of injected plastic, 2 of clear plastic, a photo-etched fret, 4 strips of resin parts, 6 resin parts for the engines, a decal sheet, and a sheet of masks. Panel lines are very lightly recessed, BPK have this exactly right as they are just deep enough to be visible, rather than the heavy 'trenches' that some manufacturers seem to favour. Unlike some of their larger airliner kits the clear area for the cockpit is only half of the fuselage not a complete round section. Like the bigger kits the main cabin windows come as a strip to fit into the fuselage. The lower wing is a single full span piece, the advantage of which is that the dihedral is perfectly set for you. The uppers are separate pieces for each side. Construction begins with the interior of the jet. Here BPK provide a full interior front and back. The rear cabin has an executive/VIP fit with a couch and 8 seats. The cockpit has 2 seats and the control columns. Rudder pedals are moulded to the floor. the galley area between the front and rear is also built up here with bulkheads to separate everything. The overheads are provided for the rear section but the instructions are a little vague as to their exact location! Once the interior is complete it can be added into the main fuselage. As note here that the main cabin deck will need to be chamfered to match the fuselage profile for a good fit. Once the main fuselage is closed up the clear window parts can be added to their recesses. Now its time to concentrate on the wings. The wheel wells need to be fitted into these first. The instructions would have you fit the lower wing part first (again the rear fuselage part needs to be chamfered), and then add the upper wing parts. For some structural stability I think I would be tempted to add the top of the wings first. The cockpit glazing can then be added at this time. I would be tempted to add this before adding the wings as it will be easier to work on just the fuselage. Once the wings are added the winglets can be added to their tips. The engines are the next sub assembly to be done. The resin pats are sandwiched between the plastic cowlings and the engine pod is then attached to its mounting pylon. The main landing gear units are next up; the nose leg has four parts to the leg, a retraction strut and wheels. There are plastic two part wheels or resin 3 part wheels depending how the modeller want to approach this. The main gear units have two part leg, retraction strut an wheels. There are plastic two part wheels + a photo etch part, or resin 3 part wheels + a photo etch part depending how the modeller want to approach this Given the good looking resin units it would be a shame not to use them. The vertical tail is added next along with the horizontal flying surfaces which attach at its top. The rear tailcone is then added under the vertical fin. This is followed by attaching both engines. There are some PE parts to add to the fuselage at this point also. The distinctive hinges for the Fowler Flaps are added along with the undercarriage. The last thing to be added is a fully detailed plastic and PE air stair for the aircraft. Markings The decal sheet allows for 4 Canadian aircraft, and one Luftwaffe to be built. Also included are mask for the Canadian aircraft with D-Day stripes. Canadair CC-144B (601/CL600-2A12) Nova Scotia, May 14, 2015. Canadair CC-144B (601/CL600-2A12) England, August 12, 2011. Canadair CC-144B (601/CL600-2A12) Ontario, July 15, 2015 (Codes on the Nacelles). Canadair CC-144B (601/CL600-2A12) France May 16, 2014. Canadair CC-144B Luftwaffe 600-2A12, Quebec, May 25, 2001. Conclusion This is a the first kit I have seen from BPK and its a good one. They make the best use of the various material to bring you a great looking kit. Highly recommended, in addition if you don't fancy the Military VIP version BPK inform us a civilian version is on its way.. Review sample courtesy of
-
Hi, this is the combination of Tamiya's Challenger one tank and a couple of figures from Accurate armour, depicting a scene where a crew man is having his photo taken along side his ride. Sun newspaper is from the web, scaled down and printed out. Sand is vallejo sand texture. The drying washing is tissue paper soaked in dyed white glue. [/url]
- 5 replies
-
- 15
-
-
- Tamiya
- challenger
- (and 1 more)
-
Hi, my name is Bernd and i have a Britmodeller account since yesterday active, so here is my first AFV on this forum. Revells Challenger is a very nice kit to build, fit is good and no real problems, except mine were discovered. The “baskets” around the turret were replaced with photo etched parts from Extra Tech. Here comes the injected plastic moulding technique to its end. That was VERY fiddly, it didn t help, that the assembled turret falls out of my hand during detailing, this was a moment the heart stands still for a second. The front baskets suffered a highly visible dent, so we have combat damage:-) The tracks are built from the usual single links/length tracks systhem. It is always exciting to close them, and see they get together (works not every time) The green was sprayed on, the black paint was hand brushed with thin layers of black, a dark wash a lot of dry brushing followed on. A major set back were the decals, the “SFOR” markings were black, should be white,i didn t find Royal Army markings, so the side skirts were sprayed with a lot of dirt/n/mud making the missing markings nearly invisible(hope so). Is there a decal producer outthere, who makes British Army stuff?? I hope you like it. Bernd
- 31 replies
-
- 19
-
-
- Challenger
- tank
- (and 4 more)
-
The U.K's Main Battle Tank: Challenger 2 From service in 2003 (Operation Telic) An Operation in Iraq which featured a host of Challenger 2 Tanks and there Added armour and skirting. I mixed up my interpretation of British Desert Yellow using Revell aqua :16 sandy yellow + Matt white and brown. I picked up the Trumpeter version relatively cheaply and after reading other peoples opinions and reviews of this kit i have to say i did not find the kit bad at all. With some added details, mainly stowage and tarp, i think this is a good example of a reasonable kit, of course for the full monty Tamiya's version plus all the after market parts will make a very accurate and show stopping example...but with that comes a hefty price tag of £60-£90. And i intend to make one at some stage... till then i have this to stare at I put this version together for £15 plus bits from my spares box. Sam
- 5 replies
-
- 7
-
-
- 1/35 British Challenger 2
- Challenger
- (and 3 more)
-
Morning All, After a lapse of nearly 15 years, I have started to build Tamiya’s Challenger 1 mk3 tank – Kids (reason I stopped modelling plus a few other things) gave it to me for Christmas (Cannot believe how expensive kits have got in that time £45+ for a dragon kit !), Anyway onto my question; what colour are those dam optics in the cupola and forward sights. Have been searching the net to find close up shots of a real challenger cupola and not found much, found loads of shots of models and the majority seem to be gloss black, a few green, a few red, a few blue and a few mixed of red and blue. Some painted some suing foil. A got hold of modelling the challenger 1 and 2 book by osprey and even in their there are differences (but between MK1 and MK2 tanks). Currently have them painted clear red over clear blue of silver. I may have got myself ‘hung up’ up on this, so please can someone restore my sanity and sleep J P.S what a fantastic site this is.

(2).thumb.png.74c5a7b8b16cee2d2508bf6a1f088cfc.png)


