Search the Community
Showing results for tags 'CAC'.
Found 13 results
-
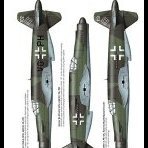
I have multiple builds under way, so that's perfect timing for starting another one! This time I'm attempting my first resin cast model, the Croco CA-11 Woomera. Southern Sky Models in Perth, Australia commissioned a run of 100 kits from Croco, and they have all sold out. Custom decals were produced for Southern Sky by DEKL'S. Here's the box: The decals feature two different schemes for the first production aircraft, A23-1 and I'll be building the overall foliage green version, as it does not require any masking (apart from the transparencies)! While this is a cast resin kit, it is very complete, with all parts needed to create the model... engines, propellers, seats, guns and cockpit controls. I may swap out the engines and props, but haven't decided yet. The main undercarriage legs have steel inserts for extra strength, a very nice touch. Here's what comes in the box: The wing comes in 3 parts, with a curious method of attaching the engine nacelles. The outer wings must be glued on to the outboard ends of thin plates which extend through the engine nacelles. This gives the correct dihedral angle for the outer wings, but until the nacelles are in place, this thin section is very flexible. The dihedral is not correct on the centre section, so I made some cuts in the upper surface where it passes through the fuselage, allowing me to slightly bend the part before epoxying it into the correct angle. Here are the components of the wing: The thin flat sections which pass through the engine nacelles were also quite twisted, so I clamped them very heavily while gluing on the outer wing sections: This resulted in the full wing, which then needed a lot of attention to allow the engine nacelles to fit properly: The engine nacelles are not intended to be "handed", but through some test fitting it appeared that each part fitted into one side or the other slightly better, so I labelled each side so that I didn't get them mixed up! As-molded there was no way the nacelles would fit onto the wings, so I sanded away sections of the wing upper surface until the upper halves of the nacelles fitted nicely into place. Below you can see the upper nacelles dry-fitted in place. I need to do more work on the wings (trimming and scribing) before finally gluing them in place. The engine nacelles also need some prep work, including fitting the rear gun turrets which will be attached from inside the engine nacelles. I also have to add some detail to the wheel wells at the aft end of the engine nacelles before joining the lower and upper halves. It's been fun so far, and gluing everything with epoxy makes for a slow but carefully planned build!
-
There was only ever one rocket-armed Wirraway. A little history... In 1949 the front-line fighter of the RAAF was the Mustang, and the first Vampires were starting to arrive (the RAAF's first jet fighter). Advanced training and refresher training for fighter pilots was being carried out using CAC Wirraway aircraft, but the Wirraways were not able to train pilots in the full syllabus required by fighter pilots, since they were not fitted with gyro-stabilised gun-sights and they could not carry rocket armament. So in December of 1949 the RAAF Director of Technical Services wrote to RAAF Headquarters on behalf of the Air Member for Technical Services with a request to enable a full syllabus of training to be carried out with Wirraway aircraft by fitting the following items: An AN-N6 Cine Camera Gun (as an alternative to the G.45 gun cameras already fitted); A Gyro Gun Sight (Mark 2D Series 2 or 3) in lieu of the Reflector Sight installed by Wirraway Order No. 134 (offset to the left to enable the instructor in the rear seat to have an unobstructed view when using the Aldis sight); Rocket pods (zero length rails) to enable the carriage of 6 rockets (3 under each mainplane) in such a manner as they do not interfere with bombing and gunnery installations; and Provide remote controls in the rear cockpit for the operation of the VHF set installed by Wirraway Order No. 173 (which only specified operation from the front seat). It was requested that the Air Armament School (AAS) at East Sale be instructed to carry out a prototype installation, and that Technical Services officers would visit if assistance was needed. This was seen as an urgent training requirement, and the AAS prototyping was requested as soon as possible. The Mark 2D Gyro Gun Sight and the AN-N6 Camera were both designed for 24V operation, requiring voltage boosters to enable them to be operated from the Wirraway’s 12V electrical system. Tests were required to determine if the power from the Wirraway’s engine-driven generator would be sufficient for these extra items and their voltage boosters. The requirement that the RP installation should not interfere with the existing bombing and gunnery installations was ambiguous, as it did not specify if the aircraft should carry under-wing gun packs (which were already fitted to all Wirraways at this time) and RP rails at the same time, or if the gun packs could be swapped for RP rails. The prototype installation carried out at AAS followed the second of these interpretations. Records show that Wirraway A20-729 was used for a mock-up installation and A20-723 was modified for the full installation and flight trials. The first flight with the new equipment fitted was carried out on 20 July 1950 at East Sale. The first rocket firing was carried out during a flight on 24 July. Further successful firing tests were carried out in July. But the program was discontinued and no other Wirraways were fitted with this capability. I've uncovered a sketch of the proposed rocket installation by the AAS, but I've never come across photos of the aircraft or the trials. So I'm basing this build on "educated speculation". So I'm planning to model A20-723 fitted with six RP-3 rockets on zero-length rails, a gyro-stabilised gun-sight and an AN-N6 gun camera on the wing centre-section. To duplicate this aircraft, I'll need a Wirraway kit, and ideally some rockets plus a gyro-stabilised gun-sight. The Wirraway will be the 1/72 Special Hobby kit (in all its flawed glory). Looking at my stash, the gun-sight and zero-length rails will come from a Tamiya F-51 kit and the RP-3 rockets will come from a Valom Bristol Buckmaster (why do I have two of those in my stash???). Here's where the fun will begin: First up is to construct the fuselage frame and detail the cockpits. Here are a couple of photos of the start of this process, alongside a scratch-built fuselage frame I've made for an MPM Wirraway I'm also building. Important to note that we must ignore the kit instructions here... Wirraways were all silver inside, no C364 "interior green" at all. None. Everything was silver, except black instrument panels, black electrical panels, and various red and yellow highlights for controls. No "interior green". And another view showing the instrument panels. You can see that the framework tubes are fairly chunky and SH have not replicated the framework too well. Several extra tubes have been added, and some real tubes are missing. Plus the foot-troughs should be discontinuous, not one long trough as the kit provides. But I'm living with it for this model... definitely changing it for my 1/48 and 1/32 builds... Edit: Note that there are two radio sets under the rear instrument panel (R.1082 and T.1083) - these were no longer in use by the 1950s, so I've removed them from the model.
- 36 replies
-
- 14
-

-
- CAC
- Special Hobby
- (and 1 more)
-
 Another Wirraway project I have on the go is the MPM Models 1/72 kit, which I'm planning to build as the legendary A20-502, known affectionately (and ironically) as "The Rocket". This aircraft served with No. 5 Squadron in Queensland and New Guinea, racking up an enormous number of sorties over its long life. To quote the West Australian newspaper, Friday 20th April 1945: ANCIENT WIRRAWAY. Achievements of the Rocket. MELBOURNE, April 19.-Now operating with an RAAF Army co-operation squadron in the Solomons is an Australian-designed and built Wirraway which is claimed to be the oldest single-engined aircraft flying in operations in the South-West Pacific area. Known as the Rocket, this Wlrraway, which began its career with an RAAF Army co-operation squadron on March 10, 1942, has completed 953 sorties and flown almost 1100 hours. It has out-lived four engines. Last month, when the Wirraway celebrated is third birthday, Flying Officer Ted Reynolds, of West Maitland, NSW, flew it on a tactical reconnaissance over Japanese positions at Bougainville Island. The Wirraway has dropped smoke bombs as target markers for Corsair fighter-bombers of the RNZAF. While the New Zealanders' dropped their 1,000lb bombs on Japanese positions it flew low over the target to observe the results. It has pinpointed numerous targets for the AMF. It has flown so low that once a pilot was able to signal base that a wounded Japanese had blood trickling down a leg. Other important jobs it has carried out include the re-charting of maps of Bougainville Island. On survey work it has flown on steady photo reconnaissance flights. It has acted as mail and supply dropper to front line troops. In artillery reconnaissances it has been shaken by mortar fire whilst flying above the barrage. It has dive-bombed targets inaccesible to high-speed bombers, and fighter-bombers. Now in its fourth year of Army co-operation work, the Wirraway is under the care of Flt-Lt F. T. Binns, of Sydney, NSW, an engineer officer. "The fact that the Rocket has never had a major misfortune is not the least of its claims to fame." he said. "The nearest it has come to disaster is wing tips damaged in ground loops." Flt-Lt Binns considers the Wirraway the ideal aircraft for Army co-operation work, because of its handling qualities and complete lack of vices. Wirraways are doing particularly fine work in the present campaigns, giving splendid co-operation to the AMF. The aircraft ended its life during a particularly exuberant New-Year's eve party in January 1946, when it was burned on a bonfire together with a CAC Boomerang! Sadly, the aircraft had been approved for preservation in the Australian War Memorial in Canberra due to its longevity and high public profile, but the signal from RAAF headquarters arrived at the squadron after the deed had been done! My plan is to model this aircraft as it appeared in May 1944 when used in some supply dropping tests at Mareeba, Queensland. It was fitted with rectangular supply canisters (different to the later cylindrical "Storepedo" designs used in New Guinea) plus a message pick-up hook. Luckily I have a copy of the factory drawings of the message hook, so I'll be able to replicate that nicely. The aircraft was finished in the standard camouflage scheme of Foliage Green / Earth Brown and Sky undersides. Here's a couple of images of what the aircraft looked like. Below you can see a supply canister being loaded under the port wing: Below you can just make out the message pick-up hook under the fuselage centre-line: Loading the experimental stores canisters... lots of wear around the engine cowl... And finally a later image with the aircraft overall Foliage Green and white empennage, taken on Bougainville around April 1945. If you look carefully, you can see 3 aerial wires leading from the top of the antenna mast - one to the top of the rudder (as usual) and one to each wing-tip (not usual!): So what are we starting with in the MPM Models kit? Well, it's pretty basic. Large gates on the moldings, honking ejector pin marks and annoying flash along the parting lines. Minimal cockpit and zero wheel-well detail... The propeller is very basic, and the engine is the figment of some tool-maker's imagination! The fuselage side panels bulge out (which they should not do) and some of the surface details on the wing panels is fictional, but at least I know what I'm working with. First step after cleaning up the moldings was to add some basic internal detail to the insides of the fuselage side-panels, representing the aluminium extrusions and pressed formers over which the fabric was attached. These panels were removable on the real aircraft, making maintenance of the hydraulics, the engine control push-rods and elevator/rudder cables very simple. More coming...
- 17 replies
-
- 11
-
-
- CAC
- MPM Models
- (and 1 more)
-
 CAC CA-19 Boomerang 'Jungle Scouts' 1:72 Special Hobby (72426) The Boomerang was a WWII fighter designed and made in Australia by the Commonwealth Aircraft Corporation (CAC). The design stemmed from the CAC Wirraway, this was a licence built North American NA-16 (more commonly known as the Harvard). Australia had realised in the 1930s that Japan had expansionist ideas and would need its own aircraft industry. this is one reason North American were approached to licence build the Wirraway. After WWII broke out and with the traditional supply of aircraft from the UK in short supply CAC looked at producing their own domestic fighter. Key to this was the recruitment of Fred David a Jewish refugee from Austria who was actually interned at the time. He had worked for Heinkel, and Mitsubishi on aircraft design. CAC had also negotiated that the licence for the NA-16 allowed for them to modify the design. The Boomerang would utilise the wing, tail, centre section and undercarriage of the Wirraway. A new forward fuselage was developed which was wider to accommodate the larger Twin Wasp engine along with a single cockpit. The armament for the new aircraft was to be two 20mm cannon and 4 .303 machine guns. Production was authorised almost immediately as it would provide insurance against a delay to an order of P-40 aircraft and it would keep the production lines open at CAC. The availability of Wirraway components would also speed up production. From design to first production was a staggering 3 months. The aircraft was tested initially against a Brewster Buffalo which was slightly modified to resemble a zero in performance, in addition to testing against a P-40. It was found to be faster though less manoeuvrable than the other aircraft, but it had far better armament, and Armor for protection of the pilot. Performance though rapidly dropped off over 15000 feet. However the maximum speed was only 265 knots well below that of Zero and Oscar. Deployment of American fighters to Australia lowered the need for the Boomerang, however due to the cancellation of the Woomera bomber the Government extend production of the Boomerang. In total 250 aircraft were built and operated by 7 Squadrons of the Royal Australian Air Force. The Boomerang would see combat initially in the air defence role. There are no records of any Boomerang air-2-air kills. Later in the war the aircraft was used in the ground attack role. Properties such as the manoeuvrability, low speed, and toughness made it suitable to this role. Extensive armour plating was fitted to the airframe to protect it in this role. In what we would now recognise as the FAC role Boomerangs would often mark targets low down with smoke bombs in order that larger aircraft could attack from a safer distance. After the war some aircraft operated in the Air Sea Rescue role. Three aircraft survive today in flying condition with others in museums and one on exhibition at the Australian War Memorial. The Kit The kit is a re-issue from Special Hobby and dates back to 2011, with a re-issue on 2012. The kit is on a single sprue of grey plastic, a clear sprue, a set resin wheels, an a resin exhaust. The parts are typical of the shorter run ejection kits. Construction starts where else but in the cockpit. First up the cockpit can then be assembled. This is a steel framed affair. There are two side frames which attach to the floor, a forward bulkhead is attached along with the rear one containing the armour. The instrument panel is then added. The seat is next along with the rudder pedals. The last item to be added in is the control column and linkages. The engine is nest with the rear bank of cylinders being moulded to the bulkhead and the front set going on. The complete cockpit/engine section is then placed into the fuselage and it can be closed up. Next up the wings are assembled with the rear well bulkhead going in before they are closed up. The main wing and tailplanes are added, the landing with it's resin wheels can then go in. The gear doors are added along with the belly tank and tail wheel. To finish off the canopy and aerial are added along with the gun barrels, exhaust and pitot tube. The last item to be assembled and added is the propeller. Decals Decals are from Eduard and include an amendment with correct colour codes. and should pose no issues, markings are provided for 3 examples; A46-217 / QE-G “Hep Cat” Flt Lt Burghard, RAAF No.4 Sqn Cape Hoskins 1945 A46-222 / BF-K “Glamour Flt Lt Curtis Girl” RAAF No.5 Sqn, Bougainville 1945 A46-209 / QE-J “Bachelor's Son” RAAF No.4 Sqn Labuan, 1945 Conclusion This is a welcome re-release from Special Hobby of an important aircraft for the RAAF. It is not a shake and bake kit however I would recommend it. Review sample courtesy of
 -
Second one for the year. The fuselage, cockpit tub and intake fit are a bit of a challenge but once together it makes for a very nice example of this variant of the venerable Sabre. This one is depicted as A94-946 or the Royal Australian Air Force Aircraft Research and Development Unit / ARDU. This aircraft albeit in an updated scheme was used for the Sidewinder trials. Finished in Tamiya's AS12 rattle can silver decanted into my airbrush. The dayglo red was a home brew based on period photos and video. Decals are a combination of the kit, spares box, Model Alliance RAAF Sabre sheet and the High Planes Models Canberra. Pictures of the real deal are courtesy of Roger Lambert from the John Hopton Collection. A big thanks also to Graeme Harris for his solution to making the vent on the spine. Overall a nice addition to the cabinet. Cheers, AGW..
- 22 replies
-
- 24
-
-
Hi all, Another from the paint shop. I'm not so proud of this one as I had a few issues along the way, particularly with the Humbrol red ;). She is a Fujimi F-86F converted to a CAC Sabre using a Tasman set. However, I wanted to retain more detail than the Tasman set offers and also feature open speed brakes. So I set about blending the two, essentially inserting the Tasman lower nose in to the Fujimi and then inserting the NACA vents from the Tasman also. It isn't entirely accurate but I got to the stage that I just wanted her done. The biggest disaster was when I used some setting agent for the decals on the dayglo. Foolishly I didn't gloss coat as the panels were already pretty shiny. The result was a number of "stains" that I couldn't remove. Anyway, that's it and here she is. The detail: She represents "A94-946", operated by the ARDU from Laverton for sidewinder trials. Kit - Fujimi F-86F "Mig Killer" (you could use a "SkyBlazers" offering) Conversion - Tasman Cockpit - Pavla Decals - Model Alliance (72125) Paints - Humbrol 191 and Humbrol 209 (with white and yellow undercoats). I hope you like her. M
- 33 replies
-
- 47
-
-
Building Brick’s Sabre in 1/32 Scale KLP Publishing Online publishing is now starting to find its way into the modelling community with a few new & existing publishers. KLP Publishing is one of the new online publishers, specialising in eBooks for the scale aircraft modelling community. Their debut title is, Building Brick’s Sabre in 1/32 Scale: A Scale Tribute to K.J. "Brick" Bricknell. Written by master modeller Eric Galliers, this 104-page digital book shows you how he built his award-winning 1/32 scale model of K.J. “Brick” Bricknell’s CAC Sabre. There is currently no available conversion for the CAC Sabre in 1.32 so this is old fashioned scratch building work brought to us in the latest digital format. The book also includes anecdotes from Brick himself, from his time flying the CAC Sabre with the RAAF. One of the great aspects of digital publishing is the inclusion of 37 walkaround images. Conclusion This is the type of publication that the new digital format will embrace. The subject is not main stream enough for a traditional publication, but should generate enough interest for the company. This is a book written by modeller for modeller and it shows. The text is clear and concise and the pictures crisp. The additional history and words from the pilot really do add to the story of the aircraft. Highly recommended. Review sample courtesy of
-
CAC CA-9 Wirraway 1:48 Special Hobby The CAC Wirraway was a trainer aircraft developed by the Australian Commonwealth Aircraft Company. It was based on the North American NA-16, a design which was itself developed into the T-6 Texan. CAC altered the basic design of the NA-16 by adding a second forward firing machine gun and strengthening the wings to enable the aircraft to perform dive bombing missions. A total of 755 Wirraways were built by the time production ended and the design also served as the basis for the Boomerang emergency fighter. Aside from fulfilling its role as a trainer aircraft, the Wirraway was also pressed into service as a stop-gap fighter and ground-attack aircraft during the early phases of engagement between Japanese and Australian forces. The type's only air combat victory occurred in January 1942, when Pilot Officer J.S. Archer dived on a Zero flying below him and shot it down. The Kit This is a re-release of the 2009 kit form Special Hobby. There are two sprues of short run plastic, a bag of resin parts, clear sprue, small sheet of photo-etch; and instrument panel film. Construction starts with the cockpit, The instrument panel s built up from plastic and PE parts with the film for the instruments being sandwiched in between. The PE seatbelts are then added to the seats. The cockpit is built up from the tubular side parts and the base. Mounts for the seats are added then the seats themselves. Other cockpit parts and framing bars are also added. Once complete this can be mounted inside the fuselage halves and the lower fuselage parts can be added. The engine mount can be added at the front and the front coaming with the machine guns can be added to the top front fuselage. Once the main fuselage is complete the wings can be added. These are a conventional single lower wing with upper left & right wings to add. The wheel wells must be added in before the wings are closed up. The resin engine is added to the front an the engine cowls closed up around it. The tail planes can now be added. The main and tail wheels and their mounting legs are added along with the undercarriage doors. The underside air filter is also added. To finish up the pitot tube, antenna mast, landing lights, propeller and canopy are added. Decals Decals are from Aviprint and should pose no problems. Markings are provided for 3 examples; A20-444/ NV-J, 23 Sqn RAAF, Lowood AFB, Queensland 1943. A20-496 / TM, 23 Sqn RAAF, Lowood AFB, Queensland 1943. A20-572 / QE-H, 4 Sqn RAAF, Port Moresby, New Guinea 1942-43. Conclusion It is good to see this kit of an important Australian type re-released. Recommended. Review sample courtesy of
-
CAC Boomerang A-46-228 1/72 & 1/48 Red Roo Models A46-228, BF-M "Miss Albany" had a fairly short life with the RAAF. Through the factory via depots it arrived at 5 Sqn RAAF on 11th May 1945. It was then scheduled in November that year for limited spares removal, which became final with a full authorisation in January 1946. The aircraft was finished in overall Foliage Green with white tail surfaces, and leading edges. Conclusion This is a great little sheet for decals of a specific Boomerang in late war RAAF colours. Recommended. 1/48 1/72 Review sample courtesy of
-
Hi all, Is there anyone out there who can confirm with certainty whether this aircraft flew with dayglo red or dayglo orange panels? The decal references say to use Humbrol 205 but I'm not convinced... yet. Any thoughts, help, guidance really welcomed!!! Thanks. Martin
-
Hi Britmodeller Mates, Another model started while waiting for the bits for the Vampire to arrive. Some parts painted. It is now ready for the fuselage halves to be joined. Closeup of cockpit. It looks pretty good considering I have had the instrument panel in and out many times the control column is now not sitting in the right place and the seat is too high. The instructions are not Airfix, I am pleased with it so far. Thanks for looking. Stephen
-
The CAC Boomerang, a Detailed Guide Valiant Wings Airframe Album The CAC (Commonwealth Aircraft Corporation) Boomerang has the distinction of being the first combat aircraft designed and manufactured in Australia. Historically at the Start of WWII Australia relied on British manufactured Aircraft, and to a lesser degree some USAAF supplied aircraft. CAC examined the possibility of designing and manufacturing their own fighter, this was a fairly big challenge as only two aircraft were in production at the time locally, the Bristol Beaufort and the CAC Wirraway which was based on the North American Harvard. CAC recruited Fred David who had worked for Heinkel in pre war Germany as well as Mitsubishi & Aichi in Japan. Technically he was an interned enemy alien but this seems to have been overlooked due to his excellent technical knowledge. Authorisation to proceed was given in December 1941, and when presented to the Australian Government it was quickly accepted. Given the speed of manufacture no real prototypes were even produced. The first aircraft was flown in May 1942. The type went operational with the OTU in October 1942, and with the first operational squadron (no 84) in March 1943. This time frame may seem very quick but at this time there was a great threat of invasion looming from the Japanese, this must have given great impetus to all involved. Once the RAAF received faster types from the RAF & USAAF the Boomerang would go onto to become an excellent Army Co-operation aircraft, what we would now call ground attack. In all 250 aircraft were built. Written by Richard A. Franks, this book has been designed as a useful guide for all those modellers who have an interest in this fighter, aside from the modelleing information it provides a look at a period in the aviation history of Austrailia not widely mentioned. The clearly defined sections cover pretty much every aspect of the Boomerangs history. The sections include:- Chapters Technical Description -This is an extensive selection of images and diagrams, this section includes; Fuselage (Cockpit interior, canopy, Main & Aft fuselage, fuel, hydraulics, oil & oxygen systems. Undercarriage (Main, Tail Wheel & Brake system) Tail (Tailplanes, Vertical Fin & Rudder) Wings (Wings & Undercarriage Bays) Engine (Engine, Cowling, Exhaust & Propeller) Weapons & Drop Tanks (Armament, Ordnance & Sighting) Electrical Equipment (Radio & Misc Electrical) Misc (Access panels & Misc Equipment) Evolution - A full look at the evolution of the Boomerang. Camouflage and Markings - A comprensive look at this subject including colour profiles Survivors - A look at those aircraft still with us. The Alley Cat 1:32 Boomerang - a look at the the new 1:32 Kit from Alley Cat. Appendices Boomerang Kit List - All scales Boomerang Accessory List - All scales Boomerang Decal List - All scales Serial numbers - A list of ALL Boomerangs built Bibliography Conclusion There can be no doubt when reading this book that a lot of time and research has been done to provide such a detailed study of this aircraft, its design, building and use. Rarely for me have I read a title cover to cover instead of skimming through it like some reference books. Since researching for this review it has been brought to my attention that whilst Richard Hourigan is mentioned as a contributor, and actually provided a lot of information to the author, he wasnt able to proof read the final draft. Apparently there are a number of typos, factual errors and incorrect colour profiles, which have been pointed out by Mr Hourigan who actually owns a Boomerang, so should know what hes talking about. It has also been stated that the selection of photographs are excellent and most of the colour profiles are correct. Therefore, if you are interested in the Boomerang, Australian Aircraft History, Pacific Theatre Operations; or even just something different then I can happily recommend this book. Review sample courtesy of To purchase the Alley Cat Kit mentioned in book follow this link
- 1 reply
-
- 1
-
-
- Valiant Wings
- CAC
- (and 2 more)
-
Commonwealth Aircraft Corporation (CAC) Wirraway. Pics thanks to Daniel Cox. Daniel would like to point out that since this aircraft is a flying "warbird" not all of its details are prototypical to how it was when manufactured during the Second World War. All images are Copyright ©2012 Daniel Cox and are only allowed for usage by Britmodeller for information purposes and are not allowed to be used for any marketing/advertising or other purposes without written permission from him.