Search the Community
Showing results for tags 'Bronco'.
-
Hallo again Now I started a new field. Tank and trucks from WW2. Most of them German and Russian. Moderns will be from the IDF. It is a totally different approach in opposition to aircraft modelling, which I do for 3 decades already. I want to show this models, as new from the workshop. Not battle used. Just minor weathering. Happy modelling
-
 Good morning (or whatever) and happy new year all, here I am with another attempt at a Work in Progress... emphasis on progress. No, emphasis on "attempt"! It is, in case you haven't already figured it out, the Bronco 1/35 Piper L-4 Cub (aka Grasshopper). A friend of mine recently purchased an actual (1:1 scale) Piper Cub, and enlisted me to help him truck it to its new home in Maine. You see, in a former life, I went to school to get my aircraft mechanic's license, and had some involvement in "real" airplanes. (He went to school to become a professional pilot, which he is. So my job is to protect the airplane from him 😉 !) Should I proceed, I might include "work in progress" on that one, too- it is a lovely airframe that has been sitting in a hangar for a while, and we (or rather he) got it sans engine and prop. Now, to introduce a bit of schizophrenia, this Cub was built in February 1945 as an L-4J (45-4635), promptly moved to New York, boarded a freighter, and sailed off to adventure in Europe. I'm in the process of decoding the individual aircraft record card, but according to Joe Baugher's website, she was assigned to 9th Air Force, and was damaged in a taxiing accident in Germany in late May. She was sold surplus while still in Germany, then came back to the states and was "civilianized" in 1946. I believe that she's looked like a perfectly typical* civilian J-3 Cub ever since. (We're keeping her that way at present, but if/when the time comes to re-cover, I'm sure we'll be tempted to go back to L-4 configuration.) * One exception to "typical Cub"- the L-4J differed from the H in being equipped with a Beech-Roby variable pitch propeller. Supposedly, these were quickly switched to the usual fixed-pitch wood prop in service, but this one had one fitted in early civilian life, so perhaps retained it in the Army. I have found some photos of L-4Js postwar still wearing the Beech-Roby, so this is something I'm rather curious about. "It's only a model." (Shh!) [Pull the wings, put it in a truck, bring it home. It sounded pretty simple at the time...] So, that's the backstory. What about the model? Well, 2019 was a VERY dry year for me, even by my own standards. I bought some pretty nifty kits, but did hardly anything in terms of actually messing with plastic bits. As for this one, I'd been in a "trainer" group build sometime in the last few years, and was planning to build a 1/48 (or 1/50) L-4 that I'd logged some flight instruction hours in. The Cub is spectacularly ill-served when it comes to plastic models. Heller's L-4 isn't really 1/48, and is a pretty lousy kit. Hobbycraft's J-3 is more 48th-ish, and is perhaps a somewhat better kit, but has its own peculiarities, such as all-clear fuselage. It also doesn't lend itself to being an L-4. So I bought the Bronco kit from a local modelling buddy, eagerly took a look, and was underwhelmed. First of all, I'm REALLY not into 1/35 and the non-flying stuff that it implies (though I admit I have one or two trucks and such just because they're kinda nifty). A quick comparison to Revell's 1/32 Super Cub (now THAT'S a pretty good kit) shows that, yes, size DOES matter- and if you think about it, there's about a 10% difference between the two scales. So, the L-4 languished on the stacks, and I even put a price tag on it at a couple of contests where we had a sell-table. Having gotten sucked into the real Cub project, I took another look at the Bronco kit- and again was, if not frightened off, at least discouraged. But I decided that it was now or never, and with the start of a new year, what better time to make a go of it. So when I got up ridiculously early this morning, I resolved to start off right, by actually doing some work on a model. Having looked at the instructions, I thought I'd start with the cylinders. They're each split into two, with a separate rocker-box cover. And what do I find when I look at the cylinders on the sprue? (sorry about the fuzzy image: ) Yep, a molding ejector pin (?) right on EVERY face that is supposed to mate to its 'better half'. Oh bother. Too early to fire up the Dremel to obliterate those, though I did snip off what the cutters could reach, as a start. Resisting the impulse to once again set the kit aside, I thought, "Right then, I can glue the two crankcase halves together." Reaching for the Tamiya Extra-Thin, I... Hmm, where the heck is it? Not on the bench where it usually is. Not in the traveling tool kit I use for build-nights with the local club. Not on the stairs coming up to "my" upstairs headquarters. Where else could I have left it? Not over there in the "catchall corner"... After going back and forth searching the suspect areas repeatedly, feeling ever more futile and still thinking what else I might have done with it, I finally found it hiding on the steps amongst the (small) clutter. I have now glued the crankcase together! So, does this mean that it is going to be that kind of year? Or does the fact that I kept going and finally achieved ONE immediate objective, despite the obstacles, imply that there's hope? I guess we'll have to wait and see... By the way, what I'm thinking with this build is to show what our Cub might have looked like in Spring 1945, but also (approximately) reflecting the details that she now has or soon will (seats, instrument panel, etc). In other words, kind of a teaser for how this airframe would look as a (future) current Warbird, rather than trying to precisely replicate its 1945 appearance. Both of us being modellers, we'd try to be faithful (no "gloss olive drab"!), but since the intent of this venture is to have a Cub to enjoy, we also wouldn't get so fussy that it got in the way of utility. Wishing all of us, and especially the world at large, a far better new year, bob
 -
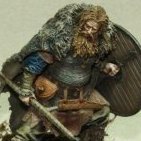
 Don't expect me to pronounce that correctly ... It is one of these ... a German gun on a French (Hotchkiss) chassis. The Germans made about 24 of these and lost them all in the Falaise Pocket. There is a film of Rommel inspecting a group of these here: Note: That film shows various H-39 chassis with three different guns. I think the crews in this movie are wearing Sumpfmuster 44 camouflage tops. Wish I knew, how to reproduce that?
 -
My set was second hand and missing the RAF Leading Aircraft Woman, here are the other three. DSC_0012 by Richard Linnell, on Flickr DSC_0013 by Richard Linnell, on Flickr All the figures seem to be based on the ones published in The ARMED FORCES of WORLD WAR II Uniforms, insignia and organisation, ISBN 0-85613-296-9 Officer, US Women’s Army Corps, 1944 DSC_0014 by Richard Linnell, on Flickr DSC_0015 by Richard Linnell, on Flickr Lieutenant Junior Grade, US Women’s Auxiliary Volunteer Service, 1942 DSC_0016 by Richard Linnell, on Flickr DSC_0017 by Richard Linnell, on Flickr Lance-Corporal, British ATS, 1940 DSC_0018 by Richard Linnell, on Flickr DSC_0019 by Richard Linnell, on Flickr
-
Evening all. With my efforts to complete the on bench projects, I think I can call this one done. Just a small thing started to break up the painting monotony on the several AFV's to finish. Quick build, and paint job, so a nice one to do. One last thing to do, after I studied the images is a light dust coat on the stowage to blend it all together. Couldn't be bothered to dirty the AB tonight, so will lave to wait until I set up a paint session in a week or so. So here she is.
- 13 replies
-
- 20
-

-
A little something I threw together watching the Cricket World Cup the last two weeks. This is Bronco's 1/35 40mm Bofors gun. It's a good kit, well detailed and fitting but with some frustrating points. Some sections are over complicated with detail included that cannot be seen once completed or photo etch that could have been included as molded on detail with a loss of detail. Also make sure you read ahead in the instructions as parts often need to fit into others in steps down the road, if you mess up the alignment you will have trouble down the road. It would also be nice if Bronco included some extra smaller parts as they are easy to lose. It's finished with Gunze Olive drab and weathered with MiG pigments dry mud and European dust.
-
Afternoon all Managed some time this week, and decided on a change from all the projects......to start a new one.. Came across this on Ebay for a tenner with shipping, so couldn't resist. A standard 1936 saloon by Opel pressed into service and on the run in '45. Built some field applied luggage rack for the rear and roof rack. The kit overall for the price wasn't bad, but the wheels/tires with....get this 8, yes 8 parts were a little excessive just to get some tread detail. The front wheel connections to are something to be desired and unless you have Tamiya/Dragon mould skills; they should have gone for different set up..too many parts to achieve very little...........but overall, not a bad little kit. Here's where she stands at present. I think primer on the body, chassis and sub components. Just need to get some weld lines on the strap steel struts to the main body and some on the main connections of the roof rack...... Catch you all soon.......
-
I believe that this was Bronco’s second issue of an A13, and as such, it had the individual track links which were a whole lot better than the original (too short) rubber band offerings. I never did get around to correcting the engine deck, but I will with the two others that I’ve got in the stash. All in all, it’s quite a nice kit to build with not too many surprises. I finished it as a tank of the 10th Hussars, based in France in 1940. As far as I can remember, it was built OOTB and finished with Tamiya paints in a G3/G4 greens camouflage. The figure is from Hornet. Thanks for looking. John.
-
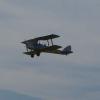
OV-10A Bronco 1:72 Revell The Bronco was conceived as a light attack, long loiter aircraft of modest size, enabling it to operate from roads close to the combat zone. As so often seems the case, the final design turned out to be much larger and heavier due to the requirements of the avionics and ejection seats, thus limiting its use to conventional airfields. The twin boom aircraft first flew in 1965 and was destined to serve with the US Navy, Airforce and Marines as a replacement for the Cessna O-1 & O-2. The Marines were the first to take the OV-10 into service as a forward air controller operating in both night and day missions. Whilst the Bronco is best known for its operations in Vietnam, it also served in later conflicts as late on as the Gulf war before being retired in 1995. The USAF received Broncos in 1968 and deployed the aircraft in the forward air control role, using smoke laying methods as well as later using laser target designators. Eventually it carried its own ground attack armament including rockets, machine guns and bombs. Seven export contracts were signed, including Germany, Columbia and Indonesia. Eagle eyed readers will no doubt have already spotted that this is not (thankfully) the original Revell kit from the 1970s. It's the much more modern Academy kit, originally released in 1999 and now repackaged in one of Revell's familiar large-but-flimsy boxvelopes. The kit features clean, crisp mouldings, fully engraved surface details and a respectable level of detail. All together there are 115 parts spread across four frames of grey plastic and a single frame of clear plastic. Two decal options are included. Assembly begins with the tandem cockpit. The seats are not brilliant compared with the most modern kits, but they could easily be swapped out for aftermarket items or jazzed up with some photo etched harnesses. Remaining details include the pilot's control column and instrument panels. Decals are provided for the instrument panels. Once complete, the crew compartment can be sealed up inside the fuselage pod. The nose cone is moulded separately and Revell recommend 8 grams of weight. This seems a little conservative for what looks to be a natural tail-sitter, so I'd be tempted to cram in a bit more. The slab-like wing is next, and it contains no surprises such as separate ailerons. Each of the engine pods includes structures for the main landing gear bays, both of which have some structural detail moulded in place. The rudders are moulded in place too. The propellers and engine faces are pretty basic but good enough, while the undercarriage is similarly complete but not overly well detailed. The canopy provides what is possibly the greatest challenge in building the kit, with no fewer than four parts being required to capture accurately the shape. A decent selection of ordnance is included: 2 x LAU-10 5 inch rocket pods; 2 x LAU-3 2.75 inch rocket pods; 2 x AIM-9 Sidewinders air-to-air missiles; 4 x Mk.82 Bombs; and 1 x 150 gallon fuel tanks Two different options are provides for on the decal sheet. The first is for a Bronco of VAL-4, US Navy, Binh Thuy, South Vietnam, 1969. This aircraft is finished in olive drab over grey. The second aircraft is a US Air Force Bronco of 19 TASS, Bien Hoa, South Vietnam, 1971. This aircraft is finished in overall tactical grey. The decals themselves are nicely printed and include a fair smattering of stencils. Conclusion Academy's Bronco is a solid kit which, although starting to show its age, is still capable of being built into a faithful and convincing replica. It's not as detailed as many of the modern kits we are used to today, but it has recessed panel lines and just about enough detail to pass muster where it counts. Overall this should be a straightforward kit to build. Recommended. Revell model kits are available from all good toy and model retailers. For further information visit or
-
#2/2019 Bronco kit, painted with a selfmixed 4BO and MRP white, dirt done with filler, AK/MIG pigments and wash used, Tamiya weathering stuff, a plastic rod for the antenna. Build thread here https://www.britmodeller.com/forums/index.php?/topic/235049231-big-badaboom148-su-152-soviet-army/ DSC_0001 by Reinhard Spreitzhofer, auf Flickr DSC_0001 by Reinhard Spreitzhofer, auf Flickr DSC_0002 by Reinhard Spreitzhofer, auf Flickr DSC_0003 by Reinhard Spreitzhofer, auf Flickr DSC_0004 by Reinhard Spreitzhofer, auf Flickr DSC_0005 by Reinhard Spreitzhofer, auf Flickr DSC_0006 by Reinhard Spreitzhofer, auf Flickr DSC_0007 by Reinhard Spreitzhofer, auf Flickr DSC_0008 by Reinhard Spreitzhofer, auf Flickr DSC_0009 by Reinhard Spreitzhofer, auf Flickr DSC_0010 by Reinhard Spreitzhofer, auf Flickr DSC_0011 by Reinhard Spreitzhofer, auf Flickr DSC_0012 by Reinhard Spreitzhofer, auf Flickr DSC_0013 by Reinhard Spreitzhofer, auf Flickr DSC_0014 by Reinhard Spreitzhofer, auf Flickr DSC_0015 by Reinhard Spreitzhofer, auf Flickr DSC_0016 by Reinhard Spreitzhofer, auf Flickr DSC_0017 by Reinhard Spreitzhofer, auf Flickr DSC_0018 by Reinhard Spreitzhofer, auf Flickr
-
After building the Eastern Front StuG III my dad stays in the east and started the Bronco SU-152. DSC_0011 by Reinhard Spreitzhofer, auf Flickr DSC_0012 by Reinhard Spreitzhofer, auf Flickr
-

Black Ponies OV-10A Bronco - Academy 1/72
Dennis_C posted a topic in Ready for Inspection - Aircraft
Hi Everyone, I’ve not been posting completed models for a while although I managed to complete a bunch over the last year. Starting to catch up now. The first one is OV-10A Bronco in Vietnam markings of VAL-4. I have a mixed feeling about the kit and about the effort I did to get it completed. The kit can be assembled out of the box with moderate effort (only sponson to nacelle fit is really poor) and will definitely result in a decent model that would 100% look like a Bronco (it’s probably impossible to do a Bronco kit that would not look like a Bronco). But that works only until you see Bronco photos… Below is the list of errors and omissions I was able to find and tried to fix: - Empty undercarriage bays. Front bay is also almost empty on a real thing – reverse side of a landing light and some wiring only. Main bays have engine covers inside (Academy kit represents an aircraft as if its engines are removed), a lot of wiring, hydraulics, etc. I tried to scratchbuild at least engine covers and added some wiring. - Too small and simplified engine nacelles in particular anemic intakes over propellers should be noted. I tried to enlarge those with plastic and putty and drilled intakes through. - Wrong weapons sponson. In real life machine guns are placed asymmetrically, while kit has completely symmetric sponson. I tried to fix this. Also sponson shape is incorrect being a little narrower and with wrong angle of the front edge. - Short wing and short tail booms. Some reviewers also wrote about wrong wing angle of attack which I was not able to measure but seems to be true as well. Wing span is around 8 mm (!) shorter. Mostly outside of booms so easier to fix. Tail booms are approximately 3 mm shorter. The above is per my matching to real thing photoes. Tails are sitting at right height which leads to wrong angle on booms upper side which is more pronounced on a kit compared to real thing. I did not do anything about it as fixing booms represents pretty strong surgery and lengthening wing without adjustment of booms would result in even greater proportions distortion. - Simplified undercarriage. Some enhancement was done by replacement of plastic parts with metal tubes. Given the weight of lead I had to hide into nacelle to avoid tail-sitting – not sure if original plastic undercarriage would survive at all. My metal gear only marginally carries the weight. - Wrong shaped wing pylons. The kit ones are shorter and place rockets at wrong angle to the wing. Fixed it. - Fuel tank has the wrong shape. The thing is too pointy. I only identified it when starting to apply decals so live with it as is. - Cockpit details OOB are heavily simplified – here I just used CMK interior set. - Inconsistently applied panel lines. Academy did pretty decent panel lines on the wings (however they marked wing walkways with panel lines which is wrong). However, Academy ignored panel lines on the nacelle and sponson. Even cargo door is not properly shown! I tried to reapply missing panel lines to the possible extent. Some other non-OOB additions included Zunies from Crusader kit, LAU-10 launchers from Hasegawa weapon set (kit have extremely tiny Zuni warheads), LAU-32 launchers from Italeri OH-6 kit, CMK interior resin, Eduard PE set (which I only barely used to do some external features), and an excellent AOA decal which actually inspired me to buy and assemble the whole thing. Not much of a background story of the chosen subject as VAL-4 history is very well known. AOA provides almost 20 different options and I selected specific aircraft because of unique spinners colour which is said to be golden per AOA instruction. Overall conclusion – quite a lot of effort done to improve the kit but I know I went only half the distance to make a fully correct copy of a true thing. Also this is the subject that desperately needs a new 1/72 kit which would be of the correct geometrical shape as a minimum and would maybe provide a better level of details in the cockpit, undercarriage. And on top of it a wider choice of loadout other than standard LAU-3/10 and Mk.82 as Broncos carried almost everything what was available in Vietnam. Hope you enjoyed A great modelling year to everyone! Dennis- 14 replies
-
- 25
-
-
Here I present my latest build, an OOB build of a Vanguard Class SSBN using the Bronco kit. The only bit of work needed was the mating of the hull halves. Primed using Halford's grey primer, German tank grey for lower hull and Halford's satin black was used overall. The sub was 'Kleared', decaled and coated with Tamiya satin varnish. Das Boot was masked to leave the deck exposed, with VERY low tac masking over the two decals and painted with Humbrol matt black and the sonar array was glossed with Klear. Five masts were fitted into fin and a couple of Tamiya figures were added to complete build. WIP here: Stuart
- 13 replies
-
- 22
-
-
- Royal Navy
- Bronco
- (and 1 more)
-
 OV-10 Bronco Replacement Metal Undercarriage 1:32 Aerocraft Models - For Kitty Hawk Kit The 1/32 Kitty Hawk Bronco is a good kit. However the undercarriage is a weak point (literally) in the kit. New brass ones have been made by Ali of Aerocraft models. Metal Undercarriage legs In this set you get new replacement cast brass undercarriage legs for the kit. The new parts are direct replacements for the kit parts. The quality of the castings are some of the best I have seen and much better that other metal sets. There are some slight casting marks to clean up but these are small. The front leg does fully articulate so can be used in any direction. Conclusion It is great to see Ali back in the game and this is certainly a needed set for the Kitty Hawk Bronco. Very Highly recommended. Review samples courtesy of
 -
Well, here we go with another WiP, this time it'll be a submarine. Now, don't expect a long epic build as they don't happen with modern submarine kits. The WiPs subject is the Vanguard Class SSBN in 1/350 by Bronco. The Vanguard class is currently in service with the Royal Navy after replacing the dated Polaris Class and its replacement, the Dreadnought, is already on its way. This is a big box, it's only that size due the length of the hull. Box contents: hull halves, one sprue, PE, base and instruction booklet. Eight page instruction booklet. Hull halves. The sprue. Like most submarine kits, even more so with modern types, has few parts to contend with, so this shouldn't take long. It will be interesting to the size comparison between the Vanguard and Polaris SSBNs. Stuart
-
Because of an extended enforced break from modelling at the moment, I've not been able to post anything for a while, so the number of shelf queens that I've got has increased. Therefore the only things that I can post here in the RFI thread, are some of my older models. This one is the Bronco kit and if my memory serves me right, I built it about seven years ago. It's not a bad kit to build although, as this was the early release, there were one or two items that required changing. The tracks are Bronco's workable tracks, the main gun came from the barrel store and I used Eduard's etched set for the Comet. The early issue has a mantlet without the canvas dust cover, so I sourced one from Accurate Armour, along with the return rollers and the main gun muzzle brake. Celerity also had field replacement front track guards which were squarer than the rounded kit supplied items, and these were made from plasticard. I do remember that this was quite and enjoyable build, so I hope to pick up another one of the later issues and build it again. That will then free up this one for the “butchers” table, as some of the components will go into making SKP's A30 Challenger into something better than what you get in the box. Thanks for looking. John.
-
Pitot Probe for OV-10 Bronco 1:32 Master The latest release from Master Models in their series of replacement pitot probes have recently arrived at BMs London offices. It is well up to their usual standard and very sharp, so care should be taken once fitted. It is so much better than the styrene ones found in the kit. [AM-32-109] – Has been designed for the lovely North American OV-10 Bronco from Kitty Hawk Conclusion Master Models must have a tremendous machining set up to be able to produce these pitot probes and to produce them with such finesse. The always look great on the finished model. Very highly recommended. Review sample courtesy of Piotr at
-
This will be my entry for the 10th Anniversary GB. It's Bronco's offering of the British Cruiser Tank A10. It'll be a struggle to finish it as I'm doing another in the M3/M4 GB, so having said that, I'm going to go against the grain for me, and build it (almost) out of the box to save time. I haven't decided which version I will build yet, I'll decide once I get started. John.
-
I've had this in the stash for a while, and have spent a couple of hours on it on-and-off between projects. The build has been nice so far, I had feared that the model would be complex, but I am not finding it anything more than an enjoyable challenge. The parts fit nicely, and the plastic is pleasant to work with. My only issue is my own fault, that being losing a tiny piece that would attach the wheel to the axle. I will have to manufacture one out of stretched sprue, making the whole assembly less solid, but other than demotivating me, it is not much of a problem. I have not yet tried any of the photo-etch parts- my ongoing 232 project, where I used an Eduard upgrade set, has made me a little less enthusiastic to work with the medium. Therefore, this will probably be a slower build, as I chip away at it, rather than my usual focused builds.
-
Hi guys! So i'm afraid i've very much caught the submarine bug. Having started with the Kursk here, I've moved onto Bronco's HMS Vanguard, one of the 4 SSBNs handling our nuclear deterrent. The kit is simply stunning to put it simply, there's so much detail from the towed sonar array right towards the bow sonar. I painted the submarine three different shades of black (believe me I did! The photo set up I've got is a bit rough though...) to account for the sections below and above the waterline as well as the main 'deck' and fin. The bow sonar dome is Tamiya acrylic gloss black and the trident missile is simply NATO green and white. Weathering was kept basic because 1. This is only my second submarine so I'm trying to keep things easy for myself and 2. the reference photos I saw of it showed it to be relatively clean. Again, sorry for the quality of the photos, they may just look like variable photos of a black pudding but thanks for looking! Sam
- 11 replies
-
- 14
-
-
- Bronco
- HMS Vanguard
- (and 1 more)
-
North American OV-10D Bronco 1:32 KittyHawk History The OV-10 Bronco, a rugged, manoeuvrable, twin-turboprop, multi-mission aircraft, served with the U.S. Air Force and Marine Corps (OV-10A). The U.S. Navy also used the OV-10. The Navy squadron VAL-4 "Black Ponies" flew them with much success in the Vietnam War. Internationally, the OV-10 served with the military services of West Germany (OV-10B), Thailand (OV-10C), Venezuela (OV-10E) and Indonesia (OV-10F). Designed and built by North American at Columbus, Ohio, the Bronco complemented the performance requirements between jets and helicopters. Faster and more tactically versatile than helicopters, yet slower and more manoeuvrable than jets, the Bronco utilized tactics not possible with either. The OV-10D night observation system (NOS) featured a unique night observation and target marking system that included forward-looking infrared (FLIR) and laser designator/ranger. With uprated 1040 SHP turboprop engines and fibreglass propellers, NOS provided greater range, improved performance and greater survivability. In military operations, the Bronco's outstanding capability to find and hit battlefield targets close to friendly troops made this an aircraft effective against conventional and guerrilla forces. The effective application of the Bronco's versatility, however, did not end with purely military functions. Civil action applications added significantly to the cost-effectiveness of this economical aircraft. Military applications for which the Bronco was particularly suited include anti-guerrilla operations, helicopter escort, close air support, armed reconnaissance and forward air control. In addition, it could be used for utility missions such as cargo paradrop, delivery of up to six paratroops, medical evacuation, smoke screening and psychological warfare with leaflets and loudspeakers. For peacetime operations, the guns, bomb racks and armour could be removed quickly, and the aircraft became a high-performance STOL utility vehicle. Potential applications included aerial mapping, geological survey, spraying, disaster relief and patrol work. Ruggedness and simplicity of operation were emphasized in the design of the Bronco. The fuselage was mounted under the wing and provided tandem seating for pilot and observer. The canopy design afforded better visibility than that of most helicopters. Each crewman was equipped with an LW-3B ejection seat system, also designed and built at Columbus, which was capable of zero-speed, zero-altitude ejections. Armour protection, a bullet-resistant windshield and self-sealing fuel cells were provided for operations in a hostile environment. Twin engines, dual manual flight controls and rugged and simple construction also contributed to survivability and safety. The OV-10 was equipped with seven external store stations and four 7.62 mm guns installed in the sponsons. A variety of conventional ordnance could be delivered in addition to 2,000 rounds of ammunition. The seven external store stations consisted of four sponson store stations, one centerline station and two external wing stations. Sponson accessibility provided rapid loading of stores and ammunition. The wing stations could carry the LAU-7/A launcher for mounting either rocket packages or missiles. The centerline store station also had the capability of carrying either a 20 mm gun pod or a 150-, 230- or 300-gallon (568-, 871- or 1136-liter) external fuel tank. The Model This is their second new tooling of 1:32 aircraft from KittyHawk and an interesting choice of release it is too. Arriving in a very attractively designed box, with one an artists representation the aircraft in flight over the desert, presumably during the first Gulf War. The box is quite deep and its easy to see why, as on opening it is full of styrene. The kit is contained on eleven large sprues of light grey styrene, with one of clear styrene and a small etched brass sheet and a metal weight to prevent the model being a tail sitter. The main sprues, unlike previous kits are not folded over but adjoined at the centre, one so theres no need to snap them apart before inspecting the parts. Detail looks very refined, with engraved panel lines and raised areas where required. The styrene feels quite soft so take care when removing from the sprues. There is no sign of flash and only a few moulding pips, all the styrene looking very clean indeed. The clear parts are very well protected from damage by being in their own separate cardboard box. Construction of the kit is quite complex as there are a lot of sub assemblies and open panels. In fact it seems like most of the fuselage, including the sponsons have poseable panels. The instruction diagrams are very nicely drawn and clear to read, which is always good. The build begins with the construction of the two ejection seats, each made up of eleven parts, plus the etched seatbelts and lap straps. The cockpit tub is a single piece item, onto which the central bulkhead is fitted, along with the two joysticks, throttle and undercarriage levers. The rear instrument panel is then assembled from its five parts are glued into position, along with the two side console aft of the front cockpit and the lower binnacle in front of the pilots position. The rear bulkhead and ejections seats are then fitted. Beneath the cockpit floor is the nose wheel well, which once it is fitted with the front bulkhead can be glued into place. At this point the instructions call for the nose gear to be fitted. This assembly is made up of the main oleo, moulded with one half of the wheel yoke and the whole axle attached. The two piece wheel/tyre is then slid onto the axle and the other half of the yoke attached. The oleo is then fitted to the main leg attachment and fitted into the wheel well, followed by the retraction jacks and nose wheel bay door. Of course you could leave the nose undercarriage off until after painting. Construction now moves on to the assembly of the NOS sensor housing, which looks like an upside down gun turret. This assembly is made up of six parts and when complete is position into the slot in one half of the fuselage. The rear equipment bay roof is fitted out with black boxes on top, then sandwiched between the fuselage halves along with the cockpit assembly and equipment bay floor. The wing centre section is assembled from a single piece upper section and two lower panels. The poseable flaps, made up of three parts each can then be fitted along with the anti IR unit fitted on top of the upper wing centre section. This assembly is then fitted to the top of the fuselage, whilst eh cockpit is further detailed with the inclusion of the pilots instrument panel, complete with coaming and added control boxes, the windscreen and the two curved post to which the glazing will attach. Something else fitted at this point, but probably best left till later are the fitting of the access steps, unless the modeller is choosing to have them closed up. The sponsons are next in the process, each one assembled from a lower section into which the machine gun bays are fitted along with the machine guns, ammunition tanks and ammunition belts. The upper sponson panels are then fitted, as are the outer tips. The modeller has the option of leaving the gun bay doors off should he wish. The completed sponsons are now fitted to the fuselage, along with the centre pylon, nosewheel bay doors and a host of aerials. The rear equipment bay door comes in two halves which when joined is finished off with the bulkhead with associated equipment moulded on to it. The main overhead canopy section is them fitted out with quite a complex gun/bombsight and fitted to the fuselage, attaching o the wing centre section and the rear edge of the windscreen. Id imagine that construction of the fuselage had to be perfect in order to get this part to fit without any gaps fore and aft, which would be difficult to cure. The nose door above the NOS sensor is also poseable and is constructed from two halves, onto which the hinges and pitot probe are added. If it is to be posed open the there are two gas struts provided. If its going to be close, leave the hinges off. The four access panels of the canopy are to be fitted now along with their gas struts, but again, probably best to leave these till the end of the build. Each of the Two Garrett-AiResearch turboprop engines, may be visible if the access panels are to be left open, as such they are both complete representations of these powerplant. Each engine consists of two halves for eth main casing, ancillary parts, cowling fitment rings, engine bearers, exhaust and gearbox assemblies. The complete engines are then fitted to the engine bulkhead which also has a number of ancillary parts fitted. The main undercarriage assemblies are next, each consisting of two wheel/tyre halves which are fitted to the axle of the single piece main oleo. If should be noted that the oleo is in fact flat , as if the nitrogen has leaked out and is indicative of the fact that the subject from which the model was copied may have been a museum ship. Therefore the main oleo gas strut needs to be cut away and carefully lengthened to give the model the correct attitude. With the main legs altered to suit the retraction actuators are fitted into the main undercarriage bays which consist of the roof, sides plus the front and rear bulkheads. The engine/bulkhead assembly is then fitted to the front of the bays and fitted to one half of the tail booms. Before the booms can be closed up a couple of panels need to be fitted from the inside. When closed up the upper boom aft of the wing trailing edge is fitted, as is the engine intake panel at the front. The booms are then fitted out with the engine oil coolers, main wheel bay doors, blade aerials and propellers, which are each made up of a two piece hub, three separate blades, backplate and spinner. Moving onto the out wings, each is made up of upper and lower panels onto which the two piece ailerons and out flaps are fitted as are the pylons and several etched parts. On the upper wing the modeller has the option of posing the unusual airbrakes extended or retracted, with each blade of the airbrakes being an item of PE. The outer wing assemblies are then fitted their respective tail boom the outer wings/booms are attached to the inner wing sections at the same time the three piece horizontal tailplane is attached between the two vertical tails of the booms, all the while ensuring everything is perpendicular with each other. The Bronco was used in a variety of armed roles and KittyHawk have provided a nice varied selection of weapons in the kit to arm your model. These include:- Two AIM-9L Sidewinders, with optional nose sections to build AIM-9Bs One 260l drop tank Two 130l drop tanks Two four barrelled 5 Zuni rocket pods Two seven barrelled 2.75 rocket pods Two Mk82 500lb Snakeye bombs with slick tails Two Mk82 500lb Snakeye bombs with retarded tails Decals There are two sheets of decals one large and one small. The smaller of the two contains the instrument panel decals as well as propeller manufacturers marks and the footstep lines. The main sheet comes with a set of stencils for one aircraft and markings for the following options:- OV-10D of the US Navy in Field green over light grey scheme OV-10D of the US Marines, VMO-2. Ser No. 55479 in a wrap round two tone grey scheme OV-10D of the US Marines, VMO-2. Ser No. 55468 in two tone tan/brown uppers over grey scheme. The decals look very well printed, with good opacity and colour density, in register and without too much carrier film. Conclusion For some reason Ive always like the odd looking OV-10 and with its elongated nose, the 10D is even odder looking. But for some reason it just look right for the job it was designed for. I have always wanted a kit of one, but never thought one would be released in this scale, so this reviewer is a very happy bunny. I realise that having poseable panels is not to everyones taste, but from the builds Ive seen they dont appear to cause too much trouble should you want them closed. Alternatively with all the open panels it is superdetailers dream. There arent too many colour options around for this version but which ever you choose it will certainly stand out in any collection. Very highly recommended. Review sample courtesy of and available soon from major hobby shops
-
Hi everyone GAZ-69 from Bronco, 1/35. The model is made for the customer. Best regards Martin
-
 New Chinese company with some interesting and new subjects: http://www.perthmilitarymodelling.com/newkitnews/geckomodels.html regards, Jack
- 17 replies
-
- 5
-
-
- 1/35
- Gecko Models
- (and 1 more)
-
 So, yes that's its full name, late start I was away for the start. Based on the Grille 10 platform was used for testing in Denmark during 1944. Now, annoyingly I cant upload photos, photobucket's having a nope moment, soon as it allows me I will upload a pile of sprue shots. What I can say is its very nicely moulded with a very detailed manual of which 2/3rds is constructing the gun. Time being you'll have to make do with an image from online I'm afraid
 -
Morning all, been hunting and emailing to no avail on this one an wondering if anyone has any ideas. I have a a bronco versuchsflakwagen 8.8cm flak 41 auf sonderfahrgestell (Pz.Sfl.IVc) kit which I have found is missing an entire sprue. I emailed both Bronco and Hannetts as they are listed as the UK distributor but over a weeks gone by without a response. As it stands the kit is unbuildable an I'd rather not have to either buy an entire new kit or get rid of this one.