
Search the Community
Showing results for tags 'Bronco 1:35'.
Found 18 results
-
 My first project for 2024, the Bronco Chaffee Light Tank in British service. Finished out of the box in the markings of “Chieftain”, C Squadron, 5th Reconnaissance Regiment RAC, 5th Infantry Division, Germany 1946. Brush painted with Vallejo paints and weathered using the same company’s model washes. Intent was to have it used but not abused. Prototypical Bronco - lots of little pieces with not so easy to follow instructions, but actually pretty fun to build (must be getting used to them). Build thread can be found here: Ventured out into the heat of the front yard (38 Celsius and it’s only 10:30 in the morning) to take some photos. Feedback welcome!
 -
With my Sherman and Whippet finished, time to start the first project of the year. I’ve had this kit in my stash for well over 5 years now. Picked it up second hand at the local scale modeling show swap’n’sell for around A$20. I’ve been opening the box, looking at it, and then putting it away for all that time. Parts have been scavenged for other kits (stowage for my recent Shermans, radio aerial mount for my Sherman Mk 1 Hybrid and of course tea drinking man). Thought I should have go before I started losing pieces - and there are a LOT of pieces. Prototypical Bronco. First action was to check all the sprues that were actually loose in the box - luckily nothing missing. Just in case I carefully repacked it in some zip-lock bags - I suspect it’s going to take me awhile to build. Also in the box, a set of Voyager photoetch, which may come in useful as the Bronco etch has been bashed around a bit. I don’t intend to go all out - just use what is absolutely necessary. I also have a second turret - I gather there were issues with the initial US boxing and Bronco provided a replacement corrected turret. However it appears to be identical to what came with the kit, so I have a spare. My intention is to complete it as option 2 which is “Chieftain” of C Squadron of the Reconnaissance Regiment, 5th Infantry Division, British Army, Germany 1946. I even managed to find a photo of this tank on-line at https://tanks-encyclopedia.com/ww2/us/m24_chaffee.php. The kit was reviewed on BM back in 2012: There are also useful reviews at the Perth Military Modelling Website (PMMS) https://www.perthmilitarymodelling.com/reviews/vehicles/bronco/cb35068.html and https://www.track-link.com/reviews/2181. To get the ball rolling I started by seeing how easy/hard the track would be. The individual track links come in sets of 12 of which there are 14 (so thankfully a few spares). So I started with a set of 12. Removing them from the sprues and subsequent cleanup was really easy. They do a clip together reasonably simply, I sort of “angled” to clip each one together. I found doing 6 together and the joining the two sets of completed links easiest. In a matter of minutes it was done. A reassuring start.
-
Well...here's one that truly ticks all the boxes. I left it on the shelf, almost finished (or thereabouts) in June during the Recon and Scouting GB. Loads of PE (too much IMHO ), finely detailed and probably over-engineered. I've regretted it ever since. This will give me the perfect chance to build these two jeeps. What's in the box? And here's the original WiP from the GB last summer. I'll get to it before the New Year! --John
- 25 replies
-
- 3
-

-
- Bronco 1:35
- Jeep
- (and 1 more)
-
Finished this one up on my year-end sprint. Bronco's kit is very nice, although the tracks are not correct, so I replaced them with a Spade Ace set. Figure is an old Verlinden one I had around that happened to fit perfectly in the cupola.
-
This has been hanging around in my stash for awhile. My attempt at the Bronco Humber Scout Car, British painted with Vallejo and Tamiya acrylics, with Vallejo Model Washes to weather. Final Matt varnish is Green Stuff World Maxxx Matt. Finished out of the box as a representation of a vehicle from 30th Armoured Brigade, 79th Armoured Division outside Caen, July 1944. Build thread can be found here: On a base I made for a previous model, along with a certain tea-drinking individual who does seem to get about. Finally one in greyscale:
-
After a short overseas vacation, I still had a week or so off work so I thought I would dig this out of the stash. It’s everything you might expect from Bronco - interesting subject, nicely molded with many tiny bits, ambiguous and downright confusing instructions (not quite in the right order). There is also some photoetch - which is mostly ignored in the instructions. What could go wrong? I had meant to keep a full build log, but just ploughed ahead. While tricky it’s been a lot of fun. First real attempt at a complicated AFV interior - most of which will be invisible. As indicated the instructions are terrible, so I kind of used them as a guide rather than follow them slavishly. First the chassis and suspension. Front was a bit complex but seems reasonably sturdy once built. Started the interior. Brush painted with Tamiya Matt White acrylic with details in various Vallejo acrylics (mostly guesswork as of course there are no serious interior painting guidance in the instructions). The wheels are made up of separate hubs and some rather unpleasant soft vinyl tyres. I decided to paint and weather the hubs separately. I am using Vallejo 71.017 for the main scheme, which looked good on the RFM Firefly I made last year. The spare wheel doesn’t coming with any kind of blanking plate, so I faked something up with scrap plastic and the bolts that Bronco provide on the sprue (but don’t mention in the instructions). Probably not very accurate, but it’s better than a plain hole. Bit of a jump ahead and here is where I was at after a few days of working on it. I also went cross-eyed trying to get the twin-Vickers mount sorted - only to find that the vehicle I intend to make actually has a single Bren. Doh! Too late now. Interior finished and weathered to make it good and grubby using a variety of Vallejo model washes. Some nasty injector marks are visible - but they are invisible once the cabin is put together, which was the next step. Rather disappointed with the fit, needed a bit of filler here and there. As expected, all that work on the interior is pretty much invisible. The vehicle I am building appears to have metal plates attached to the racks at the rear for the formation badges (which makes more sense to me than how Bronco shows the markings directly on the cans). There is also a little plate for the “50” decal, which Bronco shows as being attached direct to the exhaust muffler. I assume that’s a convoy plate of some kind? I also lost one of the tiny lifting/towing eyes, so I replaced it with some stretched sprue. Here are the wheels painted up, weathered and given a coat of matt varnish ready for the tyres. And finally for this first post the two side hatches I am leaving open so you can actually see inside.
-
 This is big kit. Two vehicles, 5 figures. An enormous amount of sprue. God only knows why I am even attempting this. Egads. I'll post some sprue images and profiles later, but for now here's there box top. --John
- 27 replies
-
- 10
-
-
- 1/35 scale jeep
- British Recon Jeep
- (and 1 more)
-
This is my A10 Mk 1A. Model - Bronco A10 with Aber metal 2pdr and machine gun barrels. The jack on the rear fender is borrowed from another kit, the wooden jack blocks, leather baggage straps below the turret, and handles on the turret spotlight are scratch built. I’ve added a few bolt heads as well. Vehicle - I've done this one as T5959 which was photographed on 5th October 1940 being unloaded at Port Said, Egypt. It still wore a European camouflage scheme of Khaki Green G3 and a disruptive pattern of Dark Green G4. The vehicles being delivered then were mostly free from most dust and mud (I assume they were hosed down before loading) but show signs of oil stains etc, so I've reflected that on my model. Paints - Base colours are all acrylics. The khaki green is a 50:50 mix of AV air and Hataka khaki greens which closely matches the sample in 'Real Colours of WWII'. The dark green disruptive pattern is Hataka. Various acrylics and varnishes for details, enamel washes, then lightly weathered using oils over the top for ingrained dirt, fuel spills, and a thin layer of dust. Overall an enjoyable build of a little-known British early war tank. In June 1940 the type name was changed to Cruiser Mk II so it is often called by that name, or both. Gecko make three different A10 kits which have interiors and slightly more detail, but for me this one is the better balance of complexity v. modelling time available, and it also includes options for a Mk 1, Mk1A and Mk 1A CS in the same kit. T5959 still had the white rhino of the 1st armoured division on its front fender. These were hardened rubber and often wore heavily. '0046' was a mobilisation code, these were applied to all vehicles being shipped overseas. Photos of T5959 show little wear but others delivered at the time are quite grimy. I assume they were hosed down before loading so oil and grease stains remained but mud and dust would have been cleaned off. I've added a thin layer of dust over the top to represent a day in Egypt. The Hataka dark green dried slightly glossy in places, so I added more dust on the horizontal surfaces than I would have liked to to tone it down. The bolts on the back of the engine air vent are ones I added. This kit doesn’t come with them but Bronco added them to their later ‘Balkans Campaign’ A10 kit. The stalk just behind the bow MG is for the driver's mirror. This was rarely mounted though the stalk was left in place. Just in front of it you can see a line of five vertical bolts. The kit comes with four, I re-arranged them and added the missing bolt – easy enough to do with a sharp knife and using bolts from spare parts in the kit itself. Unusually for a British vehicle the driver was on the left hand side. The red '5' markings are borrowed from another kit. Looking at the almost identical running suspension on running Valentines the central rod within the spring is polished smooth, so I've shown this on mine. I added the leather baggage straps below the turret. Note how the serial number is pained in different places on each side, depending on where there was space to put it. Early war British headlights often had black sugar paper behind the glass lens with a small cut-out in the centre to give a narrow beam. The PE shield for the muffler was a pain on this one, my fault for not taking enough care with it. Photographs from the Imperial War Museum collection which show T5959. On three of these the censor has tried to obscure the ‘5’ tactical marking but you can still make it out. As these pictures were all taken on the same day I’m pretty sure they all show T5959 even when the serial number cannot be seen.
-
 Hello everyone, this is my first post here so hopefully the links to the pictures work! This is my take on Bronco's A9 tank, a fascinating design from the mid 1930s which saw action in the early years of WW2. I've done my model as 'Arnold' from the 1st Royal Tank Regiment in Abbassia, Egypt. I've only been able to find one photo of this particular vehicle, which was taken around mid-day (judging by the shadows) on 30 May 1940. My model shows Arnold on this day. The kit is mostly out of the box. I scratch built a few parts such as the straps for baggage on the right storage bins, fuel cans on the rear fender, and L shaped bracket on the turret front, and I removed the bulk of the radio gear on the back of the turret to match the original photo, and raided the spares box for periscope hoods, etc. It's a fairly straight forward build with link and length tracks, unlike the mind-numbing individual links on the Gecko kit. Arnold was at a major British base and photos of vehicles there show little weathering. The photo of Arnold does, however, show some history on the turret – the triangular unit marking has been painted out, the serial number looks to have been painted over, and there is a large newly painted rectangle towards the front as well. My model is done in acrylics - Vallejo Air UK Light Stone with others for the details, and a small amount of oils over the top for dust and sand. I’m pleased with how this one has turned out. Half the fun was doing research into an almost forgotten tank. I’m fortunate to live within easy travelling distance of Bovington Tank museum on Dorset so was able to examine their A9 in great detail. https://photos.app.goo.gl/nMmxLQ8MS5FvvMDP8 EDIT: I’ve created a flikr account, so if this works you should be able to see the pictures of Arnold embedded within this post… Arnold's serial number and A squadron triangle had been painted out, so I've done the same on mini-Arnold. Arnold had its radio removed, leaving just the mounting structure on the rear of the turret. I've modified the kit to show this. There is an L shaped bracket on the front left of the turret which I've scratch built. Different tanks had different designs and it appears to have only been added in the desert. If anyone know what it is for, please let me know as I can't find a photo of it in use! Arnold has a very complex tangle of chains, cables, hooks and rings wrapped round the fuel cans. I've had to simplify it and have copied the chain and angle bar shown on ADA on the same day. When I've looked at running vehicles with this type of suspension the central rod of the shock absorber is polished smooth so I've shown that here. The storage boxes under the turret are hinged at the top. Arnold has a locking bar across them to keep them from springing open, and additional leather straps hanging down over it. I have folded the driver's mirror flat on the front right fender, from photos it was rarely used. From the shadows the photograph was taken close to mid-day. It's unusual to have such a precise date, time and location for a reference picture.
 -
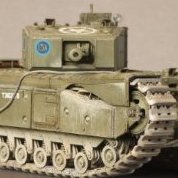
Picked up cheap in the post-Christmas sales. Not an easy build, even for a Bronco kit, but happy with how it turned out. Brush painted with Vallejo acrylics and finished with various Vallejo model washes. Build thread can be found here: Finished with the markings out of the box of one of the ill-fated tanks of 3RTR that were sent to the defence of Calais in May 1940. And one in black and white to finish:
- 6 replies
-
- 16
-
-
- A13 Mark 1
- Cruiser Tank Mk III
- (and 1 more)
-
Started this at Easter break, couple of delays due to a bout of COVID and being sidetracked by a rather nice RFM Sherman Firefly. This is my second attempt at a Bronco Cruiser and I think it came out rather better than my last go. Finished out of the box as ‘Arnold’, 1 RTR, 7th Armoured Division, Egypt, May 1940. Brush painted in Vallejo Model Air and Tamiya Acrylics and weathered (hopefully not too much!) using various Vallejo Model Washes. Build thread can be found here: Thanks for looking. One in black and white to see what it looks like.
- 11 replies
-
- 25
-
-
- Cruiser tank Mk I
- Bronco 1:35
- (and 1 more)
-
Having a week off so thought I would see how far I could get with the Bronco A9 I had in the stash. My last experience with the very similar A10 was a little unhappy, but I figured why not try again (see here for that previous attempt: Not a full build thread, just photos from where I reach at the end of each day. So far it’s been great - so much easier than last time. Or is it just that I know what to expect? Anyway, it seems to be going together well. Day 1 (Monday) Day 2 Day 3 Day 4
- 28 replies
-
- 11
-
-
- Bronco 1:35
- Cruiser Tank
- (and 1 more)
-
 This is the 2016 ‘2in1’ Bronco kit #CB35214. It was the last release of a series of SWS variants, that were based on the original Great Wall Hobby mouldings stretching back to 2009. The detail is sharp, and the armoured cab thickness is nicely rendered to scale. Although there is a small degree of mould offset on a few parts there is no flash and very few pin marks present. It is also nice to see well thought out sprue gate connections, making removal of the access easier to accomplish cleanly. The all-plastic sandwich design of the front wheels is most welcome as is the addition of plastic options to replace some photoetch parts. Unlike the GWH kits Bronco have included a comprehensively designed engine and although nothing will be seen if the engine hatches remain closed it is a nice feature that many modellers will utilise. The tracks are of the individual link type and although not workable they look to be of good quality. The Bronco kits also include a host of accessories that include Jerry cans and fuel drums. The Schwerer Wehrmachtschlepper (SWS; "Heavy Military Tractor") was a German World War II half-track vehicle used in various roles between 1943 and 1945. The unarmoured models were used as supply vehicles and as tractors to haul artillery. Armoured versions mounted anti-aircraft guns or a 10-barrel rocket launcher (Nebelwerfer). Fewer than a thousand were built before the end of the war, but production continued after the war of an improved model in the Tatra plant in Czechoslovakia. Most of the GWH variants released were actual produced vehicles, but no photographic evidence exists that either the armoured searchlight (UHU) or the armoured cargo version was ever built. Also, although images do exist of the 2cm Flakvierling 38 fitted, it was never acknowledged as an official production type. By the time the SWS was in production the 3.7cm Flak 43 was considered the more appropriate weapon. This kit gives you options to build a supply ammo or armoured cargo version. I decided to build the produced supply ammo version and used the Nuts & Bolts 41: Bussings schwerer Wehrmachtschlepper (sWS) and Variants as a reference guide. The book has a nice feature clearly showing all the design changes from prototype to production series by way of colour coded CAD scale images. Whilst there are many photographs of this vehicle it appears GWH used a prototype to base their original mouldings on. Although Bronco improved on many of the versions they later released, by adding certain components, they did not update any of the main series production changes that GWH omitted. Most obvious on the exterior is the front ‘bumper bar’ the side vision ports; the wooden platform supports, the rear panel components on the chassis and the fuel filler cap. The early bumper bars tapered in at the ends whilst the production series vehicles had simplified straight bars. The side vision ports on the kit are symmetrical when in fact the drivers port was much larger. The wooden platform supports appear to have changed although photographic evidence in this area is thin on the ground. The prototype version had the platform sitting higher than the production series but how the wooden support structure changed in shape is unclear. Clear images of the prototype vehicle support show clear daylight between them yet all the images of the production vehicles I can make out appear to show a solid horizontal beam from front to back. That could just be a trick of the light so it’s difficult to tell! The supports in the kit, although of the prototype design do sit at the lower height of the production series. The chassis rear panel in the kit is off the prototype. The production series had a step added to the offside. Only one in four production SWS’s ever received a winch so if not fitted the holes in the rear panel remained. The prototype fuel filler cap was simply screwed into the top of the tank and was obviously difficult to fill under the platform bed so an extended ‘s’ shaped funnel extending rearward can be seen on production vehicles. Very few photographs exist of the interior on the armoured version, so areas of the cab mouldings are still up for discussion. This kit does provide a split bulkhead behind the driver on the sprue trees but does not call it out for either version. One image in the N & B 41 book clearly shows the bulkhead in place but it is unclear whether it is a prototype or indeed whether it is a Flak version awaiting the gun and carriage. The image clearly shows the tubular carriage risers, so whether the holes and fittings were built into every platform is unclear. The red arrows point towards the stored fold down seats. Looking at images of the Flak variants it appears that a section of the cab roof was cut short at the rear to provide clearance for the Flak 43. My kit has slots to the roof and witness marks down the interior walls, however, the instructions in this kit have you only remove the witness marks. I decided to leave my prototype shaped bumpers alone. I will trim down the passenger vision port and fill the small fixing hole. It won’t be quite as small as the real thing but enough to show a difference. The fuel filler neck will be made from heating a section of sprue and bending it into shape. The platform support update would be guesswork so the prototype design would remain on my vehicle. As the view inside the cab will be virtually non-existent with the bulkhead fitted, I will follow the kits instructions and leave it off. Compare the prototype bumper above with the production bumper below Smaller passenger vison port compared to the drivers vision port on the Flak version above Production vehicle appears to show a solid horizontal beam support for the platform compared to the strutted prototype version
 -
Cruiser Tank Mk II (A10 Mark 1) (Bronco 1:35)
SimonL posted a topic in Ready for Inspection - Armour
This one almost defeated me. Lots of small parts, some tricky photoetch and I wasn’t very happy with the paint job. It sat on my shelf 80% completed for well over 9 months or more looking sad. It is meant to be an A10 Mk 1 of HQ 2nd Armoured Brigade, 1st Armoured Division, France, May 1940. The painting diagram is not the greatest. I used MIG Ammo Khaki Green 3 as the base colour, and it just didn’t look right. It looked far too light. I pushed on anyway, using Vallejo Model Colour 70.979 for the Dark Green G4. The markings went easily, but looked very bright at first. I used some washes with 50:50 mix of Army Painter Dark and Soft Tone to make it grubby (may be too grubby?) followed by a dilute wash of a mixture of Italeri Acryl dark earth and sand to make it look dusty. I finished with a brushed on coat of Italeri Matt Clear, which as I close to the end of the bottle added an additional dusty look. For the exhaust and cover I used MIG Ammo Dark Rust, and the added some washes and dry brushing with Italeri Acryl Rust. Aerial wire courtesy of one of our cats who dropped one of their whiskers! Not my best work, but happy to have it finished and on the shelf. -
After the disappointment of my Crusader Mk.I mishap I thought I would start a new project to restore my mojo. I wasn't sure which one to start but with Valentine's day round the corner this one seemed quite apt. The Mk.IX valentine was made in answer to the need of a more powerful gun than the 2pdr. To accommodate the 6pdr gun the turret needed to be redesigned. Vickers engineers freed up space for the new gun by reducing the turret crew to 2 men and the coaxial machinegun and smoke bomb launcher were removed. The removal of the machine gun meant that the tank couldn't defend itself against infantry and so was unpopular with its crews. The bomb launcher issue was partially resolved by mounting two grenade launchers externally. But in essence the Mk.IX had turned the Valentine into a tank destroyer. I am on a bit of a mission to build as many types of British AFV's as I can and I want to show a representation of all of the different camouflage schemes. There is a bit of a dispute as to which colour this particular vehicle was painted but I wanted to do the Desert Pink / Dark Olive. This scheme was introduced on the 6th October 1942 and was used until May 1943. The above picture was taken on 10th April 1943 so it seems likely to me that this is the scheme it is painted in, however Blue-Black, Slate and Dark Brown were also used as disruptive colours. As always with black and white photos it's difficult decipher exactly which colours have been used. This kit seems typical of Bronco with a reasonably high parts count and very nicely moulded details. There is a fair amount of photo etch included along with separate link tracks. I have enjoyed the ones I have built previously and this one has received very favourable reviews. Looking at the instructions there seems to be a a fair bit of the interior included. I probably wont use the transmission and radiators though as I don't intend to have the doors open. The drivers compartment and turret interiors are welcome as it means that I could have the hatches open and who knows I may even be brave enough to add a crew to this one. I think I have waffled on enough for now, I've got some building to do. Wayne
-
Like many on here, i have returned to the hobby after a long break. Put it this way, some of the tamiya paint i have used is nearly 40 years old! This is my first Bronco model and although it is well detailed, most of it is on the interior so a bit of a waste of time. Also the mountings for the wheels were a nightmare and quite flimsy.
-
Here’s my first model started and completed this year - the Bronco 1:35 Comet finished out of the box as “Iron Duke IV” of 1RTR, 7th Armoured Division in Germany, April 1945. My first go with so-called workable tracks (they are a bit wonky, but most of worst bits are hidden), and there was some more complex photoetch than I am used to (the exhaust cowls at the back), but the rest was a pure joy to build. Used brush painted MIG Ammo SCC15 for the main paint job, with Tamiya acrylics for any detail work. Various oil and acrylic washes to make it a little grubby and a final flat coat of brushed on Italeri Clear Flat. Pretty happy with how it turned out. Not sure what to do next - I do have the Tamiya 1:35 Matilda (more recent one) in the stash 🤔 Thanks for looking.
-
 Bronco, a very good kit (CB35043), probably the best. Scale 1:35. The project started a long time ago, so far only the cannon has been painted. I used Tamiya acrylic, chipping fluid and Model master metallics. Plastic barrel from the kit, see how well the muzzle brake was molded.
- 8 replies
-
- 13
-
-
- 3.7cm FlaK36
- Sd.Kfz.6/2
- (and 1 more)


