Search the Community
Showing results for tags 'Boeing'.
-
US Apache, pics thanks to DL Munne.
-

Eduard B-52G Updates (for Modelcollect 1:72)
Mike posted a topic in Aftermarket (updates/conversions)
B-52G Updates (for Modelcollect) 1:72 Eduard Many of us have been waiting for a new tooled B-52 for a long time, and ModelCollect have now obliged, starting with the B-52G that we reviewed here, recently. Eduard's new range of sets are here to improve on the kit detail in the usual modular manner. Get what you want for the areas you want to be more of a focal point. As usual with Eduard's Photo-Etch (PE) and Mask sets, they arrive in a flat resealable package, with a white backing card protecting the contents and the instructions that are sandwiched between. Interior (73646) Two frets are included, one nickel plated and pre-painted, the other in bare brass. A complete set of new layered instrument panels and side consoles are the primary parts on the painted set, with new rudder pedals and box; ejection seat details; a new crew-seats for the third top-deck crew; crew-harnesses for all three seats; a new floor skin, crew ladder and entranceway detail are also supplied along with a brand new lower hatch that fits into the existing hole. Zoom! Set (SS646) This set contains a reduced subset of the interior, namely the pre-painted parts that are used to improve on the main aspects of the cockpit, as seen above. Whatever your motivations for wanting this set, it provides a welcome boost to detail, without being concerned with the structural elements. Engines(72680) This larger bare brass set contains some important detail parts, such as the fans within the engines, beginning with the intake compressor, for which you are told to carve a piece of sprue to the shape of the stator cone – times eight, of course. Another fan is attached to the front of the internal tube, and an exhaust lip with three triangular(ish) flaps encroaching back into the trunk is glued to the rear of each exhaust. You will need to build them up in pairs due to the arrangement of the engine, with four pods making up the dreaded 8-engine approach. Landing Flaps (72677) To say that this is the largest set doesn't convey quite how much brass is in the bigger ziplok bag. There are two approximately A5 sheets, plus two other extra sheets that would normally be large enough for a whole set, which meant I had to scan the set in two parts as it wouldn't fit on my Letter sized plattern. The B-52's wings are enormous, so it's flying surfaces are bound to be too, which explains the hectares of PE we have here. Each flap bay is made up from a central slab that has many of the delicate ribs with detail layer captive initially, which are then folded, twisted and bent back into the etched lines, whilst meshing with the lateral parts to form the internal structure of the bay. Additional ribs are added, and flap-runs are fixed to the assembly along with 0.8mm rod from your own stock. The inner flap bays have masses of additional detail added around the root, plus a skin that matches the cut-out to the flap itself. The kit flaps are replaced by new ones all fabricated from PE, which is bent and folded over to the correct shape and detailed with small brackets, access hatches etc. once you have all four bays and flaps completed, the kit flap detail needs to be removed from the insides, with a scrap diagram showing you what to remove. The bays are then glued in place, and the linkages between the bays and flaps are finished off, allowing the modeller to join them to the model. Due to the realism of the connections, the flaps will be quite delicate, so the attachment is best done after all the major handling of the aircraft is over, so plan ahead. Masks (CX531) Supplied on a sheet of yellow kabuki tape, these pre-cut masks supply you with a full set of masks for the canopy, plus a set of hub masks for all the wheels, allowing you to cut the demarcation perfectly with little effort. Review sample courtesy of -
B-17F/G Flying Fortress 1:32 HK Models The B-17 that first flew in 1935 was quite a different beast than the one that flew during WWII, having a glossy bare metal finish, a traditional vertical tail with no fin fillet, and lots of glass. The press coined the term "Flying Fortress" because of the number of gunnery positions around the aircraft, which stuck and was later trademarked by Boeing. Its first attempt to gain approval and induction into the USAAF was foiled by an unfortunate accident that wrote off the prototype and killed the pilots, but it was given a second bite at the cherry because of its comparative performance, and was eventually accepted into service with more powerful Cyclone engines and without the blister-type waist gunner windows. The E model was probably the first "real" fortress, with a large expanded tail, tail gunner position and guns in the nose. It also has the familiar ball-turret on the underside that stayed with it throughout the rest of production. The F model brought in some more changes, most notable of which is the almost frameless nose glazing, which afforded the bomb-aimer a much better view, although he must have felt commensurately more exposed as a result. The G model with its jutting remotely operated chin-turret was the final mark of the war, and fought doggedly over Europe with a formidable offensive armament consisting of 13 guns. This of course was at the expense of bomb-load, which diminished the further the Fortress was tasked from home. Post war the B-17 was converted and used in a number of civilian roles, as well as some remaining military and pseudo-military roles such as Coast Guard and search and rescue. There are still a large number of airframes in airworthy condition, and most Brits that have been to the airshow circuit have seen the Sally-B at some point in their lives. The Kit This is a pre-release sample of the kit, and as such doesn't come with instructions, decals or even a finalised box. As a result my review will be a little out-of-the-ordinary compared to my usual offering, but I will try to cover as much of the build process as I can, which you can appreciate is a little tricky, given that there are no instructions. I spent a couple of hours poring over it with a pal, plus a few more on my own with my trusty Tamiya tape, and have divined where the main structures sit, as well how the supplied stand works. The first thing of note is that this is a huge model kit. If you have the B-25 and think that's big, you'll need to think again and reassess how you consider model kit sizes. With large size comes problems of strength because styrene isn't the strongest of materials, as anyone with cats or toddlers will have found out at some point. Each wing is a shade over 45cm in length, and the fuselage width maxes out at the wing root to 8.5cm, so you're going to have a total wingspan just scraping in under one metre. That's around 39 inches in old money. The fuselage measures at 71cm without the rear guns, which is around 28 inches. It sounds odd, but it has a presence in excess of those dimensions however, and it looks "right" to my eyes. It's difficult to judge the shape of a kit whilst still in the box, so the major parts were taken off the sprues and taped together to get a feel for it, and work out how some of the parts fit together. The fuselage and wings are covered in over 800,000 rivets, which are very nicely done, and can barely be felt by running your finger over them. A coat of primer followed by a couple of coats of airbrushed paint and varnish should see them looking quite realistically minimised. There are also raised panels, and a couple of different widths of panel lines around the airframe, which give the impression of the aircraft's skin very well, and enhance the initial wow-factor. It is important to consider the structure of a styrene model of this size, and how it will hang together both initially and in the longer term. There have been some clever techniques used by the designers that will please many potential purchasers, the first of which is the inclusion of a wall-mount for the completed model. It is on a small sprue of its own, and consists of a base plate with a circular depression in the centre, and a cross-shaped set of slots in the bottom of the depression. This allows you to screw the supplied anchor to the wall using a single screw/wall-bolt, and then slot the stand onto it in any one of four orientations, up, down and either side. The four legs slot into corresponding holes in the fronts of the bomb-bay bulkheads, so you'll need to glue the bay doors in the open position to utilise this feature. If you're not going to use the stand, you'll need to fill the four holes with the four disks that are hidden away on the sprues to make good, because they're around 6mm across and not present on the real thing. The pairs of legs are of different lengths, allowing the tail to drop slightly toward the wall, and the opposing directions of the pegs stop the model from slipping off over time. The legs are secured in the base by four styrene pins that slot into holes on the side of the base, but I'd consider replacing those with metal pegs, just in case. The next aspect to consider is whether the kit can be built so that the wings can be removed. This is a resounding "yes", as the wings once complete are offered up to the fuselage slightly forward of their intended position, then slid back into place with a satisfying clunk, where they stay very firmly without glue. I've been handling the taped together fuselage and wings during my exploration, and had no cause to doubt that the wings will stay put. The strength of the wing join is bolstered by the two bomb bay bulkheads, which span the entire inside fuselage, and are backed up from the inside by a pair of short stub spars, just like the real thing (only shorter). The wings themselves have strengthening ribbing inside them, which makes them quite strong in their own right, and not prone to droop or flex. There are a number of other full-section bulkheads within the fuselage that will enhance the strength of the join, resisting the dreaded cracking of the top fuselage joint due to the weight of the wings over time. The top of the fuselage - the "crew blister" if you like - is a separate part that fits rather neatly on the top of the fuselage, with a large contact surface and stepped joint that should result in a very strong union, further enhancing the rigidity of the join and making cracking seams very unlikely. The assembly didn't even really creak once the bomb bay was installed, despite being only lightly taped together. The fin is integrated into the fuselage mouldings, with a separate rudder that is trapped between a pin and hinge whilst gluing the fuselage halves together, while the elevators have a robust attachment method, due to their quite large size. There are two small bulkheads that slot inside the tail area, which have large tubular rods that protrude from the elevator roots, approximately 3cm apart. The elevator halves are glued together around a socket part, and the elevator then slides over the two pegs and is cemented in place, making another strong joint that should stand the test of time. The elevators themselves are trapped between the two halves of the tail planes while constructing them, so can be glued at any angle, or left loose to attract small fingers to play with them. On the wings, the large flaps can be posed deployed, and the ailerons are trapped between the wing halves when gluing. The interior is slightly less clear at this point, as it's initially difficult to see where some of the sections go without instructions, and the small parts remain even more tricky to identify unless you know the internals of the beast intimately. The main crew area around the pilots is fully floored, and has detailed bulkheads in front of the pilots and behind the upper turret, with instrument panel backs, plus radio gear moulded in, as well as the navigator's table toward the rear. The pilots armoured seats are well depicted, although the armoured backs do have a little sink-marking, which may have been fixed by the time the final release is with us. If not, a swipe with a sanding stick, or some filler will quickly fix that, unless the seat covers it completely. The inside of the fuselage is covered in rib-work from front to rear, although there are a large number of ejector pin marks to be removed, which despite being a tiresome task, is hardly something you could reasonably complain about, as without them, the parts couldn't be removed from the moulds. Hopefully, a great many of them either won't be seen, or will be hidden by equipment that is added during the build. The clear parts are all on one sprue, and there are a lot of them, as evidenced by the size of the sprue, which has a number of legs to support and protect the delicate parts until you're ready to cut them from the sprues. The parts are beautifully clear, and are also commendably thin, allowing a good view into the interior if kept that way. The nose glazing on the later marks was almost frameless, and it looks just great on the sprues, almost as if it has already had a dip in kleer/Future, it's that glossy. An interesting point is that the turrets have been very cleverly designed so the glazing can be added pane-by-pane. The top turret has a styrene frame to which the individual panels are added, and the Sperry ball-turret is made up from a clear and grey styrene two-part central cylinder, with clear outer parts making up the ball. It is supplied with the Y-shaped yolk that allows it to rotate, and although I've not looked too closely at those parts yet, looks like it can be made to stay mobile after building. The waist guns are staggered, and have beautifully clear glazing with ports for their guns that should afford a good view of the interior, and the cheek guns are separately glazed into the framework that is moulded into the fuselage. The prominent chin turret is fitted into the underside of the bomb aimer's area, and Norden bombsight is included. Finally, the Cheyenne tail turret has a large curved gun shield, through which the two .50cal Brownings project, with their ammo feeds snaking away to the large boxes that make the passageway behind the gunner so cramped. The gunner's glazing is again remarkably clear, and his sight is visible through the glazing. The curved rear section of the glazing was bullet resistant, so should be treated with a thin wash of greenish clear paint to depict the hue apparent in this type of glass. A bike-style seat is supplied to save the gunner's knees, which would become quite cramped during extended engagements, especially when taking the cold into account. It appears that some of the ammo boxes were constructed of plywood, while others were made from sheet metal with strengthening straps riveted around corners and across the large surfaces. It would add some visual interest if you were to depict them as wood using either decals or the oil-over-beige technique. The .50cals are supplied as breech parts with slide-moulded slots for the barrels, which are also slide-moulded to give them a hollow barrel, and they can also be added later - a boon to the clumsy modeller! I couldn't see the intimidating flash-suppressors for the rear gunner's guns, but hopefully they are in the sprues somewhere too. If not, a piece of suitably sized and shaped tube would do the job instead. Moving out to the wings, the internal structure that I mentioned earlier takes a great deal of the flex out of the wings, which should allay any concerns about droop over time. The engine nacelles are also moulded into the wings a far forward as the firewall, where the cowling is added, the parts for which are included on four identical sprues that also contain parts for the wheels, oxygen bottles, guns and crew seats. The cowling is a single part with the cooling flaps moulded to a ring with spokes joining a central hollow cylinder. There are two extra cooling-flap rings on the other sprues that only have one section with no flaps, rather than the two on the other parts. It looks like you'll have two left over for the parts bin. Each engine is built as a layercake of parts, starting with the cooling-flap ring, onto which a circular radial "blanking plate" is fixed, which gives the impression of the rear bank of cylinders, and is then covered with the front cylinder bank, which is nicely done, with very fine cooling fin detail. You could argue that the fin detail should be a little more aggressive, but that is down to personal taste. On top of that the connector rods are installed, terminating at the cylinder heads, which are topped off by another linked part. The magneto bell-housing is then inserted through the centre of the assembly, trapping it all in place. Each part is correctly located by a raised pin running the length of the centre tube, so you cannot install them at the wrong orientation without some serious effort. The wiring ring is moulded to the bell-housing, but you will need to put the wires in yourself to finish the job before adding the cowling, which is also keyed to fit only one way. The bell housing is a little simplified, missing some bolts around its edge, but once the props are on, most people won't notice. I'm sure that some lovely looking resin engines will be forthcoming from the usual aftermarket suspects in due course anyway, if this sort of thing is your bag. The landing gear bays are positioned in the inboard engine pods, which requires the turbo-superchargers to be relocated further back in the lower nacelle, with large pipes feeding them from the outboard side of the nacelle. This section of the nacelle is supplied as an insert, as it quite deeply recessed within the nacelle, and here fit is superb. The gear bay is a separate box within the nacelle, and has ribwork, ducting and hoses moulded into its 6-part assembly. It is surprisingly effective, and fits beautifully into the nacelle, even when only roughly prepared and held together with tape. The turbo-superchargers fit into recesses in the nacelles, and have lots of detail to make them stand out, plus a central boss for the little intake/outlet (I don't know which) that has a slide-moulded hollow lip. A reservoir of some sort is included on each nacelle sprue, as well as other parts that look suitable to be used to detail up the bay and engine area, but I'm not qualified to pick them all out off the top of my head. Moving to the gear legs, it's always a worry for an aircraft model of this size, and modellers wonder whether the landing gear will stand the test of time. The gear on this kit is all styrene, and each main leg is moulded as a single part with sharp edges and not even a hint of sink marks anywhere, which is really rather impressive and quite a surprise. Also surprising is the apparent strength of the parts, which resist flexing manfully, although I'm not the strongest modeller you ever did see. The long retraction jacks are all there on the gear sprues, and as you'd expect the contents of the sprues are all handed where appropriate, as noted in the picture caption. The tyres are styrene, and as you'd are traditionally split in halves, with separate hubs for each side. The tread pattern is diamond shaped and a little soft near the join, but the hub detail is excellent, and includes the brake hose on the outer hub. Whether the diamond tread is appropriate for your chosen subject will require a little research, as a great many period photos I've seen on the 'net show a circumferential tread pattern, although diamond tread is also seen, especially on restored examples. The bomb bay, with its structural formers backing the forward and aft bulkheads has a pair of side panels that affix to the fuselage sides using friction fit plugs, and effectively closes off the wing root from view. A false roof is installed at the top of the bomb bay, just as in the real thing, as the life rafts are stored in the small gap there. The bomb ladders fit in a V-shaped profile long the central rail, and you are supplied with ten 500lb bombs, which come in halves, and have some finely moulded two-part stabilising fins for the rear, and fuse propellers for the nose. The bay doors are broken down as the real thing, and have surface detail on both sides, with large hinges on the outboard edges, which mesh with the edge of the bay on the fuselage halves. The interior carries the full length of the fuselage in this kit, which is an improvement over the earlier B-25s, and you get a basic walkway through the full 22m or 74 feet of the aircraft. The navigator's station aft of the bulkhead is there, as is the walkway around the ventral ball-turret, and then a simple plank that goes past the waist gunners' positions, and through three bulkheads into the tail gunner's cramped compartment. As mentioned earlier, there are a lot of ejector pin marks to remove, but what you have is a solid basis for scratch-building the remainder of the detail if you are minded to. Markings At this stage I have no idea of what markings and schemes HK are planning, but hope to update this section as and when the details are announced. Needless to say, it's most likely to be olive drab over grey, bare metal (including the one on the boxtop), or some combination of the two. Either way, it will look spectacular hung on the wall. HK supplied only the basic decals for the B-25s, so we shall hope that a full set will be provided for this one, as it is an important release. If not, some enterprising folks will doubtless be along to oblige soon after launch. Conclusion Well, this is definitely the biggest styrene kit I've seen, and during the process of test-fitting and establishing what goes where, I've become very fond of it. If the parts fit together as well as they have done using tape, it should be a pretty easy build, thanks to some quite impressive plastic engineering. The bomb-load is a handy addition to any bomber kit, allowing you to portray your model loaded with a complement of bombs ready to go on a mission - it's raison d'être. I'm very pleased with the stand, although I'd have liked to see it moulded in ABS for extra strength, and with metal pins, but who knows what the plans for the final issue will be. I'm fairly certain (as far as you can be) that someone will produce a new, stronger stand for the kit, as it would be rude not to. Equally, metal landing gear will be arriving pretty soon, even though I'm not sure it's needed, due to the strength of the kit parts. Whatever level of detail you choose to finish your B-17 to, you can guarantee that it will be the centre of attention wherever it is displayed, and even if you store it with the wings off in the loft, you'll be visiting it quite frequently, just to have another look at this huge beast of an aircraft. Fortunately for me, my son has already volunteered to have the finished model hanging on his bedroom wall, although whether I'll get it finished in time before he leaves home is another matter. My build output seems to have dropped below glacial at present, sadly. Yes - it's a lot of money to lay out, but you get an incredible kit for the money. Detail, fit and sheer awesome size of the mouldings makes it good value in my eyes, and I see it making its way into many a stash once it is available on the open market. Will I build it? Oh yes! Very highly recommended. Review sample is courtesy of
-
I've always seen the Pan Am Boeing 747 as THE classic airliner. However I'm not that aware of all the small diferences between the various subversions of the 747, so I'm not sure which version to buy if I want to build a Pan Am plane. I know it has to be an earlier version, but which one? I've been looking at the REVELL 1/144 04863 SPACE SHUTTLE & BOEING 747 as it is a 747-121 (I think). Could that be used? Cheers and thanks in advance Hans J
-
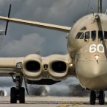
Boeing 737 Wedgetail Airborne Early Warning & Command version of the veritable 737, pics thanks to Steve.
-
Hi everybody, I'm going to try a build log. It will be slow but hopefully it will get there. The subject is Airfix's 1/44 Boeing model 314 Clipper, a fine example from the golden age of luxurious, noisy and vibration-rich air travel. All detail is raised lines but in this scale I think that works better, though repairs will be tricky. I intend to omit the glass and use Krystal Klear instead to save masking. The 1989 boxing from ebay looks complete, here's the sprue shot, though actual sprues are few and far between and the breakages and escape attempts have already started. My first dilemma is which scheme? Airfix include NC18605 "Dixie Clipper" in pre-war silver or G-AGCA "Berwick" though both paint schemes are full of known errors (Berwick should be DSG not Dark Earth which also makes her look fat). A USN blue Dixie would (I think) be possible with the decals if I can find a profile. Opinions welcomed, I'm honestly stumped which to do. I've also just spent ten minutes trying to find the 'missing' central tail fin... Cheers John
-
LiftHere! is to release a 1/72nd Boeing Skyfox resin kit - ref. LHM042 Source: https://lifthereserbia.wordpress.com/2017/12/11/near-future-kits/ V.P.
-
Hi guys! I finished this Boeing 747-200 plastic kit from revell and made a video about my experiences with it. It's not a great kit, but I feel it turned out ok - let me know what you think! Thanks
-
British Airtours Boeing 707-420 pics by Graeme H
-
Boeing 747-200, pics thanks to Graeme H, taken at the Qantas Founders Museum.
-
Evening All My first entry will be this Boeing Stratocruiser Cliff I will try and get the other two multis done as well [Cargomaster and Carvair] Hope to start this one soon Thanks for allowing me to join Martin H
-
 New from Red Roo Models in conjunction with Hawkeye Models Australia - 1/144th - Boeing B717 "The Tassie Devil" - ref. RRK14403 Plastic base is Fly DC-9 kit (link). Source: https://www.redroomodels.com/red-roo-kits/b717-tassie-devil-kit/ V.P.
 -
I had this one bought for me from SMW16 as a Christmas present from my Daughter. After a long think and a lot of planning I decided to build her as part of a comparison display between the TU-16, B-47 and Valiant. Ok so after a mornings work on her the B-47E fuselage has been closed up and the gear bays have been glued in. I'll update with photos in due course.
-
Good afternoon everybody, I would like to paint an A380 and a Boeing 737 with their respective manufacturer's primer paint. I tried to find tips or clues on the forum but I didn't find a proper answer to my question. Can someone know the equivalent with Tamiya for theses primers ? I suppose that for Airbus I can use a set of greens like XF-51, XF-76 and XF-62 but for Boeing I don't know. Thank you for your help. If you spot mistakes in my text, please advise me, english is not my mother tongue. Julien
-
 Good evening everyone please find below, after a 40 year build ! Berwick Winston Churchill's Boeing 314 Clipper. Here is a photo of the man himself at the controls, with the signature cigar: Below are the pictures of the completed build. The kit was lost in my parents loft until being recovered when we sold the house after I lost my father. I failed to finish in the KUTA IX Group Build so here it is. All comments greatly received and many thanks to all the BM members for the continuing encouragement, it would never have been finished without you Cheers Pat
- 17 replies
-
- 25
-

-
 Hi everyone and looking forward to this GB! Such a great idea to celebrate the winners, record-setters, weird and wonderful. I was going to try the forward swept-wing Grumman X-29 but in the end settled for this one, Boeing's losing entry in the Joint Strike Fighter competition, the X-32. (Or Jetty Mac JetFace as I might call her ) Will be built OOB. Good luck with your builds! Dermot
 -
Hi all, This is my latest finish, Italeri's issue of the Boeing X-32A Demonstrator which was their entry in the Joint Strike Fighter (JSF) competition and my entry in the Experimentals/Prototypes/Record Breakers GB here. While certainly a distinctive design, the Boeing entry would have looked substantially different in production, with a non-delta wing and four post tail. In the end, it lost out to Lockheed Martin's X-35 which is now entering service as the F-35. You can read more about the Boeing design here. If you want to watch a documentary about this competition, i'd highly recommend Battle of the X-Planes which you'll also sometimes catch on repeat on Discovery or PBS America if you live in the UK. Just to recap on the build.. Kit: Italeri 1208 Boeing X-32A Scale: 1/72 Build: Out of Box with Tamiya Tape for cockpit belts. Paints: Halfords Plastic primer (can); Revell Acrylics (brush); Klear; Flory Models Wash; HB Pencil; W&N Matt Coat (also brush) Decals: Kit with some extra spare stencils Italeri_1_72_Boeing_X-32_A_Done_ (1)_s by Dermot Moriarty, on Flickr Italeri_1_72_Boeing_X-32_A_Done_ (3)_s by Dermot Moriarty, on Flickr Italeri_1_72_Boeing_X-32_A_Done_ (2)_s by Dermot Moriarty, on Flickr Italeri_1_72_Boeing_X-32_A_Done_ (9)_s by Dermot Moriarty, on Flickr Italeri_1_72_Boeing_X-32_A_Done_s by Dermot Moriarty, on Flickr And posed with an Italeri Sea Harrier for comparison... Italero_Boeing_X32A_Sea_Harrier_FRS1_1_s by Dermot Moriarty, on Flickr And that's it! I have the Italeri X-35 in the stash too so might built that to display alongside it. Thanks for looking and enjoy your modelling. Dermot.
-
They say that the best way to make sure you will do something is to tell people you are going to do it and then you feel obligated to get it done. In that spirit I am announcing that I will be building the Unicraft 1/72 Boeing Bird of Prey. The Bird of Prey, (named that because someone thought it resemble the Star Trek Klingon Bird of Prey, there is some documentation that it was designated YF-118G)was a late '90 secret stealth technology demonstrator which first flew in 1996 and after 40 flights was retired in 1999. Due to its secret nature it was not publicly revealed until October 2002. For more details see https://en.wikipedia.org/wiki/Boeing_Bird_of_Prey. I like building weird or strange looking aircraft and the first time I saw a picture of it I knew I had to building it, so I did a web search and found that there actually was a kit of it in 1/72 buy Unicraft. I had never built a kit by Unicraft before so I bought it. It consists of 9 resin parts for the fuselage and wings and a resin slab for the landing gear. plus a clear canopy and decals. There is no interior, none, nothing. Note I got this picture off of their web sight since I forgot to get one before I started construction. If only may parts looked this good. What I got was warped and with huge amounts of flash and pin holes that made it look like Swiss cheaase, except I have never seen Swiss cheese with so many holes. Also the rear fuselage, (upper right) is shown here as a monolithic block. What I got was 2 pieces which looked like there hollowed out the block and then literally broke the top and bottom halves apart. I am not saying that this is the worst kit I have ever worked on, but I will take Mach 2 and Anigrand any day. Despite all that I should also say that I am grateful to have even that and will do my best to do it justice. So after much sanding and filling I have the fuselage assembled and the wings attached. Note that the front of the front landing gear opening has broken off and will need repair, both wings have broken in half and been reglued, the rear tip of the left wing is broken off and will need to be fixed, and the pi holes in both wing trailing edges. The wings still need to be blended in, but They will need to be straightened first. So after many dips in hot water I have gotten them this far; Which is a bit better. More to come, if it doesn't end up in the garbage, but I have suffered enough for now
-
 After seeing this aircraft fly low overhead while out with the family and then again give a great display at Farnborough last year i really wanted to try and build her in plastic! Never done anything other than an OOB build before so its also a good chance to learn some new skills and most likely give myself some headaches! The Aircraft in question is the Oil Spill Response Boeing 727-2S2F G-OSRA Untitled by andrewbudd2, on Flickr Photo not taken by me but sourced online She has a couple of interesting features that i will try to capture including a spraying boom mounted beneath the engines and tanks mounted inboard which hold the oil dispersant. Untitled by andrewbudd2, on Flickr Photo not taken by me but sourced online I am using the Minicraft 727-200 F kit as the base and have also got some aftermarket Resin Wheels and Aerials (Which are not moulded into the kit) Untitled by andrewbudd2, on Flickr Untitled by andrewbudd2, on Flickr I know this kit has plenty of issues but im just going to live with them for this one and not run before i can walk!Thanks to Skodadriver for some initial advice on kits!! So my first job was to mark out the location of the cargo door (which i am going to try and display open to see the tanks inside). I scaled up some photos of other 727-2S2F's and had a look at what ive got! Untitled by andrewbudd2, on Flickr I roughly marked out the paint stipes with some masking tape just to check the rough positioning. Untitled by andrewbudd2, on Flickr The first issue i have found with the kit as that the wings appear to be mounted about 5mm to far forward! Untitled by andrewbudd2, on Flickr Everything forward of this seems to measure up fine and also the measurements to the centre engine tally up so bit of a strange one for minicraft to get wrong! Anyway small steps for a first hour or so of the build but looking forward to it! BTW dont expect a quick build i make a snail look quick Cheers Andy
 -
Hi guys, Another one has made its way onto the bench... This is going to be a long term project. Basically I can foresee this being a project which I'm going to do a bit, then wait a while for drying times, do a bit more, wait a while, do a bit more... It's also going to be my first ever airliner, so will be interesting to see what happens. Help, C&C is more than welcome I'm going to do the Alitalia version, and then the plan is to use Halfords White acrylic spray for the gloss white, Xtracolor enamels for the wing grey and Metalizers for the metal areas. I hear that acrylics over enamels is a no-no, but from what I've learned is it's because of the enamel paint outgassing and reacting with the acrylic top coat, but it's ok to do so if the enamel has totally cured. I've experimented with Tamiya over Xtracolor, and this seems to be ok if the Xtracolor is given time to totally go off, and I mean 4-6 weeks plus!! If I'm wrong, please let me know Worst case scenario, sand the wings clean and start again. I've filled the windows with milliput, I'm yet to sand down though; there are no pictures as I was covered in liquid milliput and leaving white finger printers everywhere! I'll sand off the panel lines on the fuselage and won't rescribe these. I will probably try and rescribe the wings though, as the panel lines seem to make good guides for painting and the wings seem to get a bit dirtier and therefore panel lines more visible. Basically this is all that's really happened bar the milliput... More to follow (one day, you know what my builds are like!! Sssslllloooowwwww!!) Oh, and I've also got a couple of AM bits for her: The wheels seemed a bit crude OOB so replacing them, and I've heard the metal landing gear is a worth while addition to this kit as the way the kit gear fit makes them quite week OOB. Well, speak to you all soon Val
-
Scratcharonautics (https://www.facebook.com/Scratchaeronautics/?fref=nf) has just released a 1/144th Boeing P-8 Poseidon resin kit Available here: http://www.ebay.co.uk/itm/BOEING-P-8-POSEIDON-1-144-SCALE-POLYURETHANE-RESIN-KIT-/252498106728?#ht_566wt_1271 V.P.
-
Flight engineering has designed an impressive 1/48th engine nacelles upgrade set for the old Revellogram Boeing B-29 Superfortress kit. Source: http://www.flightlineengineering.com/b29-kit.html V.P.
-
The Premise: So here's the idea. Boeing turns 100 this year, and is, depending on who you ask (silly Airbus fans) one of the best aircraft manufacturers in the world. Over the last 100 years, they have built thousands of planes, and designed countless different military and civilian models. So why not take the Boeing Centennial as an opportunity to celebrate the beauty and power of their aeronautical creations? The Rules: All GB entries must be aircraft, and must have been designed by Boeing. Aircraft may be airliners, fighters, bombers, anything you wish. Even spaceships, such as the CST-100, are allowed. Collaborations, such as the Bell-Boeing V-22 Osprey, are also allowed. Larger projects which somehow included Boeing are also allowed. Designs Boeing inherited from other manufacturers, such as the Boeing 717, are allowed. This does not work backwards - eg. a DC-8 will not be allowed, as it was built long before Douglas became part of the Boeing Company. If unsure about something, consult GB hosts for guidance. Aircraft made under license by other manufacturers, as well as stolen/reverse-engineered designs are allowed. Spacecraft, such as the CST-100 Starliner, are allowed. Designs which where never built are allowed (mostly because I really want to build a B2707) Aircraft which have not yet been built/flown, such as the 777X or the 787-10, are allowed. All GB members must have tons of fun while building their models! Supporters: POTKC tomprobert theplasticsurgeon Jabba Paul J TonyTiger66 SleeperService TrojanThunder snapper_city CliffB S48 helios16v Caerbannog Dazzio Pin PhantomBigStu Jessica Addendum: Post your thoughts on this below - there should be some interest in a Boeing GB, right? Right? Right? Disclaimer: This is my first time ever (yay!) suggesting a GB, so if I'm doing something wrong (boo!) feel free to shout at me. Constructively.
-
 Good evening, After around 70 odd hours of work, I've finally completed my first built in over a decade. It was certainly a testing model kit, and despite some gross errors, this built has taught me so much about patience, taking time to ensure the intricacies and details are done as best as possible. I hope you enjoy the photos. I would sincerely like to thank TrojanThunder for the overwing decals. The default Revell ones were flimsy to say the least for this rookie. The Qantas 90's Livery was by DrawDecals and the details were off the default Revell decal sheet. Feel free to let me know what you guys think and I look forward to my next built. Yup, it does resemble and Boeing 737! Whew! I went with the default winglets and engines. One of the more testing parts was reprofiling the winglets to reflect the correct chord and height, followed by assembly, and hand painting the winglet, gold stripe and leading edge. TrojanThunder, the decals arrived in time! Thank you so very much! Another challenging part, getting these individual decals in the tailplane. Thank you and kind regards, Charlie
- 22 replies
-
- 14
-
-
Good day every one I though I would share my latest completion. This is the Revell Cargolux 747-8F. Very nice build totally out of the box. Fit was very good and the detail is (to my eye) excellent. I had issues trying to work out the correct colour, in the end I opted for Tamiya spray can which look ok but on reflection it is way, way too dark. On some photos it looks almost white, on others it is quite dark but no where near my selection. I didn't go for a respray because I used a poor primer (automotive) and was worrying about loosing the detail. The decals are very good but the tail one is very thick and just would not settle into the panel lines no matter how much micro-sol i used. The engines I think are very good and the engineering involved produces a very good looking attempt but some of the fan blades did suffer slightly from short shots or flash and they are difficult to clean up. Over all i am happy with the result, She is a big, good looking beast! I am still quite new to the civvy side of things but I do like working in this scale and looking forward to my next attempts. It does make a pleasant change. Any hoo here are the pics: And here she is joining the rest of my civvy fleet. The Concorde is on its last legs but I have another in the stash to take over Thanks for looking! Cheers now Bob
- 23 replies
-
- 17
-