Search the Community
Showing results for tags 'Blenheim'.
-
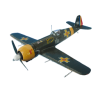
Airfix 1:48 Blenheim IF - Colours of L6739 YP-Q, currently flying with ARCo at Duxford. The Inside - To start off, this kit is fantastic by Airfix. Nearly everything is in there thats on the real thing. You can really see they researched this kit well. The instrument panel is detailed superbly with raised detail, unlike other Airfix panels that were just flat. The decals on the panel were also very well done, as shown in the photo they went on well and the colours are good. The rest of the cockpit is well made with all of the main controls, dials and wheels in place. The two spars coming off the bathtub-like structure provide extra strength to the wings, all four fit very nicely into the allocated gaps. The cockpit glass - Unlike the inside where everything fitted fine, the glass was a different story. To start with, Airfix indicate the wrong left-hand side canopy (there are two in the kit). If you look at photos of the aircraft, you will see the difference. The fit was dreadful on both sides, and if Airfix did the whole front section in one mold it would certainly better (but im not sure this is even possible with injection moulding?) . Maybe something for them to consider if they are doing a bomber version or a Mk IV version. The rest of the glass/ canopies - As you can see, my hand isnt the steadiest and masking individual panels wouldnt be worth it. Only after painting did I realise Eduard has done a set of masks. Bummer really. The turret came with a nice little assembly jig that helped ALOT with the little parts. The turret fitted together fine and can just be slot into place onto the aircraft. Personally I haven't glued it into place just to add that element that the aircraft can 'move' . I also didnt glue the main wheels on, since the undercarriage spars are really quite tight on the wheels and they havent come off yet after a few days of me rolling it around. The tailwheel though is one solid piece, and strangely its one of the last things you're told to put in place (i.e not during the closing of the fuselage). The engines - The engines could be a model of their own - the 6 part engine and 3 part propeller are superbly detailed and the first proper radials I've made. The propellers move aswell which is nice, as shown below. No photoshop! Just some wind a slow shutter speed. All in all its a superb kit, and Airfix are really doing well with the new toolings. My only wish would be rivet details like Eduard's but you cant have everything. Hope you all had a wonderful Christmas and may the new year bring you joy through scale modelling! All the best, Olly.
-
So, this is my first input since I joined this forum a few weeks ago. Probably some of you will be bored by another Blenheim building report - especialy the 40+ year old airfix model. However building this kit will hopefully be an important step to improve my skills. As usual I started with interieur details. Actualy I planned to add some details to the cockpit to make it look more interesting. But in the end I build up a totaly new cockpit section, using only some fragments of the kits parts. Pictures will follow ...
-
Hi all. I found this pic that shows a Blenheim I in North Africa (the web says that is a Mk IV, but it is wrong): https://abpic.co.uk/pictures/view/1513311 Any idea how is painted? Thanks. Milo.
-
 Blenheim Mk.IV Update sets & Masks 1:72 Eduard for Airfix Kit The new tool Blenheim was welcome for those who build WWII British Aircraft, Eduard are now along with some sets for it. Get what you want for the areas you want to be more of a focal point. As usual with Eduard's Photo-Etch (PE) and Mask sets, they arrive in a flat resealable package, with a white backing card protecting the contents and the instructions that are sandwiched between. Interior Set (73634) This set has one pre-painted fret. You get cockpit details, seat belts, instrument panel, throttle details, machine gun details and rudder pedals. Exterior Set (72669) This set contains many fuselage and wing access panels. Undercarriage bay fittings and interior, and engine details, Landing Flaps Set (72670) This set contains as the name would suggest a new set of detailed flaps. Some removal of the kit areas is needed to fit these. Masks (CX514) Supplied on yellow kabuki tape, these pre-cut masks supply you with a full set of masks for the glazing. In addition you get a set of hub/tyre masks for the main and tail wheels, allowing you to cut the demarcation perfectly with little effort, plus a landing light mask. Review samples courtesy of
 -
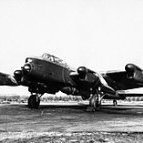
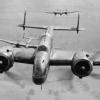
@Procopiusand I decided a few days ago that a Blenheim buddy build would be a great way to start the New Year. We've each chosen an airframe, and with Edward's Wimpey finished and with my Zero nearly so, we can make a start. I’ll let Edward introduce his own star, but mine will be the most recent Airfix boxing, the IV bomber, in the OOB markings of 107 Squadron. The aircraft featured is seen here at RAF Leuchars, not a million miles from chez 06/24: AIRCRAFT OF THE ROYAL AIR FORCE 1939-1945: BRISTOL TYPE TYPE 149 BLENHEIM IV.. © IWM (CH 2428)IWM Non Commercial Licence Whereas choosing a subject was easy, choosing a thread title took a little more work. We toyed with many options: "The Scarlet Caterpillar", Churchill’s description of Marlborough’s army en route to Blenheim, too obscure; "Britain First", the name of Lord Rothermere's private antecedent of the Blenheim, was discarded on grounds that the name's appropriation by the far right made it unsavoury; and the mottos of our two chosen Squadrons: Nous y serons ("We shall be there") Si vis pacem para bellum; (Translation: "If you want peace, prepare for war") But in the end, what better than Churchill’s words of encouragement: "Courage is going from failure to failure without losing enthusiasm.”
-
Bristol Blenheim: The Yugoslav Story Operational Record 1937-1958 by Aleksandar M. Ognjević I keep being pleasantly surprised when it comes to books on the subject of aircraft that flew for, against and simply over Yugoslavia during the Second World War. After buying the Messerschmitt Bf 109: The Yugoslav Story I came across a book in a very similar format, but by a different author and from a different publisher, dedicated to the history of the Bristol Blenheim in Yugoslavia (for avoidance of any doubt I want to say that I have payed full price for my copy of the book, including the rather expensive Serbian Post that amounted to some 40% of the book`s cost). And the news keep getting better as this book`s author, Mr. Aleksandar M. Ognjević, has also been working on a title dedicated to the Hawkers (Hurricanes, Hinds and Furies) in Yugoslavia and this book is just months away from publication. Can`t wait! To the Blenheims now... The book is available from the publisher/author and you can also find a technical presentation there and some sample pages: http://bristol-blenheim.leadenskybooks.com/ One small note: opening the presentation pdf file on the above address I`ve noticed that the photographs in that sample are rather murky, but the ones from the actual book are actually very clear. Table of contents I found the book quite conveniently organized. The first chapter recounts such things as the Yugoslav acquisition and production of the Blenheim, complete with the savory adventures of the Yugoslav crews sent across the already at war Europe to bring home the lot of British produced aircraft. This chapter is also supported by three tables: one detailing the Blenheim types that entered Yugoslav service (complete with respective dates, numbers and serial numbers) as well as the prototypes and abandoned projects, a second listing both the British and Yugoslav serial numbers of the twenty British produced machines and a third table being a complete list of the Blenheims in Yugoslav service that mentions the units in which they served and - in many cases - also their fate. The second chapter is dedicated to the April war and is divided into three sections, each following the history of the three major units that flew the Blenheim: the 1st and 8th Bomber Wings (Bombarderski puk - BP) and the 11th Independent Long Range Reconnaissance Group (SGDI). This means some episodes are recounted more than once - but from different perspectives - as some of the aircraft and units intermingled in time, but I liked this approach. I was left with a very clear image of the aircraft disposition and of which unit did what throughout the war. This was also helped by two useful maps showing not only relevant locations in Yugoslavia, but also the exact disposition of the Blenheim units at the start of the April war. The text of these chapters (and throughout the book) is well supported by the recollections of contemporaries (mostly the air crews) and is accompanied by a large number of photographs. In fact I think there is at least one photograph on each page, depicting both aircraft and crews. Among the latter, there are many portrait type photos of the airmen in uniform so that after you read their stories and memories you`ll be able to put a face on these. In this sense, the book lives up to its goal of keeping their memory alive. The following chapters are dedicated to the other operators of the Blenheim over Yugoslavia (the RAF, Independent State of Croatia and Partisans) and to those countries that operated former Yugoslav aircraft (Hungary, Romania and Finland). The chapter on the Royal Air Force is once again organized according to the squadrons that operated the Blenheim (both Mk.I and Mk.IV) and recounts their adventures to the extent that they took place over Yugoslavia or encountered Yugoslav aircraft (including the one that transported the Yugoslav king to Greece). The chapter dedicated to the Croatian Blenheims is reasonably long and it includes a three pages operational diary of the Rajlovac Airport between 27.04.1942 and 24.06.1943, but the chapters on Romania and Hungary are brief enough as they only tell the story of the one Blenheim that defected to Hungary and the three Blenheims sold by the Germans to Romania. So too are the following two chapters dealing with the Finnish acquisition from Germany of B-4 (Mk.IV) parts and their assembly in Finland and the sole ex-Croatian (ex-Yugoslav) machine captured by the Partisans. The next chapter is a discussion of the camouflage and markings of the Bristol Blenheim in Yugoslav service, with some notes on the machines taken over by the Independent State of Croatia, the ones sold to Romania and the Hungary defector. Though brief (one page worth of text) it is very informative: from the evolution of the styles of serial numbers to the one of the national insignia to the actual paint-jobs. The text ends with a glossary, a list of comparative ranks of the VVKJ (Royal Yugoslav Air Force), ZNDH (Air Force of the Independent State of Croatia), Luftwaffe and VJA (Air Force of the Yugoslav Army) and finally a substantial bibliography. Now, for all scale modellers interested in this subject, comes the exiting part: the Colour Plates section. It contains 24 profiles that depict thirteen Blenheims Mk.I - both Ikarus and Filton/Avro built - in Royal Yugoslav service, three of the RAF machines in Greece (two Blenheims Mk.I and one Blenheim Mk.IV), the single Hungarian - ex-Yugoslav - Blenheim Mk.I, one Croatian (Independent State of Croatia) Blenheim Mk.I, one Romanian - ex-Yugoslav - Blenheim Mk.I, the Partisan captured Blenheim Mk.I in two different camouflage styles, two Finnish Blenheims Mk.IV (one from the war period and another from 1955) and one profile of the sole, unlicensed, B-4 version in Yugoslav service (similar to the official Mk.IV). In addition there are three top views of Blenheims Mk.I (two Yugoslav and one ex-Yugoslav with Hungarian markings) and one bottom view of a Yugoslav Mk.I machine. These are very helpful for modellers given the somewhat complex pattern of the upper-side three-colours Yugoslav camouflage scheme. Each artwork is accompanied by a short description of the aircraft in question and taken together they highlight all the specific elements (from colours to stencils to certain modifications) that modellers will need to take into consideration when deciding how to build a certain machine. As mentioned, the Yugoslav camouflage schemes are quite colourful and should make eye catching models. The back cover is not wasted either. It depicts two RAF Blenheims (an Mk.I and an Mk.IV) in Greece, a close in on the cabin of the Mk.I machine showing its emblem and another view with the front of a modified Mk.I in Yugoslav service which highlights the modification of the windscreen to support a frontal machine-gun. In the end I`m gonna pull another "highly recommended" from my hat. Great book!
-
- 3
-

-
- Blenheim
- book review
- (and 1 more)
-
Hi chaps I have a 1/72 Airfix Blenheim that's been floundering on the shelf of doom for some time, with the 1/48 kit due at the end of the year, which is my preferred scale I've been thinking of maybe modelling my 1/72 kit in flight. Just wondering if anyone had some good tips on how to make props look realistic in flight. Any tips would be appreciated!
-
I've got a bit stalled on my Fairey Long Range Monoplane and I've got an Airfix F-111 on the go in group builds, so I'm building this for some actual fun! It has been semi-started for a while now, and I painted up the cockpit when I was doing the old Airfix Blenheim. I was impressed by the etch instrument panels with celluloid backing. I tried an etch seatbelt for the pilot but the observer got a wine bottle foil and fuse wire harness instead. Not sure I will be able to tell the difference through the canopy... I kitted out the cockpit an extra seat and panel for the observer: The two transparent halves of the canopy worked well: ... as long as you check the width beforehand and add a wedge to the bottom of the fuselage: Thanks for looking, Adrian
- 33 replies
-
- 11
-
-
 Hi everyone I’ve been gripped by the modelling doldrums lately. I have zero enthusiasm for either my HK B25 or my FLY Hurricane so rather than half heartedly attempt to build them I’ve packed them up and put them to one side (for now). So what to do in the mean time? I’ve been following, as I’m sure many of you have “From Failure to Failure” a jolly good thread by messers 06/24 and Procopuis and it inspired me to think small. I have several of the Airfix Blenheim’s in the stash and after following the said thread I thought that I’d give mine ago and I’m glad I did coz I’m really enjoying it. I started last night and from the off I’ve decided that its going to be a totally OOB build without any extras or do dads, in fact I’m not even going to get the Eduard masking set for it - I have tape and a knife so I’m sure I can mask it! So far I’ve completed the cockpit tub with the only additions being some masking tape belts and I’ve mated it to the fuselage. To get a better fit than you otherwise would I removed quite a lot of plastic from the rear of the cockpit and I’m quite happy with the results, I still have some gaps to fill but compared to what they could’ve been they should be easy to address. First up a photo of the amount of plastic I removed to try and get a semi decent fit.. The results aren’t too bad.. Excuse the dust I have since removed it (well most of it) I do however have a little work underneath the old girl to fill the gaps - I guess this is a trade off for getting a semi decent fit of the cockpit to the fuselage? But overall she is starting to take shape (it’s only taken me about 6 hours work to get to this stage.. Right I’m off to mask the cockpit. Cheers all Iain
- 69 replies
-
- 11
-
-
The latest release from Airfix is in stock now and available to order. The 1/72 Bristol Blenheim Mk.IV (04061) has decal options for 2 aircraft 1. Z7633 of Groupe de Bombardement 1 (Lorraine), Armee de l'Air, North Africa, 1941 2. R3816/OM-J of 107 Squadron, RAF Leuchars, March 1941
-
SBS Model Blenheim Mk IV in Finnish Service - 1:48 SBS Model
Julien posted a topic in Decals & Masks
Blenheim Mk IV in Finnish Service 1:48 SBS Model This set is for the Bristol Blenheim as used by Finland. 4 Options are provided for aircraft in different years of service. BL-129 of 1/LLv 46 in June 1941. Olive green uppers with silver dope undersides. BL-129 Photo Flight of LeLv 48 in June 1943. Green/Black uppers with RLM65 undersides. BL-201 of E/PLeLv 48. Agust 1944. Green/Black uppers with RLM65 undersides. BL-199 of 1. Lsto summer 1956. Overall aluminium dope with metal cowlings. Conclusion This is a good sheet with a fair spread of Blenhiems used by Finland over a few different year. The decals look to be in register, colour dense and should pose no problems. Recommended. Review sample courtesy of -
Well it took longer than expected but enjoyable every minute. 16 years ago i built the airfix blenheim of the time. I was 10 years old, sat alongside my dad, using brushes and enamel paint. But today its all airbrushes and new tooled kits. This Airfix Bristol Blenheim MkIVf is the lastest tooling from airfix. It was a great kit with only a minor fit issue on the main fuselage join. Despite that every part was a great fit and had the resemblance of a Blenheim. The whole model was painted with vallejo model air which was a nerve racking task for me as this was my first camoflage aircraft painted using my airbrush. Ìt is a little rough round some of the edges but im more than happy with it. I learnt alot of new techniques along the way as well as some of the old tried and tested techniques. I used an enamal thinned paint for a panel line wash, and learning to preshade and create tonal variations in the paint. Finally the exhaust staining was done using chalk pastel shavings and also used some dry brushing to create chipping on the propelllors. Everything was then given a coat of matt varnish and finished off with removal of the masking tape. Overall i am happy with the Blenheim and cant wait for the 1/48 Mk1 from airfix. Thanks for looking in. On e again thanks for looking in.
- 10 replies
-
- 30
-
-
 Airfix is to release in 2014 new tool 1/72nd Bristol Blenheim Mk.I & Mk.IV kits. Ref. A04016 - Bristol Blenheim Mk.I Bomber Source: http://www.airfix.com/shop/new-for-2014/172-scale-military-aircraft/a04016-bristol-blenheim-mki-bomber-172/ Ref. A04017 - Bristol Blenheim Mk.IV Fighter Source: http://www.airfix.com/shop/new-for-2014/172-scale-military-aircraft/a04017-bristol-blenheim-mkiv-fighter-172/ V.P.
 -
Has anyone else noticed the Blenheim IV in the foreground of the photo at the top of p.125 of the May 2017 Flypast? It's an article on the history of XV Sq and the photo depicts a gathering of XV and 82 Sq Blenheim IVs at Wyton in July 1940. The aircraft of interest to me (Txxxx, LS code but no individual letter) seems to have a long ventral bath under the nose, like that used later on the Blenheim V. It is quite unlike the transparent blister with ventral gun featured by other aircraft in the shot and is definitely not the later FN underside turret. I'm assuming it is a trial of the Blenheim V configuration but was unaware that it was flying on one (or more?) Blenheim IV(s) as early as July 1940.
-
Hi all, I picked up this kit from my local model shop (about a 40 min drive ) I'm going to be building this OOB as I don't have any spare aftermarket parts at the moment. Before I start is there any glaring fitting issues that I should know about? It looks like one of Airfix's new tool kits so I'm hoping that it will be good I'll be painting it with my newish collection of Vallejo Model Air (I just love those paints)
-
Hello All, Well, I see Martin is off building the old Airfix Ju88, which will doubtless cause him all sorts of grief. Why should he have all the fun?? So in a gesture of solidarity I've dusted off the old Airfix Blenheim, a kit that is not without (cough, ahem) "issues". I've been plodding away at it on and off for a while, and here it is with possibly the lowest point in Airfix box art: I've rounded off the pointy nacelle fairings and reduced the riveting with a light sanding. Wheels will be firmly up on this one, so that's one less job! The engines and cowlings are quite nice to my eye. I've replaced the turret with the spare one left over from my new Airfix Blenheim 1 build, and taken the Blenheim 4 parts from that kit and grafted them into the cockpit. The canopy has been replaced with the Falcon vac form and the fuselage has been fettled to fit. The only remaining changes are a light sanding to the fuselage rivets and re-shaping the tail fin and rudder so it looks like a Blenheim. I think the tail shape error started with "Aircraft of the Fighting Powers" (love that series of books even though the plans are all wrong). I'm going to do the Free French option. The decals look quite good for Airfix of the period, in register, not yellowed. The British option looks nice too - all you have to do is find the red disc for the fuselage roundel! Thanks for looking, Adrian
- 168 replies
-
- 18
-
-
Dear Fellow Modellers Some of you may know of a book entitled 6 weeks of a Blenheim summer recalling Alastair Panton's memoirs flying recce operations during the battle of France in 1940. I assume these reconnaissance Blenheims would have had a camera set up for their role? Was it set up in the bomb bay like with the Mosquito? Does anyone have any ideas or photos on how they might have been configured? Thanks Andrew
-
So having been born and raised in Malaysia and Singapore, and having parents lived through the Japanese occupation in WW2, subjects relating to WW2 and post-war aircraft subjects from that region are near and dear to my heart. I've been slowly accumulating associated with that region for years. At the moment the holy grail is a Malaysian Scottish Aviation Twin Pioneer, which I'm hoping there'll be an injection kit sometime soon. Anyway, I saw that Airfix's new Blenheim had the markings of Sqn Ldr Arthur Scarf VC from his fateful mission on Dec 9, 1941. The build order is pretty interesting as it has you starting with the wings and fuselage instead of the cockpit. I'm pretty impressed with the complex wing spar and landing gear. While the wingbox was glued together and painted, I put the beautiful cockpit together. The only thing I did was some masking tape seatbelts made out strips of Tamiya tape, lightly painted with Tamiya Buff and then washed with a bit of diluted Burnt Sienna. It's a lovely cockpit, and I'm sad that I have to close it up. I've found that so far, the hardest part of this kit is the nose. The very precise fit of the transparencies and nose leaves very little room for error. I've had to pop off the clear parts, reattach them to make sure they aligned, and wiped the fingerprints off the insides more than once. I was also reminded of why building WW2 aircraft with greenhouse transparencies drove me bananas.
-
 Hello BM's. Today I'm posting a model I completed at the beginning of the year. After seeing Tonyot's excellent Whitley (http://www.britmodeller.com/forums/index.php?/topic/235007302-172nd-airfix-whitley-mkv-of-297-airborne-forces-sqn-raf-netheravon-1941/) I thought I'd get the Blenheim out of it's case to see if I could improve... I initially did a whitewash on black as I wanted to see how that turned out. It highlights the panel lines well but I'm not sure I'm a fan in terms of realism. I'm probably going to just add some chipping and exhaust discolouring to the underneath. What do you think? Do it? Leave it? here's how she looks currently: Comments welcome!
- 14 replies
-
- 20
-
-
Blenheim Mk.IF Photo-etch and Masks - Airfix Kit 1:72 Eduard The Airfix kit was released last year while a great kit there is always room for some photo-etched upgrades. Interior The interior set provides a new part for the non clear section of the nose, seat belts, parts for the control columns, rudder pedals, instrument panels, and throttle levers; along with parts for the gunners seat and gun. Exterior As its name would suggest this fret contains many parts for the exterior. A multitude of inspection panels for the wings and fuselage are included, parts for the engine fronts, and aerials are provided. Most of the parts on this fret though are for the insides of the nacelles where the landing gear retracts into them, and parts for the landing gear legs. Landing Flaps As it says on the packet this set is to replace the landing flaps for the kit. Photo-etch will always do this more realistically in this scale than the kit parts. The webs are part of the main fret and twist round into place thus minimising the having to add small additional parts which the carpet monster is waiting to devour. Masks The mask set provides masks for the extensive glazing and wheels. Conclusion These frets should enhance an already good kit. Highly Recommended. Review sample courtesy of
-
Bristol Blenheim Mk.1 L 1145, 57 Sqn, 1 Gp RAF Bomber Command Shot down by a Bf109 near Bad Kreuznach whilst carrying out reconnaissance over the Siegfried Line. Kit: Airfix 1/72 Paints: Tamiya and Vallajo MA Decals : Extradecal Extras: Scratch built turret interior, Airwaves seat belts and Barracuda exhausts and air filters. WIP: HERE
- 22 replies
-
- 43
-
-
 Placeholder before the kickoff. Photos will follow once I have a working camera tomorrow. Kit: Airfix 1/72 Blenheim IV Decals: Xtradecal set X72203 Aftermarket: On order and looking like the eduard interior set to pimp out the large glass areas. Also in play: Transparency masks and a try out of the precut camo masks. I intend to use my airbrush on a 1/72 plane for the first time as well. Righty ho then it all kicks off tomorrow. And yes as an ex-matelot Fish-Head how could I resist anything FAA from a RNAS with such a wonderful name . I believe the base was also commissioned as HMS Tern.
 -
 Ordered straight from the drawing board in 1935 the Bristol Type 142, later called the Blenheim was, for its time, a very advanced aircraft but by the outbreak of the Second World War it had been overtaken by fighter development. Seeing service across all the major fronts of the Second World War, the Blenheim was used extensively by the RAF as both a light bomber and fighter before being phased out of service in 1943, replaced by more modern types less vulnerable to enemy fighters. Herein shall be documented my continued struggle with Airfix's Bristol Blenheim Mk.1. I originally started this model for the Bomber Command GB some time ago but due to life pressures (house move and one of those small, smelly baby-type-things) it never got finished. Much to my chagrin. Col. and Shermaniac (thankee chaps) have both agreed that the model in its current state is within the 25% threshold and as such as motivation to get the thing finished I've decided to throw my hat in to the ring of yet another GB in the hopes of getting it over the line. My previous efforts may, for those so inclined, be found HERE but all further updates shall, rather obviously, be contained within these here thread. So, where are we up to then? Well, in our last episode I had rather painstakingly copied a resin wheel-well upgrade in plasticard and fuse wire (with the invaluable help of bigbadbadge; who, incidentally, also supplied me with the decals for this machine. What a chap) added a little internal detail and scratched up a replacement for Airfix's poor excuse for a rear turret. I'd also rather cack-handedly drilled out the lightening holes for the flaps. Since the last post of mine in the previous thread I have stuck two pieces of styrene to two other, different and larger pieces of styrene...and bought some seat belts. So still quite a way to go. Progress so far is shown below; everything else is still on the sprue. So, now we call all see where I stand I guess I'll see you on the 2nd! TTFN Paul
 -
 Hello All, Here's my Revell re-box of the Frog Bristol Blenheim, lightly converted to have retractable skis: Sorry for the wierd "daylight vs electric" lighting effect, but I just couldn't get a decent shot yesterday. Work in progress thread is here. I was inspired to do this example by the picture shown here. Here's my reproduction of the shot: So I need to source some spinners (I think the Revell re-box of the MPM Wellington II may provide these) and build a trailing aerial dispenser. Since the photo was taken I have rigged the top aerial - I'm now wondering if the trailing aerial superseded the wiring on the top one. I've had a blast doing this model. I detailed the cockpit, replaced the turret glazing with the Falcon one, added oil coolers and detailed the undercarriage/skis, but other than that it builds well from the box and looks very good alongside the new Airfix one. The main difference to my eyes is that the Airfix nose is much wider. I will post a comparison picture when I take one. Thanks for looking, Adrian
- 21 replies
-
- 30
-
-
Hello All, Time for a new project. Whilst making the new Airfix Blenheim 1 as A-RE, I dug out all my other Blenheims (all 1/72): Airfix MkIV (x2), MPM MkIV, Frog Mk1 (x2), Revell (Frog rebox) Mk1. Didn't realise I had 6! The Frog Blenheim is a very nice kit, not far behind the new Airfix kit, and certainly easier to assemble! I've decided to make a Finnish Blenheim on skis, as shown here. I was interested because the skis are retractable, and if you look at the picture there's an additional metal fairing around the lower nacelles to blend with the retracted ski. So there's a bit of work to do on the undercarriage, and there are some other mods to be done to make it a Finnish Blenheim not an RAF one. So here's a sprue shot: The decals for this are a rather nice RAF fighter scheme and a post war (roundels) Finnish scheme. My first stop was the undercarriage bay. The kit parts fit nicely and I have cut away some of the supporting plastic: Then I boxed in the wheel wells and added front and rear spars and those tank things from scrap bomb doors from the Airfix Mk1: The cockpit supplied by Frog is enhanced using the new Airfix cockpit as a guide, bearing in mind that not much is visible when the canopy is on. The red colour is not a scalpel accident, it's the paint on the wine bottle foil dissolving in superglue: And painted. Finnish built examples were apparently grey inside, but I've gone with interior green: Here's the kit canopy dry-fitted: It looks to me like something out of "Alien" The cockpit is "somewhat" visible through the canopy. For me, this canopy is better than, or at least on a par with, the rather disappointing new Airfix canopy in terms of distortion, and it's a very good fit. Because I have the Falcon canopy set, I tried a comparison between: Kit canopy, dipped in Future: Falcon vac (not dipped): I'm not sure whether to take the plunge or not. Thanks for looking, Adrian