Search the Community
Showing results for tags 'Bandai'.
-
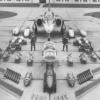
 TIE Interceptor 181st Imperial Fighter Wing | Bandai 1/72 I did this kit as a nice sendoff build before I went on vacation for the week between Christmas and the New Year. It's painted as the personal TIE Interceptor of Commander of the 181st Imperial Fighter Wing, Soontir Fel. The red "bloodstripes" signify ten combat kills, something nearly every member of the elite 181st bore on their Interceptors. Since Soontir Fel is one of the greatest pilots in the Galaxy, his personal fighter has seen lots of action against the Rebellion (and New Republic), so I decided to give it a little bit of weathering. I painted the entire ship with Alclad metallics and used some liquid mask for chipping before giving the entire model a coat in a custom blue-grey I mixed up with a couple Tamiya paints. The wing panels were painted with a mix of Vallejo Model Air Black and Arctic Blue (metallic) to give them an iridescent shimmer. The red strip is just Tamiya Flat Red weathered in the same manner as the hull of the ship. The rest of the weathering was done with MIG Productions enamels. Comments and criticism is welcomed as always!
 -
Had a look at my built but not competed BB8 today. I've started to add a pin wash but the little fella is so shiny that it's having trouble sticking so a rethink is required. I ended up thinning my paint and adding a drying inhibitor and then painting it on and carefully wiping it off, this seemed to fill some of the panel lines but not all; I also need to add 2 water slide decals that I simply could not hand paint. I also have no idea yet how I'm going to display him so I'm afraid BB8 is going into storage until I can decide that.
-
Well folks here he is, finished at last. Some of you have read the WIP thread for this little fella which chronicled not my build, but the process of learning how to paint and weather a kit; this being my first build following a break of 35 years and realistically the first I have truly painted. The WIP thread can be found here: http://www.britmodeller.com/forums/index.php?/topic/235011076-bandai-r2d2-and-bb8-newbie-wip/ Ultimately R2 is destined to be a bookend, but until I sort that part out, here is my finish painted model: A big thank you to Rockpopandchips, AndyRM101 and Oileanach for their technical help when it all went "Pete tong", but thanks to everyone else who watched and commented on my WIP with words of encouragement. I'm going to detail paint BB8 next and see if I can get away without using any of the transfers or stickers as I did with R2. thanks for looking, smeggy
- 19 replies
-
- 10
-

-
Just finished bandai 1/48 AT-ST. (Just needs a touch up here and there but otherwise done) What a great kit! Goes together like lego - no glue required. No fit issues of any sort. Painted with Tamiya Acrylics and wethered with Vallejo Washes - did not want to use my usual oils as Bandai plastics prone to cracking. Finished base with a pva glue and sprinkle of railway modellers grass and stones. Please excuse my amateur hour photography. Hope you like it!
- 5 replies
-
- 10
-
-
- Bandai AT ST
- At st
- (and 1 more)
-
BTL-A4 Y-wing Bandai 1/144 scale Bandai "Vehicle Model" Y-wing (1/144 scale); completed in Tamiya & Vallejo acrylics, Mr Color lacquers, and Mig Productions enamels. This is was a fun little weekend project! I started it late Sunday morning and finished it up Monday morning. I painted it as Dex Tiree's Gold 2 who was famously shot down by Darth Vader during the Battle of Yavin (I had no intention to copy you, Andy!). Truth be told, it could probably stand to have a little more weathering, but I'm pretty happy with how it turned out, especially for something I started on Sunday around lunchtime and finished up Monday morning. I still can't get over the detail on this kit; for something that fits in the palm of my hand, it's absurd! Comments and criticism is welcomed as always!
-
my first 1/72 scale build experience...
-
Bandai's new 1/144 Y-Wing from their Vehicle Model range. There's not much I can say that hasn't been said a thousand times before regarding Bandai's Star Wars kits. They are the best out there by a long way, and this one is as good as the rest, with details that are almost as good as the 1/72 version. This one's painted roughly in the colours of Gold 2 although the droid's not entirely correct. The wip can be found here And for size reference, it's almost exactly the same length as the Star Destroyer from the same range; about 11cm nose to tail And, somewhat unsurprisingly, it's about half the length of a 1/72 Y-Wing (Finemolds version in this case) Thanks for looking Andy
-
After th Pg Zaku, i started my first 1/72 scale model kit. Bandai X wing. This is the box and parts some parts are realy tiny first i started the assembly all parts. After that process i will be start the priming. but i realized when i assembly the all parts than i cant paint or prime everything Thats why i seperate some parts again...
-
I got some primer on the Gonk earlier today and, while I was waiting for that to dry, I thought I'd have a look at getting some of this together All these Badai box scale releases are pretty simple, with very low parts count (and very low prices too), but the detail they've managed to squeeze into the box is pretty spectacular. I posted some sprue shots a while ago, which can be seen here. You could easily just snap this together in 10 minutes and have a great looking model, but I've decided to refine some of the details a bit, starting with the two main guns. the two cannon barrels come moulded to the lower cockpit section. They're not hollow so you'd need to drill them out (if you're bothered about that kind of thing). I hate drilling out barrels, as I always get them off centre, so I made more work for myself than was strictly necessary by rebuilding them from brass tube Before After The front section is 0.6mm Albion Alloys micro tube into .8mm then 1mm, which then goes into some thicker stuff from Trumpeter. I just cut two slots into the bulkhead section, and stuck them in. With that done, the top half of the cockpit was added. I'll be leaving the canopy off for painting The other bits I've replaced are the two U-shaped bars at the back of the main fuselage. They come moulded as part of the side panels, and look a little chunky, so I cut them off and replaced them with copper wire After that the fuselage fell together. It's essentially just a top and bottom section with 4 sidewall pieces that clip into place but, despite the simplicity, it makes a very intricate layered structure The level of detail on these parts really is amazing. For scale reference the wire I added at the back is 0.5mm thick The cockpit is a very snug push-fit onto the fuselage, but I'll leave it separate for painting Andy
-
let the Force be with You!
-
 Here's a few pics of my version of Red 5, The overall build of the kit has been covered in brilliant detail by the likes of Andy Moore and other folks on here so i'm not going to bore you with it..but if you are on the fence about purchasing one for your collection, then i can highly recommend doing so... the build took about three months..(on and off).. One thing i'd like to add is 'don't get too hung up about the basecoat colours of these ships, by the time you've finished the original basecoat will completely change colour' Anyhoo...here's the pictures.. Basecoat...
- 11 replies
-
- 18
-
-
Hi all, This box has been nagging at me for a while now: So I thought I'd get on and build it as a bit of light relief. I'm still umming and ah-ing a bit about the breakdown by colour - the masking looks quite hard, and the fit is good, but I'll end up with a weird panel line between the red and silver. So far I've put together some parts and filled gaps around the rear fuselage insert and between the nose and red fuselage section. I also attached the missile tubes to the wingtips, which was weird - I used thin CA and on both sides they cracked in half almost immediately along a jagged line. I think maybe it was a flow line? I put them back together with CA, sanded it all back, and one fitted OK while the other broke again. Third time lucky though. I wonder if this is another reason why the Bandai and Kotobukiya kits are so vulnerable to enamel thinner? If the flow lines are really hairline cracks they provide some good places for fluids to run into. The idea is to sculpt the head and shoulders of Atomic Monster Bemular (from Ultraman episode one) emerging from the water and have his deadly beam support the VTOL in flight, but let's just start with what we have https://youtu.be/4x7_DBzBetM Cheers, Will
- 139 replies
-
- 2
-
-
- Ultraman
- Here he comes from the stars
- (and 1 more)
-
This is B0-R15, a rather old and broken down protocol droid who inhabits the lower levels of Coruscant. He claims (to anyone who'll listen to his ramblings) that he used to work for an influential senator before the Empire came to power. He now ekes out a living by providing translation services to various underworld gangs. At one time he was fluent in over six million forms of communication. Unfortunately, due to age and lack of maintenance, he can now only manage seven, and those not very well. This has, rather understandably, hampered his employment opportunities, especially after one unfortunate incident when he mistranslated the phrase 'honoured guest' as 'Gamorrean faced Bantha fodder', during a negotiation between rival crime lords. He still though dreams of one day returning to his former life, serving the great and good of Coruscant society. The build can be found here Thanks for looking Andy
- 24 replies
-
- 23
-
-
I've had Bandai's 3P0 sitting in the stash for about a year now, but for some reason I've never been able to get the motivation to get started on him. I thought it was time he got built, but I wanted to do something different, so he's not going to be 3P0, but a different protocol droid instead. The first thing to do was strip the plating off the kit parts, which was a wrench to do as Bandai had made a beautiful job of it. They'd also made it pretty robust, as it was less than easy to remove, but I got it all off eventually. The assembly has now been done so this will be more of a painting wip than a build one The only paint app so far has been a bit of silver and clear orange behind the eyes... ... and the mid section, which was painted dark grey, then weathered with a few Citadel washes. The moulded wires were picked out in various shades, and a few extra ones were added with wire stripped from and old USB cable. As for the droid I'm doing, my initial thought was to do TC-4, who was a protocol droid in the prequels. The only reason I'd thought of him was that I liked his colouring I'm now veering in a different direction, which is to do an unofficial (i.e. made up) droid, which will be in a dilapidated state (hence the split wires on the mid section). The current plan is to base him (or maybe her; there are female protocols) in a dark aluminium/steel metallic, then add layers of oxidation/corrosion and general grime. I'm keeping it fairly open for now, and I'll just see how it develops as I get paint on. And, no, I don't know what I'll be calling him (her) yet. I'm open to suggestions. Andy
- 132 replies
-
- 14
-
-
Hi all, this is my latest build, the Bandai Snowspeeder in1/48. The kit was build out of the box. I´ve used Revell Aqua Color and Oil Colors for painting and weathering. The fit of this kit is really great and filler was not needed. Cheers Pete
-
So I've had this one for a few months, sitting on the pile. Finally got stuck into it and had a ton of fun in the process. Felt quite liberating in a way, knowing I had a bit more freedom with this than say, a real world vehicle Anyway, enough of that. I did do a few pics of WIP, but nothing extensive. I'll add those to the end of this post. I wish I could take some better images, considering it looks better in person. Other things to mention. A few decals were left off, in part because I had already coloured some of the panels they covered differently, rendering them moot. Others would've proven too much of a pain. I tried adding decals to the cockpit side panels, hoping my Micro Sol would conform them. Did not go according to plan, so I ended up having to scrape it off. Didn't get it all off, so when I went to paint the detail, some of it was blurred. Was disappointed with that, especially since if I had straight painted it, it would've looked much better. But, live and learn I guess. Anyway, on with the show And here's some additional images, including some WIP Thanks for looking Gaz
- 16 replies
-
- 14
-
-
So i figured I tried this on a candy toy. It looks good, and topping on the cake is I have it signed by Katsumi Kawaguchi and here it is work in progress. It comes in clear plastic
-
Just finished this other day. Lovely ole canvas for weathering. An enjoyable learning process. Bit grey but hey, she is what she is … the fastest hunk of junk in the galaxy Thanks for looking. Cheers
-
Afternoon Guys, Just a quick build whilst i had a couple days off from work. Bandai New Order Stormtrooper. Pete
- 2 replies
-
- 7
-
-
- bandai
- stormtrooper
- (and 2 more)
-
 Hi, here’s my take on the Bandai T-70 Force Awakens X-Wing, the Incom-FreiTek T-70X X-Wing prototype. The 2nd prototype to be built which then went on into service for a very long time with Rebellion/Resistance so she’s a little banged up. Probably over the top for some but, I’m really quite happy with how it turned out. Obviously went together no problem at all (apart from the bandai v enamel exploding engine issue). Primed with UMP, painted with Vallejo Metal Colours and Vallejo acrylics. Washed with UMP washes. Anyway, thanks for looking. Cheers. A long time ago in a galaxy far away …
 -
Kit: Bandai Tie Fighter Scale: 1/72 Paints: Tamyia xf-82 Ocean Grey, xf-54 Dark Sea Grey, xf-63 German Grey, xf-85 Rubber Black, Vallejo 71120 USAF Medium Grey, other Vallejo colours for hand painting, water based grey oil paints for weathering, Tamiya XF-86 Flat Clear finishing coat. Extras: None, not even glue! Build link: http://www.britmodeller.com/forums/index.php?/topic/235005473-172-bandai-tie-fighter/ So, another Bandai Tie fighter. The kit? Well, as good as any Bandai Star Wars Kit. Glue not required!! Simply undercoated with xf-82, top coat 71120, base is xf-54, the wing panel things(!!) are rubber black and dry brushed with various Tamiya greys. Quite a lot of time went into the cockpit which is now invisible!! But it's in there!! Here are the pics: And here he is chasing that pesky x-wing around! That's about it, hope you like them! There will be more... Many thanks, Val
-
Poe Dameron's Black One T-70 X-wing | Bandai 1/72 scale Poe Dameron's Black One T-70 X-wing, completed in Tamiya, Vallejo, and Secret Weapon Miniatures acrylics; Alclad lacquers; 502 Abteilung oils; and Tamiya weathering pastels with a custom wooden base. This model was done as a commission along with Luke's X-wing for a fellow in Canada. This kit was a pain because I dislike painting black and the construction is not as intuitive as Bandai's classic X-wing. All in all, I think it turned out well enough on my end (I tend to be pretty critical of my own work) but more importantly, the client was extremely happy with the finished product. A WIP of this model can be found here.
-
Bandai's latest addition to their Star Wars range. For my money this is the best one they've done so far, with the fit being perfect, and the breakdown of parts being completely logical. This one isn't lit but it would be a pretty simple job to do, as Bandai have conveniently moulded the engine inserts in clear plastic. The included Turbolaser turret is the icing on the cake. OK, it's not to scale with the A-Wing, but that would have been unfeasible anyway, but it makes a great display piece in it's own right. Everything's painted predominantly with a mix of Gunze and Tamiya and weathered with AMMO and AK enamels and oil paints. Oh, and of course there's International Man of Mystery, Mr Flatty, seen here with his somewhat low rent sidekick Nigel the Mouse Droid Thanks for looking Andy
- 37 replies
-
- 37
-
-
Hi all! So this is a project I started at Christmas on a group build on another forums. I didn't get very far because I was finishing off my degree in my spare time around work, and didn't even get time to chuck together a Bandai kit! But, that's all done now and after a month of settling down I've got back to the bench! So this is what I've been up to over the last day or two: The cockpit was undercoated in Tamiya rubber black, then painted with German grey, details picked out with True Metal Aluminium oil, then washed with black water based oil paint before decaling and flat coating with Tamiya's excellent flat coat. There was some dry brushing with light greys and silver paint. He was just painted with Vallejo black paint and lightly dry brushed. I know Phil Flory on his videos didn't paint these panels, but i thought I would with Tamiya rubber black, and then dry brushed with a few shades of lighter grey before Tamiya flat coat. I was pleased with how they've come out, i was hoping for that dusty kind of look. The build: It all comes together so quickly that I've not got many in progress shots!! It just falls together. I did glue the two halves of the main body together as it was quite tight and a couple of the locating plugs got lost in the process. She's undercoated in Tamiya's XF-82 Ocean Grey. I am intending to go over this in a blue grey from Vallejo, but actually this colour isn't that far off so maybe I won't... time will tell! I elected to paint all the framing for the black panels separately rather than fit them and mask the panels, but it probably took just as long or longer to do it this way! I've fitted the clear top part to the model and painted the non-glass bit separately. When the build is finished I'll fit the above bit instead and put windows in with Micro Krystal Klear. So that's it for the minute. Coming together nicely. I might finish it next weekend as I've got gigs all week, and then onto the Lancaster which is not too far off the painted stage. Thanks all Val
-
 Hi everyone, I have been lurking on here for a while now looking for tips and pointers; so I finally decided to register and ask questions. I am about to return to modelling after a major 35 year hiatus, but having said that, I am really more of a newbie. I used to build airfix kits and add the water slide transfers and that was pretty much it, any painting was done with a cheap brush and humbrol enamels (and not often at that) I more enjoyed the building. Anyway, looking on here has inspired me (especially the work of Andy Moore; I mean WOW). What I do need is advice. I have been bought the bandai 1/12 scale R2 and BB8 kit and I'm wondering where to start with weathering. The kit is still on its sprues so I have yet to make any kind of start, as for materials I have some Sprue cutters, craft knife and diamond files from some of my day job tools (I'm an engineer - mainly in the aircraft and submarines industries; 3 colour smoke pod in the red arrows hawk is some of my work). So, where do I start - I want to build the kits and start to introduce some grime to each droid, bit of dust for bb8 and some oily type grime for R2. Help?