Search the Community
Showing results for tags 'Austin'.
Found 4 results
-
WWII British Army 30-CWT 4 x 2 GS Truck (A1380) 1:35 Airfix Introduced as the Austin K30 in 1938, with a six-cylinder petrol engine and four-speed gearbox, this truck was initially built with a doorless open cab and canvas roof, which was far from ideal for the British winters, gaining an unpleasant reputation for making its crews unwell, probably due to hypothermia. Not long after the beginning of WWII, the cab was enclosed to give the crew some respite from inclement weather with the GS index added to differentiate between it and the earlier model, and this was produced in large numbers, although more famously it was also the basis for the K2/Y heavy ambulance. The truck served throughout WWII in British hands as the K2 in many variations, and was also sent to Soviet Russia under the Lend/Lease scheme, where the doors and metal roof must have been most welcome. It was powered by a 6-cylinder 3.5L Austin engine with a non-synchromesh ‘crash’ four-speed gearbox that had to be practiced and fully understood in order to be mastered. Lots of crunching gears were the symptoms of someone unfamiliar with this type of box, which complained loudly if you didn’t get the revs and clutch timing just right. Double-declutching was a common technique to smooth out gear changes, and with a trailing wind it could reach a maximum speed of around 50mph, depending on how heavily it was loaded. Its overhead-valved engine output 60hp to the single rear axle, suspended on leaf-springs to damp vibration on less well-prepared roads, of which there were many in Wartime. The wooden-sided flatbed load area was separated from the cab by a spare wheel, and could be covered with a canvas tilt by deploying the hoops that were stored upright at the front of the load area, with the other tubular parts stowed along the side of the bed. The Kit This is a new tool from Airfix, although it shares two sprues with the K2 Ambulance that Airfix released in 2022. The kit arrives in a top-opening red-themed box with a handsome painting of the subject matter in a Caunter camouflage scheme on the front. Inside are just two main sprues and a single bonnet part in sand-coloured styrene, a clear sprue, a tiny fret of Photo-Etch (PE) brass in the same bag as the decals, and the instruction booklet that is printed on glossy paper in colour, with profiles of the decal options on the back pages. Detail is good, and if you have one of the K2 Ambulances from Airfix, you’ll know exactly what to expect, with lots of raised and engraved detail throughout, including the cab and around the chassis. Construction begins with the ladder chassis, making it up from two rails with four cross-braces and a H-shaped front section that is moulded as one piece. The middle brace, part D13 has a square raised section on the top surface that should be used as an alignment cue, as identified in the diagram. A depiction of the underside of the Austin motor and gearbox drops in from above, and the rear leaf-springs are added to mounts on the sides at the back of the chassis. This supports the two-part back axle with transmission bulb, which fits onto two rectangular plates, and is joined to the back of the gearbox underside by a long drive-shaft. The front leaf-springs attach to the sides at the front to support the axle beam, and has a two-part exhaust slipped under that exits near the back axle on the left. A steering arm links the two front wheels together, which are different from the rear wheels, although they both have three parts each, just different hubcap details. The wheels are all made up from two halves, plus the inner hub, and it’s possible that if you are careful with the glue, they could be left to rotate, providing the paint doesn’t gum up the works in between times. The front wheels are covered over by a single-piece wrap-around wheel arch, and the twin fuel tanks are made up from four-parts each before they are attached to slots in the sides of the chassis rail, taking care to use the correct one for each side, as they are handed. A pair of crew steps are fixed to the chassis sides behind the arches, and at the rear, the chassis rails are capped off by a pair of triangular parts. The floor of the load area is moulded as a single part that has a planked surface texture on both sides, plus moulded-in supports on the underside. The wooden sides are fitted into slots, with the base of the tilt’s hoops glued into the front on both sides. The load area is enclosed at the front and rear by another pair of planked sides, then four multi-part stowage boxes are built up and fitted under the bed. The tops of the tilt hoops are glued in place atop the short bases, and the straight sections are glued to the side of the load area, adding a three-part bracket for the spare tyre to the front, then lowering it onto the chassis along with the two-part wheel and an additional support underneath that fixes to a recess in one of the chassis rails. A pair of mudflaps are fitted either side of each rear wheel into slots in the floor to keep the mud splatters to a minimum. The cab floor is separate in this kit, and has the driver’s foot pedals fixed in the kick panel, adding the gear lever and hand-brake between the seats, which are each single parts with a box frame underneath them, locating on the floor thanks to raised L-shaped marks moulded into it. The windscreen frame has its two panes inserted from outside before it is joined to the bulkhead and has the steering column and its wheel fitted between two raised marks just below the dashboard, which has two dial decals added into the recesses after painting. The completed dash is then joined to the cab floor along with the side panels and the rear wall, which first has its optional window or sliding panel and a bracket to accommodate a pair of rifles fixed to the inside. The cab is then completed by installing the doors with their glazing slipped in from within, and the metal roof that keeps the rain out. The completed assembly is then dropped into position in front of the load bed so that the engine cowling and radiator grille can be located between the wheel arches, first fixing the radiator in place in the engine compartment. A pair of wing mirrors sprout from the A pillars of the cab on long stalks so that the crew can see past the sides of the load bed, then the headlamps are inserted on short brackets into depressions in the sides of the radiator grille, with a choice of clear lenses or wartime hoods to keep the Germans from spotting them from above. Lastly, a pair of brackets are attached to the centre of the front bumper, with a tube set between them, perhaps a kitchen towel dispenser? Markings There are two decal options on the small sheet, one in the colourful Caunter scheme, the other in a more subdued two-tone Dark Earth/Black camo scheme. From the box you can build one of the following: 419th Company, Royal Army Service Corps (Divisional Supply Company), 70th Infantry Division, Tobruk, Western Desert, August 1941 Evaluation Unit, Russia, 1944 Decals are by Cartograf, which is a guarantee of good registration, sharpness and colour density, with a thin gloss carrier film cut close to the printed areas. Conclusion While this isn’t the first K2/K30 truck that has been released in this scale in the last few years, it’s a well-priced and detailed model of the type, and should appeal to the oft neglected builders of WWII British soft-skin modellers in 1:35. Highly recommended. Review sample courtesy of
-
 Hello everyone, my entry for this group build will be a Miniart Austin Armoured Car. There are two Ukrainian versions, a Polish and a Georgian one. I always like the box art covers that Miniart produce and have always ended up doing that particular version. So that's the one I will be doing this time as well, which is the "Army of the Ukrainian People's Republic, Sich Riflemen, Autumn 1919". I have had this model for a while now, so was very pleased that we had this group build so that I could do this. This is a lovely looking kit with lots of lovely detail and It's an Interior build, which I'm looking forward to. But typically with Miniart, there are lots of very small parts and quite a few straight fragile pieces that have lots of gates on. So will probably have to substitute some with rod or wire, I'll see as I go along. MD has kindly given some info regarding his build, with difficulties that he had encountered, so will take note and see if I have the same issues. So all I have done now is to label the different sprues for easy identification and I'm looking forward to starting the build... all the best Ed
- 140 replies
-
- 22
-

-
- MiniArt 1/35
- Armoured Car
- (and 1 more)
-
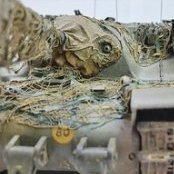
 Hello all 🥳 The construction of the T54 has been delayed a bit 😴, so I have started a new project 😁 For a change, it's not a track, but wheels - 6 to be precise. Besides tanks, I also love building trucks and exotic models that you don't see every day. Today I would like to introduce you to one of my favourite vehicles, the Austin Armoured Car 1918 Pattern by Miniart. I find the WW1 theme at least as exciting as WW2, so there will be more to come.... Ok, now to the model: The box is full to bursting with parts, some of which are very fine and fragile. The connections of the sprues are partly very large which makes it difficult to loosen the parts - beware of the danger of breakage! The soft Miniart plastic is not my cup of tea, some Parts were warped / bent in my kit. But anyway-there is only this supplier for the Austin and as a modeller every new kit is a challenge. If you are interested in the build, I can o highly recommend Andy Moore's report on TMN. From my point of view a very good kit with complete interior and the option to show many doors, hatches and flaps open. Plus nicely detailed wheels and a engine as a model within a model. Maybe not for beginners or people with little patience (sometimes you have to find out by yourself how the parts fit together best), but therefore something special. As usual I will also build a small vignette, hence the title: "Greetings from the front". Enough words and have fun! MD Nice Boxart Many parts inside The decals look good Many fragile small parts that can cost nerves I recommend loosening the parts with a PE saw or rebuilding them. It is very difficult to clean these small parts. The frame parts were bent in my case I have already glued and fixed the largest parts in this step. I will do the fine details on the engine and frame later, so nothing can break off and cleaning is much easier because of the handling on the frame. Of course, you have to study the instructions carefully to see what needs to be done first and what can be left out. The main frame work is done Whenever the glue dries (which it has to do very well with this soft plastic), I prepare new parts for the next steps. some nice references 🙂👌 See you!
- 36 replies
-
- 14
-
-
Or.......... "Right then Jenkins there's a thousand pound Jerry bomb ticking ominously in Mrs Perkins basement. Here's a stirrup pump, a tub of vaseline and a jam jar. Best of luck" Joking aside that's not far from what they actually used but more of that later. The Bomb Disposal Service caught my eye so I went for it. I then went down the rabbit hole of their equipment. I needed a beak from the mega build Dorchester so went for something really nice and quick. What could be better than a two spru Tilly. Really nice easy Tamya style. I wasn't going to do much fussy stuff. Well I did re do all the side cleats and loops for the canvas support. I wanted stuff in the back so didn't put the cover on. The big issue I had was with the black and red. I brushed it and cocked it up big style. Really thick and lumpy. Had to rub it down but still not good. WIP here: Note the brass Spade. Fascinating subject the BDS. They used brass and copper tools to prevent sparks. The Stevens Stopper, which is the box of tricks in the rear looks like this If you thought I was joking about young Jenkins then read the contents If you want more on the Stevens Stopper here's a brief explanation: http://www.rafbdassociation.com/wartime-equipment.html My absolute respect to the guys of the Bomb Disposal Service. Especially at the beginning of the war when they were effectively making it up as they went along! Thanks for watching 😁 A
- 31 replies
-
- 43
-
-