
Search the Community
Showing results for tags 'Alleycat'.
Found 13 results
-
I hope to do a couple of builds for the GB, but my first one will be: Resin and white metal, originally produced for Montex but fortunately re-launched and upgraded by AlleyCat. The main bits: .....some of the "other bits": ....the white metal bits (undercarriage and struts): The instructions....rather sketchy throughout, much studying and interpretation required: and the schemes: I haven't decided which actual plane I'm doing yet, quite possibly neither of these because I make my own masks for markings in preference to using decals.
-
Hopefully I am not being too ambitious in my plans for this Group Build, my 4th and final planned build is a Fairey Gannet AEW.
-
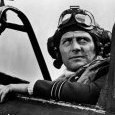
Ages ago I started a model of Sir Keith Park's Hurricane that he flew before and through the Battle of Britain. I've finally gotten around to taking the finished photos today. The build is here - The model is based on the Airfix rag wing kit married to Alleycat's tin wing conversion. Even with the advent of Arma Hobby's Hurricane kits this is still a valid way of producing the model as the early tin wing aircraft did not have one of the panels depicted on the Arma Hobby kit. The wheels are 5 spokes from an Eduard spitfire kit and the tyres from an Arma Hobby kit. The canopy is also from an Arma Hobby kit, this being a better representation than the over tall Airfix rendition. Paint is Mr Hobby Aqueous weathered with Flory washes and oils. Decals are from the kit, DK Decals and Avialogy. Many thanks to all those who chipped in on the build especially, as ever, Troy Smith. It was originally going to be part of a display of models related to the Battle of Britain film. However, I've now decided that I'll build a model of Park's Malta Spitfire and put the two on a base together hopefully later this year. Having helped my son with some fencing earlier this year he gave me a couple of bottles of beer as a thank you. One of these goes rather well with this model Think I'm on Spitfire tonight, though it's a Lancaster on the bench.
-
 Hawker Sea Hurricane Mk Ib, HMS Eagle, 1942. Altough overshadowed by the Spitfire during the Battle of Britain the Hurricane accounted for 60% of total losses by the Luftwaffe during that time. Built by 3 other countries as well as Britain, nearly 14,500 were built and it served till the end of the war in all theatres. This Sea Hurricane was part of 801 sqn, FAA, aboard the aircraft carrier HMS Eagle, part of a convoy which sailed to Malta with supplies. Of the 14 merchant ships that left the UK only 5 made it to Malta and more than 500 Merchant and Royal Navy sailors and airmen lost their lives, HMS Eagle, along with two cruisers and a destroyer were sunk, but it was considered a strategic success because the Tanker SS Ohio delivered much need fuel for the defending air-force there This is my 5th entry into the 'In the Navy' GB. Airfix's new tool Hurricane MK I with an Alleycat Sea Hurricane conversion. Everything went splendidly, the resin parts marrying up to the Plastic very well. Everything except decals were in the resin kit including the Armoured Windscreen. Vallejo ModelAir paint out of the bottle, cobbled together the fuselage markings. I don't know if I got everything accurate but it'll do me. I now apply all my decals with Johnson 'Klear' and it works great, draws the decal nicely down to the surface although sometimes I can't resist 'helping' a little! Just light weathering, I know they get hammered by the sea and salt but I never like to go too far! This is the first Hurri' I've done since I was a kid, I have a fair collection of Hurricane kits to do now somehow! Davey.
- 12 replies
-
- 32
-

-
Here's one of my entries for the 'In the Navy' GB still ongoing just now. The conversion from the new tool Airfix kit was a breeze, the Alleycat parts fitting superbly, even for a hamfisted numpty like myself! I've ordered another to do a MkII NF which I have markings for. The Airfix kit even has the early teardrop canopy to use for this build, signs of a MkI or MkVI on the way maybe? The decals were from High Planes and worked smoothly using the 'wetting on with the Johnsons Klear' technique described variously on this forum. I do very little weathering to my models, to worried to overdo it! Questions and comments welcome. Davey.
- 14 replies
-
- 43
-
-
Here's my 1/72 SAAF C-47TP 'Turbo Dakleton', built for the Maritime Patrol and Coastal Command group build. Build thread is here: It's the Airfix kit with an Alleycat conversion. You get everything you need in the conversion - resin forward fuselage, engines, props and a replacement starboard wing root, clear resin windscreen and extra windows, PE aerials and decals. Quite a nice conversion but the resin forward fuselage needed a lot of sanding to get it down to the same diameter as the Airfix fuselage. thanks for looking Julian
- 19 replies
-
- 42
-
-

-
I have a soft spot for the Tucano, I regularly see them zooming around the east coast, over the North Yorks Moors and York. They make a distinctive noise and even my wife doesn't need to see one to know a Tucano is out and about. I even built a Premier 1/72nd scale one eons ago. However seeing the 2014 display scheme when passing Linton-on-Ouse made me get off my backside and buy one of Alleycats lovely kits. It really is the complete package, no after market was harmed in the making of this model. I had three main undercarriage legs in my kit, and no nose wheel leg, I got it replaced by Alec swiftly once we had established communication. It is a bit of a tail sitter even though I crammed lead shot into all available orifices, I was resigned to having to use a prop, but when I added the i/d light covers it miraculously just balances!
-
 Having a trawl through the Internet this morning I spotted Alleycat are preparing the following: Some more new items this weekend! In 1/72 AND 1/48th Early Bristol Beaufighter conversions for the Mk1/early 6 with flat tailplanes, unshrouded exhaust etc. 2 new 1/48th Sea Vixen FAW1 sets for the 2 Martel missile test aircraft, plusSAAF C-47TP Turbo Dak in 1/72 and Vought Kingfisher windscreen without guntube slot for the 1/32 KittyHawk kit are now available. New 1/72 decals for Meteor NF11/12 and Merlin powered Wellington Mk2 have also arrived. As a sneak, there are new items on the way that include in 1/72 AC47T 'Fantasma'(Just waiting on guns and mounts), AC47, Early DH Mosquito bomber, and Merlin Beaufighter Mk2 in both 1/72 and 1/48. Along with a 'tin wing' for the Airfix 1/72 Hurricane (Imminent!!), a Shackleton MR1/T4 conversion in 1/72 for the Airfix kit, and maybe the odd conversion for the new 1/48 Meteor. Going live are the 1/32 Yak /1b /complete kits, however, these are off for casting with up to 6 weeks for return, though it is hoped that 3-4 will be the case. These latter along with the Fury, Gamecock and M1c kits are now cast for AlleyCat by MDC. For those who have recently ordered a Spitfire Prototype kit, (Thank you!) they will be despatched week commencing 28/03/16. They had been held back awaiting decals, which sadly have now missed their second arrival date, and so will follow on as soon as in stock. I have no link to the company, save having bought various updates in the past. With the renewed interest in all things Shackleton & the number of Hurricanesd converted to metal wings though some here may be interested. Edge
 -
 Hi gang - so here's the start of this one. For the background see here: http://www.britmodeller.com/forums/index.php?/topic/234995305-spitfire-vc-no-4-sqn-saaf-kj-z-the-blue-one/ I'm using Airfix's new-tool Vb kit combined with Alleycat's C wing resin conversion, and have some decals from MAVDecal in South Africa on the way - though I think these will be used for codes and the 'Boks only. This is my second build using this kit and third including the new tool Mk 1 from last year ( which shares many build similarities) - so with luck I hope to be able to show you a couple of solutions for the kits 2 main "talking points" namely the cockpit coaming/fuselage fit, and the UC legs attachment method. I've already started the build so the first pics will show the wings in progress. I mean, come on, it's got a trop filter, a C wing, weird camo and orange centred roundels, AND it's a Spitfire. What, ask I, to like is not? as master Yoda say might LOL cheers Jonners
 -
 McDonnell Douglas F-4B Phantom Seamless Intakes AlleyCat 1:48 The Academy F-4B Phantom has already been praised for it’s detail and accuracy, but there are always areas that need upgrading in any kit. This new set from AlleyCat provides the modeller two seamless intakes along with separate splitter plates. The parts are made of white resin and are very nicely moulded, with fine panel lines, sharp edges and smooth intakes. There is a small amount of cutting to remove an area of the kits lower wing, but this is well described in the instructions, including a diagram of the offending area. The intakes need the fan face end to be cleaned up, removing the moulding lugs, before the kits fan faces can be attached. With this done the intakes are then fitted as normally along with the splitter plates once they have been removed from their moulding blocks of course. Conclusion Another very easy conversion set from AlleyCat that not only look good but alleviate the problems of trying to remove the seam from the inside of the kits parts. These should be able to be used by almost every modeller and I can heartily recommend them. Review sample courtesy of
 -
Messerschmitt Me-109G6 AlleyCat 1:32 Revell can be full of surprises and when they announced the new 1:32 Me-109G6 the usual clamour for information started. Fortunately for Revell, the kit was very well received, but as usual there were some areas that could have been done a little better. To help with making an more accurate model, AlleyCat have released this upgrade set of resin parts for it. Arriving in a sturdy cardboard box with just a simple sticker on the front describing what the set is for, the set replaces many of the kits problem parts and has been designed to improve other areas. The set contains 37 parts, all in a medium grey resin, plus a small etched sheet providing a couple of scribing templates and two A4 sheets of instructions. The first takes the form of colour photos showing how the parts are assembled and where they go, the second is a sheet of well written instructions, clearly describing what needs to be done and how. There is quite a bit of cleaning up to be done once the parts have been given a good wash in warm soapy water, as each part is on its own moulding block or surrounded by flash. This shouldn’t take too long as the parts and blocks have been well designed to allow for minimum contact. With the set parts sorted, some of the kits parts also need to be altered to allow the fitting of the resin bits. This is mainly around the engine cowling parts where small raised areas need to be removed for the replacement cannon bulges. The new carburetor intake will also need the three holes in the side cowling to be opened up and joined together to form a triangle for it to fit into. There is also a small scoop on the starboard side cowling that needs to be carefully removed to be replaced by a replacement scoop. The set includes a completely new propeller, with new blades, spinner and back plate. The blades have been designed to be slotted into their respective mounting points, with mounting blocks fitted beforehand, and pinned from behind, which is quite unusual, but effective in getting the blades at the correct angle. Also included are new radiator housing, radiator flap, exhaust stubs and backing plates, cowling gun bulges, elevators, rudder, cockpit floor, pilots seat, joystick and rear bulkhead, cockpit air vents, drop tank pannier, and aerial mast. The etched scribing templates are for correcting the small air vents below the cockpit, with clear instructions for the positioning. Conclusion Even though the new Revell kit looks great straight out of the box, there’s always room for improvement and set that not only corrects the slightly wrong areas but also gives much nicer detail definition to others. Very easy to use, even for the novice to resin it will certainly go a long way to help make a fantastic looking model. Highly recommended. Review sample courtesy of
-
Grumman Albatross correction set AlleyCat 1:48 The release of the 1:48 Grumman Albatross by Trumpeter was a very welcome and pleasant surprise and whilst the majority of the kit was nicely done the nose section and the distinctive chines wasn’t quite correct shape wise. To remedy this, AlleyCat have released this correction set, which consists of a completely new nose section, canopy and overhead console. Packaged in a plain sturdy cardboard box the dark grey resin parts are pretty well protected with poly chips and the clear resin canopy is in a separate zip-lock bag to prevent scratches etc. The written instructions are on one side of the A5 sheet. Because of the way Trumpeter produced the kit with a separate nose section the two resin halves will be easy to fit, with no cutting required at all, just some cleaning up and the opening up of the side windows. Inside of each nose section there is a representation of the soft insulation on the hull floor and around the nose, which is nicely done and with careful painting should look good, if it can be seen once the halves have been closed up. There is quite a bit of flash around the parts and some moulding blocks in quite awkward places on the join line of the fuselage halves, although with a bit of care these shouldn’t prove too much of a problem to the more experienced modeller. The overhead panel just needs the casting block removed from the rear before being fitted to the inside of the canopy. The clear resin canopy is well moulded, but again with a fair bit of flash and a large moulding block at the rear. The removal of which has been helped by the join line being thinned out so that a sharp scalpel blade is all you need. The resin itself isn’t the clearest around, but with some gentle polishing and some Aqua Gloss it should come up well. A nice touch is the inclusion of a sheet of paint masks for the canopy, side windows and port holes. Conclusion The release of this set is great news for those who were disappointed with the kits nose section. The ease at which this conversion can be used is also a great help thanks mainly to the design of the host kit. I can recommend this set to all modellers conversant with the use of resin and the different adhesives required. Review sample courtesy of
-
Morning sports fans. It a cold icy day here at the Jonnerstad, but there'll be partying on the streets of Oxford this evening if all goes to plan... Anyway in prep for the arrival of the much discussed Trumpeter vampire FB9, as I suggested I'm going to do a double build with Alleycat's resin kit of said Nosferatic di-boomer. It will be a compare and contrast job, and with luck we'll see how the Trumpy kit shapes up. First up though, the current 1/48th "Champeen" ( cue Rocky music....) The kit comes in a sturdy pizza box type carton, and with excellent well printed decals, some canopy masks, and very nice instructions including a stencil placement guide. My FB9 boxing has markings for 213 sqn ( both camo & High Speed Silver), plus another HSS one from 60 Sqn. Parts all come bagged, with clear cast bits, and white metal parts in separate packets. The main body of the Vamp is cast as one piece with separate front fuselage, booms and tailplane The main body has a little casting flash on the very fine & thin wing trailing edges, and the other main components have fairly large casting stubs, BUT they are easy to remove as the connecting edges are well defined and pretty thin. I used a heavy scriber tool to score these or a razor saw. The main body has a plug on the engine exhaust area, which needs removing, and the hole for the separate jet exhaust needs enlarging for this to fit. I used a new scalpel blade to shave it wider, then a piece of coarse foam backed sanding pad rolled into a cone shape to do this. Easy. The stubs on the booms run along the botton edge, and this needs a bit of a sand down after to smooth out the area ( Note- if you have never worked with resin, ALWAYS sand with a mask or outside, or wet sand. While the dust isn't toxic per se, its very fine and you DONT want to inhale it) On my castings there was an area on the tailplane underside where a small area of resin had delaminated - this needed filling with Mr Dissolved Putty and sanding smooth; as did a small blemish on the starboard upper rear inner wing. Nothing too arduous, and do bear in mind that these kits are hand made, so occasionally you will get the odd glitch. Theres a complete lack of any bubbles in the resin surface, and the detail is finely recessed much like a modern IM plastic kit, if not better. As far as I can see all the parts seem to not suffer from any warpage at all- which is testimony to the caster's art indeed. The perfectly cast clear parts are also formed from a transparent resin, and need careful removal from their stubs. I cut them with some stub spare and then sanded this back to the frames. Be warned the clear resin is pretty tough, so take your time. If I were to do this again I'd mask the parts with tape and use a very fine saw to cut much closer. However, as long as you are careful some nice parts emerge, though I think they'll benefit from a dip in Klear/Quick Shine to bring out their clarity. White metal UC legs and elevator balances are finely cast, with the nose wheel fork supplied as a separate part. 3 white metal weights which fit inside the forward fuselage are also included - a thoughtful and much appreciated touch Finally a PE fret provides seat belts, rudder pedals, UC door retraction links, Intake strakes and cockpit levers. Suffice to say that Alleycat's resin model is an excellent kit. If you've used resin conversions parts before, or just fancy a resin kit- then this would be a great introduction. At £45 it isnt cheap, but I would say that this price seems to be about par for resin kits nowadays, so I don't think we can accuse Alleycat of wanton profiteering either! As you can see I need to remove a few more parts form their stubs and clean them up. Then we'll hold for the Trumpy kit to arrive, so we can start to examine the parts against each other, and some plans from a source that I think we can all trust. TBC..... Jonners


