Search the Community
Showing results for tags 'Airliner'.
-
 Tinted Windscreen for 787 & A320 (CR144501 Revell/Zvezda & CR144503 Zvezda) 1:144 Counting Rivet Models We’ve received some upgrade sets from our new friends at CRM, the initials standing for “Counting Rivet Models”. They’re new to us, and based in Hamburg Germany, creating highly accurate sets for the airliner community, which is to some extent an untapped market, as most aftermarket companies seem drawn to the military side of things. CRM are part of the new wave of producers that are using technology such as 3D printing to create their products, and it shows. Their sets arrive in a clear blister pack with a card header within, which has a QR code that leads to the instructions, cutting down on recycling, as most instructions get thrown away after use. Hold your phone or tablet’s camera up to it and follow the link to their download centre in your browser of choice, which has all the instructions available for download in the de facto standard PDF format. These sets have been designed as 3D printed masters from which the clear-tinted production copies have been cast using traditional clear resin with an appropriate tint added during mixing. Detail is exceptionally crisp, and once they are removed from their casting bases, they should be a drop-in replacement for the kit parts, so quite simple to use. Cast on a rectangular base, the resin is crystal clear where it matters most, which is the window panes themselves, with minimal distortion for anyone that likes viewers to see into their cockpits. Each set also includes a sheet of masks for the sharply defined glazing panels, pre-cut from genuine Tamiya tape, which is the gold-standard for masking tape for modeller, so you can guarantee it will go down well and peel back off without issue. We have two sets in, as follows: Tinted 787 Windshield for Revell/Zvezda Kit (CR144501) Consisting of a brownish-red tinted windscreen component that is attached to the pour block at the bottom, the removal and installation of this screen should be simplicity itself. There are a generous three sets of masks for each of the four glazing panels, so you can afford to make a couple of mistakes during the process of applying them, which will be useful if you’re new to applying pre-cut masking to your models. Tinted A320 Family Windshield for Zvezda Kit (CR144503) This set has a greenish-blue tint, and as well as the screen it also depicts a portion of the roof above the cockpit, and as is likely with the kit part you will need to add a little filler if the joint above the rear of the cockpit requires it. There are three sets of masks again, although the Airbus A320 series has six panes that wrap around the sides of the nose. Do the Masks Fit? Everyone is probably wondering that, and I’m pleased to advise with a great deal of confidence that they do. It took mere seconds to apply each element, aligning the vertical frames with one side of the mask, then laying it down and burnishing it with light finger pressure. The results below speak volumes. Conclusion Upgrading the look of your airliner model with a good-quality tinted resin screen will separate it from the rest, and as it’s comparatively easy to do, with masks to help you make a good job at a totally reasonable price-point, it’s very tempting. Highly recommended. Review sample courtesy of
 -
Boeing B747-8 Fans for Revell (CR144103) 1:144 Counting Rivet Models We’ve received some upgrade sets from our new friends at CRM, the initials standing for “Counting Rivet Models”. They’re new to us, and based in Hamburg Germany, creating highly accurate sets for the airliner community, which is to at least some extent an untapped market, as most aftermarket companies seem drawn to the military side of our hobby. CRM are part of the new wave of producers that are using technology such as 3D printing to create their products, and it shows. Their sets arrive in a clear blister pack with a card header within, which has a QR code that leads to the instructions, cutting down on recycling, as most instructions get thrown away after use. Hold your phone or tablet’s camera up to it and follow the link to their download centre in your browser of choice, which has the instructions available for download in the de facto standard PDF format. This set includes four 3D printed replacement fans for your Revell 747-8 kit in 1:144 surrounded by perforated protectors, plus masks for detail painting. We’ve reviewed the Revell kit several times over the years, so here is a link to my earlier review, because why not? The kit fans are each made up from two components, and differ in shape, as well as being thicker and less well defined than these replacement parts. The detail extends to the protective surrounds, which have the name of the intended recipient and product code around the bottom edge in raised lettering. When cutting them from their print supports you should follow the instructions carefully, as printed resin can be brittle, especially when it is this finely printed and realistically thin. I went at it in my usual gung-ho manner initially, cutting the bottom of the supports with a pair of nippers, and as a result broke one of the blades off immediately due to my haste – see if you can spot the repair from the detail picture above. Learn from my mistake and take care when removing the supports, proceeding slowly to minimise flexing and using diagonal cut nippers, then tidy up the backs to your satisfaction. After this they are a drop-in replacement for the two-part kit fans, with the painting guide advising you to prime with a compatible primer, then paint semi-gloss black after painting the spinner and masking them off using whatever method you normally choose. When the black is fully cured, apply the masks to the front faces of each blade, leaving the leading edges exposed to be painted in a titanium metallic to complete the job. The finished fans should far exceed the detail and finesse of the kit parts, and you have the masks that make painting much easier and the finish crisp. Conclusion 3D printing has come a long way since the early days, as evidenced by the quality of these fans in all aspects, with not a layer step in sight, even under magnification. The detail plus the included set of masks make for a compelling argument for the upgrade. Very highly recommended. Review sample courtesy of
-
Boeing B787 GE Fans for Revell/Zvezda (CR144100) 1:144 Counting Rivet Models We’ve received some upgrade sets from our new friends at CRM, the initials standing for “Counting Rivet Models”. They’re new to us, and based in Hamburg Germany, creating highly accurate sets for the airliner community, which is to some extent an untapped market, as most aftermarket companies seem drawn to the military side of things. CRM are part of the new wave of producers that are using technology such as 3D printing to create their products, and it shows. Their sets arrive in a clear blister pack with a card header within, which has a QR code that leads to the instructions, cutting down on recycling, as most instructions get thrown away after use. Hold your phone’s camera up to it and follow the link to their download centre in your browser of choice, which has the instructions available for download in the de facto standard PDF format. This set includes two 3D printed replacement fans for your Revell 787 kit in 1:144 with GE Engines surrounded by protective balustrade, plus masks for detail painting. The Zvezda Dreamliner kit was first released in 2009, and has since been seen in Revell boxes, so there should be a healthy stock out there in stashes everywhere. The kit fans are made up from two components plus the rear bulkhead with the next set of blades moulded-in, and are thicker and less well defined than these replacement parts. The 3D printed parts have a short axle at the rear of the spinner so it is a drop-in replacement for the blades. The attention to detail extends to the protective surrounds, which have the name of the intended recipient and product code around the bottom edge in raised lettering. When cutting them from their print supports you should follow the instructions carefully, as printed resin can be brittle, especially when it is this finely printed and realistically thin. I still managed to break a couple of blades off while preparing the photo above, probably because I’ve only got single-bladed nippers. Learn from my using inappropriate tools and take care when removing the supports, proceeding slowly to minimise flexing and using diagonal cut nippers, then tidy up the backs to your satisfaction. After this they are a drop-in replacement for the two-part kit fans, with the painting guide advising you to prime with a compatible primer, then paint semi-gloss black after painting the spinner and masking it off. When the black is fully cured, apply the masks to the front faces of each blade, leaving the leading edges exposed to be painted in a titanium metallic colour to complete the job, using the suggested shade in Gunze, MRP, Revell Aqua, and Tamiya codes. The finished fans should far exceed detail and finesse of the kit parts, and you have the masks that make painting much easier and the finish crisp. Conclusion 3D printing has come a long way since the early days, as evidenced by the quality of these fans in all aspects, with not a layer step in sight, even under magnification. The detail and the included set of masks make for a compelling argument for the upgrade. Very highly recommended. Review sample courtesy of
-
Boeing 737-800 (03809) 1:288 Carrera Revell Whilst Boeing was achieving considerable success in the early jet-airliner world with the larger 707 and 727 in the 60s, development of the BAC 1-11, DC-9 and Fokker F.28 were progressing well to serve an anticipated need in the world market for smaller aircraft on short haul routes. In 1964, Boeing proposed to tap into this market, but to reduce development cost and save time, they created a design that would use 60% of the structure and systems of the 727 which would also benefit by reducing new tooling costs to a minimum. The 727 body had an advantage over its potential rivals in that it accommodated six abreast seating compared to a maximum of 5 abreast on others of the period. Another feature of the 737 would be its capability for Cat II or instrument landings, the first of its kind. Production was guaranteed following an order by Lufthansa for 21 airframes with 100 passenger seats each, the first of which went into service in 1968, with others to follow from other operators. Further variants with different capabilities followed, starting with the second generation that are now known as the Classic with variations in engine fitment and passenger capacity, reaching service in the 1980s, to be replaced again by the third or NG for Next Generation during the 90s, beginning with the smaller -600, and the stretched -700, which was supplied in either C for convertible between passengers and cargo, or the ER Extended Range with 126 passengers. The -800 was a further stretched airframe, seating between 160-190 passengers, and acting as the direct replacement to some of the early variants, including the -200 and -400 series from the original range. Following the -900, the 737 MAX was created to extend the life of the 737 line rather than creating a completely new airframe, with a keen eye on costs and re-training requirements, something that has caused issues relatively recently. The Kit This is a re-release of a 2012 tooling from Revell of what was originally intended to be a clip-together Easy-Kit that required no glue, pre-painted at the factory in Air Berlin livery to appeal to their home market. This boxing is marketed as a traditional kit, and it arrives in a small end-opening box depicting the aircraft in Boeing’s own livery as would be seen on a demonstration airframe. Inside are two small sprues in white styrene, a comparatively large decal sheet, and instruction booklet with colour profiles on the rear inside pages. For the unusual scale, the detail is good, with fine leading and trailing edges on the wings, while the panel lines will appear oversized at this scale, regardless of how fine they are. At this scale there are no physical depiction of the windscreens and passenger windows in the parts, which are instead shown on the decals that cover much of the model once completed, providing registration points for locating the decals in the process. Construction begins with closing the fuselage around a substantial 20g of nose weight and the fin at the rear, which fits into a pair of slots within the aft fuselage for additional strength. The wings are applied to the lower fuselage insert, which is a separate part that covers the lower inner wing profile and the main landing gear bays, inserting it in a space under the fuselage, detail painting the bays and fitting the elevators into slots on either side of the fuselage. Surprisingly at this scale, the gear legs have separate wheels that push-fit onto the axles at the bottom of the legs, making up the nose gear and two sets of main gear, which slot into holes in the bays under the fuselage. The twin engines under the wings are each made from four parts, starting with one half of the cowling, into which the intake fan and exhaust are slotted, closing the cowling with the other half before they are both fitted under the wings on pins that locate in holes in the wing fairings. Markings This edition depicts the aircraft as a demonstrator, which is in factory livery that is common between all Boeing aircraft types, showing the product number on the tail fin, and company branding on the forward fuselage, accompanied by a wave pattern along the sides and wingtips. From the box you can build the following: Decals are by Cartograf, which is a guarantee of good registration, sharpness and colour density, with a thin gloss carrier film cut close to the printed areas. There is a separate windscreen decal, and the side windows are incorporated into the fuselage side decals, which are applied as one per side, adding a separate decal to the underside around the main gear bays. There are silver decals for the leading edges of the wings and elevators, and more decals with silver leading edges for the winglets on both sides of each tip. The modeller will need to paint the fuselage and engine cowlings white before decaling, and the wings a silver colour that is common to most airliners. Conclusion It’s an unusual scale for an airliner, which has a de facto common scale of 1:144, or less commonly 1:200, but if you feel like adding a pocket-sized 737-800 to your collection, this is a nice model, and may well be suited to a novice due to its Easy-Kit origins. Highly recommended. Carrera Revell model kits are available from all good toy and model retailers. For further information visit or
-
Here is my third Junkers connected to Estonia. Estonian AS Aeronaut provided its Tallinn-Helsingfors route and in July 1923 Aeronaut became a member of Osteuropa-Union and received three Junkers F13 from Junkers Flugzeugwerke. These planes were used on both wheeled and skid landing gear and on floats. Flights were made on the Tallinn-Riga-Köningsberg and Tallinn-Helsinki routes. Harald Stunde was one of the most colorful pilots who flew the F.13 in Estonia. Later in 1927, he was employed by the airline company Lloyd Aereo Bolivano as a flight attendant. From March 21, 1932, he was a pilot of the Brazilian airline Varig, and from June 19, 1938, he was the chief pilot of the Varig airline. Stunde was the first Estonian who had flown one million kilometers in one type of aircraft (Junkers F13) by the summer of 1938, having worked at Junkers for 12 years by that time. This is Revell boxing of the Veb Plasticart kit I believe. I think it's a great kit for its time and it was good to build it with minimal changes. Decals are not used (except the Junkers in the nose) because they are not available and I am not surprised
-
Among my models, models that are related to Estonia and Tallinn, which is my hometown, have an important place. If the previous one, Junkers G24, was only briefly connected to Tallinn, this one here has quite sad and direct connections. Kaleva was a Junkers Ju 52 belonging to the Finnish Aero O/Y, which on June 14, 1940 was shot down by two Soviet Tupolev SB high-speed bombers on a flight from Tallinn to Helsinki. Soviet planes opened fire, causing the plane to crash into the sea a few kilometers northeast of the Keri lighthouse. All nine people on board died. The incident took place during the armistice between the Soviet Union and Finland and shortly before the beginning of the Soviet occupation of Estonia. The Soviet invasion was preceded by several days of Soviet air and sea blockade, which included preventing the sending of diplomatic mail from Estonia abroad. Among the passengers on Kaleva's last flight were two German businessmen, two French embassy couriers, one Swede, an American courier and an Estonian woman. The French couriers had more than 120 kilos of diplomatic mail on the plane. An American courier allegedly transported US military codes to safety. The Finnish government did not send any complaints or questions to the Soviet Union for fear of a hostile Soviet response, and the real cause of the accident was hidden from the public. In addition, the widows of the pilots were forbidden by the government to tell the truth about the death of their husbands. The reason for this was the strong pressure exerted on Finland by the Soviets during the temporary peace. This describes well how bad and fragile Finland was at that moment. In modern times, there has been a lot of speculation about the reasons for this incident, and since there is very little information and the wreckage of the plane has not yet been found, it gives rise to a lot of flying theories about the reasons for the attack. Most of the time, the focus is on the secrets surrounding the diplomatic post, and the most popular theory has proposed that Stalin personally ordered the downing of the plane because he thought that Estonian President Päts was trying to escape from Estonia on a scheduled flight. However, there are also many opinions that ignorance and lack of orders on board the bombers led to the shooting. Seeing the departure of a plane unknown to them under the conditions of the blockade, in the absence of a direct order, they reacted out of fear of punishment and acted just in case. In any case, the downing of an airliner for no reason is another example of a neighbor we all here have to live with. The Kaleva was put into service in 1936 and was originally used as a seaplane, but at the end of the same year it was sent to Germany, where it was converted to a wheeled landing gear, and it remained that way until the end of its service. I like the seaplane version more and so I also made the model as it was very originally and also visited Tallinn. Now about the model. It is a mix of Heller hull and wings, with Revell floats, with some added detail on the engines and interior.
-
a.thumb.jpg.58d92d116b0315dc55d352fd191d65e4.jpg) Hello fellow modellers, here is the third DC-8 I have finished this year. here is the first one: https://www.britmodeller.com/forums/index.php?/topic/235131153-dc-8-52-air-new-zealand-authentic-airliners-1144/ here the second one: https://www.britmodeller.com/forums/index.php?/topic/235132131-douglas-dc-8-73-aire-devasion-minicraft-1144/ This one here is from the X-Scale kit with decals from Nazca. African Safari Airways started their business with a single Bristol Britannia (available from Roden) and bought this aircraft here as their first jet airliner in 1973 and used it for three years for flights mostly from Basel and some german airports to African destinations. The -33 used a very special kind of thrust reverser. The rear part retracts to the back, then folds the doors to reverse thrust. After landing, the so called ejector stays in the backward position as shown here. I hope you like this airliner with the non standard markings. cheers, Norbert
Hello fellow modellers, here is the third DC-8 I have finished this year. here is the first one: https://www.britmodeller.com/forums/index.php?/topic/235131153-dc-8-52-air-new-zealand-authentic-airliners-1144/ here the second one: https://www.britmodeller.com/forums/index.php?/topic/235132131-douglas-dc-8-73-aire-devasion-minicraft-1144/ This one here is from the X-Scale kit with decals from Nazca. African Safari Airways started their business with a single Bristol Britannia (available from Roden) and bought this aircraft here as their first jet airliner in 1973 and used it for three years for flights mostly from Basel and some german airports to African destinations. The -33 used a very special kind of thrust reverser. The rear part retracts to the back, then folds the doors to reverse thrust. After landing, the so called ejector stays in the backward position as shown here. I hope you like this airliner with the non standard markings. cheers, Norbert- 14 replies
-
- 49
-

-
Hi guys, here is my second finished DC-8. The first one can be found here: https://www.britmodeller.com/forums/index.php?/topic/235131153-dc-8-52-air-new-zealand-authentic-airliners-1144/ The -73 was the final stage in the development of this sleek airliner. It had the longest fuselage, the widest span and the most modern engine of that time. The airline only operated this single aircraft for only almost one year, based in Paris CDG in 1993. The kit is from Minicraft and the fit was mostly okay, only the wing span extensions created some problems. Of course, the small deflectors on the engines, the antennas and fuel probes had to be added. The metal colours were done mostly with MiG-Ammo, with some polishing paste by AK. Decals are from TwoSix, with some additions from the kit decals. The aftermarket decal makers mostly forget to provide overwing exit markings, engine details etc. Hope you like the "flying tube", as the long DC-8s were called.
- 18 replies
-
- 43
-
-

-
Here is the first of at least four intended models of the DC-8. It is a DC-8-52 flown by Air New Zealand. It was only used for a little longer than one year, because this aircraft was then destroyed in a training accident. See more here: ZK-NZB Douglas DC-8-52 (aussieairliners.org) The kit is a resin kit by Kurt Lehmann's Authentic Airliners with decals by Nick Webb (classic airlines). The white was painted with Mr. Hobby by Gunze, the metallic surfaces with different shades of MiG Ammo and AK polishing paste and some powders. Hope you like it! Greetings from Germany, Norbert
-
3rd of September, eh?! This one is simple, even I can get this done in time 😇 2 livery options, BEA Airtours and Olympic Windows are done by decals. Hardly anything in the box. It's a walk in the park, isn't it ⁉️😎 My Beaver is in the bag, if you'll pardon the expression, and I'm tinkering with the little Airfix Auster Antarctic which is now released on the Vintage Classic range. That's going well - she's up on her floats already. I was pleased to discover that Airfix have made a brand new mould for the transparent canopy part which is miles better than the ancient original and fits perfectly Decals look good. So I'm looking around..... My intention was to do a LOAD of Dehavilland gems but.... you know....... Surely even I can get this over the finish line
-
Here I would like to show you my latest finished model. I built it from the old resinkit by Kurt Lehmann, (authentic airliner), which consisted of two fuselage parts. Also the realistic window decals are made by this manufacturer. The Airline decals are from Flightpath. The D-AMUX was used by LTU Süd from 1988 til 2001 for chartered flights to holiday destinations. I had some trouble with the paint job, the first window decal was not opaque, so the red colour was shining through, but I quickly got a new one from the Lehmann company. I was not careful enough doing the red and white striping, so I had to remove part of it and had to look for another one of these very rare decal sheets, but finally found one on a model show in the Netherlands. But after all these fallbacks this project is completed now. I hope you like this colourful airliner from an almost forgotten company! cheers, Norbert
-
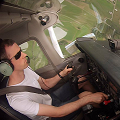
Hi All, Edit: Having written all of this it seems like I've done a mini kit review as we go as such so feel free to read or just skip to the photos. I couldn't resist picking up a boxing of Karaya's (Hasegawa Re-Box) Embraer 170 when I saw that they were going to release it. As I'm sure you will all agree the cost of some 'rare' kits on Ebay is quite ludicrous these days (I genuinely saw the Hasegawa 1/48 Sea King HAR MK.3 fetch £250) back in November and more recently some British Sea King decals go for £56) and anytime I saw the E170 get listed it would likewise reach bidding prices I felt outweighed what you were getting for the kit. In any case, I picked up the kit from Hannant's for a fairly reasonable price of £28.99, this still seems a touch steep in price when you consider how much you get for you money (especially when comparing the prices of Revell's recently released A300 Beluga at £36 or their A330 which according to Hannants will be even cheaper than the A300 Beluga.) But I think it's really important to support the smaller companies like Karaya who I admittedly don't know much about but if they keep on producing and re-boxing kits that you might deem a bit more on the unusual side then I'm all for paying a bit extra. Karaya have so far released 4 boxings of the E170 with a variety of markings 1) LOT 2) US Airways and United Express 3) Alitalia and Finnair 4) Limited Edition LOT Special Livery. I wouldn't be surprised if they released more in future such as HOP, Jet Blue, American Eagle, Delta, etc as the appeal to the American market might be fairly large. Bra.Z Models also produce the alternate wingtips not provided in the kit and a resin fuselage to convert the kit to the E175 which I might consider at some point in the future. In any case onto the kit: The kit is rather small in both size and parts so good for someone after a relatively quick build and or limited by storage capacity (for me both kind of apply!). Nevertheless I'm afraid this won't be an in-and-out job as I'm renting a small place with no real space for an airbrush, and certainly whilst I am finishing my training I don't have much time for anything other than basic construction on models. Also if you're a fan of having a 1/144 cockpit and clear windshield this isn't the kit for you! The fuselage is your standard plastic halves without any cut-out or separate piece for glass. I'm sure there's an expert caster and 3D printer out there who could make me very happy and make a cockpit and glass hint hint.....! Construction is relatively simple as you would expect although there are a few minor areas to watch out for which I'll attempt to highlight along the way. As you can see below I love how Hasegawa designed the kit to include a clever nose weight system involving a bolt which you glue into the nose. For some reason, the nut and bolt didn't tighten up properly (nothing that a few drops of super glue didn't solve) but you might be able to consider it an advantage as I was able to get more weight further forward and over the nose to ensure the model won't be a tail sitter. As I'm writing this I've realised that I am posing the aircraft on the stand that comes in the kit or I'll make my own making the nose weight redundant but it's still nice to have it in just in case I ever need to display the aircraft on it's wheels. The details on the kit are, on the whole, good although perhaps a touch uneven and soft in some areas so these areas were deepened with a razor saw or scribing needle where needed. The plastic isn't nearly as soft as Zvezda's kits which I like and makes scribing easier. The fuselage however is a touch disappointing in my opinion, fine panel lines are limited to the area around the wing root, tail, nose, windscreen and doors. The Karaya painting instructions clearly indicate the locations of all the panel lines that should be there on the fuselage but referring back to the Hasegawa instructions they aren't there. I'm rather confused as to why Hasegawa decided to omit them from the moulding process as the wings and fuselage look very odd paired up together, the wings having such good fine detail and the fuselage being so bare and boring. I may end up attempting to scribe them in but I hate scribing and am a touch afraid of getting it all badly wrong and the kit looking horribly asymmetrical as a result. On the subject of the cockpit windscreen panel lines, try as I might they wouldn't line up. Either the top or bottom lines remain offset by a minute amount. As you can see in the photo the area ringed in red is nicely aligned whereas the lower region ringed in black is offset by a tiny amount (zoom in to see this properly as I admit the photo doesn't make it obvious). Also I had to be really careful when sanding the seam line ringed in green to avoid wrecking the raised surface detail which could be considered to be a touch overscaled for a 1/144 model, however I know I'm being super picky and I don't mind at all (just letting you rivet counters out there know for future reference!) The instructions tell you to assemble the wings first before attaching them, the system is, in some way, similar to the Zvezda method rather than the older Revell system of building both wings and then glueing them into slots in the fuselage. Here I opted to ignore the instructions and put in the underside of the fuselage/wing-root piece which assisted the fitting and sanding process. Any gaps were large enough to fill with sprue-goo (see yellow arrows in the photo) rather than needing any plasticard, I could have used epoxy putty which might have made the smoothing process easier but on previous builds epoxy-putty has messed up and rescribing so this kit is a but if an exploratory project for me because I don't claim to be a pro by any means. I forgot to take a photo of this part but I have outlined the shape of the part in red in the photo below. When it came to fitting the upper wings the dry fit revealed that there was a slight gap between the wing root and where it met the fuselage part. I opted to place small pieces of plasticard on the wing parts instead of epoxy putty or sprue-goo as I wasn't too sow how much surface detail I'd lose in the clean-up and sanding. In hindsight, I'm not too sure if it was the best option as when I sanded them down to fit the profile of the wing and slightly back to make sure they weren't too thick but it has created a slight problem of the wing profile not matching up to the wing root but this should (hopefully) be solved with some sprue-goo and intricate sanding. Many thanks for taking the time to have a look and please let me know if you'd rather just see the photos and have a bit less of the explanation. Only thought was as this is a kit some people might not have made and might consider making having some reference material might be an idea. Cheers, Mark
- 3 replies
-
- 9
-
-
- 1/144
- Embraer 170
- (and 1 more)
-
Here I would like to show you my finished latest project. Two Boeing 777-300ER from Revell, originally Zvezda, which I bought bagged with no decals. But I found two attractive liveries, the SWISS faces at 8Adecs and the Saudia at Pas Decals, both completed with Draw and Pas Detail Sets. I built both kits simultaneously, which saved some time for the research. In February 2016 SWISS received their first 777 and wanted to dedicate this event to their employees. So they put faces of 2500 People working for them on the plane. Saudia created a special livery with some attractive sights and buildings from the country. Both kits went together very well. I mixed the paints from Revell Aqua Colours, The White is Gunze Mr. Hobby. Hope you like them! cheers, Norbert
-
I've got a little bit of a thing for Lockheed aircraft, and especially the twin engined types. Postwar civil conversions are a fascinating topic in their own right and the L14 Super Electra and L18 Lodestar really bridging the jump from single engine 6-seater planes right up to the extraordinary and fabulous Constellation series of airliners. Fantastic bit of aviation history wrapped up here and of course the gamechanging WW2 thrown in to the mix.. I've done L14 Super Electras, even bashed the ancient Airfix Hudson into an example, and L18 Lodestars, and PV1 Venturas, and now I finally have a kit of the ancestor, the first of the twins, the little L10 Electra. ‼️Good old Special Hobby ‼️ Sad to see this little beauty with so much fame and history being marketed in some rediculous military splodge camo livery, an alternative scheme is supplied for the Romania Airforce..... I kid you not ⚠️😧 A 3rd option is catered for, as the Amelia Earhart Special which was lost without trace over the Pacific Ocean. This tragic loss makes it probably the most famous of the L10s. Amelia had already made some epic flights in the single engined Lockheed Vega, across the American continent and notably from Newfoundland across the Atlantic, landing in Northern Ireland with a few onboard difficulties and 100 gallons still in the tanks. It's reported that the authorities charged her import duty on the 100 gallons. Anyway, the kit is by Special Hobby who have been really raising their game over recent years. This kit has an air of being one of their earlier productions. Still very nicely done and moulded but perhaps a bit more "short run" in style with a number of resin cast pieces and a clear vacform cockpit Canopy. I'll be honest, I've made a start, sorting out the resin cockpit parts, before starting a WIP. Just in case I fell over the first hurdle 😋 Not sure that I like resin parts, and I hate working with CA superglue. But I managed. Somehow.... There's no reason they wouldn't produce these items in styrene now, I'm sure, but it probably seemed the way forward at the time. So I'm feeling Good to Go with this one 🤩 Bare metal foil of course for this, and the final livery to be decided. Not the Amelia plane as I want to have all the windows clear.... I'll just have to bide my time and explore the civil options. I'm well pleased to finally get my hands on one of these for my Lockheed collection
- 69 replies
-
- 7
-
-
- 1.72
- Polished bare metal
- (and 1 more)
-
 This is my first serious build. Prior to this I'd glued a few kitset models together as a child & did build a 1:200 A320. The kit is a 1:144 scale F-RSIN ATR72, sourced here in New Zealand through OldModelDecals with my choice of decals - https://www.oldmodelsdecals.com/ATR72-DHC7-8-Saab340-CV580.html Originally I wanted to do the Pacific Wave livery, but ended up settling on the Trade Mark White livery.
- 67 replies
-
- 9
-
-
- Air New Zealand
- ATR
- (and 1 more)
-
 This is the 1972 NITTO kit of the DC-10. NITTO,later Doyusha produced a range of airliner kits in 1/100 scale,like the 747,TriStar,767,DC-9,707,727,737,DC-3 and Concorde. The quality of those kits is very nice,given the time when they were produced,with resessed panel lines and some fine details. The 747 kit was back then,the largest injection moulded kit ever and is very impressive,both in size and amount of detail. The DC-10 is also quite a good kit,considering its 50 years of age. In some places the fit is tricky and some areas need a bit of improvement/corrections. Things I added/ corrected or improved are Engine inlet on No.2 engine: plastic tube inserted to get a more realistic look and a seamless intake. Intake ring recreated with Evergreen plastic sheet to get a round inlet. Wing engines: Inlet rings recreated like on No.2 engine,top and bottom of the housing flattened to get it more round. Otherwise its egg shaped. Landing gear: Hydraulic cables, disc brakes on the main gear,struts added to the front gear Rudders lowered,these went in down position once the hydraulic pressure was off on the ground Intake on the left side opened up and the flap inserted diagonal as on ground operation Landing lights on the fuselage sides drilled open and recreated with white glue Position lights on the wings:drilled 2 small holes into the clear parts,clear red/green paint inserted and glued on the wings with white glue Cockpit:Front window /nose angle corrected as good as possible,otherwise its shape is like on the Caravelle with no step between window and nose. The decals for the Demonstrator come frome the kit. Despite their age they worked quite well,only the white between the red and blue lines isnt as white as it should be. I had no choice as to keep it as is because the silver framed window openings and cabin doors are printed on the stripes. To get the windows and doors alligned,I cut the decal into 5-6 sections and applied separately to avoid any discrepancies with the fuselage windows and door outlines. The frame for the cockpit was done with silver decal stripes, Paints are Gunze white surface primer 1000 for the upper half,Gunze grey primer 1000 for the wing box and inspar panels. Gunze metallics . Sealed with Gunze Premium Gloss. This DC-10-10 was delivered to United Airlines after completing flight tests on 3 june 1972 and went to FedEx on 22. october 1998.
- 21 replies
-
- 48
-
-
Back in the year 2000,Revell USA released their ancient Boeing 707 kit as Boeing 720. The first issue dates back to 1964,as they released it as KC-135 Tanker/Transport. Since then the kit appeared in many different airline markings,none of which of course resembled the real thing. Revell's 707 comes, if anything, closest to a 707-120. For this project,I decided to try to modify the kit as good as possible to produce a 720. The fuselage was shortened in front and behind the wings,counting the recessed cabin windows,compared to the real thing. Some slight adjustments were unavoidable to get the fuselage segments seamlessly back together. So there is a 2mm discrepancy in length to its 1/139 scale. But its as close as possible you can get with that kit. The main gear wheels I replaced with wheels from a Revell 747-100. They have the same size to the kit parts but are far more better detailed + the original wheels suffered from poor moulding. The cockpit was replaced with a DACO canopy to correct the front section. The kit features just window holes and looks completely off.Some later releases had a clear window part and there the shape was quite right. The rest of the kit was built OOB. The most challenging part was the painting,esp. the wings. Research on the net showed many different color patterns on the 720,even on United aircrafts,so I picked what I thought looked the most interesting. The silver/white on the fuselage was done with masks.I copied the decals and used the paper copies as layout pattern. The cheatline decal is printed with the blue,white and gold as one unit. I remembered from an earlier attempt to build this kit,that the white is not opaque. So here I decided to trim away the white parts. As I had shortened the fuselage,the decals had to be trimmed as well. I used first the copies to find out where to cut and create the correct layout. That worked out well and only slight touch ups were needed Paints are my usual brands,Gunze,Tamyia,Testors. Its not 100% accurate but I am quite pleased with the outcome. For a more accurate Boeing 720,there is the Roden kit. It was an interesting and fun build,despite its issues I like those Revell 707 wanabees Something new for the photoshoot...the runway is from the Hawk/Round 2 Comet kit Alex
-
This was an airline that I wanted to have for a long time. I flew with them on one of their A340s from Zurich to Saigon in 2018 and was impressed by their service standard. I planned to make one of my A340 kits with that livery but unfortunately the decal set from 8a decals was out of print. So I looked for the Revell A320 kit with those decals instead. It took a while to find an affordable one but I managed it finally. But I wanted it a bit different,so I used a Zvezda A320 kit,which offers a nice cockpit,options for an open door and lowered flaps. Its depicting something like a maintenance check,but I havent got some ground equipment for it yet. The cockpit is necely detailed but I added arm rests to the seats,thrust levers to the middle console and painted on the display screens. A logbook was placed behind the co-pilots window to add something extra. The entrance was enhanced with detailed painting and the blue carpet was created with Tamyia masking tape. After closing up the fuselage,not much of the work can be seen though....😳 The flaps and slats construction is a bit complicated explained in the instructions,so some research and photo reference of the real thing was needed. The construction itself is easy as the parts fit very well. Painting and weathering was the most work on this project. Careful masking for the red front to get it symetrically was tricky. Paints are Gunze white primer 1000,clear coated with Gunze Premium Gloss. Gunze gloss red,wings are painted with Testors aircraft grey mixed with white.Coroguard panels are from the Zvezda decal sheet. The "Edelweiss" billboard had no window openings ,no idea why Revell did it this way.Their decal sheet only provides silver frames for the windows. As I opted for open windows, I applied the decals over the windows,then clear coated them.After dry I used a new sharp blade and cut out each window, then filled in the windows with white glue.After that the silver frames were applied. This is one of my most sophisticated models to date,for my first time doing all these things,I am quite pleased with the result. Alex
- 22 replies
-
- 32
-
-
These two kits were started in early 2021,but just got finished recently. 2020 saw the 50th anniversary of both the Lockheed L-1011 TriStar and the McDonnell Douglas DC-10,so these were built,a bit late I know 😊 ,as part of my anniversary builds. The DC-10 Demonstrator is already here on the RFI. This is the original Otaki kit released somewhere around 1970-1972 and is the most accurate TriStar injection moulded kit. They are being sold for silly prices on some well known sites because of their rarity status. I did not mention the Eastern Express kit here,because its more or less a copy of the Otaki kit,with some slight modifications and added parts.The exception is the -500. It features recessed panel lines and lots of details everywhere on the parts. They are a tad too deep,but nothing that sandpaper cant fix and with paint on,its quite ok. A nice feature that comes with the kit are the air stairs.Otaki provides not only one but two ! and also a display stand is included. The decal has options for the TWA twin globe livery and the All Nippon Airways "mohican" livery. They are nicely printed,a bit thick though. Due to their age,the carrier film has a bit yellowed but otherwise they are fine. For my builds I chose the Demonstrator version and the Air Canada delivery scheme. The demonstrator decals are from Classic Airlines by Nick Webb. They are of good quality,durable and fit on the model with just minor adjustments. Some extra parts are included if something goes wrong or does not line up properly. The Air Canada decals are from 26 and are wonderful as well. A big plus there is the detail sheet with everything necessary provided. The windows are from Authentic Airliners. Paints are from Tamyia and Gunze. Cheers Alex
- 21 replies
-
- 44
-
-
- Lockheed TriStar
- Airliner
- (and 1 more)
-
 Hello again. Its been a while since my last post and here is the my first airliner model for 2022. Hasegawa 1/144 Embraer E-170 Saudi Arabian Airlines livery. The kit is a generic Hasegawa kit, which is no problem in the building, with very little sanding and filling required. Only addition to kit is navigation lights in the wings. As to decals, it was a complete disaster! I used Gio Decals set which is known to be very brittle and not responsive any decal solution. This one is no exception. During the application cheatline completely destroyed. So I had to make my own cheatline by using decal paper spaying gold and cut it 1mm wide. Other elements of the decal tended to silver after dry. Lots of careful trimming away the clear film took care of the silvering, not perfect but a lot better than without. So, I am not satisfied the finish in term of decaling however, I decided leave as it is. The windows are from Authentic Airliners as usual. Paints used were mixture of Mr. Color C44 and white for the upper fuselage, Mr. Color C316 for the lower fuselage and engine nacelles and MRP Boeing Grey for the wings and stabilisers. Metals are a mix of Alclad. Its in my opinion not quite up to my usual standard due to the problematic decals but it looks good. Hope you like it. Cheers! Berk.
- 17 replies
-
- 38
-
-
Started somwhere in 2020,I finally managed to get this off my bench. I already built a 747-400F by using a Revell -200 fuselage and the wings of a Revell -400. For this build however,I used the fuselage of an incomplete Airfix 747 kit and the wings of the Revell -400, I had in my spares. Mating these parts was a major task,as the Airfix kit has no wingbox,the wing root had to be built up with sheet styrene and putty. I also tried to correct the front end as good as possible, Many sessions of puttying and sanding were necessary to make everything look smooth. The decal for the Singapore Cargo comes from V1 decals and are very well printed and nice to work with. Painted with Gunze white surface primer 1500 for the entire fuselage,and Gunze enamels for the rest of the model. All in all,I am pleased with the result and happy to have been able to use parts from the spares entirely for this 747. Cheers Alex
- 10 replies
-
- 30
-
-
-
- Boeing 747
- 1/144
- (and 1 more)
-
 I owe the pleasure of this kit to fellow modeler John Eaton, that very kindly let it go so I could have a go at this extremely exciting build. As we corresponded, John commented on what must have been to travel to exotic places on this gentle beast, in absolute luxury that only the well-heeled could afford. As many of you know, there were in fact two of these Handley Page types, the HP42 and HP45, four machines each. One covered the Eastern routes while the other covered the Western ones. They differed on the powerplants, propellers, and seat number and arrangement. Many other external details varied from plane to plane too, so as usual photo references are a must. I have wanted to build this vacuformed kit for a long time. And to think that I believed that I was handling a "big kit" and model when I built this same manufacturer's Blackburn Kangaroo, but this behemoth is far, far bigger, almost 55 ctms. in span (that is for you still leaving in the dark ages about 21 1/2 inches). This design epitomizes "The Beauty in the Beast" character that I so much love about vintage, Golden Age planes: ungainly, preposterous, but ultimately irresistibly charming. Through the years I gathered so much references on this type, that only to go trough the graphic material takes me hours (I just did it, again), not to mention the written portion of it that I leave for a rainy day (or days). The Contrail kit is not state of the art as we all know, but I believe it will provide a decent base for a good model. The kit , reputedly released in 1982 (37 years ago!!!) comes with some goodies in the form of Aeroclub's white metal engines and four-blade props, some airfoiled material, a metal rod for the landing gear, a few molded parts (wheels and such) a cut of clear (now yellowed) plastic and some extra styrene sheet. Accompanying the package are printed instructions, quite clear for what I can tell at a glance, and clearly printed reference photographs, not the fuzzy blackened photos much newer manufacturers some times provide. A big decal sheet is also provided to cater for (I think) every HP42/45. Not sure about how it survived the passage of time, we'll see. This kit also provides a full interior, cockpit and cabin. There is a particular piece of engineering in this kit, as the cabin interior is eventually wrapped within a shell, which sides have the curtains already molded in, and you have to cut off the "window" area. That sub-assembly is later enclosed by the fuselage sides. The monster kit: Some details included, among them Aeroclub white metal engines and props. Notice that the Eastern route machines had different, stacked two-blade props, easier to carry on as replacements: Contents of the box: Interior provided: The cabin "shells": A Parnall Pixie (same scale) could take off... ...and land on this plane's wing: Now, because I am building at the same time seven models (six of which are posted here as ongoing WiPs), this one may have to wait a little.
 -
 My scale model airliner build portfolio basically serves as a Cathay Pacific advertisement at this point, and this one is no exception lol. Subject - Cathay Pacific Boeing B777-300ER (B-KQY) The Boeing B777 was designed as a widebody long-haul aircraft designed as a replacement to aging B747s. Having been the first airliner fully designed with CAD, as well as Boeing’s first airliner to fully use fly-by-wire controls, it represented a quantum leap in airliner efficiency. Cathay Pacific Airways is the flag carrier of Hong Kong, offering passenger and cargo flights to international destinations around the world. It is considered one of the world’s largest and most prestigious airlines. The airline was heavily involved in the development of the B777, even becoming the recipient of the first prototype and the launch customer of the -300 variant. Cathay Pacific continues to use the type heavily in medium and long-haul routes, and is one of its largest operators. The aircraft depicted is B-KQY, one of CX's newer 777s that I was on twice, one from an FCO-HKG flight and on another in an HKG-MNL flight. The fact that I've built this same aircraft multiple times before made it easier to make the decals and copy the window layouts. B-KQY now seems to reside in storage along with other CX aircraft at Alice Springs, Australia for obvious pandemic-related reasons. Build I was originally planning to build this as an Emirates bird but a few days into the project made me decide that the CX livery was too good to pass up. I actually built Cathay 777s in the same livery before, one in 1/144 (B-KPK) and one in 1/200 (also B-KQY) but neither project really left me satisfied with the end result. Years after, and having accumulated what I hoped was enough modelling experience, I decided to tackle the 777 again one more time, partly as a gauge for how much I've improved. This was painted with mostly Armored Komodo lacquer paints and the paint mixtures were eyeballed with various so unfortunately I don't have a proper formula to give. Gloss was with GX112 polished with Tamiya and Novus polishing compounds and micromesh. Decals were a combination of 26Decals from the Emirates decal sheet I bought for the initial Emirates livery I wanted to do and Cathay Pacific decals designed and printed by myself with inkjet decal paper. Everything else is out of the box, short of the wi-fi dome I 3d printed. Kit - Zvezda 1/144 Boeing B777-300ER Going into it, I was expecting to be met with fit issues and seams given my experience with the similarly tooled Revell kit, so I was pleasantly surprised that the Zvezda kit went together easily and without too much fuss. If I had to talk about anything that could have been done better, the breakdown of the fuselage and wings makes it so that the belly is attached to the wing assembly. This makes it difficult to assemble and do polishing work on the wings, and also means that if you wanted to leave the wings off until after painting and decaling, you would have to sand, fill and repaint at the seam. I really liked Revell's engineering approach to their A350 and A380 wings wherein the wings can be left off until the end, and it would be nice if Zvezda did the same. It isn't really relevant in my case because 26decals included almost all the decals necessary for a 777, but Zvezda's inclusion of decals in this kit is very lackluster and misses out on a lot of big details. If you are buying an aftermarket set of decals for this kit, better to make sure that the set you buy includes 777 stencils or buy those separately. Decals This is the first time I've used 26decals, and although I had to pay a huge premium for the Emirates decals that I never used anyway, the other decals went down really well and the borders are practically invisible once applied. They're very thin though so extra care needs to be taken in applying them as it is easy to rip or fold them accidentally. - Overall, this build turned out to be a lot more enjoyable than I was expecting, and I'm happy to be able to do justice to this aircraft once and for all, with the end result being a Cathay 777 that I can feel satisfied with. Thanks for looking, feedback and comments are appreciated!
- 22 replies
-
- 38
-
-
Dear fellow modellers, I would like to show you my latest finished model. The Caravelle III is made from the very challenging Mach 2 kit with the use of Werner Lehmann's excellent Authentic Decals Window set and the Airway Graphics set for the SAS livery. The most visible flaw of the kit is the wrong position of the cockpit windows. This could be mitigated by the use of decals but required a lot of sanding. Other difficulties where the fit of the wings to the fuselage. I opened one engine nacelle and put in an engine. The experts will recognize where it comes from originally. I cut out the flaps and installed them in a lowered position, a state you can often observe on fotos of parked aircraft. The original OY-KRD is preserved in a Danish museum and I used some fotos to work out some details. Enjoy watching the fotos! greetings from Germany, Norbert
- 21 replies
-
- 54
-
-
Next up in my 767 collection is LTU SÜD Boeing 767-300ER. LTU SÜD was a subsidiary of Dusseldorf based charter airline LTU,and had its base at Munich airport. It operated a fleet of 757-200s and 767-300ER to various holiday destinations. I remember the 767-300 standing next to our DC-8-63 in Mombasa when we were boarding for our return flight to Switzerland back in october 1992. I was still a teenager back then and as soon as we got home,I went to the local modelshop to pick up the Revell 767 kit with these markings. The result of my build was less than stellar,partially to my limited modelling skills and patience back then and also because of the mediocre decal set provided in the kit. Anyway,I had much fun with my model back then. Now,a good 30 years later,I thought it was time to rebuild this aircraft,this time though,I used the Zvezda kit as a base,just because the kit has the correct window and door layout for the LTU version and I also planned on using only the registration and the white LTU and LTU SUD markings from the afforementioned Revell kit. The whole livery was airbrushed and for the details I used parts from the PAS detail set and decals from my spares box. Compared to the Revell 767,the Zvezda kit is mire detailed and also more accurate in some areas. All panel lines are very fine and recessed,same goes for the flaps on the wings. They are a bit too fine for my liking,on the wings I think the Revell kit is better done. The landing gear and wheels are much better and more detailed on the Zvezda kit. Both kits are very nice and considering the fact that the Revell version came out a good 25 years before the Zvezda kit,it still holds up very well.A big bonus is also the engine option. PW or RR engines are provided on some Revell kits,alas Zvezda gives you only PW engines. Paints used are Gunze white primer,gloss coated with Gunze Premium gloss and Revell red 31. Wings are painted with Gunze light grey 315,and my Tamyia mix of 66 and 56 for the corogard. Metallics are from Gunze as well. Apart from the poir decals from the Revell kit,the build was easy and straight forward.The kit goes together really well. Cheers Alex Some photos to compare the Revell (BA) and the Zvezda kit (LTU)
- 14 replies
-
- 33
-
-
- Boeing 767
- Zvezda
- (and 1 more)