Search the Community
Showing results for tags 'Airfix'.
-
This kit was originally tooled in 1973 and was released from 1973 to 1978, briefly in 1980, and again from 1991 to 1994. This is packaged in a blister pack. The instructions are printed on the reverse, with assembly in 6 sections. The moulded parts are in white plastic. There is some flash, but details are well depicted, and two sheets of thin plastic card are included for the belts and straps. Options include parade or campaign uniforms and the possibility of making different poses. In addition, this kit has excellent conversion possibilities. History: During the 1815 campaign the Foot Grenadiers were organised into two battalions, each having four companies of 150 men plus 10 officers (1er and 2e Batallions, 1er Régiment de Grenadiers (Old Guard) 1280 officers and men). Uniform consisted of a bearskin with a semi-circular bronze plate, white cords, red plume, red top patch with yellow (white) grenade. Special blue-within red-within white cockade with gold crowned eagle at the centre. Dark blue coat and collar, white lapels and three-pointed cuff flaps, red cuffs and turnbacks, red, fringed epaulettes, white small clothes and belts, gold grenades on the turnbacks. Brass buttons; white and black gaiters, blue great coat and forage cap with white piping, orange lace edging turnup and orange grenade edged white in front; cartridge box with bronze/brass eagle and small grenade in each corner. Reference: AN ILLUSTRATED ENCYCLOPEDIA OF UNIFORMS OF THE NAPOLEONIC WARS ISBN 0-7548-1571-4
-
Hi, this is my recent build, Airfix 1/72 P-51D Mustang, painted with Alclad II Polished Aluminum and weathered with Tamiya's weather sets. Decals from Blue Diamond Decals. Thank you for looking.
- 10 replies
-
- 16
-

-
BAe Hawk T.1a in the 75th anniversary scheme of 234 Sqn, 1 TWU, RAF Brawdy, 1992. Airfix kit oob with Xtradecal decals and scratch built seatbelts, cushions, nose light and pitot tube. I tried to replicate the grime toward the rear.... Overall went together very well but I could have improved the finish on the fin and around the canopy.
-
A friend is building the Lanc from the BoB flight set. Unfortunately he's lost the seat! Can someone give me the dimension from cockpit floor to the top of the headrest. He's scratched one but I think it looks a little over scale. Thanks All, Tom
-
One of the first models I started up my return to modelling, she slipped back for a variety of reasons but now is finished. The colour's are those as given by Airfix, so not really right, apart from the underside which is my own concoction in an attempt to get the colour I thought Airfix was aiming for. Anyway, on with the pics...
-
Hello All, I've started an Airfix Hawker Demon, as the first of a planned sequence of builds covering the Hart family from various kit manufacturers. For these builds I have an Airfix Hart and a Demon - the Demon (Left) is a modification of the Hart mould (Right), "modernised" with added fabric sag (shame!). I am using up my dodgy Hart with a warped top wing and slightly warped fuselage - I still have a mint one in the stash. The Demon seems to be about 3mm short and the fin/rudder is off compared to photos, but otherwise pretty accurate in outline. The Mushroom Model book plans and the Air Pictorial plans both match the kit, but they come up about a foot short. The old Harleyford/Aeromodeller plans show the right length. First stage was to lengthen the fuselage and add some cockpit detail. I rebuilt the gunners cockpit as well, as the Airfix one doesn't really line up against my references. So here's where I am Thanks for looking, Adrian
-
This was bought on e-bay. It is packaged in a blister card, with two sprues of white mouldings. The six assembly stages are illustrated on the header and a small sheet of Plastikard is provided. The figure is nicely sculpted with crisp detail, but some flash evident. This kit was first released from 1971 to 1978 and again from 1991 to 1994. History: At the start of the nineteenth century and the short-tailed, single-breasted jacket was worn. Officers, however, retained the long-tailed coat. Traditionally, hair had been worn in a pigtail, but these were abolished, to the relief of the rank and file, in 1808. The Belgic shako with tall front plate was adopted in 1812 and a short-tailed, single-breasted jacket replaced the old-fashioned long-tailed coat. Officers, however, retained the long-tailed coat. Grey overalls replaced white breeches and gaiters. All regiments of the line wore red tunics with white turnbacks. Facings were worn on collars, cuffs and shoulder straps; collars and shoulder straps were edged in white lace. The centre companies wore a white, worsted tuft at the outer end on the shoulder strap, and a white-over-red tuft on the shako. The two flank companies wore wings in the facing colour, edged and barred in white tape and often having worsted tufts all along their outer edges. The light company wore a green tuft and a small hunting horn badge. There is evidence that these elite company badges were worn on the shoulder wings and the tunic turnbacks as well. This kit is moulded to represent an infantryman of the 2nd Foot Guards (Coldstream) one of the battalions of Guards at the Battle of Waterloo. The Coldstream was the 2nd regiment of Guards Infantry and had buttons and laces in pairs. Their shoulders were decorated with dark blue wings (their facing colour) edged and decorated with white tape. Reference: Airfix Magazine February 1974 page 355 AN ILLUSTRATED ENCYCLOPEDIA OF UNIFORMS OF THE NAPOLEONIC WARS ISBN 0-7548-1571-4 page 100 WELLINGTON’S ARMY ISBN 1-85367-501-6 plate 26, 31 Brassey’s History of Uniforms Napoleonic Wars Wellington’s Army ISBN 1-85753-221-X page 18 BRITISH INFANTRY UNIFORMS Since 1660 ISBN 0 7137 1127 2 plate 35 Sgt Coldstream Guards, 1815
-
 Hey everyone Well I've finally finished her, its not been without its problems and my intereptation of RAF Azure blue leaves something to be desired. The Airfix kit of the Blenheim Mk1 builds into a pleasing replica of the real thing the only additions were the Barracuda Resin Intake and exhaust set (BR72196) and Xtradecals set X72202 everything else was out of the box. And to accompany my FLY 1/32 Hurricane build I'll be building this.. The link to the build... Thanks everyone that followed along. Here's to next time. Iain
- 27 replies
-
- 55
-
-
Hello All, I'm nearly finished on a pair of Bristols (titter ye not - a Blenheim (MPM) and a 188 (vac)) and I have dragged out a bargain bin Airfix Storch, with "Tomy" secondary branding. The moulding quality looks terrible: all the struttery looks misshapen and wobbly, and the clear parts are a combination of short shot (windscreen) and roughly moulded. Not anyone's finest hour. Although I remember building it as a kid and thinking it was pretty good so it must have had better days. I jumped straight in: the cockpit (which isn't bad for 1967 Airfix) and the canopy (minus the short shot windscreen). I wanted a strong canopy to hang the wings off, so I used Tamika extra thin, which promptly ran everywhere! Here it is after an hour's remedial polishing with sanding sticks and toothpaste: You can see the two halves of the windscreen below. I have worked out a paper pattern for some folded acetate to replace this. You can also see how the canopy is way too low for the fuselage - I'm hoping it will be more fun when I get past the clear bits! Thanks for looking, Adrian
- 16 replies
-
- 10
-
-
Hello gents! There is an Airfix HC.4 on my workdbench right now and I came across a question that all the pictures on my HDD can't answer: Are the top windows tinted in the same blue-greenish colour as the german version is? On most pictures it looks more greyish. Also the Airfix instructions say that the main coulour for the camo is BS381C 298 Olice Drab for the arctic scheme. On this forum I read the Sea Kings were switched to NATO Green. When did that happen? What would be a suitable Tamiya- or Gunze-colour ?
-
 Don't start me talking - I could talk all night My mind goes sleepwalking - While I'm putting the world to right Called careers information - Have you got yourself an occupation? Oliver's army is here to stay Oliver's army are on their way And I would rather be anywhere else But here today There was a checkpoint Charlie - He didn't crack a smile But it's no laughing party - When you've been on the murder mile Only takes one itchy trigger… Go on – admit it – your singing along already… So where do we start and who do we blame for this latest escapade into the world of tiny tanks? Was it @badger for getting me interested in AFV’s in the first place? Was it ALDI for putting an offer on these bad boys for £4.99 each? Was it @Lawzer for building one and then teasing me with the pictures of his triumph? Was it the PLASTIC SOLDIER COMPANY for luring me into the belief that these things are ‘easy and fast’ to put together? Anyway – let’s not apportion blame - until things start to go wrong of course… So let’s get going shall we and what better way to start than with the ‘box’ shot… ...well 3 boxes to be accurate... ...as usual I'm sure to have lots of questions along the way and as this is my first 'real AFV' kit(s) I'm sure to need some expert help - so I hope a few folk will tag along and keep my spirits up when it all goes pear shaped. More updates after tea - Steve
- 278 replies
-
- 9
-
-

-
- Airfix
- Cromwell Tanks
- (and 1 more)
-
 Hello fellow modellers, Last summer I had a chance to buy my firs Airfix kit since more that 25years and I have to say I have been positively impressed. Really nothing to do with the old stuff I used to buy when I was a boy. The Defiant kit is nicely detailed and quite easy to build even if the turret requires a bit of patience. As usual for me it is an OOB with just little additional details like belts, some wiring etc. Paint has been done using airbrush and Tamiya acrylics with Tamiya spray cans for finishing. Any comment or suggestion is always welcome. Enjoy pictures. Cheers, Andy
- 11 replies
-
- 28
-
-
This one This kit was originally tooled in 1971. The kit is reputedly of dubious scale, but the olive-green injection mouldings are adequately detailed. The tracks are wholly inadequate being badly distorted. The small decal sheet is old and yellowed, but appears to be in register. The instruction sheet illustrates assembly in seven stages, with options to build Mk II or Mk III versions with decal options provided for a Crusader III of 1st Army 17/21st Lancers, 6th Armoured Division in temperate scheme or a Crusader II of 8th Army 10th Hussars, 1st Armoured Division in desert scheme. My original plan to do this as a 1st Northants tank is foundering on a lack of images and Reg Spittals’ pictures look like Crusader IIs to me, so I shall try to replicate the muddy conditions at Linney Head in a small vignette. Stage 1 sees the construction of the Mk.II turret. All went fine until I tried to cut the spade from the runner; it snapped into two pieces, one of which was consumed by the Carpet Monster. I thought I might have a spare from a previous build but inspection of my bits and bobs failed to reveal one. However, I found something that looks like a starting handle, so fixed that in its place (having filled the locating holes with putty). I also found a British tank crew member I had built previously. I cut off his arms and repositioned them. He will stand behind the turret in a similar manner to those in Reg’s photos. I also found a spare set of tracks. I have no idea where they are from and they’re probably totally inaccurate, but they may be better than the kit supplied ones. Then the carpet monster gave up the missing part of the spade. I fixed both halves and added the spade to my spares. I also assembled the Mk.III turret because it is possible that the 2nd Northants fired these at Anney Head in December 1942. Next up was stage 3 and the assembly of the hull. I quite like the way the hull is broken down making assembly simple yet sturdy. I must remember that the tyres were solid black rubber
-
Ready for inspection I offer my Airfix 1:72 Hawker Typhoon IB. This is an out of the box build, decorated in the colour scheme flown by Squadron Leader Basil Gerald Stapleton DFC. The kit went together well with no problems except for the invasion stripe decals, not wanting to play ball. I was lucky enough to get a new airbrush and compressor for Christmas, and got to test them out painting.g the camouflage top coat. Great little kit, and fun build.
-
I had a choice of 2 kits for my next build, Revell's 1:72 Hurricane or Airfix 1:72 Typhoon. After some deliberation my son chose the Hawker Typhoon. I have just finished 2 bombers, so fancied building something smaller. In my stash I have Eduard's Royal class Spitfire's (I love building Spits), but fancied making something similar but very different. So here it is, Airfix 1:72 Hawker Typhoon IB. I got the kit for only £5.99 and am very impressed with the detailing. The box includes clear instructions, with a choice of 2 paint jobs, and a nice sheet of decals. There are 4 grey sprues, with little flash and loads of detailing. As well as one small clear sprue. I have decided to go with the markings of the aircraft flown by Flight Officer A H Fraser, No.439 (Westbound) Squadron, No.143 Wing (Royal Canadian Air Force), 2nd Tactical Air Force, Eindhoven, Netherlands, February 1945. I have given the sprues aquire wash, and can't wait to get started.
-
Hey Guys, So speeding along now! Built my first aircraft about 2 weeks ago (though uploaded much later here) and now here i am again having finished Airfix's lovely little Typhoon bubbletop. Construction was on par with Tamiya - that being you just shake the box and the bits fall together. The only real issue I had was fitting the fuselage halves together but considering I'm new to this game I'm sure its my inexperience rather than the kit! I painted her with Hannant's brilliant Extracolour range enamels which with a beautiful gloss finish prepared the surface nicely for the decalling stage. Weathering was simple, I thinned raw umber oil paint and ran it into the panel lines before wiping away. I coupled this with some basic metal chipping with Humbrol Metalcote Aluminium. Compared to my last (and first) aircraft build which was the Spitfire, I think I've come on a few steps and I'm quite pleased with the finish! Thanks for looking! Sam
-
 My Seafire 46 is now close to RFI, so time to start something else. I have been toying with a Seafire 47 - and will probably do it in parallel with this build; however, having got hold of the new Airfix 1/48 Walrus, I find I cannot resist working on R.J. Mitchell's other great aircraft of the war. I have always planned to build at least one of these at some stage, as part of my long-term project to build an example of every aircraft I flew (which doesn't include the Walrus!) and every aircraft my father flew (which does). He only flew Barracudas front line, so I started looking at training squadrons, and found this: AA5R / W3040 was an old warhorse (she'd flown from HMS King George V earlier in the war) which served on 751 Naval Air Squadron at HMS Condor (RNAS Arbroath, which also had a satellite field at Dundee). 751 was an Observers' training squadron - the equivalent of the modern 750, where Lookers are brought up to wings standard (navigation, r/t, weapons work etc). My father was on 65A Drake Course and got his wings in July 1944, before moving onto Speke and Ronaldsway for radar training (bearing in mind that airborne radar was a new thing at this point, and many front line types didn't have it), and then to Maydown in Northern Ireland (747 NAS) for Barracuda conversion, and then to 810 NAS on the front line at RAF Beccles, then Machrahanish, and then embarked in HMS Queen. I think there was more than one squadron at Condor; my father's logbook only mentions being appointed to Arbroath, but not a specific squadron number. He certainly flew several different types during his training; Swordfish, Albacore & Walrus at this stage, but also Anson, Stinson Reliant, Defiant, Proctor, Blenheim, Whitley - even an hour in a Wellington! Anyway, I knew that the Xtradecal AA5R was a likely candidate because every RN Observer trained in the UK went through that squadron at some stage (every other course was trained in Canada and/or in Trinidad, but Dad's flying was all in the UK). It's better than that, though: not just the right squadron, but the right aircraft - 27 April 1944, with Sub Lieutenant Ure up front, he flew W3040 for 2 hours on a Surface Reconnaissance Exercise (SRX). So clearly this is the airframe I am going to build. Having done the Seafire largely OOB to get my mojo back, this one is going to be a bit more embellished; I have the Eduard interior and exterior PE sets, plus masks (and of course the Xtradecal markings). If you are remotely interested in the "Shagbat", you will no doubt already have read that this new release is the best Walrus out there by a huge distance - it looks really, really good when you open the box. Like all CAD-era kits, fit is by all accounts very tight; keep paint away from joint lines etc. - but we are used to that in Wing Nut Wings etc., so why not Airfix. The only criticism I have seen of this kit so far is that there are a LOT of ejector pin marks on the inside; probably the price you pay for all that moulded rib detail. There are a lot of them - about 20 per side - but nothing that half and hour with a sharp No 10 scalpel blade and some careful scraping couldn't sort out. I did take some before and after photos of the ejector marks, but some advanced camera muppetry on my part means you'll have to take my word for it! Here is a general view of the inside of the aircraft; the "duckboard" floor parts are glued, as is the forward of the two major airframe ribs - the aft one is dry fitted. You can see how much detail Airfix have moulded in to this beast! In the pic above, you can see that I have removed 2 sections of the floor - one on the port side immediately aft of the second frame, and one on the starboard side immediately ahead of the first frame. That is to allow some extra Eduard detail goodness to fit (the one on the right is a mere 9 pieces of PE...) I have also started adding PE to the side walls - I have been doing a lot of planning to work out what to add before painting (because the interior is going to need a lot of paint and weathering work before I close it up). Finally for today, here is a closer shot of some of that PE, complete with some pencil marks on the side walls where other bits are due to go: More soon Crisp
- 292 replies
-
- 26
-
-
I'm finally going to start a project that I've been planning for a long time. Hopefully posting the progress of the build here will give me a push to finish it... This is the background story. I work at the local museum at former Swedish Air Force base F 10 at Ängelholm, Sweden. I love to just sit and browse through the extensive photoarchive now and then. It is absolutely huge and full of interesting photos from 1940 up to 2002 when the base was shut down. Sometimes I happen to stumble over something that I haven't seen before. A couple of years ago I found some pictures of a different looking Spitfire at a different airbase. I discovered that these pics were taken at the F 14 base at Halmstad, Sweden. It turns out that no other than Jeffrey Quill made a sales tour to Sweden in this Spitfire 22 in June 1946 with the mission to sell airplanes to the Swedish Air Force. As you can see it was a slightly different looking Spitfire, it was equipped with a contrarotating propeller like the Seafire 47. Unfortunatly the timing was awful since the same day Jeffrey Quill landed his Spitfire in Stockholm the first of the new DH Vampires for the Swedish Air Force was delivered! The Spitfire was by 1946 old news when compared to the Vampire jets... However, the Swedish Air Force did eventually bought the Spitfire XIX and used them as S 31 for a couple of years. I'm very thankful to the photographer for this pic. Note that there is no gunsight. Jeffrey Quill and some beautiful details... :-) I actually did a quick build of the Airfix Spitfire 22 in 1:72 scale two years ago. I stole the propeller from the Special Hobby Seafire 47. I'm sorry for the lousy quality of this photo... Now I want to build me a bigger version of this rather sexy looking aircraft. I'm going to use this Seafire 47 in 1:48 from Airfix. Most parts including the propeller is already in the box. I think that the only thing missing compared to the Spitfire 22-kit is the lower portion of the tail rudder. I've collected quite a lot of aftermarket "candy" that will be used on this build. What do you think? Anything I need to think about before starting? I'm mostly interested in Swedish aircraft so this will be something new for me. To be continued... Andreas
- 17 replies
-
- 12
-
-
- Spitfire 22
- Airfix
- (and 1 more)
-
Hi everyone I’ve been gripped by the modelling doldrums lately. I have zero enthusiasm for either my HK B25 or my FLY Hurricane so rather than half heartedly attempt to build them I’ve packed them up and put them to one side (for now). So what to do in the mean time? I’ve been following, as I’m sure many of you have “From Failure to Failure” a jolly good thread by messers 06/24 and Procopuis and it inspired me to think small. I have several of the Airfix Blenheim’s in the stash and after following the said thread I thought that I’d give mine ago and I’m glad I did coz I’m really enjoying it. I started last night and from the off I’ve decided that its going to be a totally OOB build without any extras or do dads, in fact I’m not even going to get the Eduard masking set for it - I have tape and a knife so I’m sure I can mask it! So far I’ve completed the cockpit tub with the only additions being some masking tape belts and I’ve mated it to the fuselage. To get a better fit than you otherwise would I removed quite a lot of plastic from the rear of the cockpit and I’m quite happy with the results, I still have some gaps to fill but compared to what they could’ve been they should be easy to address. First up a photo of the amount of plastic I removed to try and get a semi decent fit.. The results aren’t too bad.. Excuse the dust I have since removed it (well most of it) I do however have a little work underneath the old girl to fill the gaps - I guess this is a trade off for getting a semi decent fit of the cockpit to the fuselage? But overall she is starting to take shape (it’s only taken me about 6 hours work to get to this stage.. Right I’m off to mask the cockpit. Cheers all Iain
- 69 replies
-
- 11
-
-
Finally the weather is just right to take a few pics outside! This is my effort at the new Airfix 1/72 Gnat kit. I found the kit somewhat fiddly to fit, so much so that this is in fact build No2, build No1 getting trashed as it emerged that it was quite easy to build this kit badly! red3 Main tip is to fit the intakes to the fuselage halves before you fit the cockpit sidewalls, which otherwise will stop them fitting flush. The fit of the wing also needs a fair bit of sanding and fettling to get it to sit down tight against the fuselage without gaps. I also left off the main gear until the rest of the kit was put together - this needs some nervous bending to get them in, but it was a better result than on No1 where I mashed them up proper with misplaced thumbs while sanding the seams. red1 Paint is Humbrol Acrylic Arrows Red which sprayed very nicely, and has been observed here, is proper red rather than orange like the Xtracrylix version. Decals are a mixture of kit and the S&M Decals Gnat sheet. The S&M has a number of decals which are not identified on the instruction sheet and after much peering through a magnifying glass I reckoned one tiny one was a Silver Jubilee marking found on the tails of the Red Arrows in 1977. I chatted with Mr S&M (aka Mel) at the Croydon aviation fair in January who confirmed this. As I hadn't seen any kits with this marking I thought I would do one, and found a nice pic of XS107 on the net to use as inspiration. red5 To add a bit of interest I also opened up one of the nose panels as can be seen in a few pics on the net, but as I have no idea what is in there, I just blanked it off and hope no-one objects!! red6 Hope you like! red4 Pat
- 25 replies
-
- 24
-
-
Hello folks, Again an Airfix Skyhawk! There is no after-market items used but a little of scratch for the cockpit, flaps and few details. The bombs are Hasegawa mk-83. Hope you like it, cheers
- 23 replies
-
- 51
-
-
Just a heads up that Hornby just charged me for my 1/48 Airfix Sea Fury pre-order so these kits should be shipping imminently. I got rid of my Trumpeter 1/48 Sea Fury on ebay when this kit was announced so someone else will have to do that side-to-side comparison. I think I still have a few Hobbycraft Sea furies floating around but I expect that this new kit will be so superior a comparison won't be worthwhile.
-
Could not help but notice that apart from selling the magazine monthly Tesco now sell the 2018 catalogue in the newspaper stand. Could it be that kits are next? Hmmm
-
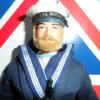
Those of you who have been following my Sea King build will know that it has already lasted more than a year. This is entirely my own fault, since I'm the one who chose to detail it to such a degree (not to mention adding the odd rivet or three). I have, however, got a bit bogged down of late, and since the Sea King is a subject very dear to my heart, I've decided to take a break from it before it turns into a chore and I start to make mistakes. It will return, I promise. I expect many of you will have guessed from the title - not to mention the near certainty that that it will be a Fleet Air Arm aircraft, in 1/48. But here is the start point. You ought to be able to work that out easily enough... I acquired this kit for £5 at a show. As you can see, it has been started (though the previous owner didn't get much further than a dash or two of interior green, an opened camera port and a glued contra-prop). The kit has a good reputation, but I have ordered a couple of bits of after-market to address known flaws (to be precise: a vac-form canopy, seamless chin intake, better shaped cowling "bulges", and a new airscrew or two). It's the original boxing, too, so I might have to get in some replacement transfers - the originals look decidedly yellow, so I'll see how they look after a bit of sunshine. There is a strong argument to say that this (with its F22/24 cousins) was the ultimate version of probably the most famous aircraft of all time. There is an even stronger argument that Supermarine's subsequent offerings were either never adopted (Spiteful, Seafang) or not in the same league (Swift, Scimitar...)... so that this represents the best aircraft ever produced by that most august of British companies. So, ladeezanngennnellmeeeen… I present to you a Seafire FR46 (the clue is in the fact that I didn't show the sprue with folding wings), using Airfix's original FR46/47 boxing. To be built essentially OOB (other than the after-market stuff already mentioned, to correct known issues with the kit). One of the reasons I've chosen the FR46 rather than the 47 (wing fold apart) is the fact that I far prefer the look of the low demarcation between colours (though eventually I will probably also build an FR47 with folded wings [Edit; especially since I've now found a photo of a folded, embarked FR47 with low demarcation line!]). And yes, I know there is disagreement about whether 46s were pure-EDSG or Temperate Sea Scheme on top - but I am taking Winkle's word for it and painting TSS (and there are at least some photos where there are definitely two colours on the upper surfaces of an FR46). I am in no way a Spitfire / Seafire expert, and this is meant to be a quickish build to restore my mojo. I don't think there are any howlers in the kit, and if there are then this model will be built with howlers. I do, however, have one question for any late-mark Spit-/Sea-fire experts out there; cockpit. Black or interior green? The FAA Museum's Mk XVII suggests that it was black top half and IG lower, so if in doubt I'll go for that. Can't find any photos, though. The game's afoot!