Search the Community
Showing results for tags 'Airfix'.
-
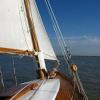
Hello All, A rather belated start to this build. I've just made a space on my bench by finishing a Gladiator, so next up is the Short Skyvan of the Nepal Air Force. It's a small country, far away. The Airfix Short Skyvan kit was released in 1975 and is a nicely detailed model, with options for Olympic airways or the Oman Air Force, offering two interior fit outs. I will be going with the military fit out with canvas benches rather than the quite luxurious-looking Olympic cabin. I have a couple of pictures from the Internet of the aircraft in question and I know next to nothing about either the Skyvan or the Nepalese Air Force. I will endeavour to keep it that way, and any deviation from OOB will be brief and speculative! Sprue shots to follow when I get to a device that does photobucket! Thanks for looking, Adrian
- 26 replies
-
- 3
-

-
- Airfix
- Short Skyvan
- (and 1 more)
-
The young version
-
Hello again, here is what i'm calling a Blue Peter post, ie here's one i did earlier!! Its built straight out the box about 2 years ago or whenever it was the kit was released. A lot of nice detail is packed in to this little kit, and i recon its the first one that showed Airfix were really upping their game. There's only one decal option in the kit and i recon its a good one. The main overall silver was sprayed from a can, and the rest is brush painted, except the yellow stripes which are the kit decals. The undercart legs on this kit are a bit soft and seem to be getting a bit bandy with age! Anyway, I hope you like.
- 26 replies
-
- 13
-
-
Officer, 60th Foot, 1812. The 60th Foot were formed from loyalist Americans during the American War of Independence. Like the 95th, they were uniformed in green. The officer wears his pelisse in the hussar style and has a stylish leather trim to his overalls. During the Napoleonic Wars the regiment saw action in the Peninsular War. The first four battalions had been raised as regular line battalions, but in 1797 a 5th battalion had been raised at Cowes on the Isle of Wight and equipped entirely with the Baker rifle, and wore green jackets with red facings. The mixing of rifle troops and muskets proved so effective that eventually line battalion light companies were replaced with rifle companies. The line battalions found themselves in several different theatres, including the West Indies. The rifle battalion was soon joined by a second, and these found themselves in the Peninsula with Wellington's army, serving along with the 95th Rifles, and the King's German Legion rifle units. A 7th battalion was eventually raised as a rifle battalion specifically for service in the American War of 1812. After the Napoleonic Wars the regiment received a new title: first, in 1815, its name was changed to The Duke of York's Own Rifle Corps and then, in 1830, to the King's Royal Rifle Corps (KRRC). Colour Sergeant, The Rifle Brigade 1854. The early stages of the Crimean War were fought in the home service full dress. The Rifle Brigade wore the normal infantry shako but all NCOs and men had the double-breasted coatee of the Guards cut. Colour-sergeants wore a special badge on the right arm and a black three-bar chevron on the left. All sergeants wore a red sash around the waist and bronzed badge and whistle on the pouch belt.
-
 I've just finished these, the first trio of Airfix's Spitfire I's from my stash built to utilise three of the schemes on the new Xtradecal Battle of Britain 75th Anniversary Spitfires transfer sheet X72221 here. A further three are on the way for the release of the second Xtradecal set of Spitfires when it is released in a couple of weeks time. The first is a Spitfire I, RNoN, serial overpainted (or possibly retouched out of the photographs by the censor) of 72 Squadron at RAF Leconfield in Yorkshire, May 1940. The text indicates this aircraft was flown by the Australian ace Des Sheen, I would suggest that although he may have flown it on occasion it 'belonged' to another pilot as it has a Kiwi badge on the cowling; I have seen another Spitfire from this squadron with a boomerang motif on the access door coded RNoJ also described as Des Sheen's aircraft which would make more sense - not that it matters in respect to my model This was built out of the box except for Eduard microfabric seatbelts, Owl etched metal exhaust shield night-flying 'blinkers', SBS resin exhausts (the ones for the Hurricane kit but they fitted fine, as they should ) Rizla paper gun-port covers, EZ-Line R/T aerial wire and Xtradecal transfers as described above. I also added plasticard seat and headrest armour, but I would not bother doing that again unless I was planning on leaving the canopy open, as it is quite invisible once closed up. Uppersurface camouflage was Phoenix Precision Paints Dark Earth and Dark Green, the undersides are a one-off mix of near-black and near-white, The second is a Spitfire Ia X4593 UOoA of 266 Squadron based at RAF Wittering in Cambridgeshire in July 1940, I haven't been able to find out anything about this aircraft or who might have flown in it, but the Aviation Directory suggests that it first flew in October 1940 which is possibly correct as it is quite a late series serial number... again, this makes no real difference to my model though, except that they might be displayed in the wrong chronological order; sorry... This model was built and painted as the one above, with the exception that the exhaust glare-shields were not fitted and the undersides were painted in Phoenix Precision Paints 'Sky'. The third and final model represents Spitfire Ia P9323, ZDoF, of 222 Squadron based at RAF Hornchurch in Essex in late August 1940. This aircraft was shot down by a Bf109 over the Isle of Sheppey on 30 August 1940; the pilot Sergeant Arthur Spears baled out unhurt - he was later shot down and wounded by Adolf Galland in 1941 but survived the war and died 30 September 1998. This one was painted as the others, but with the underside done in WEM Colourcoats 'Eau de Nil' (now available under the Sovereign Hobbies label) as there is some reason - ranging from 'probable evidence' to 'wishful thinking' depending what end of the spectrum you choose - that at least some 222 Squadron in 1940 were, for a period at least, painted in a colour other than standard 'Sky'* These were my first builds of the 'new tool' Spitfire kit released in 2011(?) and it was a lovely build; I 'loosened' the holes for the locating pins on the fuselage and the wings on the advice of our compadre Beard from this very forum (thank you Simon) and may have sidestepped several issues in doing this - ignorance in this case being analogous to bliss Most of the criticism of this kit I have read relates to the panel lines - they are actually quite thin but they are very deep indeed and you might consider not making any effort to shade them; I just left them as they were and I think they are okay, bit more present than would be ideal but not a sufficient reason not to make this your Mk.I Spitfire of choice. Sorry for all the words. Cheers, Stew * How to avoid saying something while appearing to say something, or to say something while appearing to say nothing
- 28 replies
-
- 26
-
-
I wanted to depict R7192 PETERBOROUGH AND DISTRICT a presentation Spitfire delivered to No 92 Squadron (QJ) and favoured by Wing Commander A. G. ‘Sailor’ Malan, consequently flying fewer missions. Due to a lack of information I've probably got lots wrong in terms of accuracy, but in 8 years not a lot has emerged and how long can it sit in the stash, looking out longingly to be built
- 14 replies
-
- 12
-
-
Ok, here goes my second attempt at posting! Here, folks, is the first model i've completed this year, and the first i,ve posted at BM. Most of you will be familiar with this on by now as i've seen plenty of nice examples posted already. Hopefully you have time for one more! I think this is one of Airfix's nicest 1/72 kits so far, and built up very easily. The only "snag" i had was lining up the fuselage halves, which produced a little step at the nose end. Other than that it was a very enjoyable build.The model is finished in brush painted Humbrol acrylics, and weathered with Humbrol powders. Decals are from Hannants Xtradecal sheet for the Defiant and depicts a machine from the RCAF based at Drem in 1941. Hope you like!
- 25 replies
-
- 26
-
-
One of the airfix black friday deals Junkers JU-87 Stuka.
-
 As a child of RAF Chivenor I have built a small collection of Hunters & Hawks in 1/72 & 1/48 scale, but I have a big hole in my collection and that is the 22 Squadron SAR Helos. I did attempt a HAR 4 a few years ago with the aid of RAFDECS sheet but it didnt turn out too good. The HAR 10's were a daily sight where I grew up in Braunton next to the base and during the summer they could be seen plucking grockles out of the sea at Croyde & Saunton!! Anyway, this is not so much a WIP but more a look at what i did as the model is pretty much finished but I dont want to clog up RFI with progress pics. I recently picked up a job lot of four unboxed Airfix Whirlwinds for a tenner (bargain!), I sold a couple and thought i'd attempt a MK10 conversion with one of the others. I picked up an Airwaves MK10 nose on ebay and set about chopping the kit up to see if it would fit! I only attempted the most obvious changes ie the nose and the bent tailboom, I expect there are more suble differences that I hadnt noticed but i'm sure somebody will! :-) I'm not expecting this to be 100% accurate but just a bit of fun really and if I can end up with something that looks a bit like a 10 in the cabinet i'll be happy!! First up, heres the helo I am modelling with the aid of RAFDEC sheet and some spares for the serial XP350. Photo taken by my brother on Braunton Burrows sometime in the late seventies I think. Here's the sprues and extras. This mould is dated 1950 something and it shows, pretty basic with minimal interior detail and lots of rivets! First thing to do was chop the nose off, I measured the width of the Airwaves nose and the kit fuselage and it was pretty close, only problem was I had to remove the whole of the front end from under the windscreen to get the resin part to fit. Next up was the tail, I cut it in rougly the right place and then cut the boom at aprox the right angle to get the drooping tail, may have gne a bit too far but if I'm going to all this trouble it may as well notice!! I also had to remove the faring between the boom and fuselage and re-build this out of plastcard. Managed to get the boom back on with a lot of filling & sanding and the nose is taped on, so far so good! I'll add some more photos when finished.... And heres some more old pics of 22 at Chiv... http://www.britmodeller.com/forums/index.php?/topic/72577-chivenor-sar-old-photos/
 -
 Hi everyone So I've started another build, the JP has temporarily been put on hold as this is a model I've wanted to build for a long time, in fact I first build this machine in 2013 and it turned out ok but I think now I can do it real justice. I'm using the fabulous Airfix Mk1 Spitfire as my canvas and it will be built mostly OOB apart from a HGW Sutton Harness and Montex masks for the markings. The build has been going well apart from in my example part C51 was broken in three places, I tried to fix it but no joy. I've emailed Airix and asked for a replacement, so hopefully I should have a replacement soon. So far the build has been easy without any problems and I'm happy with my progress. Cheers all Iain
 -
 Afternoon folks. I decided just after Christmas to start both the Airfix 1:24 Harrier GR3 and the Trumpy 1:32 Lightning - why I have no idea and I won't be doing anything that daft again! I am really pleased with the Harrier despite the amount of filler needed (a whole tube)! I decided early on to do both kits 'in flight' which actually makes the build more difficult as 'closed gear doors' are a nightmare to fit and get to 'look right'. Anyway its been an enjoyable build overall and it is OOB. I used Mr Color for the camo and did this freehand with the airbrush and I think it looks quite effective. Hope you like it Chris
- 26 replies
-
- 37
-
-
13th (Duke of Connaught’s) Bengal Lancers 1897.
-
Born at Domrémy in 1412, her parents were well-to-do peasants living near the edge of the French Kingdom. At about the age of 13 she began to hear the voices, later identified as those of St. Michael, St. Catherine and St. Margaret. In 1429 these voices bade her to rescue Orleans, which was under siege by the English. Joan entered the city on 29th April and by 8th May the English were in full retreat and Orleans saved. The following year she responded to an attack on Compiégne by the Burgundians, but was captured on 23rd May. John of Luxembourg sold her to the English for 10,000 gold crowns. She was tried at Rouen from 21st February to 17th March, and having been found guilty of sorcery and heresy, was burned at the stake in the market place of Rouen on 30th May 1431.
-
Hi all, My second attempt at anything not medium-scale aircraft so be gentle! I wasgiven this kit to complete for the up-and-coming D-Day diorama at the Hornby museum - my club is organising and preparing the hundreds of tanks, guns, aircraft, ships and figures which will feature. I have done a 1/76 Sherman for the same display. It is not muddied up yet as I don't know what shades will be used in the diorama so it would be silly to have it not matching - nonetheless I hope my feeble attempts at weathering pass muster here on the armour forum. I actually really enjoyed it - was lovely to leave the filler alone and just experiment with preshading/washes and chipping, and all done in a couple of days! Cheers, Chris
-
After a bit of feedback on the next aircraft kit from Tiryidium Models. Now there is a decent 1/48 Hurricane on the market from Airfix thought I would do a second version of the Hurricane lighting kit that was on the backburner. Short YouTube video showing features of kit, navigation lights, landing lights, prop and gun fire. http://youtu.be/nrAHK_sGIv8 Was also thinking of one without gun fire so that it can be displayed with wheels down. Let me know what you think. Cheers, Warren
-
Hey guys. Just really confused and hopeful here that the product I have seen on HLJ is going to be a new tool Radial Halifax B.III? Here is the link: http://www.hlj.com/product/ARFA06008A/Air I looked into the Airfix site awhile back when the Blenheim was announced and saw it then but just figured it was the old tool. Please tell me this is new. Pretty, pretty please. If not I'll go and brood next to my pile of half built kits.
-
 My daughter bought me the new tool 1:48 Spitfire Vb at Christmas time and last year I picked up cheap at a swap and sell the Malta Defender's boxing of the Special Hobby Spitfire Vc. I thought it would be instructive to build both of them "side by side". The Special Hobby kit was a bit trickier than the Airfix kit (no surprise really), although the Airfix kit did have its moments (the landing gear legs were particularly troublesome). I also did not make use of all of the photo etch in the Special Hobby kit - not being a great fan of it. Rather than use CA glue I used Humbrol Clearfix, which worked pretty well. I also tried a few extra bits of weathering that I haven'r tried before, some exhaust staining using dry brushed acrylics (may be a little overdone on the Vb?), cordite stains using some pencil graphite and some minor paint chipping using some flat aluminium acrylic. Both were completed as Malta Spitfires, although I know that colour schemes for these are a bit of a can of worms. First, the Airfix Vb finished as the aircraft flown by PO "Buck" McNair DFC RCAF with 249 (Gold Coast) Squadron RAF, Ta'Qali, Malta, March 1942. Brush painted Tamiya Acrylics, using XF53 Neutral Grey for the locally mixed grey colour. I almost regretted that because the paint was quite old and went on a bit "claggy" even when thinned. Decals were fine but needed some help to sink down into the detail using some brushed on Tamiya Acrylic thinner. Made grubby with some watercolours and finished with a couple of coats of brushed on Italeri Acrylic Flat Clear. Second one is the Special Hobby Vc finished as the aircraft of Sgt Claude Weaver of 185 Squadron RAF, who was shot down on September 9th 1942. There is a well known image of this aircraft crashed on a beach. I chose to go with Extra Dark Sea Grey over Azure, which from reading around on the forums is not completely unreasonable. I used Italeri Acryl Azure Blue for the undersides, the first time I have used this brand of paint on a larger canvas, and I am very happy with the results. It went on beautifully in thin coats using water to thin it without obscuring the fine engraved detail. While fragile it also touches up really well. Decals were a bit fragile, and I had some trouble getting them to settle over the lumpy detail on the underside. Had to resort to a coat or two of the Tamiya Acrylic thinner. Again some water colour to make it a bit grubby and highlight the detail, and Italeri Acryl Flat Clear to finish. And finally both of them together. Thanks for looking.
- 11 replies
-
- 20
-
-
The newish Airfix kit completed as Wing Commander Guy Gibson’s G-George. Kind friends of mine gifted me this for my birthday just before Christmas, so I decided it would be this year's 'Christmas build". First time I have completed the annual Christmas build within the holiday period. I have had an interest in the Dams Raid ever since reading Paul Brickhill's book during a wet week in Betws-y-Coed as a young lad. Later on when my father was posted to Soest in Germany we lived in a flat in Korbecke, just a short walk from the Korbecke Bridge across one arm of the Mohnesee. I believe this was where Gibson turned to head up the lake towards the Mohne Dam. I have previously made the old Airfix version - but it did not survive a fall from a great height 10 years ago. For some reason I still had the remnants in my garage: Any way onto the completed model. Brush painted with Tamiya acrylics. WIP thread here. I really enjoyed this, although I did find it a bit fiddly at the end fixing the last pieces. First time I have had a go at serious exhaust stains, which not having an airbrush I did by some sequential dry brushing of tame acrylics (Nato black, buff and medium grey). I also tried Clearfix for the side windows in the extreme nose, which I think I need some practice with (got an air bubble on one side). Thanks for looking.
- 24 replies
-
- 27
-
-
Due to the smaller size of the Royal navy,s carriers the Skyhawk was found to be Ideal in the light strike/ground support roll as a partner to the Phantom due to be purchased for the FAA and like that project some avionics and the engines were to be British in origin which led to inevitable delays and problems without much improvement to the aircraft,s performance.The Skyhawk or Kittywake as it was Known in RN service Had a short service life especially after the cancellation of the new proposed carriers in the mid sixties,all were sold on to smaller operators including Argentina,here,s a 700A NAS machine based at Yeovilton in 1963.
-
Found this old'un from the back of the shed covered in a thick layer of dust. Made this 10 years or so ago, back when I still used enamels. Brush painted with Humbrol enamels and finished straight from the box to represent an aircraft of 80 Squadron RAF. One of the first models I attempted to make a but grubby using watercolours. Thanks for looking.
- 10 replies
-
- 18
-
-
- airfix
- spitfire f24
- (and 1 more)
-
I've started too many threads recently without making any decent progress. I can't promise this will be any different, but I've spent my weekend back in 1938.
-
Avro Lancaster B.II 1:72 Airfix The Lancaster is without doubt one of the most famous aircraft ever to fly and became the back bone of Bomber Command alongside the Halifax in the latter half of WWII. Development was born out of failure in the guise of the Avro Manchester to which history has been unkind because of the unreliable Vulture engines. Convinced that the basic Manchester airframe with an unobstructed full width bomb bay was basically sound, Roy Chadwick and his team designed the Type 683 Manchester III which used a larger wing supporting 4 Merlins. From the start, the aircraft proved Chadwick right, requiring only minor modifications for operational service. The cleverly designed bomb bay meant that the Lanc could carry a 14000lb conventional bomb load but with some modifications could even lift a 22000lb bomb which was unheard of at the time. With over 7000 Lancasters serving in WWII, most were indeed powered by the legendary Merlin. With a risk of Merlin shortages, a design was tested using the Bristol Hercules radial engine which led to one of the most visibly unique variants to operate, the B.II. Whilst the Hercules was more powerful, it had a slightly inferior service ceiling meaning that they generally flew lower than the Merlin variants during raids putting them at greater risk. This contributed to a 60% operational loss although they had a slightly faster cruising speed and rate of climb. All together, 300 B.II’s were produced, operating mainly with the RCAF which used it to replace Wellington bombers. B.II’s were eventually replaced by Merlin variants although a few went on to become test beds. The kit If you’ve wanted to build a B.II in the past, your only option was a conversion set. Paragon designs was a popular choice for several years with superb engine replacements and more recently CMR produced a very fine resin conversion kit including full wing replacements which I was lucky to treat myself to last year. This kit from Airfix is the first full B.II kit available and a very good sign of the direction that Airfix with its new releases. Unless you’ve been abducted by aliens and returned for the summer, you’re no doubt aware that this is the second variant from the same basic tooling as the recently released Dambuster reviewed HERE by Paul So first impressions.... The kit comes packaged in a very sturdy bright red top opening box with stunning digital artwork across the front. Inside, there are 5 light grey sprues bagged together and a separately bagged clear sprue. One is immediately struck by the crisp moulding and wealth of detail, very much in line with recent Airfix offerings and a far cry from their earlier kits which were quite bland and had what looked like prescription canopies! The A4 instruction booklet has superb assembly diagrams and no less than 110 steps so there’ll be no knocking this together in a weekend! This is accompanied by an colour A3 panting and decaling guide which was a pleasant surprise. Shape wise, having seen several of the Merlin variants built up, it looks very good. Throughout the review, I’ll make comparative reference to the Hasegawa and Revell kits. This isn’t to form criticism, but to make comparisons for those who have built either to relate to. Assembly starts with the interior, and plenty there is. Using the bomb bay floor, the cockpit is built onto it in the normal ‘Lancaster’ way. The interior walls are beautifully detailed. The only gripe I have is the instrument panel lacking instrument detail and instead relying on a decal. I think I’ll choose to get an Eduard replacement. There is also room for some scratch building in the cockpit if you choose, for example the prominent but missing trim wheel located to the right hand side of the pilots seat. Something else to consider when assembling the interior is that the spars that sit across the bomb bay reach out and support the wheel well assembly within the wings. If you choose to build as per instructions, you will be required to fit the wings around the bay assemblies rather than fitting them at the end as you can with the Hasegawa and Revell kits. Another option here is to cut off the ends of the spars that become the main gear bay bulkheads but leave enough of the spar protruding out of each side of the fuselage to support the wing. This will allow the wings to be fitted at the end of the build, a tip which I take no credit for but will be doing myself. With the interior fitted and side windows / formation lights fitted, the fuselage can be closed up. Detail on the exterior parts of the kit is very nicely done. Panel lines are recessed and a touch heavier in appearance than the Hasegawa kit for example, but certainly not excessive. I believe that the side windows along the fuselage are a little too deep, photographs of the real thing show these to be very narrow. Surface texture has a slight matt finish which will be good in helping the paint to bond. Attention next turns to the wings. The instructions show the ribs to be fitted between the two spars, however if you’ve cut them off, it might be better to assemble everything into the top wing to ensure you get everything located correctly. Detail in the gear bays is quite stunning, it almost seems a shame to paint them black as you won’t see it! Unique to the new Airfix kits is the ability to have lowered flaps straight from the box. Again the detail is well thought out meaning that it would be rude not to show off the flap detail by having them closed. A slight downside however is a notable sink mark on one wing top surface resulting from the flap moulding on the other side. Fortunately, whilst quite large, it’s on an area of the wing which is easy to fill and sand. It’s strange how only one wing has been affected by this. The wings can be joined up once the gear bays have been assembled. A quick inspection indicates that the dihedral on the outer wings looks to be quite accurate. Next comes the tailplanes and engine nacelles. I’ve read on Britmodeller (Thanks to Stuart Wilson) that there is a mistake on the part numbers for the tail planes. The instructions tell you to join parts A6+A7, but both have locating pins. The correct fitment is A6+b8, A7+B9 so be aware. Separate elevators allow you to choose the position. Each tailpane comes with well engineered tabs to ensure that they don’t sag after fitment. Engine nacelles are quite straight forwards. An unusual design unique to the airfx kits is the requirement to drop the undercarriage through the top of the wing according to the instructions before fitting the nacelle wing root fairing into place. I’m not sure if this is necessary or whether the gear can be fitted from below as per normal, perhaps someone who has already built one can comment? The gear legs are of a sturdy and detailed design although quite fiddly to assemble the drag links which look similar to the Revell kit in design. The gear bay doors have their control links moulded to the doors which is another unusual feature and I suspect at least one will get consumed by the carpet monster when I build mine, so take care with these. They unfortunately suffer from having ejector pin marks that are quite visible (see further down on picture of bomb bay door interior). Flaps can be positioned either in the open or closed position. Plan this step carefully as there are alternate parts for the trailing edge of the inner nacelles which ever you choose. A nice touch comes with the tails. Separate rudders allow choice in position. The rudder horns are moulded as one piece per tail which gets wedged between the tail and rudder unlike the Revell kit which has each one independently attached and tend to go missing at the earliest opportunity. The armament... This kit comes with some great parts and options in regards the turrets. You get the standard 3 turrets as one would expect, but being a B.II you also get the FN.64 under belly periscope sighted turret that was a common fitment on B.II’s. Also on the clear sprue is an FN.82 turret housing .50 guns which whilst I’m pretty sure wasn’t found on this mark will come in useful somewhere for everyone! The turret interiors are well designed with enough detail straight from the box. The .303 barrels are ‘OK’, certainly better than the Revell parts, although I’d prefer to replace them with Quickboost ones. A novel feature of the rear turret is the ability to fit the barrels from the outside which is great for us sausage fingered modellers as you can leave them off until after painting. Getting back to the FN.64, some B.II’s had the turrets installed, some not. Also there are two different types of bomb bay doors included, so better to do some research on your chosen kite before proceeding underneath. Be aware that the doors with full length extra depth suffer from some noticeable ejector marks that will need dealing with if you use these. Unfortunately, whilst the kit comes with bomb carriers, it doesn’t come with the actual bombs. It does however advise you to purchase the separate ’Resupply’ set which carries the bombs plus much more. Whilst this may be a little frustrating for some, having got that set ready to review too, it’s well worth getting. Instructions on alternative loadouts are however included in the instructions. The engines... The design of the engines has been well thought through. Separate banks of cylinders and gearbox are provided with the propeller mount fitting through the gearbox from behind to hold it in place. The cooling gills are provided in the open position only. I’m not sure about the 4 engine stays that are mounted in front of the engine. I’m sure there should be three positioned in an irregular layout, although happy to be proven wrong if information comes to light. If not, you may want to scratch build these as I’ve done with other Hercules powered kits. The Rotol propellers are superb and have not only a separate aero hub, but additional back plate too for each one. The canopy looks quite good. I say quite because when you look closely, there is a slight distortion effect throughout that is difficult to show in the pictures. I’m comparing it to the Revell and Hasegawa kits which suffer less distortion, but shape wise, the Airfix part looks excellent with separate astrodome and has the escape hatch in the correct place unlike Hasegawa’s part. Whilst only simple parts, the main wheels have well designed hubs. These are very simplistic on the Revell kit so I find these quite refreshing. There are quite a lot of ‘sticky out ‘ parts on the kit such as control surface push rods, aerials etc. and these are finely moulded. The decals Typical of recent Airfix offerings here in terms of quality, register is spot on and the print is very crisp with some fine detail. Colour of the codes and roundels is good in respect to the blue and dull red tones. Two decal options are provided: LL725 – ‘Zombie’ EQ-Z of 408 ‘Goose’ Sqn, RCAF based at Linton-on-Ouse, 1944 DS842- ‘Fanny Ferkin II’ of 514 Sqn, RAF based at Waterbeach, Cambridgshire 1944 LL725 was lost on operations over Hamburg in July 1944 however DS842 was more fortunate and survived the war. Conclusion As the B.II is my favourite Lancaster mark, I’m very happy with the kit. It’s great to see this radial engine brut being produced for the first time by a mainstream manufacturer so my hat is off to Airfix for widening the choice of Lancaster kits on the market. More importantly, they’ve done a superb job. Yes there are some minor issues that I’ve picked up during the review, but there are far more positives to celebrate. You get a lot of detail included so value for money is excellent and yet assembly is such that both novice and expert builders will enjoy it and be able to get good results. No more is a B.II only something that those brave or skilled enough to do conversions were able to add to their display Review sample courtesy of
-
So I am calling this done. It is the Airfix 1/72 Messerschmitt 109E-7 Trop (A02062) built in the hope of representing white 8, the mount of Ofw Franz Dorr of 7./JG 5 at Petsamo, March 1942. This build held a few firsts for me. First attempt at a wash. First use of some Tamiya weathering set. First go at fitting antennae (used stretched sprue), though I think I need to add the strand that joins the fuselage mid way between the rudder and the antennae mast. Ailerons dropped exactly11 degrees to match the dropped flaps (are you looking Joachim), and a crappy attempt at painting an opening at the front of the exhaust manifold covers. Next (new) build I will make holes. Pics were taken on i phone, with not great light. I will get camera shots sometime on future builds. The real reason that the Germans were unable to stay put on the Northern front was the constant harassment attacks by giant ant colonies bred by mad Russian scientists.
-
I finished this last night; the new-tool Airfix Blenheim IV representing V6028 GBoD which was the aircraft flown by Acting Wing Commander Hughie Idwal Edwards on 04 July 1941 in the low-level raid on Bremen for which he was awarded the Victoria Cross. The kit is a nicely complex but pleasantly easy build so long as you go carefully and do plenty of test-fitting before you commit to glue. The join of the forward fuselage/cockpit to the rear fuselage and wings did not present any problems; I may just have been lucky but it worked first time and gave no hint that it could be troublesome - the bomb-bay interior however did not fit well at the rear join and would have needed work had I left the bomb-doors open. The kit includes both types of 'under-chin' turret for bomber variants as well as a full bomb-load as per the Mk.I kit, however it does not include the later modified bulged side windows for the pilot and navigator so you will need to consider your options if that is a major issue to you, or just do what I did and stick your fingers in your ears and loudly say "Lalalala I can't heeeaar you" if anyone mentions it. The kit was built OOB apart from the replacement of the exhausts, air intakes and fuel dump pipes with those from the Barracuda resin set (I really just wanted to see what they are like and for the record they are lovely) and the addition of an EZ-Line aerial wire. Other points - I have painted the navigation lights red and green when in fact they were red and green bulbs with clear covers. I don't even care. I also accidentally gave this one aircraft the exhaust staining of a whole squadron, then compounded it by trying to cover it up. I care a bit more about that because it is just embarrassing, but short of not posting pictures of the underside (which is not a bad idea now I come to think of it) there is little point in my trying to hide it. The paints used were Phoenix Precision Paints Interior Grey-Green, Dark Earth, Dark Green and Sky and various other bits and bobs for the detail painting. The decals were from the Airfix Victoria Cross Icons set and were fairly good though not quite up to the standard of the decals in the current boxing. Cheers, Stew
- 31 replies
-
- 34
-
-
I think I must have Attention Deficit Disorder or something, because I was thinking I would take a break from modelling for a couple of weeks until the start of the French Fancies GB; however less than a week later I find that I am bored (and I used to work in Insurance so believe me I know bored when I see it)... So I thought I'd make a start on something I had been meaning to do for a while, and combine the decals from the Airfix VC Winners set with the new-tool Airfix Blenheim IV to represent the aircraft flown by Acting Wing Commander Hughie Edwards on the Bremen Raid on 4 July 1941 for which he was awarded the Victoria Cross. Here's the basic kit; labelled as a IVF (the fighter version) but it contains all the parts you would need to make the bomber variants too: I also got some aftermarket goodies which I accumulated over the last few months, the Peewit canopy masks being the most recent I think: Here are the decals from the Airfix VC Winners set - Question: surely by July 1941 underwing roundels too? ... and so I started assembly, the Mk.I I built following the instructions and it turned out fine, but this time I am starting with the cockpit because construction starts with the cockpit, Airfix - these are the relevant components awaiting clean up and later on, paint: It's worth noting that if you intend to build a bomber with either of the under-chin turrets, these are both supplied but you need to open a slot in the floor of the right-hand cockpit part. Cheers, Stew