Search the Community
Showing results for tags 'Airfix'.
-
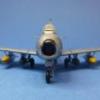
Hello All, I got back from my trip on Friday with acute modelling withdrawal symptoms, and I wanted to do a quick build. So I chose this: From the wonderful Ace Hardware in Berkley. I bought it in their moving sale earlier this year, so I actually paid around two dollars for it. The cockpit was a "seat on pegs" affair so I constructed a new one out of plastic card: The engine is a bit anaemic, so I added some valve gear to the ends of the cylinders that you can see. I cut away the moulded turbocharger intake scoop and made my own out of bent plastic card and some rod: Cockpit installed: And painted in bronze green, instruments simply scratched into the paint: The instruments may look a bit crude in a close up, but they look fine seen through the canopy. I have seen on other builds that there is a big gap between wings and fuselage. This is not a new feature: I cured it with a piece of sprue cut to length to push the fuselage sides out a bit: I made some cheap and cheerful wheel wheel wells out of plastic card and strip. I'm also going to replace the undercarriage doors with something a little more refined: And I've added some detail to the propeller: My symptoms have subsided! Thanks for looking, Adrian
- 38 replies
-
- 20
-

-
Hi guys, Having a few builds on the go, all mostly long termers that don't have a finish time yet, I decided to build something OOB that was 'easy'. So, back in June when I went down to Fairford for some B-52's, we popped into Swindon for a bit of shopping & I picked up this B.II for £15 from the Hornby shop in the shopping centre. It was all looking good until I cut the fuselage off the sprues to see that both parts were heavily warped, as were the spars & floor. So with a bit of work, I've managed to get it fairly straight.. Some pics of where it's at.. I've not had it out for a while as I lost interest at first, but when speaking to @woody37 at Newark, it's sparked the interest back and I'm now full steam ahead. Will add the black and start painting the interior shortly.. hoping to get it closed up by the weekend with wings attached. One of my favourite WW2 bombers, just something about a radial on a Lanc..
-
The boy and I were in Glasgow yesterday picking up this year's crop of past papers and study guides for his latest batch of Highers and,of course, a visit to Scott's Models had to be fitted in. I've been meaning to pick up the USAAF Bomber Resupply Set for a while and there it was, beckoning to me from the shelf. It would have been rude not to: I really like the look of the tractor and fuel trailer unit, so I'll start with these. Sprue photos to follow shortly. John
- 12 replies
-
- 4
-
-
- USAAF Bomber Resupply
- 1/72
- (and 1 more)
-
Hi folks, second finished build for the day is Airfix's new tool Wildcat and what a beautifull little kit they have given us,there is debate elsewhere on shape issues but to me and I think most modelers It certainly looks like a Wildcat.The only vice the kit has in construction is the under carriage which for me was a bit fiddly but I,m not the most patient so enough said,I lightly weathered her with a light brown wash using a black wash for the flaps,wingfold etc.I only need to add the radio wire when I stretch some more sprue.WIP and sprue shots can be found here and thanks for looking in. http://www.britmodeller.com/forums/index.php?/topic/234989568-airfix-172-grumman-wildcat/page-1
-
 I was looking for an 'easy build' as a break from my Memphis Belle and recent Valoms and my thoughtful daughters provided a solution as a birthday present, a 1/12 (or 1/8th?) Airfix (Nr. 51101) 1999 classic. The intention was a build for fun (WiP here). Built almost OOB but, at Procopius' suggestion (thanks PC) also as a sort of 'tongue in cheek' BoB tribute. Any concerns over scheme authenticity were explained by Procopius: "...this scheme was worn for a short period in 1940 by the Royal Cartoon Auxiliary Air Force's 1567 (Anthropomorphic Dog) Flight." Thanks PC. Here is the finished article: The build took over from the Belle and various problems reduced the fun, a bit, mainly the plastic. Nigel H thinks it's probably ABS; it's certainly heavy and very shiny leading to all sorts of adhesion problems until I started sanding to remove the gloss / oil. A few non-OOB changes: primed with Vallejo acrylic grey which tried its best but didn't bite into the plastic VMA 'Sky' (71.103) and DE (71.029) airbrushed and H30 DG hand brushed. AK True Metal gunmetal for the 'porridge cannon' and aluminium for its mount. Prop tips Liquitex marker pen. Klear coated prior to transfers and VMA matt coat after. Gromit initially painted with supplied 'Super Acrylic' but later gave up and used Humbrol enamel 61+130 50/50. Helmet and jacket H10 Acrylic with Humbrol filler 'sheepskin'. Custom transfers for the 'Preston kill awards' and others from my limited stash Porridge added (water, no salt, bit of sugar - actually it's a cotton bud) Five minute epoxy used in place of the supplied poly cement. The WiP was one of our usual joint efforts and, I think, is both entertaining and educational - this build certainly taught me a few lessons! Hope you like it but remember, it's a fun build of something that doesn't actually exist so be nice guys please!
- 35 replies
-
- 44
-
-
- airfix
- Wallace & Gromit
- (and 1 more)
-
The Humber Snipe 4 x 2 four-seat Open Tourer was built from 1941 to 1944 by the Routes Group, Coventry and used by the British Army as a Staff car. Field Marshal the Rt. Hon., the Viscount Montgomery of Alamain KG, GCB, DSO made extensive use of two of these vehicles. The first was M239459 and named ‘Old Faithful’, used from October 1942 to October 1943 in the Western Desert, then Sicily and Italy. This car was left for his successor, General Sir Oliver Leese. M239485 was his second Snipe and took him through the final stages of World War II. I copied this scheme from 'Old Faithful' as she was painted at IWM Duxford some years ago. However, this scheme was not introduced until April 1944 so maybe the museum got it wrong or transposed the scheme from 'Victory Car' to 'Old Faithful'.
- 12 replies
-
- 12
-
-
 Hi, A couple of months ago I finished an Airfix Vampire in Swiss Air Force colours but I haven't gotten around to posting it in RfI. If you wish you can read up on the building process in this Work in Progress thread. Sorry for the fancy pants photography- I was experimenting a bit. I used mostly kit parts apart from the main wheels which were from a Pavla replacement set meant for the Amodel Vampire kit. DIY additions and modifications include: -cutting out part of the wing and construction of dropped flaps as well as inner wing details with plasticard, lots of stretched sprue and some metal wire -cockpit enhancements with stretched sprue and plasticard -cutting out the elevator to allow some droop -clear parts for the nav lights -construction of Swiss fuel tanks from Esci F-5 parts. by J Goat, on Flickr I painted using only Vallejo metal White Aluminium, coated it with Alclad II Aqua Gloss before a little Gunze Mr Hobby H14 for the orange, straight onto the finish. Decals came from the Vampire sheet by Matterhorn Circle and also a few from Xtradecal and the kit. When applying Matterhorn decals it is important to use Future/ Klear as setting solution because in my experience nothing else worked. After another coat of Aqua Gloss I weathered only slightly using matt make-up eye shadow which works a treat I must say. Thanks for looking! Jay
- 20 replies
-
- 46
-
-
- Airfix
- de Havilland Vampire
- (and 1 more)
-
Good afternoon. My first RFI for a while: Airfix's 1/72 Boulton Paul Defiant. I finished this one sometime last year and I'm finally putting her on here. Painted with Tamiya flat black for the main colour, Vallejo steel for the base coat and a mix of Vallejo zinc chromate green for the primer, using Shuttleworth's - then unpainted - Spitfire Mk.Vc as a reference. Built OOB except the harnesses from spares and the Master gun barrels. Weathered with powdered chalk pastel. Enjoy!
-
Evening all or morning now. This is my latest finished model the Typhoon Ib from Airfix. I must admit to being rather underwhelmed by this kit but it's hard to say why really as it's went together fairly well. I painted it with Tamiya acrylics which I just love. Decals are from the kit and are nice and thin and easy to work with,apart from the yellow leading edge decal which needed trimming to fit. Here's some pics. cheers Allan
- 15 replies
-
- 32
-
-
 I wasn't sure whether to do this as a WIP and I'm quite a way through it now, but it's been such a fun set to build that I thought I might share where I've got to so far. No pics of the box, or it's contents - plenty of others on here have posted pics of the fabulous bunch of goodies crammed into this box. The main models in this set are a Bedford truck, an Albion refueller & the star of the show - the new tool MkI Hurricane. There is also a set of ground crew & various items for them to play with.... I decided that starting with the Hurricane would be the obvious thing to do, so I had a go at the Albion refueller instead. Most people appear to knock this up & then paint it, I have no idea how you guys manage to get your brushes into all those nooks & crannies, so I painted the bits first & then stuck them together, here's the Albion chassis.... WP_20160828_13_20_47_Pro by Andy Moore, on Flickr sadly most of the detail on this will be covered up by the body, but it is great fun to put together. The front section is a lot trickier to put together & really needs a lot more care taken than I did. Once I had completed the front I sprayed it with Humbrol Matt coat (rattle can) - big mistake, it went all white. so that has added to the beaten up look of the truck. WP_20160912_18_49_45_Pro by Andy Moore, on Flickr The back end of the refueller is fabulous: WP_20160912_18_48_34_Pro by Andy Moore, on Flickr next up is the Hurricane: I cut out both gun bays as this one isn't going to be flying - I'm going to try to use everything in the kit & maybe add another Hurri for good measure. The cockpit is complicated, but everything fits perfectly, as do the machine guns. I gave the wings & the body a coat of aluminium, just in case I chipped any paint later on I the hope that the aluminium would show rather than bare plastic. Airfix 1/48 Hurricane by Andy Moore, on Flickr The panel lines were highlighted using a Gunze panel line marker, the thought behind this was that I don't want sharp black lines, but that the black would gleam through the colour coating. Here's how the underside looked once I'd given it a coating of Vallejo model-air Grey: airfix 1/48 Hurricane by Andy Moore, on Flickr I reckon that's more than enough for this post - more to come in a day or two, thanks for looking
 -
Hi all! Having recently aquired the Airfix 1/72 Consolidated PBY-5A Catalina (an aircraft I've always liked) I was doing some browsing on the interweb for various military colour schemes that I could knock up from the various decals I have floating around. One article I found was on the crash of a PBY-5 from 11 Squadron RAAF. This aircraft (A24-52) crashed while landing in Cleveland Bay, here in Townsville during 1943. Thirteen of the 19 people on board were killed, either during the crash or when the depth charges on the wings detonated. One of the survivors was Air Commodore Arthur Henry Cobby, Air Officer Commanding North Eastern Area. Thats right, the great Harry Cobby himself! I would like to model this aircraft, if possible. So, here is my question. Can I backdate the PBY-5A to a PBY-5? What are the mojor visual differences beside the undercarriage? I know that Academy do a PBY-5, but for financial reasons (that being that Mrs. TheBear would have my head on a platter) I won't even consider buying it. I also, for the same reason, don't want to buy a myriad of aftermarket products, or attempt major plastic surgery. Adding a bulkhead might be possible, but extensive detailing of the interior that won't be seen is out. I want to do this as close to OOB as possible. Thanks in advance for any advice, and fir your patience and forebearance! DennisTheBear
-
Here I present my rendition of a Bedford QLC Cockatrice, Built from left over Airfix QL parts and scratch building.... ATB Sean
- 5 replies
-
- 9
-
-
- 1/76 scale
- scratchbuilt
- (and 1 more)
-
Evening all. As I could not pick which P-51 to do I have decided to do three, a Tamiya, an Airfix and one from Italeri. As they are all in 1/72 it should not be to taxing...probably. The markings will come from these decal sheets although I quite fancy the kit decals from the Italeri for the Royal New Zealand air force. The two top choices are Detroit Miss and Miss Marylin II. Cheers Allan
-
Ok time for a quick relaxing build (lol). After the spitfire I'm back off to 1:72 land. I was hoping to build one of my nice Tamiya or Eduard kits but the paints I need are taking their sweet time to cross the Tasman sea... Anyway rather than waiting I've decided to get through a quick OOB build from my (tiny) stash. I've had Airfix's new tooled 1:72 Wildcat F4F-4 kit staring at me forlornly for ages and I decided to put it out of it's misery. I know... another Airfix kit but the plastic on this one especially on the wings and fuselage looked suspiciously smooth and had nicely refined details . I tentatively cut out a few bits and test fitted, and everything seemed to be in order. It's got a nice easy camo scheme to boot. Time to crack on then, Started with the cockpit bits. All seemed to fit, though there was some of that soft Airfix moulding on show on some bits. Nothing major though. I'm not going to spend weeks detailing this little office, looks good enough out of the box. Got some Gunze H58 Interior Green on, and sprayed some H51 Light Gull Gray around the wheel well bits. Annoyingly enough the H51 is a gloss paint so takes ages to dry and is very prone to acquiring fingerprints. I'll have to be super careful. Especially when I get to painting the underside Also had to do a bit of early glass masking with the underside windows but it wasn't too taxing.
-
 Mind if I play? Got a Home Bargains £2.99 Airfix Spitfire IX kit and was thinking it'd make a good quick build subject as this machine. All the references I can find have this one in overall white but I'm wondering why it couldn't be PRU Pink.
 -
This is a build I've been wanting to do for a while now, a cross kitting of the QL bowser from the old Airfix refuelling set and the much more detailed QLD from their excellent QL twin pack. Basically, the bowser body from the refueller has been mated to the cab and chassis from the QLD along with some details scratch built from card and brass fret. Just like the original Airfix refueller, this represents the later, post war truck. Now..... what to do with the QLT....???
-
Hello again! At Ellesmere model show last Sunday I got a Sea Hawk for £2. It came without decals, only in the bottom part of the box, with loose parts. I've wanted a Sea Hawk for a while anyway, but never got round to picking one up. So I bought it as I figured I could build it in the last hour of the show when things were winding down anyway. As it's such an old kit anyway, the parts are few and far between and it didn't take very long at all to finish building. I glued it together and then gave it some sanding at home. I then decided to buy a Hobby Boss Sea Hawk so that I could get some decals. It didn't cost me much more than it would have to get the decals on their own anyway! So the Airfix kit will be a Luftwaffe one, and the Hobby Boss an Indian one! Below are pictures of the two kits...you can certainly see the age difference!
- 8 replies
-
- 4
-
-
- Airfix
- Hobby Boss
- (and 1 more)
-
(other imaging programs are available) I am looking for someone who can help me reverse the colours on the decals for the air filter on the Sea king HC4 / Mk3A so that the bits that are grey and the bits that are black are reversed. That would look better than the current scheme. I have a colour laser that can print them but am rubbish at using any of the photoshop type software. I was hoping to just be able to take the new image and put it into a word document and print off some for my own use. If you see the image below you can see what I mean (forget the red rings)
-
I'm wondering if someone/organisation has collected and digitalised all those old Airfix Catalogues from the 60's and 70's. And are they available as a download. In particular, I'm interested in Edition #10, dated 1973 (I think that date is correct) as I had a copy as a boy back then and would love to peruse the pages again, if only in a digital version. I've searched the net and found images of the front cover, but I haven't been able to find a file that has all the scanned pages for me to download the entire catalogue.
- 11 replies
-
- 1
-
-
- airfix
- catalogues
- (and 4 more)
-
After having fun with the Airfix 6 pounder and Universal Carrier I decided to have a go at another vintage Airfix piece of artillery, the 25 pounder, quad and limber. I first made one of these many moons ago and IIRC it came in a plastic bag. These guns were the standard field artillery for the British Army in the desert and Italy as well as every where else in WW2 and later. There were in use right into the 60's with the U.K. and later with others. Four sprues with nicely moulded slightly shiny plastic. Has a full gun crew who although nicely moulded I probably won't use them this time around. There is a bit of flash and some mould ejector marks. Not that bad considering age of the kit and I'll only deal with those that can be seen.
-
Here’s my second RFI on Britmodeller, and my second model since taking up the hobby again. A 25 Year Falklands Anniversary boxing of the venerable Airfix 1/72 Avro Vulcan finished as XH558. Have been working on it for ages – I didn’t really appreciate what a big bugger it was until it started to come together – it was entertaining trying to shoe-horn it into my extractor booth! The tool is 80’s vintage, dating back to just after the Falklands War and it’s really showing its age with nasty raised panel lines and more flash than Gordon! Also the fit of the wings was the worst I’d experienced, taking an awful lot of filling and sanding. I discovered Deluxe Materials Perfect Plastic Putty and happily ditched my nasty smelly Squadron White Putty. I syringed in the new filler with one of their Pin Point Syringe thingys and then smoothed it with a wet finger or paintbrush – hardly needed sanding. Pity I’d already sanded off most of the surface detail by then getting rid of the blobs of rock hard Squadron! Airfix really should do a new tool for this aviation icon. Loads more firsts for me with this build: First airbrush camo and so first time with yards of white-tac worms and Tamiya tape. I had to choose the largest surface area for a 1/72 model and both sides in camo for my first try. Should have tried a Spitfire first! First resin – Freightdog tail pipes – see below. And isn’t resin dust horrible! First panel line rescribing – again, I had to pick this model! More little bits of scratch building rectifying mistakes or lost bits. More confident weathering I’m quite a fan of Vulcans so have lots of reference materials. The VTTS’ own books were the most useful with hundreds of great images along with the Haynes Manual and Aviation Classics magbook. Postings on this forum were also a great assistance. Finishing off a 1/72 Airfix Control Tower next as part of a diorama build and then onto the Dambusters Lanc! So happy looking and thanks to anyone who cares to comment! Laying down the camo Time to play dirty! Flory Grime all over my pride & joy, sloshing into my laboriously scribed panel lines. And underneath, with loads of nasty raised lines ... The Grime wash gave the model a nice 'used' look. I know they keep XH558 nice & clean but you can't disguise the wear & fading of a rather elderly airframe. I finished it with a gloss topcoat as it always seems to be gleaming in the pictures! Didn’t have much fun with the decals. I don’t know what vintage they were in my 2007 25 year Falklands anniversary box, but they pretty much all suffered from silvering around the edges that no amount of MicroSol/Set could cure. Irritatingly some of the decals broke up on handling even after a coat of Humbrol Clear so there was a bit of patching needed. From photos, I noticed that there was some discolouration around the front cockpit windows so I tried to replicate that. You can just see the face of the co-pilot through the side window! Only noticed quite late in the day that there are two small side windows for the other crew shown as a recessed circle. Had I noticed earlier, I would have drilled them out & shoved some clear plastic in. I think I read somewhere that there’s a Deluxe Materials product you can brush on from the inside to imitate glass – would have been perfect for here. The numerous hours spent rescribing the panels lines on the top surface were worth it in the end. I wonder what that white/silvery panel along the spine at the top is for? Not sure what the odd shaped discoloured panel at the bottom of the tail fin is for – I saw it removed in a picture when they were doing servicing. Any ideas? I tried to replicate the fading seen on today’s airframe. For the rivet counters amongst you, I followed the instructions from my 2007 pre VTTS kit which told me to put the pod on the side of the taper behind the tail fin. Not sure what it is or what it’s for, but subsequently I saw from photos that XH558 doesn’t have it. Rather than prise it off and have more filling to do, I’ve left it as a tribute to other Vulcans and even adorned it with the appropriate decal! It also told me to paint the air intake interiors white so had the joys of trying to paint them in camo once assembled. The Freightdog Models tail pipes. I bought them after I’d assembled the wings to the fuselage but soon realised that they should have put in during assembly so my first experience of resin was a bit scary! Lots of sawing, hacking, sanding, filling, sanding etc. But I’m really happy with the result – much better than the originals. I retro-fitted some extra nose weight just in front of the bomb bay after fitting the resin tail pipes as per the Freightdog instructions but it’s still a bit tail happy & will tilt back with a bit of a nudge! I scratch built a sort of coffin with one half of a Blue Steel missile, filled it with lead shot and glued it under the front wheel well. It’s not quite forward enough and also partially melted the roof of the well! Couldn’t face the idea of rescribing the under-surfaces – would have taken me weeks! Apart from giving the surface a nice ‘used’ patina, hardly any of the grime wash stayed on the raised panel lines. The bomb bay was a big disappointment on this model – the doors were really thin & flimsy. I built some ribs out of sprue which helped but in the end they were held in place with filler more than anything else! After it was all sealed up I found that you can get after market bomb bay detailing – will save that for my next Vulcan build! Would have loved to have added some extra detail to the wheel wells – will save that for a subsequent build! Just a bit of dirty goo for this one. Thanks for looking!
-
Had an email invoice from Airfix today for my 2 new Seaking HAR.3's and on checking the Airfix site its now showing as a New Arrival! No dispatch email just yet but hopefully Mr Postie will be bringing me a wee parcel in a day or 2 Eng
-
The waiting is almost over. The new Airfix 1/72 B-17G kit arrives today so get your orders in now. The kit is available at our usual discounted price of £27.99. We will also have the kit with us on our stand at Scale Models World Telford next week -if there are any left!
-
Hi all, I'm currently building a 1/48 Airfix Lynx Mk.88 in German Navy markings, and I want to add the door gun to it, but I'm rather dissapointed with the kit one. Especially the barrel is underwhelming. Does anyone have a suggestion for a decent replacement? Just the barrel will do. Thanks in advance
-
Another one of my recent builds, the 1/72 Airfix Curtiss Hawk, really enjoyable build, no fit problems and an interesting subject. I tried to capture the dusty look of the actual plane and did a few oil streaks on the fuselage. I used the dot filter technique as well as a few other oil washes and filters to get a grubby feel to it. It's some way off but it's been a great learning experience, taken about 3 weeks and again all from a kit that was under £6! Thanks for looking
- 12 replies
-
- 18
-


.thumb.jpg.3c5b41eb004e624ff9bdf837868ecbb6.jpg)