Search the Community
Showing results for tags 'Airfix 1/72'.
-
Good evening For this Gb Iam building the Airfix kit https://modelingmadness.com/scott/allies/previews/airfix/a06015.htm With the Albatross decals sheet https://www.scalemates.com/kits/993350-albatros-modelworks-alc-72008-b-25-c-d-g-h-j-mitchell I am going to build "Worth Fighting For" An aircraft of the 428Bomb Squadron 310 Bomb Group based in Tunisia in 1943 Some books I just started to paint a coat of Interior Green .. Patrice
-
The fifth of 2019 and a swansong to my Airfix Therapy Build thread: Their F-4F-4 done as an early F-4F-3 . Some liberties were taken as usual and the WIP is here: Paints are Alclad and Mr Color lacquer and the chevrons, cowl and fuselage bands were painted so as to match the new spinner Also a test run of my Amazon freebie review flashheads, which seem much better behaved than my el cheapo ebay continuous lights. Thank ye, one and all fer tuning in, have a fab weekend and eat more fruit! Anil
- 20 replies
-
- 50
-

-
- airfix 1/72
- conversion
- (and 1 more)
-
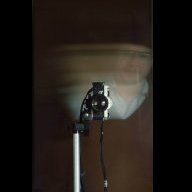
Re-posted from the inter war forum On the aft deck there are 6 upright cylinders topped by parts 147-150 and 159, 160. Are these storage tubes for the Vickers GO drum magazines or engine room vents or fuel filler pipes etc.? TIA Tom
-
 Hi all This is my next project: FOKKER EINDECKER E.II "69/15", Baron Kurt von Crailsheim, FFA 53, Monthois, France, October 1915. Baron von Crailsheim scored the first (and his only) air victory for FFA 53 Eindeckers I'll be using the Airfix kit 01086 in 1/72nd scale. The art work(as for most recent Airfix releases) is very appealing Two grey sprue, very crisp details, no sink marks or flash The box back with the painting and decalling instructions Since this will be my first ever WWI project, I'll keep it basically straight from the box. However, I'll add a few things that I've noticed are missing (the windscreen in front of the cockpit, harness and the rigging). Oddly, I decided to start this building by the propellers. The kit brings two propellers types to chose from. One from Garuda Propellers (wider paddles) and one from Germania Propellers (slim paddles). I used the following technique to paint the wood laminated propellers: For the Germania propeller (lighter in colour on the photos below); Paint the part with XF-02 Flat White Watercolour pencil Brown and Ochre to make the wood veins 20% Gunze H91 Clear Yellow + 80% thinner 20% Gunze H92 Clear Orange + 80% thinner Mr Color C218 Aluminium for the metal centre. For the Garuda propeller (darker colour on the photos below); Paint the part with XF-02 Flat White Watercolour pencil Brown and Ochre to make the wood veins 20% Gunze H91 Clear Yellow + 80% thinner 10% Gunze H92 Clear Orange + 10% Gunze H93 Clear Blue + 80% thinner Mr Color C218 Aluminium for the metal centre. After painting with XF-02, use various browns shades using a pointed brush to create wood grain in the Germania propeller You can either draw it on the piece or use the brush to paint it, blende it with some water if desired Next steps is to add colours with the various clear shades Front view: Left the Garuda propeller and on the right side the Germania propeller Back view: Left the Garuda propeller and Germania on the right side I'm still undecided which one to use. Next I started on the cockpit. The first thing I've done was to close some annoying release marks. Only the one on the front of the cockpit would be visible and required to putty I've used the same technique used to paint the propellers to paint the floor board and back of the seat. In this case I've used the lighter wood colour. After the XF-02, watercolour pencils were used to simulate wood For the first time I decided to try the Mr Metal Color lacquer paints. I don't ever use Alclad due it's extreme smell and I'm allergic to it. Therefore it seems to be a viable option. Used for the first time and I was really impressed with the results and quality of the paint Airbrushed MrColors 211 - Chrome Silver on the "metal" parts using the following settings: 1 paint : 2 Mr Levelling Thinner (MLT) @ 15psi. The result was outstanding and I became a fan to it. Metal parts sprayed with MrColors 211 with any prior preparation on the plastic. Fuselages halves ready to be glued together I've added some synthetic fibre harnesses from my spare parts box. Maybe not the correct one but will do the job on this scale. I also did improve the handle on the control stick. The part is hallowed but comes as a single flat piece of plastic in the kit Cockpit masked and ready for the next painting task The Fokker Eindecker had a very distinctive metal characteristic. All Aluminium panels and cowls remained unpainted and were given a "squiggly turned" finish. Please observe the squiggly turned finish on the cowl Since the beginning of this project I was trying to figure it out how to represent it in this small scale. I came up with this technique that I was happy with the result. First airbrush the metal parts with Chrome Silver (211) Spray a coat of Tamiya X-19 Clear Smoke (40% paint : 60% Thinner) Brush paint MrColor C218 Aluminium in format of the squiggly marks Airbrush a final coat with MrColor C159 Super Silver (40% paint : 60% MLT) Next in my list was to add some detail to the engine. The Eindecker E.II was powered by a 100hp Oberursel U.1 (which was a license built 100hp Gnome Monosoupape). I added the ignition wirings to the cylinders using EZLine fine. After a first base with X-01 Black I sprayed it with MrColor C159 Super Silver (50% paint : 50% MLT @ 15psi) Following I did spray the cylinders only with: 1st: 20% X-19 Clear Smoke + 80% thinner 2nd: 20% Gunze H91 Clear Yellow + 80% thinner 3rd: 20% Gunze H93 Clear Blue + 80% thinner 4th and final, Tamiya Panel Accent BLACXK wash. The Eindecker was equipped with an IMG 08 "Spandau" 7.92mm machine gun. Obviously the kit would benefit from an aftermarket representation of this machine gun. However, I have decided to build it as most out-of-the-box as possible, so I just painted the piece XF-01 Flat Black and had some graphite powder rubbed into it afterwards. A new aftermarket machine gun would add value to kit. Note how characteristic it is XF-01 Flat Black applied Graphite powder was rubbed overall I did open the machine gun barrel to add some detail Fuselage is now masked and ready to get painted. Comments and critics are very welcome! To be continued!
- 32 replies
-
- 17
-
-
- Armouredsprue
- Fokker E.II
- (and 1 more)
-
Morning All, Since returning to the hobby a couple of years ago I now find it hard not to have a Spitifre of some kind on the go. Following on from my Seafire 47 which I enjoyed immensely, I've decided to do another Spitfire variant which hitherto has eluded me due to lack of talent and time - the Mark 21. It's an interesting variant, being the last with the original style fuselage and the first with the new wing, and so it was something of an interim model of which only 120 were built. It was also a tricky model to get to fly straight, with all sorts of longitudinal stability problems which took time to iron out. But, as test pilot Jeffrey Quill writes, they got it right in the end, and the high-performance Mark 21 had a relatively long career, starting in the final weeks of World War 2 and continuing in the Auxiliary squadrons, with a 1950s swansong doing anti-aircraft co-operation work outsourced to the private sector. I think the 21 is pretty, and as a boy remember seeing LA226 displayed in the atrium of Vickers' HQ at Millbank, central London, in the 1970s. With a number of production 21s having contra-rotating propellers and even bigger rudders than normal, there's also a good deal of variation available to choose from for a subject. For the base kit I'm using the Airfix Spitfire 22 (because I like it), with the spine and tail of the Airfix XIX. My XIX fuselage was spare as I built a Mark XI by combining the XIX wing with the IX fuselage, modified appropriately. I had planned to use the Freightdog XI conversion set on the XIX fuselage but in the end decided against it, because whilst the Freightdog set is very nice and accurate, the XIX fuselage that it should be bolted onto is not, and the combination looked all wrong to me. So I've still got the Freightdog set and the XIX fuselage minus its nose. The other awkwardness is that the XIX tail is now in two pieces, with a horizontal separation just above the elevators, which I made to accommodate the Freightdog XI fin. What this amounts to is that the fuselage halves below are made up of four pieces each, all stitched back together and with a first application of filler: I'm also going to push ahead with my Spitfire I, which is a refugee from the Battle of Britain Group build. Unfortunately my plans to make R6915 as it currently appears in the the Imperial war Museum (in a late-war paint scheme) render the model ineligible for the Group Build. No problem: I'll push on with it here. Here's the original: R6915 is a real Battle of Britain veteran, with a number of victories to its name. Later on it went to the OTUs and received some modifications: over-wing strengthening ribs, fishtail exhausts, and later-style canopy all added. I'll try to model all these if poss. So here is how far I've got: I've added the wing strengthening ribs and also the vents for the gun heating at the wingtips. After doing the latter, I went over to IWM Lambeth to have a look at the original, and found I'd been too clever: the vents had been removed from the wing undersides, so my plasticard representations will also have to come off. The ejector slots for the empty .303 cases were also doped over on R6915, so I'll have to fill and sand these too. Justin
-
And the third finish of 2019 from my Airfix therapy build thread: The loveable li'l Airfix Scooter. paints by Mr Color and an Xtradecals set used. Nice little kit with usual issues for new Airfix but looks good to me. BTW the repeated comments about missing pilots, drones etc have been registered and are just as funny as they were six months ago : These are being sold on as desktop models to non-modellers who don't care for little plastic men with smeary badly painted faces! Great to get three done in a month but really could do a lot more with organization: Took some liberties with this one- blue windscreen? Decals for intakes instead of painting and that factory fresh sheen that all Scooters seem to have , even after a jaunt to Hanoi.. WIP Here
- 12 replies
-
- 32
-
-
- Airfix 1/72
- Skyhawk
- (and 1 more)
-
Hi all, Quick update on the scratch built hatches collected from the etch spares box.. Nearly there with hinges and clasps as you can see the poor quality from the kit.. Updates soon.. Happy modelling
-
Having just finished my 109F, I was inspired to to build a stablemate. A little trawl found this likely candidate: Apparently it may have been a white 7 not a yellow, this is fortuitous as I happen to have some spare white Luftwaffe "7"s. There is a fascinating story re JG53's red band and Mr Goering that is well documented. It seems they even flew without swastikas at one point, perhaps I'll use artistic license for that one. The camo looks interesting, , RLM70/02 but with the splinter seemingly oversprayed. Have just received my Badger Sotar 20/20 (still unopened sadly and in pile of other ebay/amazon detritus) so will be using that for freehand camo. Again artistic license not historical accuracy will be the order of the day. To the kit, the venerable Airfix 109E4 that we seem to love and hate : Mine came with the odd soft on detail one side, of no concern to me It also came with this super annoying ejector pin mark prominently in the 'pit, which did concern me and was dispatched with Mr Surfacer 500 Decided to mod the crappy seat by removing the belts with my nail salon grinder and then making a slot for the seat belts: Great fun using all my weird and wonderful tools, finally flooded with some Mr Hobby Liquid Cement to smooth out and its off to the paint shop tomorrow when its all dry
- 23 replies
-
- 6
-
-
- Airfix 1/72
- 109E4
- (and 1 more)
-
I wouldn’t normally go out of my way to build an Airfix 1/72 Spitfire as it’s not really my cup of tea, but having received this kit as a gift I thought it rude not to have a go. It started life as the newer moulding for the Mk.1a and I guess thousands have been made as per kit recommendation, but I wanted something different so I purchased the Pavla resin conversion kit for a PR version and the Eduard cockpit upgrade.Three options are possible with the Pavla upgrade and I went for the later Mk4 which served overseas in Palestine and researching the full size showed that it was a very scruffy looking plane so plenty of weathing would be need. Having never weathered a war bird before I wasn’t sure what sort of job I’d be able to, but I was up for trying out a few techniques I’d seen on YouTube and in this forum. There were quite a few modifications required to the basic Airfix kit, but I won’t go into all the gory details as I’m sure most readers here will have done similar projects. Anyway, here’s the finished model so please feel free to give a few pointers where I can improve as I’m aware it’s far from perfect, but the Christmas period is upon us and time was of the essence! Oh, and I am aware of the small seam that’s showing over the engine/fuel tank cover, but I’ll live with it. Bill. This shows the Pavla resin auxiliary fuel tank and some of the Eduard cockpit parts.
-
 As the title suggests a little late starting but hopefully this will come together pretty quickly😉 Onto the kit, it’s the new Airfix 1/72nd with a couple of extra bits from the GR1 version, that I have just finished. Having spent the last couple of months playing with this kit I have sped up the build process for the AV8A and am hoping to get as good an outcome as the GR1. Fuselage is joined together with the fan installed, wing joined together and soon to be attached. Nozzles etc also already attached as I reckon they’ll be easier to paint in situ than do them separately and attach later (time will tell). Hopefully get the gun pods and the outriggers and main gear leg on aswell as some primer for all of it by lunchtime, can then finish painting the cockpit (at least the bits you’ll be able to see), the seat and attach the canopy prior to masking and another quick blitz of primer before leaving it a few days prior to painting (hairy sticker for this jet). As you can tell having just finished the GR 1 is speeding up the process second time round as is the great fit of this kit! Thanks for looking, all top tips greatly appreciated Cheers Graham
 -

Science Museum Hurricane: Finished in 4 days!
azureglo posted a topic in Work in Progress - Aircraft
My build of the Udet 109 V4 has stalled temporarily while I wrestle with various scribers so a quickie to keep things moving. Inspired by @dogsbodys build and this link therein, decided to whack out something quick and try some AML camo masks that have been lying around for a couple of years. Nothing fancy here, just some Eduard belts and see how quickly I can get a model up on the shelf. Wheels will be up and I'll be using one of my twee magnet/acrylic stands so here we go: Cockpit tarted up with Eduard belts and colours through guesswork, its a closed canopy (which in true Airfix fashion, is pretty full of moulding flaws anyway) so accuracy not paramount. While I was there, added wing tip lights from coloured acrylic, sanded the leading edge lights flush and filled in the spurious fabric behind the gun access panels- fast drying odourless cyano and Mr Surfacer 500 kept things moving quickly Nice thing about Mr Color and Alcald, is its near instantaneous drying hence the speed in doing the pit. Everything zipped up and ready for some primer action after a mere few hours work. Might even sneak it in later today. if I can avoid the Aperol Spritz Siren....mmmm 31 centigrade...- 16 replies
-
- 6
-
-
- Airfix 1/72
- Hurricane
- (and 1 more)
-
 Good morning My 2nd build for this Gb will be the Airfix 1/72 P 51D Mustang flown by Capt Freddie OHR https://en.wikipedia.org/wiki/Fred_Ohr The real aircraft My references The Box art The sprues The decals sheet https://www.scalemates.com/kits/961795-had-72019-p-51-d-mustang-decal-set I will replace the seat by a Quickboost one and the Instrument panel by a Yahuu models one .. I will start when the Mitchell and Kittyhawk are finished Patrice
 -
Good morning My 3rd build will be Helen the Mustang flown by captain Art Fieldler of the famous Checkertail Clan 325Fighter Group https://www.first-world-war.com/aces.php?PilotID=2448 My references The Box art The sprues I will use a Superscale decals sheet I will replace the seat by a Quickboost one and the Instrument panel by a Yahuu models one .. I will start when the Mitchell and Kittyhawk are finished Patrice
-
 To quote Uncle Albert, “during the war” My grandparents where based at RAF Linton on Ouse, my grandad was a Royal Engineer repairing the runways after ze Luftwaffe had visited. My grandma was a WRAF and worked in the tower as a radio operator, she had trouble seeing the end of her nose but had a very clear voice over the radio. My grandma was a bit rebellious too, wearing a skull and cross bones on her uniform, scrumping apples, and when she didn’t have enough leave after her marriage before my granddad was sent off to Burma, she went awol for 24hrs and hoped she wouldn’t get caught climbing over the fence to get back on camp. For some reason she had fond memories of the guard room, and many stories of “ this one time on jankers” In the late eighties my dad arranged with RAF Linton on Ouse a trip for them back to the camp to celebrate there wedding anniversary. They were treated to a tour of the station and flight line to see the Jet provosts and time in the memorial room. They were even on the local Yorkshire tv news, funnily enough with my grandma appearing from the guard room. My my own connection to Linton on Ouse during my time in the RAF was limited to four visits in my last ten years, mostly to road move Tucanos and collect one that “ crashed” on the airfield. One trip was to remove the old JP gate guard and relocate it to outside one of the sqn buildings and deliver the new Tucano gate guard to the paint shop. I plan to build the new Airfix JP in proper trainer colours based at Linton on Ouse. Pics to follow
 -
Hi! I'm join in with a special subject , the wildcat recently discovered 3000 meters under the Coral Sea next the USS Lexington wreck link to the image I will use an Airfix kit in 1/72nd scale with addition of a set of F4F-3 wings from Quickboost and the zoom p.e. set from Eduard Decal from kit and a sheet included in a Kagero book
-
Hi, I've started the Airfix Dambusters Lancaster and decided to make up the trolley for the Upkeep mine. What puzzles me is what colour should it be. According to the instructions the main part should be Humbrol 33 (black) with the wheels, mine frame part G16 and towbar Humbrol 30 (green). The photo on the back of the box shows it made up and all green, so I'm guessing that the colour callout for the main trolley G19 is a typo.. I would have presumed that the trolley should be green overall until I saw that the vehicles in the RAF Bomber Resupply set are all Humbrol 29 (brown). So should it be green or brown or could it be either? Cheers Phil
-
Good afternoon My 3rd build for this Gb will be the Airfix Hawker Typhoon in 1/72 http://imodeler.com/2013/06/imodeler-review-airfix-172-hawker-typhoon-ib/ and I will represent Nicky the aircraft flown by the Flight Officer A H FRASER of Sqn 439 in February 1945 I will use a Yahu models Intrument panel , Quick boost seat and exhausts Patrice
-
Hi everyone Lets hope I've understood the qualification rules correctly and this.... .... with the number 10 on the bow gets me an entry, otherwise it ain't gonna get built any time soon! Craig
-
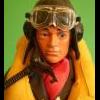
I have a question about the colour of the Aircraft behind the 2 glass panels ? behind the cockpit . I have seen them painted as per the camouflage ,others are painted interior green . Any advice would be welcome . PS it is being painted in the RAF Desert scheme of 112 squadron in 1942.
-
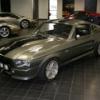
I'm on a bit of a roll with the Mustangs at the moment. Now that I've got a bit of a grip on airbrushing technique and the use of Alclad, the options seem almost limitless (and that's just in the 8th AF which is my interest). But there are a couple of iconic P-51s that I've always wanted to do, including at least one of the aircraft in those classic photos of the 'Bottisham Four' taken on 26 July 1944. Here's 361FG CO Lt Col Christian's 'Lou IV' captured on film that day: And here's my rendition of it. It's the lovely little Airfix 1/72 kit, basically out of the box but with fin fillet removed, wing panels puttied, canopy rails added, elevator mass balances scribed, and a rear view mirror scrounged: Decals are Eaglecals, which worked beautifully. The main code letters were a bit too tall so I cropped them a touch to get the fit just right. Underwing tanks are from the kit, but I moved the filler cap on one of them and added the flange that runs round the middle of both. I also added the plumbing for good measure. Paint is Alclad Polished Aluminium for the natural metal, and plain Aluminium for the lacquered areas. This was protected by a coat of Alclad gloss clear, brushed on - it worked a treat. The greens went on next and are both Tamiya: the dark areas are Olive Drab (brush painted and inspired by our very own Tony O'T's impressive results), and the lighter bits are RAF Dark Green (a mix of brush on the fuselage and airbrush on the wings). There's been a lot of discussion over the colours which I took into account before making my decisions. The invasion stripes were airbrushed for the wings and brushed on the fuselage. And the yellow is Xtracrylix. Final varnish is my preferred mix of Humbrol enamel Satin and Matt. To get a hopefully accurate reproduction of the underneath I used period photos of Christian's aircraft: ...and of 'Tika IV' also from the 361st FG. Both appear not to have invasion stripes on the radiator door: The cockpit is stock Airfix, so the seat, instrument panel and gunsight are not correct for a D-5 model. But I'm not fussed about that: the aim of this build was to get a decent replica of that classic paint job, and I don't think it's too far off. Here she is with my fairly recently built P-51B, which used the KP wing and the Hasegawa fuselage: Hope you like it! Justin
-
Hello! I would like to partecipate with an amphibious helicopter Airfix 1/72nd Westland Sea King HC.4 with BigEd set I hope I can finish it in time..
- 13 replies
-
- 6
-
-
- airfix 1/72
- SeaKing
- (and 1 more)
-
Trying to locate some photos after my computer went AWOL found these old ones from about 10 year ago so thought I would share beefy
-
Hi folks, Seems my models are like London buses: you get nothing for ages and then two come along at once. Whilst finishing off my Seafire I was also bringing this to a conclusion. I've always liked the yellow & black checkerboard markings of the 353rd Fighter Group, and have long wanted a Mustang in those markings. But in1/72 scale, decals for Slybird P-51s are very hard to find, particularly with the excellent Barracudacals set now discontinued (or so it seems). Still, I found the website of Draw Decals who provide a set for a warbird two-seater which is painted to resemble The little Witch, which was flown by Lt Don Schoen in early 1945. The kit is the 1/72 Airfix, which is an easy build. I filled in the wing panel lines, modified the fin fillet to the earlier Swayback style, and added cockpit rails. Otherwise it's pretty much out of the box. Paint is Alclad Polished Aluminium for the natural metal areas, and plain Aluminium for the wings. Tamiya olive drab on the nose and black on the rudder. Here are some piccies: Ths spinner is Xtracrylics RAF Trainer Yellow, lightened a touch to match the decals as best as possible, with Tamiya black rings. A bit fiddly but it came out OK. I kept weathering to a minimum: a thin pin-wash, a couple of streaks here and there - nothing major. I was originally thinking of displaying the model wheels-up, with radiator door slightly open and flaps partially deployed. Then I changed my mind, but by then the flaps were stuck on. This presented a dilemma: as Mustangs were parked with flaps either up or fully down, how to display an accurate-ish model with flaps only partially lowered whilst on the ground? So I decided to add the pilot, and display the aircraft as though he's got flaps for take-off, with clamshell doors closed. Pity the propeller isn't spinning... Don't read the data panel: there are some inconsistencies... I also realise that I should have blanked off the flare tube for this particular aircraft. Doh! The nose decals behaved very well with a bit of help from the Microscale solutions, though I did have to cut them a couple of squares-worth to make them conform better. The fuselage codes are slightly incorrect in terms of style for the original Little Witch, as they are spot on for the modern recreation. I chose to chop them up and reassemble the pieces make them look slightly closer to the originals, i.e. a narrower font. Doesn't look too bad. The serials are a mixture of Draw Decal and Kits World. Other stencils are from the kit. Here's the slighly reshaped fin fillet, which was a relativley straightforward job. I also scribed the horn balances on the elevators. Photos of the modern Little Witch can be found at the Website below. https://forum.keypublishing.com/showthread.php?90644-Lt-Don-Schoen-(353rd-FG)-to-be-re-united-with-quot-The-Little-Witch-quot Which is where I also found the pictures of the original aircraft: Number four for the year! Hope you like it. Justin
-
Hi folk'sgot an early finish so thought I'd get an hour start while the house was quiet! So poured a Malbec and waited till ten. Interior green where applicable. Interior air scoop facings painted black and fitted. Interior paited,dry brushed and detailed,IP decal on and air bottles painted. Wing's assembled after dry brushing details. And first hour gone with seat and wheels now with first coat of paint on,so not a bad start thanks for looking see you around seven AM.