Search the Community
Showing results for tags 'Airfix 1/48'.
-
 Well, as alluded to in my recent (and only second!) RFI (here if you are interested) displaying my 3rd, 4th & 5th completed builds, I am now going to embark on my first WIP! What I have learnt in my short time in the hobby is that taking time to plan, solve problems and learn new techniques is what I have enjoyed most. I did my last model (Seafire XVII) as a quickie but didn't enjoy it nearly as much. I have also found myself drawn more to the WIP than RFI threads - perhaps this too suggests I prefer the process rather than the results (although I do enjoy the results too). I am fascinated and awed by the skill and attention to detail of some guys on here. This WIP is going to be the first small steps towards hopefully achieving those levels of skill, and as such, I looking for as much help and suggestion as anything from this WIP. Some have already helped in the planning stage elsewhere on Britmodeller, even if they don't know it, so thanks to those that contributed here and here - in particular Nick G (NG899) and Dave (SHAR2) for their help and PMs. That's enough of my life story! The whole reason for building this Sea Harrier is continuing my theme of British Heroes and none can claim to be that much more than the Sea Harrier FRS.1 and those that flew and looked after them during the Falklands. An aircraft untested in combat and with many detractors writing it off as too slow and a just gimmick, piloted by brave and skilled men, proved itself anything but. You only have to watch the recent re run of "Decisive Weapons" (here on Youtube and well worth a watch) to realise how brave ("75% of you will not return!") these guys where and how well they were supported. Anyway, on with the build (which will be a marathon not a sprint by the way - it took me a month just to get started!!) Here are the bits I shall be using.. Model and extras oooo, lovelly Sidewinders First class book with pictures, diagrams and building tips ...and this is the link I have used so far for my main inspiration.... Nick Greenhall SIG Build Process The first skill I knew I was going to have to learn was one that, reading so many comments by so many of you, was going to be hard going - rescribing!! I have begun to realise, after one fuselage half, many expletives, sanding and puttying and more sanding why it is so unpopular!!! As well as rescribing I have also drilled a hole for the camera towards the nose and recessed the panel. I have a small panel of 5 thou cut with a hole and backed with clear pastic from a Tesco meat container (glued with Klear) as a cover panel for the camera (currently testing a copy of this to ensure when masked with liquid mask it doesnt pull it out/tear). I also drilled a hole for the vent just ahead of it and have put some fine mesh in taken from a spare PE grill that was, according to Eduard's instructions, for the GTS/APU exhaust vent that doesn't require a mesh - I think I am right on that - I hope so as I have a knackered mesh now!) Airbrake internal area has been cut out to make way for some detailing when fuselage halves are put together (can't see from these pictures).I have prepared the tailplane slot so I can use the Pavla tailplane. Cut the heat shields and will make some more as per Nick Greenhall's template (website named above). Cut a hole for the GTS/APU inlet (difficult to see against white background) Next job is to start to make necessary cuts and adjustments to bring the turbine blades forward - bit scared of that bit! Onwards and upwards & thanks for looking!
 -
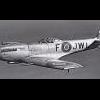
EE Lightning F.6 XR769/B RAF Tengah 1971 Fitted with overwing tanks for the transit flight back to RAF Akotiri to hand over to 56 Sqn shortly after 74`s disbandment. In 1988, while with 11 Sqn, XR769 was lost in the North Sea while taking part in practice interceptions with 74 Sqn F-4J(uk)`s. The pilot ejected safely and was picked up shortly after.
-
And could I get this photo the right way round? No!!
-
Hi All, I like to try something new with each build and this time I had a go at building a biplane and torturing myself with rigging. I certainly learned a lot as I went through this and will happily do some more. The kit itself is pretty horrible, coming from some fairly antique molds. The age of those molds is plain to see with flash everywhere, parts that have become quite misshapen over the years and fit that is...well the parts fit where they touch so a deft hand with the filler is required almost everywhere in order to get a reasonable finish. Having said all that, I really enjoyed building this and although there is a lot of work to correct the many faults, none of it is all that difficult but just time consuming. A number of parts were scratched - mainly wires/links from control horns and the tailplane struts went in the bin straight away to be replaced with fine brass tubing. A visit to the RAF museum came in very useful indeed to get some reference shots of the way rigging was dealt with. There are myriad inaccuracies still, many of which I chose to live with in the interests of pragmatism and getting the thing finished! I used Bob's Buckles for the first time - creating turnbuckles by mating them with 0.5mm brass tubing that I cut to size. Great service from Bob - his email confirming despatch included a photo of the envelope being put in the postbox! These things really are tiny and I could never have used them without the aid of a good magnifying lamp. The rigging and antennae lines were made with EZee line but I will be trying knitting-in elastic that another BM member has suggested. I like EZee line very much but it is slightly ribbon-like rather than round and sometimes that does cause problems sometimes when the line twists and then the flatness can be very apparent. I chose not to use the kit decals as I'd been really taken with the 5 FTS colour scheme and this also gave me a chance to use Mal's great Miracle Masks again. The only decals used here are the stencils on the edges of the wings and tailplane. Because of the contours on the model to simulate ribbing and fabric, using the roundel masks was fairly tricky with regard to getting them to adhere closely to the surface and then reapplying the various parts of the masks for shooting the different colours. All in all I'm quite pleased with the effect though. I didn't have that problem with the masks for the squadron signifiers, of course, so that part was very easy. This is the second model I've built using masks and I'm a complete convert. Paints were a fair mixture. The cockpit was sprayed Humbrol 78, although you don't get much of a view when it's all zipped up. There's quite a nice little instrument panel in there too. The trainer yellow was a 1:1 mix of Tamiya XF3 and Mr Hobby FS13538 and the metal surfaces are finished with Alclad Airframe Aluminium, shot over Halfords gloss black (a Rover colour, IIRC), all over a base of Halfords grey primer. Struts and anything that would have been painted with silver laquer have been painted with Citadel Mithril Silver, or whatever the odd new name is - Runefang Steel? I knew I'd have to paint and mark the build before adding the upper wings and rigging so I gave the Alclad a coat of the same brand clear coat, and the other surfaces all got a few coats of original Klear. It all stood up well to the considerable handling the kit got during the rigging stage. I chose not to weather the model as I don't think any would have been visible on the real thing. Or that's what my research suggests, anyway. I did consider taping over the ribs and giving wings and tailplane a shot of Tamiya Smoke to simulate highlights but, in the flesh, the finished build doesn't need it. I had a terrible moment when I ham-fistedly snapped the undercarriage cross-strut after painting and clearcoating the whole assembly. To my eyes the repair has never looked 100% but I'll live with it. Annoyingly, I didn't check the fit of the radiator before planning the bracing wires that should go, cross-ways, from the rear of the radiator to the U/C cross-strut. Once it was on and glued in place, I only then discovered that there just wasn't clearance as the radiator part is too long and extends so far that it would have been fouled by the bracing wires. It would have been easy to shorten the rad - ho hum, next time! Anyway that's enough waffle and on to the shots. I hope you enjoy them and I'm always more than happy for people to offer constructive criticism. Cheers all, Roger
-
Hi Everyone, thought I`d share some pic`s of my very latest completion, Airfix`s 1/48 b-57 kit Done as an RB-57E, Det. 1, 460th Tactical reconnaissance Wing, Ton Son Nhut, Vietnam, 1970 Decals from Xtradecal X44077 sheet Made a few modifications that I became aware of; reshaped the nose a bit, enlarged the tail-skid... modified the tail-cone, reworked the aerial array and added anti collision lights. Also added nav` lights and wiring to the tip tanks, couldn`t find much info on the cockpit layout so fitted the crew to hide lack of detail Hope you enjoy looking at, Cheers Russ
-
This kit was made in August 2011. . . . . Await your comments. . . . . . . . . .I hope you enjoy it.
-
Just completed! Great kit: fits together very well and good detail for the scale. Dors and side stowage racks are quite easy to leave movable it's so well engineered. Some tips I can give from my experiece with this one: Leave the sand channel off until after painting & decaling. There's a reg-plate decal goes behind it. Do the decals on the dash-board before attaching the front portion to the chassis Paint the tools, on the face of the step up to the gunners platform, while you can still get easy access to them The wheels are a tight fit over the hubs. As I left them off until after painting so I could do the hubs black and the wheel rims sand, they were an even tighter fit....the axels are fragile: be careful! But despite those bits, which are more my fault than anything, I really enjoyed the build and am pleased with the result. Now to get the Jackal! Hope you like it and all comments welcomed Sean
-
Hi All, May I present my version of the 46, its the Airfix kit with a True Details cockpit. I used Xtracrylix paint and a mix of the kit decals and Fantasy Printshop for the roundels. I have seen two colour schemes for this machine and I opted for the splinter version with C type roundels on the wings as I figured it was more likely for a 48' machine, I'm sure someone here will correct me if I'm wrong. Hope you like her and thanks for looking.
-
Basically OOB except Pavla seat and Model Alliance decals. Decided to keep it quite clean. Oh, yes it's a tail sitter!Thanks for looking. FF
-
I have been struggling with this kit but here's how she sits at the moment.... FF


.thumb.jpg.d17ff607fc7e89ed057e63fcb6f2a888.jpg)