Search the Community
Showing results for tags 'Airbus'.
-

Airbus A330-200F Turkish Airlines Cargo 1/144
Timo posted a topic in Ready for Inspection - Aircraft
Something a bit different – an Airbus A330-200F, the cargo version of the A330-200 passenger aircraft. It’s quite rare to see an A330-200F as only 36 have been built to date. Apart from the main deck cargo door, the most visible difference from the passenger version is the distinctive hump under the nose. The passenger variant has a marked nose down attitude while on the ground, so the freighter’s nose gear has been lowered into a fairing beneath the front fuselage to lift the nose so that the main cargo deck is level when on the ground to help loading/unloading. I’ve converted Revell's 1/144 scale Airbus A330-300 into an A330-200F. This is quite a straightforward conversion – the front and rear fuselage shortened, all windows filled, together with fitting a new shorter tail fin and RR Trent engines (both from Braz Models). The nose gear fairing was made by mounting the kit’s nose gear bay in the lower position and sculpting the fairing using Milliput. The open main deck cargo door and crew door are scratch built. The Turkish Cargo decals were home made inkjet printed, with some of the kit’s original decals being used for the detail. I thought that this cargo version would look far better with doors open, so I’ve included some ground crew and equipment: > the cargo loader and pallets were scratch built > the passenger steps are from a Dragon 747 kit > the aircraft tug and towbar are from an Eastern Express aircraft tugs set > the people and transit van are N-scale railway accessories A few more pics below. Hope you like this conversion and cargo apron scene. Thanks for looking Tim- 18 replies
-
- 27
-

-
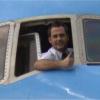
Just gone 7am on 4 February 2015 and South African Airways Flight SA257 from Johannesburg is about to touch down at the King Shaka International airport in Durban : At the controls are Captains Frik van Schalkwyk (left) and Matthew Smith (right) The hour long journey marked Frik's inaugural flight as Captain, following an extensive flying career with the airline, and here's the proud man after arrival : I'd like to thank Frik's wife Shirley (my cousin) for allowing me to post her photos of the momentous occasion - I only hope my model has done it justice. Here are the rest of my pics of Zvezda's A320 finished off with Draw decals (Set 44s-A3N-1), Skyline details (SKY14058), and Authentic Airliner windows (A320 family) ...and for those of you who are wondering about the secret of levitation, here are a couple of pics that haven't had the brass wire airbrushed out : Best Regards. mike
- 31 replies
-
- 38
-
-
- South Africa
- Airbus
- (and 1 more)
-
Hello all, This is one of my entries for the recent Airliner III Group Build. It was completed by the deadline but a few things prevented me from posting it in the gallery section of that group build. So here it is presented to you in it's (99.99999%) completed state and how it got here is detailed here I thoroughly enjoyed building this and the others for the group build. Once again, huge thanks go Ben Sweezey of V1decals.com for providing me with an updated decal sheet. Many thanks for looking and feel free to query, comment, critique as you see fit!! Jeff
- 13 replies
-
- 23
-
-
- Revell V1 Decals
- Air Côte dIvoire
- (and 1 more)
-
Airbus A320 Etihad 1:144 Revell The first of the successful narrow body range from Airbus, the A320 flew commercially for the first time in March 1998, having completed its maiden flight in February of the previous year. Designed to compete for a share of the short to medium range market which at the time, was dominated by Boeing and Douglas with their B737 and DC-9 respectively, a production run of fewer than 1000 aircraft was originally intended. However, the success of the design, and the introduction of the longer A321 and shorter A319 and A318 derivatives has seen the A320 family become the worlds fastest selling airliner. As of April 2016, Airbus has delivered nearly 7000 aircraft, with a further 974 firm orders making this the worlds best-selling, single-generation aircraft programme. The kit. The Revell kit has been around for a while now, and has been issued in many different airline liveries such as Lufthansa, Eidelweiss, Air Berlin, and Condor. This latest release offers the rather attractive Etihad livery that has been recently introduced. The box is in Revell's new 'black' style with a side view painting of an A320 climbing to altitude. The instructions have likewise been revised and are now in full colour on glossy paper. The plastic parts are the same as previously issued, and are now beginning to show traces of flash in some areas, but nothing too serious. The first of the two main sprues holds the fuselage halves and undercarriage components. The passenger cabin windows are moulded open, so you will need to decide whether to finish them with one of the liquid glazing products such as Micro Krystal Kleer, or fill them in and use decals. Glazing is provided for the cockpit windows, but without any framing on the decal sheet (apart from outlines for the two centre panes), or a 'solid' decal option. I always prefer to retain the clear option and mask it, so this is no problem. Others who like to use decals will need to take one from the spares box. The second sprue contains the flying surfaces and the CFM 56 engines, but the V2500 engine option on some previous releases have been deleted here. The trailing edge flaps on all the Revell A320's need a little modification to remove some of the smaller track fairings, and this is clearly pointed out in the instructions. Note also that the inboard flaps need the 'sub section' engraved oblong filling in. The little 'winglets' on the wingtips are somewhat undersized, but larger replacements are easily fabricated from plasticard if you desire. All my previous builds of this kit have them, and it only takes 15 minutes to make a pair. Decals. The decal sheet is probably why most modellers will want to obtain a copy of this kit. Designed by DACO it provides a wealth of stencil detail, wing walks, door outlines, engine and pylon details, as well as the Etihad livery. It is all beautifully printed in sharp register and with excellent colour matching. Being a DACO design they should fit perfectly as well, no small consideration when considering all the decals to go around the rear fuselage and tail. The fuselage colour is suggested as mix of Revell's own paint, 75% White 04, 20% Orange clear 730, and 5% Aluminium metallic 99. Several other Etihad airliners have been posted on this forum over the last few years, and other suggestions may be available with them if you search. (My own Boeing 777 was done with nail varnish applied by airbrush). Whichever method you use, it is probably wise to mix up a batch and keep it for re-coating and touch ups. Conclusion. It is nice to have this kit back in such an attractive livery. The new upgraded box and instructions are also very welcome, and much clearer to read than the old instructions. Many of us will have already built at least one of Revell's A319/320/321 kits, so know that it is a trouble free build. The real 'icing on the cake' here is the beautifully produced decal sheet, and should produce a stunning model. Recommended. [EDIT] Under construction now ! Build log here [/EDIT] Review sample courtesy of
-
 Hi again, now with this quite unique aircraft. I liked so much the way it looked at Auckland I knew I had to build one someday. Gio Decals, which were a nightmare, and Model Master enamels. I did my best with the decals but at some stages I must confess I almost quit. Glad I managed to get through the storm though. Thanks! Ignacio
- 19 replies
-
- 22
-
-
Still digging in my collection now I bring you one of our service stars: the A340. They arrived in 2000 and were retired this year from service. 15 years flying to Madrid-Frankfurt, Auckland-Sydney, Los Angeles, a few times to Easter Island-Tahiti and even once to the Falkland Islands. I was lucky enough to fly it for 3 years and I am deeply proud of it. I did try to make her justice as much as I could. Real aircraft paint matched to Automotive paints, Gio decals, tail hand masked and painted. Thanks for looking. Part of the family in scale:
- 20 replies
-
- 26
-
-
Pics thanks to Steve.
-
First ever Group Build entry so be gentle on me! Took advantage of this kit being £6 on Amazon, the box shows why it's so cheap Current update on build: First time I've built a conventional airliner so this should hopefully be easy, all out of the box with BA decals too
-
Airbus A319 - Frontier 'Mickey The Moose' Revell 1:144 with Draw Decals Another Revell A319 finished in the attractive Frontier scheme. Each of their fleet features a different animal on the tail fin and is named after it. These are another set of the superd Draw Decals and my fourth in Frontier. This one is slightly different as it features the modified 'Fly Frontier.com' billboard. And with something else, else, and else! A319's 'Perry the Puffin' and 'Chloe the Fawn' and converted A318 'Stu the Rabbit' Thanks for looking, John
- 24 replies
-
- 24
-
-
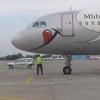
Mangwanani fellow modellers. Keeping up with my African theme, here's Air Zimbabwe Flight UM 468 from Johannesburg about to touch down at Harare International Airport : Zvezda's A320 with a mix of home-made decals, paintwork and other bits and bobs. Struggled with just about everything on this build, but finished it just in time for the Airliner Group Build next month - Hooray (I think......) Thanks for looking. mike (Perhaps one day I'll get to make the journey ?)
- 45 replies
-
- 31
-
-
Work in progress. Standard Revell kit with Draw Decal decals. Hope to fly one of these one day! See my BA A319 in the background.
-
Hi all, I've been building the Revell A319/20's recently, putting a little more work into them each time. I'd really like some metal fan blades for the engines. A quick search hasn't turned up any. Does anyone know if they're out there? Chris
-
 Airbus A320 Etihad Revell 1:144. Review Build The Airbus A320 is one of the most widely used airliners today, and is the middle sized version, with the A318 & A319 being shorter, and the A321 longer. All share the same basic wing, with the most noticeable difference being the fuselage length. Go to any civil airport in the world, and chances are you will see one of these, if not several. The Revell kit has been around for about 20 years now, and was recently released with a new decal sheet for the latest Etihad livery. Review Here To get the slightly pearlescent look, I used womens nail varnish thinned and sprayed via airbrush, which worked well. Were I to do it again, I would use a slightly lighter base coat as I feel that the final shade is a touch darker that I was aiming for. There are issues with the engines in this kit which are discussed in detail in the Work in Progress thread. 99% of purchasers of this kit will not be bothered by these issues, but for those who like to pursue accuracy, you will need to consider these points. The kit only has CFM 56 engines, only 1 of Etihads A320's has these (Reg A6-EIZ). Thanks to member 'Lesthegringo' for first pointing this out. It does not look like A6-EIZ has been painted in this scheme yet. It is still in service with Etihad, so may be repainted in the future. All the rest of Etihad's fleet use the V2500 engine. You can get these from Revells other A319 or A320 kits. As these other kits also have the CFM 56 engines, you can still build them. If building a V2500 powered machine, most of Etihads in this new livery have the new curved up 'Sharklets' on the wingtips, rather than the small endplates. Foe sure, A6-EIC has the end plates supplied in the kit, and has been painted in this livery. At the moment this is probably the best bet for finishing this model. In a further twist, all the engine decals in the kit are for V2500 engines, despite them not being in the box. Despite these minor problems I thoroughly enjoyed building this kit, the decals are beautiful and behave perfectly. You'd pay almost as much for it as an aftermarket sheet, as you would for the whole kit. The livery is really unusual and to my eye, quite attractive. So on with the photos. And finally, with the my recently completed Boeing 777 in the previous Etihad livery. It also shows that the A320 is a touch darker than I would have liked, due to the base coat i used. Both were painted with the same nail varnish as a top coat, (And despite what it says on airlinercafe, the cheat line on the triple 7 is straight . I accept that in some photos in can look like there is a wiggle in it, but that is due to compound curvature towards the front end. In real life it is fine. ) Thanks for looking, John
- 20 replies
-
- 24
-
-
Airbus A320 Etihad - Revell 1:144. Review Build
Viking posted a topic in Work in Progress - Aircraft
Airbus A320 Etihad Review Build This kit has been around for 20 years or so, and released in various different boxings & airline liveries. The latest release is in the new Etihad livery and was recently received at Britmodeller for Review It is a fairly simple kit to build, so I thought I would take it out of the box and and use it to show a few techniques that I like to use on airliners. The lovely decal sheet by DACO just calls out to be used! I like to keep the cockpit windows clear if I can. Here is how. 1. Glazing glued in. Note the schoolboy error of a gluey finger mark on it.No worries, though, the following processes will eliminate it. The A320 kit is a bit awkward to fit the glazing, the aperture needs clearing of flash, and you need to fit it in carefully or it can crack. I leave the wing off so that I can get fingers to the inside of the glazing as well, and help push it into position. Fit it off centre so that one side is on the inside of the fuselage and the other outside, so that you are sliding it from left to right in the cockpit 'slot' to get it into position. Once located run a bit of Tamiya extra thin cement around to secure it. But watch it, if you keep fiddling with it you are likely to smear gluey finger marks on it! 2. Once dried overnight, start to sand it down to blend it in better. 3. The fit isn't perfect, so it will need filler to blend it in properly. White Milliput used here, and left for 24 hours to harden. 4. Further sanding, and the Milliput is mostly off the glazing now, and filling the gaps, particularly on the centrer 'crown' . 5. Using Micromesh polishing cloths, the glazing is restored to being crystal clear. 6. Masks are now needed. It is a straightforward job to get an A320 decal sheet with a 'solid' glazing decal on, lay a sheet of clear plastic over, add some Kabuki tape on top. Cut with a new blade following the glazing pattern beneath, remove the excess tape, and you have a set of home made window masks! 7. Add them to the model.Use thin strips to adjust any edges. Here the central pillar wasn't right, so a couple of this strips corrected it. 8. The wing on this kit needs a little fettling to get it to sit flush in its opening. I find that trimming, test fit, trim, test fit etc in these areas will help to get the wing fitting snugly without the integral lower fuselage section standing proud. 9. Talking of the wing, the kit winglets are too small. 15 minutes can make a new pair from 20 thou plasicard. Above, the replacement pair. Below, the kit (too small) kit pair. 10. The wings have the extra flap tracks of the A321 version, which need to be removed. A chisel type blade is ideal for this. Shave off most, and finish off by sanding. The engraved split flap lines also need filling in. 11. While the plasicard is out, I replaced some of the lumps and bumps I had cut off the fuselage, With them in place it makes it hard to sand and smooth the fuslege. So I usually shave them off, and make new ones later like this; 12. Primed up with Halfords rattle can 'Plastic primer'. I hope this helps anyone contemplating building an airliner in general, and the Revell A320 (or A319 & A321) in particular. More to follow as I move on to painting it with nail varnish, for that Etihad pearlescent look! John- 29 replies
-
- 12
-
-

-
 Hi all, After building a Thomson 787 I decided to take the plunge and build an A380. It's still very much work in progress, you will notice parts missing but as my second build I'm quite pleased with how it's coming along. I have made the model without landing gear as I intend to build a stand for it, I just think it looks cleaner. Most the paint I used was Humbrol hobby Spray, apart from the wings which are Halfords Ford Polar Grey (the poor pic quality doesn't do the Halfords spray justice) BA Blue was Humbrol hobby Spray Midnight Blue Please excuse the picture quality, I will get round to Hi res when it's finished PROBLEM I ripped my Flight Deck Decals, does that mean I have to spend £12 on a brand new set? The one that came with the model in the Airbus House Colours wasn't good enough. Thanks
 -
 Nerded out and built a Revell A319 kit I had lying around in a personalised livery (imaginary airline I had when I was a kid). Clearly I was a complex child. Anyway, here it is. A 'Lomasair' A319. still a bit scratchy here and there, but i'm learning. ...and here it is on the shelf next to my BA 319. See that here.
 -
Airbus A319 British Airways (Revell 1/144)
lomasca posted a topic in Ready for Inspection - Aircraft
Airbus A319 I completed a month ago. Not perfect, but getting better. I'm currently building the same kit again in a personalised livery (will post on here when done, if it succeeds) Goes together relatively easily. On my second time round i'll be paying more attention to the join lines on the engines. If you go for the CM56 option, i've noticed the starboard engine on both kits didn't fit together. The IVAE engines (pictured) seem to fit consistently. Chris- 14 replies
-
- 16
-
-
Hi all, I'm building a 1/144 A319 at the moment, and to be geeky for geeks sake i'm painting it up in a fantasy livery of the imaginary airline I has when I was a kid... Take what you will from that. Either way, I need to find a decal sheet of standard lettering to form a random/made up registration. G - XXXX (or whatever). Ideally I need them in white. I can find some squarey RAF ones around, but if someone can point me towards some more generic ones, i'd be grateful. I can paint the livery but not the reg. Cheers, Chris
-
Hell fellow modellers. I have finally completed my Norwegian Air Shuttle fleet. A project that has lasted me far too long. The first model being the Revell 737-800, LN-NOL, was finished back in November 2012. The -300 was completed back in January 2014. Now, two years later, the Dreamliner is complete. My target back in the days, was to model one of each plane type in the 2012 fleet. The -300 has now been withdrawn from service. The Dreamliner has switched registration, so its now on norwegian registration; LN-LNA, and accordingly, the 737-800 has changed from LN-NOL to EI-FHC. The Norwegian Trio by Robin Matcham, on Flickr Norwegian Long Haul 787-8 EI-LNA by Robin Matcham, on Flickr Norwegian Air Shuttle 737-3Y0 LN-KKR by Robin Matcham, on Flickr Norwegian Air Shuttle 737-8Q8 LN-NOL by Robin Matcham, on Flickr After being three months in the Phillippines with work, I have now returned to Denmark and should be able to complete some more models in the near future. Robin
- 14 replies
-
- 29
-
-
 Well, it's a new year, so why not a new WIP? I wasn't initially going to do this thread, so I've already made some progress. I started by painting the inside of the fuselage matt black and fitting the clear window parts. Following this the main and nose gear bays and the flightdeck were painted and installed. After joining the fuselage halves, I fitted the belly plate and the wings. The fit has been very good so far - only two small patches of filler have been needed. A350 by Caution Wake Turbulence, on Flickr The windscreen is very slightly under-sized, but after painting the edge with black paint, I able to make a good join using some microscale crystal clear. I cut the mask using the windscreen from a second kit. A350 Nose by Caution Wake Turbulence, on Flickr I've masked the cabin windows with Microscale Micro Mask, applied using a short length of 0.5mm styrene rod mounted in my pin vice, which seemed to work better than a cocktail stick. A350 Windows by Caution Wake Turbulence, on Flickr It's a bit of a pain having to fit the nose gear at the beginning, but it hasn't broken off.....yet! With some thought, you could probably modify it to fit at the end. A350 Nose Gear by Caution Wake Turbulence, on Flickr It took a little bit of fettling to match the curvature of the fuselage and the belly plate, but with a little sanding and some rescribing, I'm quite pleased with the result. A350 Belly by Caution Wake Turbulence, on Flickr I decided to add a little detail to the main gear.... A350 Main Gear by Caution Wake Turbulence, on Flickr I've been experimenting with various shades of Alclad on the engines.... More or less successfully. There are a couple of sink marks on the engine cowling to be filled. A350 Engine by Caution Wake Turbulence, on Flickr I'm reasonably pleased with the engine fans, although the blade spacing is a bit uneven. Trent XWB Fan by Caution Wake Turbulence, on Flickr As ever, Revell's painting instructions seem to have only a loose relationship with reality... I have to say, despite some people's misgivings, the A350 is really growing on me! Thinking about doing a second in Virgin colours if my A330 decals will fit. More as small people permit..... Happy New Year, Andrew
 -
Hi everyone, One of my earliest civil aviation memories refers to the A320 with the 'non-standard' landing gear flown by Indian Airlines: http://www.crashdehabsheim.net/autre%20crash%20indian%20airlines.htm Has anyone of you build a model of this? Is there perhaps another 1/144 kit you reckon I could borrow the main landing gear from so that it makes some sense proportionally if not outright perfectly dimensional. Perhaps from a 757 or would even that be too big? I have just saw the Vintage Flyer Decals sheet(s) for the Indian Airlines 737-200 and remembered the atypical A320... Cheers, NIki
-
 Hi there, After the Air New Zealand A320 decals, Attach Before Flight has released another two decal sheets, this time for Azerbaijan Airlines: These two, just like the ANZ sheet are printed by BOA in the Czech Republic. I have bought the A320 sheet because some of these jets had/ have a bit of extra colour, carrying titles for the 1st European Games held in Azerbaijan's capital Baku in 2015. Maybe I'll go for a double build: Azerbaijan A320 and Indian Airlines A320... Cheers, Niki
 -
This is Zvezda's latest "ultimate kit" which was released earlier this year. It includes extra details such as options for open cabin doors, extended flaps/slats and even extended undercarriage oleos to represent a final approach mode. I've built this version in Thomas Cook's new "sunny heart" colour scheme with just flaps/slats extended into the landing position. Some say that this new livery is drab compared with Thomas Cook's previous two-tone blue scheme, but I think its actually quite striking. The kit goes together really well and was a delight to build, although some care is needed in assembling the extended flaps - the kit instructions need a bit of interpretation. Also the kit doesn't come with wingtip sharklets which are now fitted to most new A320 family aircraft, so these are add-ons from Braz which were easy to fit. The Thomas Cook decals are home made with the detail decals (windows, doors, etc) from Daco. Paints used for the Thomas Cook colours are Yellow Revell 310, Dark Grey Revell 378 and Mid Grey Humbrol 128. I think that Zvezda are definitely setting the standard for airliner models. Their next release will be a Boeing 777-300ER - bring it on! Thanks for looking. Tim
- 23 replies
-
- 24
-
-
Here is one that has been cluttering my version of Victorville for a while. A Revell A340-300. I saw a nice build over at ARC where the inboard pylons were corrected. The engines hung too low so I had to do it with mine. Pylons removed from the nacelles Pylons attached, of course some putty is involved and has to be cleaned up when set I did not take many early progress shots. Here is is how is stands now I have filled some cabin windows and added some antennas, lumps and bumps and finally test fitted the engines to check sit and ground clearance
-
http://www.plastik-modellbau.org/blog/herbstneuheiten-von-revell-septemberoktober-2013/2013/#more-23277 Thanks to modelldoc for posting this link in the rumourmonger section. Regards, Andrew Edit: it says it's a reissue of the old Aer Lingus boxing, which had GE engines, but presumably it will have the PW engine sprue too - as far as I can tell Thai have only had PW and RR engines on their 330s?