
Search the Community
Showing results for tags 'Afghanistan'.
Found 19 results
-
Hi, All. Another kit and, gasp, it's another Warrior. This time the Meng version and it's a commission! One of the Lads wanted a Warrior model, as he used to Command one, so I made a deal that if he buys it I'll build it. He buys, I get the enjoyment of building it and I don't have to worry about finding room on the shelf afterwards. First things first, ALL HAIL THE CARPET MONSTER!!!!! Thence to some track bashing. They are individual links that come in pairs and have to be separated. Six join together and you sandwich into the clear contraption and force in the pins (on the combs looking sprues). I must confess I didn't find it as easy as some, but that could be me being cack-handed. After a couple of hours in front of the TV I managed to get a track and a half done. Tonight I started the main build. It falls together with minimal flash. One unusual thing - the PE is pre-cut so all you have to do is peel it off and glue it down. A couple of hours later and it is starting to look like a Warrior I obviously didn't wash the sprues well enough as one of the return rollers pinged off....and landed in the bin 😡. After emptying it out I eventually found it. That's when I decided to call it a night. Bill
-
This is my MIG-21 BIS in 1/48 from Eduard. Nothing special on the build. Happy modelling
-
These are my three favourite shots from my tour in 2010/2011. These are from Jan 2011. Hope you enjoy them. Coops
-
 Hi guys, not posted for a while, ive still been modelling but as i have recently had a baby, the man cave time has been cut considerably. I did however get this finished last year, and some of you may have seen it at telford in the competition area, but ive only just got round to taking pictures of it. A lot of time/effort/money went into it and took about 6 months from start to finish. Its 1.2 metres long by 30cm wide. Ive based it around a fictional story. Also to add that ive weathered the black hawk more since the pics were taken. Its set at some point in the last few years, the diorama depicts a blackhawk being recovered. It was hit by an RPG after carrying out an infiltrate mission in Afghanistan. The blast damaged the tail rotor, the pilot managed to land safely but it was in such a place that it couldnt be airlifted out. The tailfin/gearbox were beyond repair so was removed and dumped, and then the blackhawk was loaded onto the trailer. On the diorama it has just arrived at a US checkpoint on its way back to the airbase to be repaired, being escorted by an M1070 Light medium tactical vehicle (LMTV) Would be great to hear what you think.
- 15 replies
-
- 32
-

-
- m1070
- afghanistan
- (and 1 more)
-
Hi to all🙂 I need advice about diorama which i am planning. The plan is to put few Evolution Miniatures U.S.special forces in action (Afghanistan ~2003) 1/35, next to Academy's M1025? And i am concerning about M1025? Was it used in Afghanistan and if it was, do i need to make some modifications or i can go straight OB!? Thanks to all!
-
Hi everybody; here's my first completion of the year, but actually started back in June 2016. KIT: Airfix 1:72 BAe Harrier GR7A/9A ("new tool" type of kit) AIRFRAME: BAe Harrier GR9A, ZD433, as deployed in the Harrier detachment during "Operation Herrick", Afghanistan 2009 DECALS: from the kit; there's a little bit of silvering on a couple of them which really annoys me PAINTS: mainly Tamiya acrylics, with the addition of Model Master Metallizers for the exhaust hot and cold nozzles, and Lifecolor and Italeri Acrylics for detail painting Aftermarkets: - PAVLA cockpit set - PAVLA exhausts and intakes set - EDUARD PE cockpit zoom set (this one is actually for a AV8+, I only used a few items from it, like the HUD frame, rear view mirrors, canopy handles, canopy sills) Scratchbuilding: - Bottom Beacon light - AoA probe - Canopy detonation cord - Nose ARBS sensor and lens - Canopy boarding step - Bottom blade antennae - IP Coaming - Map holder - Engine breather vent, on the main intake starboard - Top vents, just aft of the cockpit - Main intake probes plus a few minor improvements to the ordnance, the LIDS fence etc Build thread: Edit: apologies! I totally forgot to thank everybody who followed my WIP thread, giving invaluable advice, knowledge and support throughout the whole build. I love BM! Thanks a lot, mates! Pictures (I tried using natural light - from a window - as much as possible, but I had to integrate with a LED lamp): A few details of the interiors: Any comments welcome. Ciao
- 53 replies
-
- 56
-
-
- Herrick
- Afghanistan
- (and 1 more)
-
British Army AH-64D "Afghanistan" 1:72 Academy The AH-64 Apache was developed from the US Army's Advanced Attack Helicopter programme in the early 1970s. This stemmed from The US Army need to fill its anti armour role, following the cancellation of the AH-65 Cheyenne programme. This was designed to find the replacement for the AH-1 Cobra. Hughes Helicopters developed their Model 77 which became the YAH-64. The YAH-64 first flew in 1977. It features a nose mounted sensor suite containing targeting sensors and night vision equipment. A 30mm chain gun was carried under the forward fuselage and stub wing pylons provided four hard points for carrying AGM-114 Hellfire missiles and unguided rocket pods. The helicopter was introduced into US Army service in 1986. The UK operate a form of the Apache license built by the then Westland Helicopters. This is designated the Apache AH.1. The first 8 were built in the US and the remaining 59 in the UK. in 1993 the UK Government had a competition to select a new attack helicopter for the Army. Bids were received from Eurocopter Tiger, Bell with a modernised AH-1 SuperCobra, the AH-64 Apache, the Boeing/Sikorsky RAH-66 Comanche, and the Agusta A129 Mangusta. The Apache was selected and contracts signed in 1995 for 67 Helicopters. Unlike American machines all UK Apaches would carry the Longbow radar. Also in typical UK fashion we would change many systems on the airframe and the engines. Rolls-Royce Turbomeca RTM322 engines would replace the GE units. These do give more power and allowed easier operations in Afghanistan than other helicopters. Primary armament of Hellfire missiles and the 30mm chain gun are the same, however the UK Apache carries the Canadian CRV7 rocket system instead of the US Hydra one. The Kit The kit contains the same base plastic as the new tool Hughes AH-64D Apache Block II kit I reviewed here last August. It was a given at the time that this version would be produced. The kit is produced to a fine standard, crisply moulded parts and no defects present anywhere. A great touch is the one part main rotor in the kit so you wont have the often problematic job of aligning the rotor blades to a main hub and stopping them from drooping down! The kit also features fine engraved panel lines, great detail throughout and slide moulded engine pods which are basically one piece. The kit differs from the US Apache kit by having a separate sprue containing the different UK only fittings. Construction starts with the main fuselage halves. Holes must be opened up for various parts to attach later on in the build. Once this is done construction can move onto the cockpit. Control columns are added to both cockpits, along with the main display panels. There appears to be a cyclic control only and no collective. The one part moulded seats can then be added. Coamings are then added to the front and rear panels. The next step is to make up the mount for the main rotor blades. Once this is done the completed cockpit assembly and rotor mount can be added into the fuselage and the halves closed up. Next on the list of jobs is to make up the wings for mounting the weapons systems. Once made up these are attached to the main fuselage along with the top cover for the engine area. A five part assembly each side is required each side for the front landing gear. Once made up these too can be added to the main fuselage. The next major step is to attach the fairings down both sides an underneath which house a lot of the electronics carried as well as the feed system for the 30mm canon. Once the underside part is on the 30mm canon itself can be added. The tail wheel is also added at this point. Rocket pods and/or hellfire missiles can be added to the weapons pylons next (though I suspect these will be left to last by most modellers). Next up are the engine pods. The engine fronts and heat shielding exhaust parts are added and then pods can be attached to the main fuselage. Following this the main sensor package can be assembled and attached to the front of the helo. Now that the man parts of the helo have been assembled it is time to add the myriad of aerials, sensors, handles etc that seem to festoon the exterior. The last steps in construction are to add the main and tail rotors. The main rotor is one part while the tail rotor is a more complicated four part affair. The last item to be added is the mast mounted radar system, though check your references as often this was not carried to save weight in a lower threat environment. Canopy The canopy is a one part one which is a shame you cant open it up and show of the cockpit more. It is clear and distortion free. Decals Markings on these helicopters tend to be sparse so Academy have provided the main basic markings, and serial numbers to do any of the UK Apaches. Decals are by Cartograf so should pose no issues. Conclusion This is thoroughly modern tooling of the UK Apache. Highly recommended. Review sample courtesy of UK Distributors for
- 3 replies
-
- 3
-
-
- ah-64d
- afghanistan
- (and 1 more)
-
Hey all I present my first fully completed project vehicle. This a 1/35 Revell BTR-70 I've had sitting on my for years windowsill for years as a three-tone GDR version. After a foray into respraying an old T-80 in Olive Green, and discovering it has a bang-on Soviet armour look, I decided to recolour my BTR. I then used some old decals from a Tamiya T-62 (I don't know how accurate the combination is), and put to use some old desert Mig Pigments in my first attempt to weather up some armour (my first successful attempt was a Y-Wing). I have some old Dragon Motor Rifle Troops as well, which need a bit of tidying up to go with it. The cardboard I have it resting on has me thinking of a simple dusty base for it, roughly the same size as the vehicle. The vehicle itself is missing the odd component. I think I have the parts somewhere but, couldn't be bothered to find them, lol. Going to add a tiny bit of stowage that I have that would suit a Russian vehicle, namely a single Jerry can that differs from the rest (I don't know what it was from originally), and maybe a sleeping roll or two and a folded tarp. Overall, I think it turned out quite well. I did worry that it looked a bit heavy at first, but it seems to have worked out Looking forward to any thoughts you guys have Gaz
- 10 replies
-
- 17
-
-
 Hi After what seems like ages, here's my attempt at an RAF Merlin, as used in Afghanistan....Plus a bonus pic of the Merlin with some of it's flying cousins. The Merlin is slightly untidy around the edges of the windows - always a part I struggle to get looking right. Hope you like! Cheers Rob.
- 15 replies
-
- 27
-
-
 Welcome to my corner of the Bastille for the Britmodeller French Fancy Group Build! This is basically the old Heller/Airfix SuE, with quite a few bits of resin (of which more later), non-coloured etched brass, and decals for a single aircraft (#17, 17 Flotille) at two points in its career: one from BAN Landivisiau in August 2010 in the customary two-greys scheme, and one from Kandahar during its tour in June-July 2008 in a single-grey colour. Unfortunately, this makes for a very expensive package for an older kit –even the desperate throat-cutters on eBay won’t drop one for much under UK£55, but I really, really love the wee beast, so I hope a breath of sea air (from Afghanistan, yes...) will be well received in our little sewing circle! Having a Neomega cockpit to hand already, I picked up an ExtraTech brass package to fizz the thing up a bit more, foolishly thinking it would be a straight scale-up of their 1/72 outfit. It isn’t –the funky intake covers are missing for a start. Never mind, onwards and downwards...
- 19 replies
-
- 4
-
-
- Heller
- Super Etendard
- (and 1 more)
-
 Good afternoon, I like to present my newest (and one of the longest - almost a whole year!) work: the well-known Airfix Harrier. It was not always fun to build, as I struggeled with some parts. Still, fitting was generally good. I added some small PE-Parts from Eduard, and changed the aux intake doors to show it on ground, with engine running. Colours are Xtracrylics Dark camo gray (which was a pain, as it almost didn't adhere to the airplane even though I used some primer), and Modelmaster DSG for the topside. The rest is almost plain vanilla, colour, then gloss varnish from Tamiya, decals, washing, semi-gloss finish, that's it. Hope you like it! Alex
- 15 replies
-
- 10
-
-
Hi, It has been a while since I've posted. I've now finished my AAC WAH-64 Longbow Apache AH Mk.1. It has been a slow build, but I managed to finish it. It's from Operation Herrick ca. 2006. I've scratched som UK specifik antennae, and a scoop?? on the right side of the nose. I've also remade the grips and the guards in front of the landing gear. I did some wire superdetailling on the Longbow unit and on the gun. For the HIDAS gear, rockets and the decals, I've used Isracasts conversion set. Cockpit is Aires resin cast. I managed to find a '4' in my spare decal box, and the serial is ZJ224, which I think is the one Ed Macy flew to Jugroom Fort ? It was painted with WEM Helo drab and toned down with MM helo drab. Afterwards, I made a thin dust wash, which doesn't really show through the dust powder. I wish the dust would have been more red, though. I wanted to show a dusty Apache, from Afghanistan. I hope you like it. I am just pleased to have finished it and can now move on to something other. Cheers,
-

Operation Herrick British Forces Vehicle Crew - 1:48 Airfix
Mike posted a topic in Diorama & Accessory
British Forces Vehicle Crew 1:48 Airfix Hot on the heels (I use that phrase far too much) of the Merlin, the Supacat Coyote/Jackal duo, and the Snatch Land Rovers/WMIK pair are another figure set to complement the Infantry Patrol set I reviewed October of last year here, comes the set that probably should have been released at the same time as the vehicles, to be fair. The set consists of eight figures, which arrive on one sprue in Airfix's slim end-opening figure box, and are moulded in a mid-brown coloured styrene, with chunky, flat-edged sprues. As with the initial set, the figures are very well moulded, complete with wires to their comms gear, microphones, MOLLE loops on their combat gear, and a couple of the newer L85 rifles with the newer forward handgrip and RIS rails for additional equipment. An Fn Minimi is also included, but this looks a little soft with overly thick butt-stock tubes. It does however come with moulded in box mag, and a separate tripod, but you'll have to add a carry-handle from bent wire if you feel the need. The stances of the eight figures vary markedly, with two standing and gesturing, one kneeling and one prone figure providing overwatch, one kneeling to work on a vehicle (possibly changing a tyre), two seated crew figures and one stood at a weapons station with his hands on the grips of some invisible machine-gun. The only work that will need doing other than removing the moulding seam is to add some undercut to the prominent chest pouches that are moulded on most of the figures, to give the appearance that they aren't simply projections from their chests. This is most prominent on the standing figures, but unavoidable when creating figures using injection moulding processes. As well as the figures and weapons, a small selection of tools are included, in the shape of a jack, wheel chocks, tyre iron, tool roll and fire extinguisher. The instructions show the build-up of each figure, which have separate heads, arms, with some having separate packs where moulding dictates. The seated crew figures are shown installed in the Jackal/Coyote cab, for which they are designed, although separate notes advise that shoe-horning them into the Land Rover variants will require some re-working of the figures. Of minor concern is that the instructions would have you install the headless and armless figures into the cab before adding the front of the vehicle. Whilst this may well be the best way to proceed, most methodical modellers would probably rather build up the figures in their entirety, filling joints and painting the figures in one fell swoop, but with some careful planning, this shouldn't be a major obstacle. There are no decals in the set, but a comprehensive painting guide shows which colours to use and where, as well as giving examples of the three types of camouflage cloth available to the British army - Desert DPM, European DPM and European MTP, the new Crye Multicam based camouflage that is being used to great effect in Afghanistan. Conclusion Another good set of figures for the proud owners of the Supacat sets, although it should be perfectly feasible to mix-and-match between vehicles, although as mentioned earlier, the drivers will need some coaxing to fit the smaller Land Rover based designs. As with all of these figure sets, I dearly wish that a sheet of camouflage decal was available to assist those such as myself that go into a cold sweat at the thought of having to paint any unform that is camouflaged. I'd even pay extra for this option! Highly recommended. Review sample courtesy of -
 SKIF T-54 Northern Alliance. When I decide to build a model it has to meet some criteria:- 1/ It must be an interesting subject to research and build. 2/ It must be an accurate and easy to assemble kit. 3/ It must cost around £12. Sometimes I have to relax rule 2 to comply with rule 3 This is one of those times! I bought this kit on Ebay after reading online reviews which were generally unflattering. Upon opening the kit I found that it came with an additional resin turret and hatches. I had intended this model to be a quick 'knock up' but ended up becoming quite involved in it. I am not really interested in absolute accuracy, preferring atmosphere and perhaps a little story telling. This shows an early stage of the build. Note the Trumpeter tracks I bought on Ebay (cheaply) as the kit tracks are really poor. They do not fit over the drive sprockets at all well. I had to cut parts off. As the build goes on the impact of this bothers me less and less. (Purists may not agree but each to his or her own!) The picture also shows attempts to improve the stowage boxes, the brass wire stowage hooks, the distressed tyres and missing wheel hub cover as well as the copper shim exhaust cover made by burnishing a piece of shim over the original. This shows the unsatisfactory track run over the drive sprocket and the representation of the rubber covered fabric material of the mudguards. These were made by cutting Plasticard with serated 'Superscissors'. The tow cable is a commercial item. The cable stowage is of a type seen in the 'Topshots' T-55 walkaround book. It may be correct for certain versions of the T54/55. I don't know and don't really care. The lighting conduits are from plastic rod. The fuel tanks come with the top surface detail raised instead of engraved. The detail was removed and engraved with my famous 55 year old Xacto No1 knife. A nightmare, but worth it in the end. The scratchbuilt cable stowage and fuel pipes (plastic tube and electrical wire) The story so far
 -
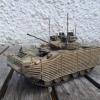
US Anti-IED Devices & Antennae 1:35 ET Model Due to the conditions in Afghanistan and Iraq, US vehicles have had to be retro-fitted with a group of sensors that are designed to counter IEDs that are triggered remotely either by RF frequencies, or even mobile phone signals. These are mounted on vehicles on booms held out in front, or antennas mounted on a high-point such as the roof or top of the turret. This set includes a full complement of the various types and should be sufficient to upgrade a complete vehicle or more if spread about. The parts arrive in ET Model's usual thick gauge polythene bag, and inside are two frets of Photo-Etch (PE) brass, plus a bag containing three more bags with 12 resin parts spread between them, a length of copper chain and two tiny springs. Construction of the antennae is relatively involved, and uses both brass and resin parts to complete most assemblies. A large panel antenna with a short mounting bracket is built up first, and here you will need a little 0.5mm rod to mount a small cylindrical sensor on top. You will also need some thin wire, of approximately 0.3mm diameter, more of which will be needed later. The "flag" style antenna that is often seen on booms at the front of a HUMVEE is next, and this is constructed almost entirely of PE parts, needing some careful and accurate folding of the parts, especially the beam that anchors it to the front of the vehicle. All of the bend lines are pre-etched to make the task easier, but care will be the order of the day. Two vertical pole antennae are supplied as resin parts with PE mounts, and here you will need one of the springs to simulate the flexible mounting base, and you should back that up with a piece of brass rod up the centre, drilled into the base of the resin. This is shown in the instructions, with a hand symbol next to it, which translates to "make it yourself", which made me chuckle. There is a spare pole included, which I guess is just in case you manage to snap one? Another long antenna is made up mostly from an 8cm length of rod that you must supply yourself, top and tailed with resin parts, mounted on a spring, and then on a small PE bracket. The third antenna is a thicker type, with a separate resin base and cylindrical resin top. This also has a PE base, which is the same part as used on the two others. The last antenna is reminiscent of an old TV aerial, having a central rod of 0.3mm (which you must source yourself) that has six dipoles along its length, the rear two at 45o to the forward four. It is backed by an umbrella shaped rear, and sits on a small tripod. This section will also require some lengths of 1mm diameter rod, so make sure you have some available. A "black box" control unit is also built up from PE, and linked to the antenna by some more wire that you must source yourself. Conclusion A very nicely done set, but there are lots of bits that you need to supply yourself, so be prepared. You could argue that these should have been supplied, but that would have only increased the price, and as these items are readily available elsewhere, it's little hardship, particularly if you're like me and have scratch building "stuff" on hand at all times. The small piece of copper chain isn't mentioned at all in the instructions, so either look upon it as a bonus for another project, or check your references to see if it is sometimes used in anti-IED setups. Highly recommended. Available soon from White Ensign Models in the UK Review Sample courtesy of
-
British Forces Infantry Patrol 1:48 Airfix A set of 1:48 figures from Airfix is a nice surprise, especially when they are modern British Army, another rarity in injection styrene. This set is an accompaniment to the Operation Herrick series that is being released by Airfix to include the WMIK & Snatch Land Rovers, Lynx and the forthcoming Merlin helicopters, as well as a couple of nifty resin buildings to complete the diorama potential. The set includes eight figures in various poses, and on opening the end of the standard figure sized box, you are confronted with an unusual looking sprue with flat edges reminiscent of the "olden days". The parts aren't at all retro in their moulding though, and are well sculpted, with a good portrayal of the Osprey body armour used by the Army, including MOLLE loops for attaching pouches to the front, sides and rear of the vest. The Mk.6 kevlar helmet is similarly well moulded, and a number of the figures have knee pads that are often worn in-theatre these days. One chap is sporting only the one as is sometimes the case, to protect the favoured kneeling knee, whilst sparing the other from the chaffing of the straps of non-integrated pads. Radios, pouches and backpacks are similarly well done, and of course the ubiquitous L98A-2, sporting the newer RIS railed handguard and foregrip, with two of the older type with smooth handgrip. A pair of LSW (Light Support Weapon) machine guns complete the weapons supply, and one is usually carried by a member of a patrol for support of the squad. From the box, you can build five walking soldiers, and three crouching, one of whom has a hand raised in the "stop" signal to the rest of the troop. Construction is straightforward, with separate arms, heads and appropriate legs where moulding dictates. Backpacks and weapons are also separate parts, allowing some degree of customisation if you wish. Each soldier is supplied with oval base, which is probably supplied for the younger modeller to play with after construction. There are no decals in the set, but the full-colour painting diagram gives all of the colours necessary to paint the camouflage uniforms, including samples of Desert DPM, which is being phased out in favour of the newer Multicam based European MTP pattern. A sample of the traditional European DPM is also given if you plan on painting your troop in service outside the desert environment. Conclusion Moulding is good, as is the sculpting of the figures, so don't be put off by the chunky sprues. This is every inch a modern set, and with careful painting should really look the part. Painting the camo pattern convincingly will be the hardest part to tackle, and if some enterprising decal manufacturer were to provide some sheets of the various patterns, similar to the ones sometimes found in Trumpeter figure sets, I'm sure the job would be made easier. Full marks to Airfix for providing us with this set. A set to crew a Merlin, including sitting soldiers, medics etc. would make a good addition, as would standing soldiers about to board or just disembarked from a Merlin or Chinook. Highly recommended. Review sample courtesy of
-
Middle Easterners 1:35 Meng Models Following on from their highly successful and high quality Pick-up Trucks, Meng have released this set of rather handy and topics figures dressed in typical middle-eastern clothing. The set contains four very well sculpted figures, all of which are in multiple parts to improve detail and facilitate moulding, including: Man standing and leaning against "something". Wearing a jacket and knitted hat and sporting a beard Female youth/child carrying a bag of produce on her head with a long smock dress and open-heeled shoes Woman in long robes and sandals with her lower face and hair covered Boy in open jacket and sandals Moulding is first-rate, especially for a company's first figure set, and a slide-mould has been used to give the woman figure a realistic overhanging hem to her long robes. The facial sculpting is excellent, and the female faces look distinctly female, while the males have a middle-eastern look without being caricatures of the region's people. Both male figures have separate legs to enable moulding of the creases in their trousers to go fully around the leg, and the women have separate feet that glue to the recessed bottom of their dresses. A painting guide is included on the construction diagram on the back of the box, with call-outs in Gunze Sangyo colour codes. A list of paint colours without reference codes is given on the side of the box, but in reality the world is your oyster. Check your references for the colours typically worn, and don't forget that sometimes dust and dirt makes its way onto people's clothes no matter how they try to stay clean. Conclusion Given the military activity in the Middle East during the last decade, these figures are both topical and useful in any diorama or vignette. They are well sculped, and with careful construction and painting should look very well, especially in conjunction with one of the Pick-Up Trucks I mentioned earlier. A little filling of joints will be necessary, but that's standard fare with figure construction. Highly recommended. Review sample courtesy of
-
WMIK Land Rover & Snatch Land Rover 1:48 Airfix The WMIK is militarised Land Rover, and has been in service with the British Army for what seems like forever in various guises. The WMIK moniker actually refers to the Weapons Mount Installation Kit, which gives the basic chassis teeth, and widens its use in combat situations. It has seen service in Iraq and Afghanistan, where it has been criticised for lacking crew protection, which is perhaps a little unfair, as it was never designed to be used in an IED environment. The Snatch Land Rover is again based on the civilian Defender 110 with a light armour kit installed (VPK), which was originally designed for operations in Northern Ireland, where it got the nickname from being used in operations to take suspects into custody. The nickname stuck, and even found its way into official references to the vehicle, relegating the official designation of Truck Utility Medium (TUM) redundant. Military Land Rovers have been somewhat neglected in the modelling world, with only a small number of kits in any scale. These new kits from Airfix in 1:48 are designed to compliment their growing range of modern helicopter kits in that scale, giving modellers plenty of scope for Iraq or Afghanistan themed dioramas. They are also a welcome boost to the 1:48 armour range, which tends to concentrate on the more familiar subjects of WWII. The kit arrives in a long top opening box in Airfix red, and inside are four sprues of grey styrene, a clear sprue, a set of decals, and a 20 page instruction and painting booklet. All of the sprues except the clear sprue are bagged together, while the decals are loose in the box, and the first thing that strikes you on opening it is that there are quite a lot of parts for these two small (in this scale) kits. Detail seems good, although the backsides of some parts look a little agricultural, but that's probably because they won't be seen once the build is complete. Construction is broken down by vehicle, with the Snatch first to be built. A basic engine is included, but it's a little chunky in places, with the more detailed top section added later, presumably for clearance of the wing portions. A little careful painting and detailing work would be needed if you're planning on posing the bonnet/hood open. The engine fixes to the one-piece ladder chassis, and the running gear is built up onto that, starting with axles and suspension, drive-shafts and anti-roll bars. Detail here is quite nice for the scale, and includes some nicely moulded, if a little chunky, coil springs on each corner. The wheels are installed next, and have a separate inner hub, with a key moulded in to ensure correct orientation. The seam is relegated to the inner face of the tyre, and the attachment of the axle is also keyed, which takes all the work out of aligning the slight flat on the tyres with the ground. The tread on the tyres is well done for the scale, although a more accurate block pattern is sure to be forthcoming from the aftermarket providers. They should be suitable for most people's tastes out of the box however, and once weathered it's moot whether the detail will be seen anyway. The floor pan is next, with the fuel tank and towing hitch added to the underside. The interior floor has moulded in ribbing which is nicely done, and a few ejector pin marks are confined to the raised "arch" area, which receives a quartet of crew seats later in the build to hide them. In the forward part of the floor, the driver's hand-brake is installed and his pedal box fixed to the forward bulkhead along with the dashboard, which also has a decal for the instrument panel. Of course, it's all right-hand driver, as this is Her Majesty's Armed Forces! The front bulkhead has the windscreen and a raised cable-cutter moulded in, which will be very easy to knock off during construction, so take care here. The gear-stick, stowage bin and crew seats are installed next, with the seats able to be positioned anywhere along their installation slots to give the impression of different driver and passenger heights/driving positions. The bulkhead between forward and aft compartments is festooned with equipment/stowage, and will need a little fettling to remove the flash that is present on the finer parts. The rear crew seats affix over the aforementioned ejector pin marks, and a roll-over hoop is glued to the rear of the vehicle floor. The outer body consists of a number of slabs, broken down in a similar way to the real thing. The sides include the curved transition to the roof panel, which is installed at the same time, and extends to cover the driver's cab. A large ventilation panel (I hesitate to say sun-roof) installs next, and can be left loose to slide back and forth to add a little visual interest. This can be replaced by an armoured glass "emplacement", although this isn't entirely clear until later in the build. The thick rear panels install to the bodywork leaving space for the doors to be added later, and a few additional parts are added to complete the main build of the rear body. Attention then turns to the engine compartment with the installation of the wings, which are each provided with separate arch extensions, while the starboard part also has the various fluid containers added. Only after the wings are attached is the top portion of the engine installed, and here detail is better than the cylinder block itself, which is good because of its prominent position. The grille is made up from two parts, with the radiator at the rear, and lights added later in the build. The bonnet/hood attaches to the engine compartment by two lugs that allow it to be posed open or closed, with a stay included for just such purposes. An optional deep water wading snorkel can be attached to the starboard wing, or the opening blocked with a cover part that is also supplied. The windscreen is made up from one clear part, so will need to be installed before painting to ensure continuous cover of the moulded in framing. A set of windscreen wipers is supplied, and a fold-down clear part is supplied for the windscreen protector, which can be posed in either position, and has mesh decals that can be applied later. Moving back to the rear of the vehicle, the light clusters are done in an interesting way, which should prove effective. The lights are moulded into the body, and should be painted before installation of the hollow glazing parts, which should give a good impression of the real thing. The armoured glass rear panels fit into the cut-outs in the rear panel, and the two heavy doors can be fitted open or closed by using different parts that have suitably positioned hinges. The side doors are done in the same way, having different parts fitted if the doors are to be open. Headlights, spare tyre, wing mirrors and sensor fit finished the build, although a Gimpy light machine gun can be posed on the open roof emplacement. Painting and decal instruction follow straight after the pages dealing with construction, giving a general sand-coloured vehicle with optional "greater than" Allied markings, and a host of wire-mesh decals for the windows, light clusters etc. These will only be effective if applied to a perfect gloss finish, as any silvering will ruin the effect, so take care at this stage. The WMIK is a different beast altogether, although a lot of the chassis parts are identical and the build follows a similar pattern until the crew compartment floor is added. Instead of ribbed steel, it has an armoured base, bolted to the original panels for crew protection. Another angled armour panel affixes to the underside of the chassis, directing blast away from the interior in the event of an IED strike. The cab is first up with this build, with a more cluttered look to both the dashboard and the interior. The front bulkhead has no windscreen, but does have a pair of wing mirrors built in, which again would be easy to knock off. The majority of the upper bodywork is made up from tube steel, and doors are foregone in favour of a cross-brace of steel that is low enough to leap over. The rear compartment has cut-down sides topped with more steel-work, with a pair of tubular all-terrain seats for the gunners/crew and a pair of steps to the rear that can be used as additional crew seats. On top of the steel-work sits the turret ring, to which more support is added fore and aft, with the driver/co-driver seat brackets added to the front ready for the two contoured seats to be installed. The steering wheel, crew weapons and front roll-bar are then added, with the same wing and engine installation as the Snatch. The sides of the main crew compartment are optionally covered with an armoured panel, as is the driver's position from above. The bonnet attaches in the same way as before, and then the ring mounted .50cal crew-served weapon attaches to the turret ring. Additional equipment and sensors/aerials affix to the wings, and a pair of armoured cut-down doors cover the front doors, with a pintle-mounted Gimpy overhanging the co-driver's door. On the driver's side the wading snorkel is attached, and the spare wheel is mounted on the port side, along with some PSP planking for un-ditching the vehicle if it gets stuck in the desert. To the rear is an optional clear window, presumably to cut down on wind buffeting, and a large open stowage bin, which presumably hinges to admit the crew. Painting and decaling is ostensively the same as the Snatch, with just the addition of a sky blue call-out for the Gimpy's ammo box. Decals are in good register, have good colour density and appear to be nicely printed. There is no printer's name on the sheet, but it looks typical of Cartograf quality. Conclusion A nice pair of vehicles to pose with the forthcoming Merlin kit in the same scale, but some aspects have been moulded quite chunky through necessity of the moulding process and will benefit from replacing. A couple of crew figures would have been nice, as the new Infantry Patrol set that accompanies these kits doesn't have any suitable figures to fit the job. These vehicles, especially the Snatch, are often decked out with Barracuda camo material, which has a 3D look to it, which always reminds this modeller of Pringles scattered on a sheet. This isn't included with the kit, but it shouldn't be long before an enterprising aftermarket provider creates either resin replacement panels, or a sheet that does the job. Recommended. Review sample courtesy of
-
 General News We have just received the much anticipated 1:48th scale Modern British sets from Airfix. We have a large number of backorders for these and we will try and dispatch all pre-orders on monday. Although we currently have good stocks we recommend ordering early to avoid missing out. We have received deliveries from Revell, Airfix, Kinetic and Deluxe this week and are expecting restocks from Vallejo, Gluelines and Masterbox next week. Below are the new arrivals from this week. AIR50121 Airfix Gift Set 1:48 - British Forces - Landrover Patrol SRP - £24.99 Received - 28-Sept-2012 AIR50122 Airfix Gift Set 1:48 - British Forces - Helicopter Support Group SRP - £39.99 Received - 28-Sept-2012 AIR50123 Airfix Gift Set 1:48 - British Forces - Patrol and Support Group SRP - £49.99 Received - 28-Sept-2012 AIR03701 Airfix 1:48 - British Patrol Troops (Afghanistan) SRP - £9.99 Received - 28-Sept-2012 AIR75009 Airfix 1:48 - Afghan Single Story Dwelling SRP - £14.99 Received - 28-Sept-2012 AIR75010 Airfix 1:48 - Afghan Single Story House SRP - £29.99 Received - 28-Sept-2012


