Search the Community
Showing results for tags 'AIrfix'.
-
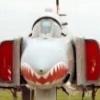
 Here's my F.3 (Mk IIIF?) kit from Airfix: It's arrived! by Ced Bufton, on Flickr Not much detail on this aircraft (that I can find). Sprue shots: and the V1: Parts by Ced Bufton, on Flickr
 -
 Hello to everyone! This is my first attempt at this so forgive me of any mistakes. As a very keen modeller through the late 60’s all the 70’s the one kit I always lusted after but could never afford (or do justice to) was the 1/24th Harrier. An older friend bought one as soon as it was released. He kept getting the box out, looking at the massive sprues and it and put it away again, for years we all kept asking where the Harrier was. That friend unfortunately died a good while ago so in some way this build is to the happy memories of Dave Rodgers. After starting modelling seriously again 3 years ago, I decided that it was time to have a bash and tackle the monster - thanks to a sale on Amazon I picked up the newly boxed GR3 for £36. Even though I enjoy using resin and photo-etch we sometimes seem to be heading toward a world where you needn’t worry about painting skills when you can stick in self adhesive pre-painted details. I remember when building flying models in the 70’s ARTF (Almost Ready to Fly) appeared, buy Saturday - fly Sunday; I railed against that a little too, I’ve always been a builder. My concessions to the modern era are cyano glue and acrylics. I always use Mek as a plastic solvent which costs around £10 for a litre. I buy Isopropanol for around £12 per gallon from Amazon. A great Acrylic thinner is 50% Isopropanol and 50% winter car windscreen wash. Anyroad, the kit still is a cracker and is a superb representation of the early tin-wing Harriers. Anyone who looks closely at a preserved GR1 or GR3 will see Airfix got the surface textures and details spot on. In places the early harriers look almost ‘boilerplate’ in construction. The kits surface detail is one thing - interior detail is another, it’s virtually absent. The design and engineering is typical of the era - even having the novelty folding undercarriage and closing doors etc. I decided to avoid resin and etch and built the whole thing in a true 70’s scratch build style. I haven’t had this much fun in years. Please respect copyright of my photographs. Starting the build. I attacked the cockpit tub first (as tradition dictates) .5mm card was used for the raised riveted plates using the Trumpeter riveting tool to detail. I built some switch panels from plasticard with thin slivers bonded upright to represent toggle switches. I dug out as many reference images as I could but the bulk of the ejector seat obscured much of the view; therefore a little artistic licence was used to give the impression of a busy cockpit. Most of the detail is added from plasticard scraps and stretched sprue. Different thicknesses of solder are always good for detailing. After a few coats of paint, glossing and washing the cockpit tub looks suitably grimy! The decals supplied work very well on the instrument panel and are large enough to cut out individually to fit, I use a set of cheap hole punches. I painted the back of the clear moulded radar/moving map screen then the HUD frame was built from fine brass wire. Shadows were airbrushed in to increase the impression of depth when the cockpit was closed up. At the same time I added detail to the sidewalls using tube, solder, fuse wire and plasticard, I cheated a little and got some ideas for the detail from resin examples I saw for sale at the Huddersfield show… The Seat The kit seat is virtually blank and needs a complete replacement/rebuild especially when everyone peers into the huge cockpit of a 1/24th scale model. To ensure a clean fit in the tub I used the measurements of the kit seat to build one from scratch - only the kit headrest was used. Canopy cutters were added to this and the parachute with its straps and cables were added to form the headbox. The parachute and straps are lead foil. The seat itself was a simple construct of 1mm card with details added from scrap plastic and .5mm brass wire and seat cushions carved polystyrene foam, dipped in PVA to seal the surface before painting. The seat straps and canvas cover are lead foil again. All the separate elements were built, painted and weathered before final assembly. You know, those headbox height adjust bars (red at the moment) are scraps left over from an Aurora biplane model from the late 60's... The straps and canvas cover are all made from lead foil, I found scraps of Eduard etch left over from a Chieftain MK5 build that worked very well for buckles etc. The supplied Airfix decals finish it off very nicely. A quick dry brushing with grey and a coat of matt varnish and it's ready for the straps fitting. My first plan was to build as originally intended and have the whole wing removable to view the engine; however as the build progressed it became obvious that I wouldn’t be able to get a clean fit without large gaps. I did away with this original feature enabling a much more solid build and elimination all those awkward wing joints. a pity though as I'd spent over a week detailing and painting the Pegasus, based on one displayed at Cosford. The Airfix Harrier is big, very big so to avoid damage during construction I replaced all the blade aerials with .5mm brass sheet glued firmly into slots cut deep into the plastic. The slots were filled with thick cyano and sanded, I'm determined to use this method for future builds (of all scales). Bits & Bobs The undercarriage wells on Harriers are quite large voids within the fuselage. In 1974 it was more important for Airfix to compete with other manufacturers and add moving components. Of course moulding technology has moved on in huge leaps since then but the 1/24th Harrier was seen as a wonder in it's day. The wells are nothing more than empty plastic boxes in the kit; I couldn't source any clear images of the inside of these areas so I used my 'Artistic Licence' (mine came from Woolworths for 2/6d) to detail the voids. Only the nosewheel bay is clear on a few internet images I found. It wasn't too difficult to drill plasticard and cut into strips after marking the plastic with a riveting tool and then drilling every second hole with a drill made from a 1mm Hypo Needle. A drill made from a hollow needle gives a very clean cut, I grind the end down to a 30 degree (ish) angle on wet and dry paper. The pressure vessels are 1/72 torpedo bodies from a Nimrod. These areas are well weathered to depict a harrier flown from rough ground. The kit mainwheel well has detail on the backside (in the engine bay) so I invented appropriate looking ribbing, boxes and tubing (I only bought the cheap Artistic License) this was then painted and weathered. It was at this point, when the fuselage was starting to fill up that I could test fit the wing assembly and decided to fix the wing in place. I cut out one access panel to show some engine detail as can be seen on the finished model. All the various vents and intakes on the fuselage were cut out and backed with foil from an old electric razor - the fine mesh was ideal. The nose camera had a similar treatment, a lens was made from scrap sprue, mounted on a bracket in the hole and then blocked with foam until painting was finished. The window was afterwards formed from ‘Clearfix’. The kit vinyl tyres look very realistic after a rub down with wet 800 grade paper, turning them a very accurate dark grey. The undercarriage legs are fairly well detailed, the nose wheel benefits from a small bracket for the lamp, some electrical cabling and hydraulic tubes. These were well weathered to represent the dirt kicked up from rough ground and oil leakage. The fit of the huge fuselage halves proved to be excellent, the little filling necessary required my favourite slurry of cyano and talc. I found that a 1mm hypodermic needle was the same diameter as the Airfix rivets and was used to recreate those lost. I cut square and sharpened a short length of hypo tube and glued it into a paintbrush handle. After drawing lines for the missing rivets this improvised tool was ideal for re-cutting the missing detail, initially easy to do, after completing a few hundred the novelty wears a bit thin. The wingtip ‘puffers’ are not really represented and need cutting out and boxing in before detailing, The same applies to the auxiliaries surrounding the main intakes, these are lightly sprung and drop under gravity on harriers at rest. I cut out the engraved panel lines and constructed a long square tube from 1mm card, cut unto short lengths and bonded in they could easily be sanded flush and filled to neaten the finish. The .5mm plasticard flaps themselves were cut to fit and glued in at appropriate angles. Onto the canopy, this is a very thin and crystal clear moulding, the windshield only lacks the wiper which is easily build from brass wire and a sliver of card for the blade. I traced the outline of the detonation cord on a scrap of balsa and pushed pins where the cord bends, it was relatively easy to wind solder around this and then rest it inside the canopy. Using Pledge floor wax I glued the solder in place. I cut 1mm strips of white decal paper to lay on the inside to form the sealant band and dipped the whole thing in Pledge and covered it to dry for a few days. The canopy was them masked, painted and put away for a few months until needed. The fit of the sealant looks uneven because it's on the inside of the canopy! after masking and painting the camouflage it looks very real. The windshield was masked the wiper added and the whole assembly glued in place with pva, it fits perfectly and needed no other work. The most awkward job proved to be the hot and cold nozzles, the kit ones have a joint in the worst place possible and are smooth all over. The real ones have riveted vanes inside and ribbed plates on the outside (strengthening I assume) these were made from .5mm card, bonded with Mek and then wet sanded to blend them in. These took A LOT of filling, smoothing and fiddling to get them looking something like. I painted them with Tamiya Aluminium, fading into Titanium at the hot end and then thin coats of Tamiya Clear Orange for heat staining. The saving grace is that the moulded exhaust halves are very thin and very nicely contoured. The underwing stores needed some extra detailing, mostly small plates and panels, the pylons however are blank, I made beer can tin templates for the panel lines needing scribing, as eight sides needed detailing this was the best method to achieve consistency. The cut-outs for sway braces were there but I needed to add the braces themselves from 2mm square pieces of plasticard drilled to accept short lengths of .5mm brass wire. As with all the other bits, the pylons, rocket launches, fuel tanks and Aden gun packs were painted, decaled, weathered and put away for use. By now I had a box crammed full of sub assemblies, moving to major works on the airframe was a relief! The overall shape is very good and considering the Harrier is one of those aircraft without a straight line anywhere the Airfix surveyors & drawing office did an amazing job in 73/74. The contours are very well captured and the fit of the fin is so good only a line of thin cyano is needed to hide the joint. The final hurdle, painting the beast. I used a cheap black aerosol car undercoat for the fuselage (it looked great all black!) all the seams were checked and luckily only a few needed filling. On a large scale model I prefer a dark undercoat as I paint the topcoats using a very thin mix and spray at low pressure. In this way I can work closely painting each panel from the centre outward. I find this gives me much better control over a weathered finish and avoids the toy like look of weathering that is even and precise all over. The mixture (mostly Tamiya and Vallejo acrylics) were thinned 50/50. Tamiya thins well with my invented mix mentioned earlier. Vallejo needs water to thin it (or their own thinner). I think Vallejo paint has Polyurethane in the mix and Isopropanol thinners create an instant jelly monster in your airbrush that needs Professor Quatermas to remove it successfully. The paint applied in this manner on a dark ground will look alarmingly patchy, it is also quite fragile. The magic happens with a coat of Pledge floor wax (known as 'Klear' in the colonies). One coat immediately blends the colours and darkens the paint to look like the colours on the tin. It also toughens the finish. Another 3 coats and a polish with a clean dry j-cloth and the monster was ready for decaling! Incidentally, most of the painting on this model was completed with a cheap £25 Chinese airbrush (cheap but beautifully made, sprays anything and is easy to clean). My Badger Renegade Velocity has never lived up to it's macho name and has been completely rebuilt twice in twelve months and was out of action for the third time during this build. I'm afraid the airbrush body is made from a hard anodised but VERY soft brass and the needle mechanism was so badly made Badger themselves described it as 'pants' and sent a replacement. The engineering and build quality is worse than the Chinese £25 special; I'll never buy Badger again... The Airfix Cartograph printed decals are superb, dense, thin and in perfect register. They settled onto every contour and panel line to perfection. Two more coats of Pledge on top and the whole was put away for a week to harden. I weathered and highlighted the panel lines and rivets with Flory Models 'Dark Dirt' wash, this is an absolute pleasure to use and is one of the very few recent products that are genuinely innovative and make finishing simpler. After drying, excess wash was wiped away with a new damped J-Cloth & cotton buds dealt with the tight corners. All those sub assemblies were now added with 5 minute epoxy, cyano and PVA for the canopy before a final post shading with Tamiya smoke thinned with 75% pure Isopropanol. After everything set the whole monster had a couple of coats Windsor and Newton matt varnish, this needs a few days to cure properly but is very matt and very tough. The post shading, dirtying process, paint chips were all completed after decaling. Some of the decals were weathered slightly around the edges to depict paint wear. The dark aircraft grey is a self mix and has a little blue added, if you look at period Harrier images, you will find mixtures of both hard and soft edge camouflage schemes, I like the look of soft demarcation and went for that. I have an old publication from 1982 'The RAF in Colour', there are hard and soft edged camo aircraft from the same squadron in the book! The decals needed only a little softening with dilute acetic acid to settle them onto the Pledge glossed paintwork. And there it is, after 39 years and 7 months I finally built and finished the big harrier. I've always been fascinated by the Harrier it was one of the first aircraft I can remember seeing that seemed to have an 'organic' look to it, no straight lines. Those huge intakes and the pilot seemingly sat in a 'pod' in front of the aircraft had a real 'science fiction' appeal to a youngster brought up on Gerry Anderson programmes. Airfix caught the 'hunkered down' look of the early Harrier to perfection. Oh yes, and all the wheels stood on the ground together when finished. The build was aided by, Radio 3, 4, 4 extra, BBC6 Music, Stuart Maconie's Freak Zone, Amon Duul II, Hawkwind, Faust, Can, Black Sabbath, Falkenbach, Van der Graaf Generator and far too many other unremarkable heroes to mention. The whole experience was an absolute joy and will always rank as a favourite build, it’s also the first model of mine in 40 years to be on a stand!
- 57 replies
-
- 49
-

-
Quick Build Typhoon, Spitfire & Bf.109 Kits Airfix A kit without a scale? What is the world coming to? I'll throw a guesstimate of around 1:60 for the Typhoon and 1:40 for the others, but that's a totally off the cuff figure, and I'll not be held to it in a court of law. These kits aren't quite kits in the sense that a serious (I use that word advisedly) modeller would build, but they're a fantastic way of getting youngsters interested in our hobby. They mix the shape of a proper aircraft with the ease of build of a lego kit, whilst ending up with something that is robust enough to stand up to hours of play, numerous dismantlings and reconstructions, and probably the occasional crash-landing. So where do they stand in our hobby? By the till appealing to the children as daddy makes a purchase of his latest must-have loft insulation. They're cheap for what they are (£9.99 RRP), and they are quite straight forward to make up, with a recommendation for ages 5+ on the front of the box. The boxes are made of very thin card, and aren't intended to be kept for storage, but they do have a built-in hook for the shopkeeper to hang them on one of those rotating display bases, or a peg-board. Inside the box is a bag of parts, an instruction sheet in full colour, and a sheet of stickers. Stickers in the self-adhesive sense, not our sometimes self-deprecating humorous references to water-slide decals. Opening the bag will probably result in spillage, so keep it over the table when you do. The external parts are all smooth, unlike traditional lego kits, but they are built around a core of flat bricks of varying sizes, which allows the builder to construct a pretty good likeness of the chosen subject. The bricks are made of similar plastic to lego, and the inner bricks have a logo comprising of a pair of interlocked Hs, which may tell some of you where they come from. I did a quick Google and came up with nothing. The exterior parts are self-coloured, so your Typhoon is predominantly a creditably shade of Barley Grey, and the internal parts are bright red. The cockpit glazing part is a translucent smoky black, but of course there's nothing to see inside anyway. You can't have your ha'penny and the bun! The two camouflaged aircraft have their parts broken down along the breaks in their colouring, with Sky undersides on the Spit and Hellblau on the 109. The uppers of the Spit are green/brown, as is the underside of the nose and lower fuselage, with overhangs in camo under the wing edges. The 109 is green/grey on the upper wings and fuselage, with a stepped demarcation on the fuselage sides. Of course a 109 wouldn't be a 109 without a yellow nose, which is provided complete with nicely moulded nose guns and exhaust stacks. The props are held in with a small circular red brick, which was sadly absent on the Spitfire, so was temporarily bodged with a piece of Blu-tak. I can foresee these being lost very easily, as they are quite small, so expect to see lots of Quickbuild 109s and Spitfires without their props down the line. If you're able to grab them first however, you might try some epoxy or another suitable glue to permanently attach the props to their red end-caps. The Typhoon and 109 include some removable drop-tanks that clip to the underside via friction fit pegs that slide into corresponding large circular attachment points. If you opt to use the stands that are provided however, you'll need to remove the 109's drop tank, and the centreline tank from the Typhoon. The Spit is unencumbered, so the three-part stand, which is moulded in the same smoke plastic as the canopy, fits straight into a hole on the underside of the aircraft. Markings Stickers! The Typhoon's markings are 19 squadron, serialled ZJ928, with low-viz roundels and fin flashes. These are a bit grainy, but I doubt any child would care. The Spit is serialled P7350 wearing the EB-G codes, and the roundels are very nicely done. Lower wing roundels are conspicuous by their absence though, although I doubt anyone will care. The 109 has a set of Hakenkreuz, but no Swastika, and a number 12 for the side of the fuselage. If the intended recipient of the kit plans on dismantling them, it would be sensible to cut the stickers along the lines of the parts, although I suspect that the wing parts will benefit from being held together by the stickers, as I think there may be a tendency for the parts to spring apart over time. That should improve with use and as the newness wears off though. Some of the corners of the clear backing film are also not quite cut through, so they may need a little extra work, and if you want to be sure they don't get ruined, perhaps an adult's help will be useful here. Conclusion A great introduction to building your own aircraft models with as few corners cut in terms of detail as is practical. Exhaust stubs, panel lines and guns are all there, but moulded in to keep the builder from getting frustrated, or parts getting lost, eaten or worse. The only small parts that might get popped in the mouth are the prop retaining pieces, which again suggests that gluing them in place before construction/play begins might be a good idea. Other kits are available in the range with an F-22, a BAe Hawk and Apache Longbow helicopter in the initial range. If these are as good as the ones reviewed here, there should be plenty of those sold too. There are a couple of sink marks here and there, but nothing that will trouble a child, and their robustness is good due to the flexibility inherent in this type of plastic. I think they're a great idea, and have been well executed. Here's hoping that they become many a child's first memory of building an aircraft. Very highly recommended for the youngsters of 5 years old and above. Review sample courtesy of
-
 ....... Just had a strange thought!! The last few Airfix announcements have been on a Friday and roughly two weeks apart. So it's been two weeks since we heard about the B-17 and Bomber Respply set and two weeks before that when he heard about the new 1/48 Meteor F.8 ...so... Should we be expecting a new Airfix release announcement today?? Cheers.. Dave.
 -
Hello guys... The following pictures of my latest model ... I must say a special thank to Fritag, for inspiring me and for very valid tips ... ciao....
- 37 replies
-
- 22
-
-
Hi, This one is a favourite of mine - the Mitsubishi Zero. I love the shape, the colour, the canopy and it was an excellent aeroplane. This is the starter set (to build up my paint stash cheaply) and will be built OOB. Any hints and tips would be greatly appreciated The engine cover panel lines didn't match those on the instructions, so I rescribed: Best wishes Danyel
-
Hi all, I thought I'd share a build I completed a while back for a colleague at work who was leaving. I did intend on doing it wheels down but thought the inflight approach would make a better display item. I found the basic kit from Airfix easy enough to throw together, I had real issues with the finish however, this was kit number 2, the first took a mk2 flight against the wall after attempt number 3 at a gloss enamel finish failed. Finally got to a reasonable finish with acrylics and future. I noticed one of the long side decals was on squint a bit too late Bonus points if you can name the location in the frame/ base -Stuart.
-
I've just finished my latest model of a P-51D of the 359th FG. I have seen hardly any 1/72 (or any scale for that matter) depictions of Ray S. Wetmore's "Daddy's Girl" Mustang, depite being the aircraft of the leading ace of the 359th FG, as well as one of the highest scoring American aces in Europe! It also wears some pleasing colours on the nose and rudder. This is the best picture I have of the subject, and I found 3 more b&w pictures, as well as a WWII colour photo of the plane before bearing the "Daddy's Girl" writing. To build the model I have used the new tool Airfix kit, with decals from the old tool P-51D Daddy's Girl Mustang starter set. I've used the cockpit, seatbelts and part of the landing gear suspension mechanism of a Smer P-51 kit and then I scratch built the rear view mirror. So...not really an OOB build. I've appropriately filled the panel lines on the upper and lower surfaces of the main wings, which I think gives it a more realistic look, although the other panel lines are very deep, as I am sure many a modeller have complained about before me. Another thing about the Airfix new tool kit that is pretty annoying is the aerial mast. It's not clean at all and covered in flash and very flimsy. I broke one in the process of seperating it from the sprue. I had a spare, but this one also broke - even though I was super careful - when I slipped while sanding it smooth. I ended up using the mast from the old tool Airfix kit. Although I don't think this plane was ever very dirty (maybe after a sortie, but kept pretty clean otherwise), I have made use of dry pastels, oils and dry brushing to emulate a plane that isn't super clean. Initially I thought I overdid it, but I think the end result is acceptable. Something I only realised when I was almost finished is the kill markings decal for the port side of the canopy is marked with crosses, and not swastikas like the real subject! I really hope this does not detract too much off the end result... Anyway, enough talk. Please look at the pictures below, and I hope you can enjoy it. Cheers J
- 18 replies
-
- 26
-
-
 Hello and thanks for your interest! This is my latest model, the 1/72 Airfix Hawker Typhoon, dressed as "F-3A 'Diane'", serial number MN716, flown by Pilot Officer R.G. Fox in November 1944. The model was built from the box, the only addition was photo-etch seatbelts from CMK. Decals are from the Aviaeology sheet "RCAF Hawker Typhoon Mk.IB 1944 to Bodenplatte" (https://www.hannants.co.uk/product/AOD72008). The Squadrons covered are No 438, 439 and 440 Sqns during 1944 through to operation Bodenplatte. The series covers nine different subject aircraft including one car door version and eight bubble canopy versions. Aviaeology include an exclusive on the two sizes of the early “type B” upper wing roundels. Aviaelogy supply far more than your average aftermarket decal sheet, in fact it is a multi-page b/w booklet with background info and b/w pictures of some of the aircraft featured. A colour PDF version of the colour scheme is available for free though registering on the Aviaeology Web Site. The decals are of highest quality and perform flawlessly. However I did manage to break up the correct "F3" codes for this particular machine by mishandling them; I had to fall back to another "F3" code that has a slightly different font. I guess you would not have noticed unless you're an expert on 2.TAF aircraft (or you work for Aviaeology). Former squadron codes ("5V") were overpainted; I copied this by spraying the "5V" codes with dark grey through a paper mask before applying the "F3" codes over it. If you look closely, you will notice that the "F3" codes look brighter then the code letter "A" - this is intentional as I believe only the "5V/F3" code was changed. I tried to replicate the tatty appearance of the invasion stripes on the lower fuselage. The model was painted with Gunze acrylics. Photographs by Wolfgang Rabel, IGM Cars & Bikes.
- 16 replies
-
- 34
-
-
Hello everyone! This is my first post on Britmodeller after a long time lurking. I just finished my my first model in ten or so years, feels good to be back with the paint and glue! So, the model. I made _a lot_ of rookie mistakes, especially which the paint (did not stir the matte coat, and had to redo it several times before I understand what was wrong…) But I am pretty pleased with the result anyway. It is an Airfix 1/72 Hawker Hurricane Mk.1. Not a lot of details, but the fit was OK. Brush painted with Humbrol Enamels. The antenna that’s way too thick is stretched sprue. Base made from scratch with a flowerpot saucer and putty. Thank you for looking! Regards, Johan
-
Hi All Finished this a couple of days ago. Some small modifications: added some wiring to the engine, loop antenna in the cockpit and hydraulic hoses to the undercarriage. Very lightly weathered. Best wishes, Danyel
- 18 replies
-
- 24
-
-
 Morning all, WR963 was finished at 1.30AM on Saturday 7th November, with just a few hours to spare before the Telford show. I awoke at half six in the morning to scratch build some new bomb bay jacks and create a packing case ready for the show. Horrible weather in traffic ensued, but we made it with the Shackleton safe and sound to display her on the Coastal command table, with thanks to Tom W. My apologies for the RFI being a week late, but it's taken a week to get decent enough light for the final photos. Thanks for looking, I hope some of you got the chance to see her at Telford. I may have her at Cosford and hopefully Telford alongside an RAF B-24 next year. With thanks to the guys and gals who look after the real WR963 for providing the info on where to cut the bomb doors, without out further ado; Cheers, WV908
- 18 replies
-
- 29
-
-
- avro
- shackleton
- (and 4 more)
-
Evening all, The Avro Shackleton has long been one of my favourite airframes; WR960 being the first four engined British 'heavy' to stare down on me. At that time, I knew of Lancasters, but had never seen one. This was before I grasped hold of the internet, so had no idea where to see one either. My parents didn't know anything about the Shackleton when we saw it in Manchester all those years ago, and I was intrigued. Is this a Lancaster? I asked the man who was polishing her. From that resulting answer came my love of all things Shackleton, and a little bit of a deviation of interest from the amazing Lancaster. Afterall, '960 is credited with a depth charge hit on a submarine. I did the rounds of seeing three Shackletons and a Halifax before I would see the BBMF's pre-internet elusive Lancaster, flying over my hometown. It wouldn't be until 2013 that I revisited the Museum of Science and Industry, Manchester, now with a significant amount of Lancaster knowledge under my belt and having almost forgotten about old '960. It was only on the off chance that me and my friend were cheeky enough to ask to have a look inside that we found ourselves sat in the fully lit cockpit, grinning and both filling our camera cards with the internals of this cold war beast. By this point, I had learned of WR963, having visited the cockpit of VP293 which had been at that year's Cosford air show. In the time during which I've followed the progress on WR963, she has changed dramatically. Why the want to build this Shackleton as WR963 and not WR960? Two reasons really. Although I have the full aeroclub AEW.2 set in my stash, my late grandfather was in the Merchant Navy through the years the Shackletons were in service. On the occasions that we visited Newark Air Museum, he'd always mention about how he used to see Shackletons on a daily basis and was fond of the type (before wandering off to try and get into Vulcan B.2A XM594, which he eventually did). I wish we'd asked him, but we have no idea where he went during his time in the MN, but then again, we never knew where he was on his work trips with various railway companies abroad. It is because of this that, thanks to the bomb bay names scheme, when WR963 becomes airworthy, she will carry his name wherever she goes. The other is that Airfix is clearly planning to to release the AEW.2 in the near future and that I have already received some assistance with this model from the brilliant guys at Coventry, so it's only right that I build it as 'their' aircraft. Now then, down to business. This build will be as quick as I can make it as i'd like to get it polished off before the AEW.2 arrives as i'm itching to build WR960 (rubber mats included). This is the starting point; Airfix kit, my own AEW.2 interior photos and the sought-after Aeroclub goodies (and the kitchen worktop because this kit is huge... and my workench is full of class 47 parts - the joy of running two hobbies!). WR963, being presently an MR.2 with a number of AEW.2 parts still fitted, makes this model interesting, in that the bomb bay doors supplied in the kit are for an MR.2, and Airfix would have you build it that way. Lovely. Using photo references and info from the guys at Coventry, I've figured out where the cuts need to be made, and if I decide to do it, where that lovely Aeroclub radome sits. Playing around with the aeroclub canopy, which still makes the grade even now; Progress so far is just seats and the deck really, as i've been doing more research. The kit is a bit iffy for flash and there's some serious mould depressions on top of the starboard fuselage half, but at least nothing on mine is short shot... so far. The question for me though, is what condition? I hate painting anything white. White paint just does not like me, hence why my Concorde has been lingering for nigh on a decade *cough*. I'd like to do her current condition, but i'm erring to her post AEW.2 conditon, just to be different from the kit scheme. What do you guys and girls think? Cheers, WV908
-
Evening all, There's plenty of folk who've been ahead of me with this so will spare on the details. Just wanted to share my rendition of the new tool 1/48 Spitfire Mk.Vb, built straight out of the box with the markings for the restored aircraft from the Historic Aircraft Collection at Duxford. As its a restored aircraft I've applied almost no weathering as all the pics I've looked at seem to show the aircraft being kept in a very clean condition. Only thing the eagle-eyed among you will notice is I'm missing the rear view mirror.....blame the carpet monster! Will be fabricating a replacement. My only gripe.....that undercarriage attachment....aaaarrggh! Horrible. And yes, young Nigel does have a moustache!! All comments, suggestions etc gratefully received, good and bad, it all helps. Rgds, Eng
- 12 replies
-
- 22
-
-
Just completed, a twin build of a two seater and single seater Gnat, the first Airfix and the second Special Hobby. Both kits are built "out the box" and neither gave any particular problems (standfast the ever-unpleasant dayglo paint). The Special Hobby kit is a very straightforward build, with superb detail and excellent fit. However, its decals are very thin and need careful application (I spit a few of mine). The rocket pack and ejector seat are both somewhat fiddly. Of course, the Airfix kit is a lot cheaper to buy (nearly half the price) and really represents excellent vfm. Its panel lines may be a little heavy for some and it is not an easy colour scheme to paint, but I found the parts fit very good and it is a relatively easy build all round. Hand brushed Humbrol enamels were used on both models. Seat belts are simply painted on for the T.1, but I used thin paper strips for the F.1. Both kits have a light oily wash in the panel lines and acrylic satin varnish to finish. FredT
- 21 replies
-
- 33
-
-
- Special Hobby
- Airfix
- (and 1 more)
-
Picked up this kit from my local model shop (so good to be able to say this) on Monday after work and somehow seem to have started it already. No photos to show yet but here's some initial observations; The kit is well moulded and the cockpit in particular looks packed full of detail. Most parts I've worked on so far fit together well with one exception - the three-part wing slipper tanks need far too much work to get even roughly together and are taking a lot of filler to smooth up the joins. The ejector seats come with two optional squab parts - one with belts moulded on and the other plain to make fitting pilots easier. Unfortunately, however, there is only one pilot figure included. After the issues with canopies in recent Airfix kits I was delighted to see all the clear parts were well moulded and without blemish or flaw. There is, however, a short shot in one of the ejector seat parts, 16, that wasn't restricted to my kit alone. This means one side of the head box isn't properly formed. Easy enough to fix but worth watching out for. Once I've had a chance to take pictures will share them with everyone.
-
I thought I'd share my latest build. I finished this one a month or so ago time to share it now... Well where to begin... As a young chap in the ATC I had my first air experience in this aircraft. After looking through my flight log I noted that in fact most of my air experience flights were in this aircraft. It had been my intention to model it at some time but did not know where to start. At this point I must give a nod to Fritag. His Chipmunk gave me the inspiration to get going on the model. So what did we do.... Ok, the rivets had to go!! Then came the scratch building of the cockpit, landing gear, intakes, exhaust and a bunch of other stuff that I can't remember now! One thing that I am pleased with is the canopy that I vac-formed myself. Having never done it before I'm happy to add that to my skill set. On with the photos.... Lighting wasn't to good, I may add more later... That's all for now, the CL-215 awaits.... All comments welcome...
-
 Been building up to this one for a while and I'm finally done. As said in the title, this is my first step outside of the gentleman's scale of 1/72 and after some initial trepidation I must say I thoroughly enjoyed it. I think this is the tooling before the most recent release (code A05115A if anyone more knowledgeable would like to confirm) and I did find it less intricate than expected. However I got myself a 1/48 bf109 as well recently which looks much more like what I expected ie lots of small parts and finer detail. The build itself was relatively trouble free though I lost count of how many times I knocked off the radio antenna and pitot. Hand brushed in the usual humbrol enamels and then finished in the Battle of Britain scheme we've seen so many times of DW-K. I did think about getting some other decals but its a classic and I think any self respecting Spitfire enthusiast needs at least one of her. There are a couple of build flaws, seam lines etc I'm aware of but I'm not confident enough of filling and sanding just yet and the kit was a gift from a good friend so I didn't want to end up with a mess and ruined project through my own ineptitude. Really annoying sand paper scratch on the starboard side of the canopy was my major and very annoying slip. Finally, the weathering. A mix of humbrol washes and weathering powders, I'm aware its very heavy (SWMBO got a bit confused when I referred to this model as 'my dirty girl'). I wanted to portray a fighter at the height of the battle, hard used and constantly at work. She's already flown a couple of sorties today and will be up again before long. The scratches/chipping were done with a silver pen and is the only part I think I'll go back to at as it hasn't turned out as well as I hoped. A bit more study needed on that one. Not sure the pictures really show it at its best but its hard to get good light in Scotland in November. Overall, I'm very happy with this one, I think its as good as I could make it with my current skills. Not sure what's next as Fallout 4 just came out and is probably about to eat my life for the next few weeks. All comments welcome. Thanks for looking.
 -
Hello and thanks for your interest in this topic. This is my 1/72 Airfix Fw-190 A8 dressed as a "Sturmbock" of II/JG4. This particular aircraft is well documented on color pictures (seen here: http://www.clubhyper.com/reference/luftcambg_5.htm). It was piloted by Walter Wagner on January 1, 1945, participating in"Operation Bodenplatte". It was hit by flak during the attack over St. Trond airfield, when the engine died and the pilot had to make and emergency landing. The plane was captured by the US Forces and sent for evaluation. It later carried an all-red color, decals for the caputred version are available from aftermarket manufacturers as well. This aircraft had black/white/black RVT bands (denoting JG 4) and the emblem of the left side of the fuselage only. I added additional side armor from the Brengun etch set, which also provides various antennas and cockpit interior. To my chargin, the left armor plate lifted off with a "ping!" during the paint session and would not go back into position by any means, which spoils the look of the model from a certain angle. Nonetheless I decided to finish the build wtih it's flaw. The decals are from Sky Models Italy, are of reasonable quality and can be recommended. The sheet also provides the spinner spiral. Painted with acrylics from the Gunze/Mr.Hobby range, weathered with artist's oils and pastel chalks. The red blotches on the fuselage represent primer spots, as seen in the original pictures, and have been hand-painted using Vallejo colors. Pitot tube is a metal piece from Master Model. All photographs by Wolfgang Rabel of IGM Cars & Bikes - a big 'thank you'! Here's some in-progress shots I took during construction stage. The fuselage halves were badly warped, evident in this picture: ... and so were the wings ... Cockpit with Brengun etch, very little can be seen afterwards: Fixing the side armor panels was a difficult task due to the curvature of the fuselage: Thanks for your interest ... and off we go for another mission in the ever expanding universe of Plastic Modelling! Until next time, take care, and all the best from Vienna/Austria! Roman
- 13 replies
-
- 18
-
-
Neé: 1961 LMS Kitson 0-4-0ST Boxed: 1973 Airfix 0-4-0 Saddle Tank Rehomed: 1980s Dapol BR Pug https://www.scalemates.com/kits/182057-airfix-r9-0-4-0-saddle-tank Missing front cab wall & firebox, 1 small internal lever
-
 Hello gents, Here are my two Airfix Beaufighters from the recently-released new-tool kit; the first uses one of the kit-supplied markings schemes and the second uses markings from one of the Cutting Edge transfer sets which are, I think, long out of print. The kits went together extremely well; I used the Eduard masking set purely because I am lazy and will almost always take the path of least resistance even if it means shelling out several pounds for some pre-cut pieces of masking tape. The aircraft were painted in Phoenix Precision Paints Extra Dark Sea Grey over Sky, the invasion stripes were painted in various acrylic shades of light and dark grey to give a worn appearance. As the schemes were monocolour on the upper and lower surfaces I tried pre-shading the model and I'm quite pleased with how that came out (though it isn't really noticeable unless you know it is there) and I think it was probably worth the effort and the time it took. Anyway here are the models; first NE829 PLoJ of 144 Squadron RAF, which served in the famous Banff Strike Wing based in Aberdeenshire: ... and the second, NE548, UBoE of 455 Squadron RAAF which flew as part of the ANZAC Strike Wing based at RAF Langham in Norfolk from April 1944 before moving to RAF Dallachy in Aberdeenshire in October 1944: The first kit was built OOB and the second almost so, apart from the markings and the replacement of the 60lb rocket heads with the solid-shot semi-armour-piercing 25lb heads from a Tamiya Mosquito - I have read that the 60lb R/Ps were used for flak suppression so the kit-supplied ones are not necessarily incorrect but the 25lb version were more commonly used for anti-shipping raids. I also filled the cannon-ports on both aircraft and painted them with WEM Dull Roundel Red to represent the doped-fabric covers often seen on Beaus - mine representing the 'tidy' end of the scale, not all were so neatly applied... ... and finally, if you will permit me the indulgence, this is how I intended them to be displayed:
- 37 replies
-
- 64
-
-
 Hello, I'm happy to share my completed Airfix 1/24 Typhoon, as a late war Canadian 'Bombphoon'. Quite a long and involved build, and I hope I've done the kit justice. The WIP is here if you want to see all the amazing detail that got covered up! I added Eduard belts, and a whip aerial from plastic wire, everything else is Airfix, including the decals (and the very slightly cracked canopy...), which took some work to settle as they were a bit crispy. Paint is a mix - Humbrol spray can Medium Sea Grey, Xtracrylix top colours and various Revell aquas elsewhere. Lots of disrupting shades, and then pastels. Thanks to all who dropped by to watch the build and offer advice and encouragement. The kit is well worth getting, it doesn't fall together, but it is a very rewarding build, and I love the surface texture Airfix added throughout. Welcome all your constructive comments! Something a little smaller next time - it might even have tracks... Take care, Matt
- 38 replies
-
- 28
-
-
Hi everyone ! I decided to start a double build using airfix's new tool kits . Here is my progress so far . 12191564_10153823052669925_1531349394408642387_n by Dionyssis Vacalas, on Flickr 12187927_10153823052484925_5142870879137663476_n by Dionyssis Vacalas, on Flickr 12191799_10153823052559925_9187483391850227152_n by Dionyssis Vacalas, on Flickr 12208686_10153823052524925_6034714894277398808_n by Dionyssis Vacalas, on Flickr 12227611_10153823052579925_1335589703527540165_n by Dionyssis Vacalas, on Flickr
-
Remember making this fit in the 70s.
-
 For a few years now I have belonged to the Beyond the Box SIG. The idea behind the group is to let the imagination run free and do some serious kit bashing, more often than not using the 1/12 scale Wallace & Gromit and Shaun the Sheep kits produced by Airfix. The theme for this year's Nationals is Space - so I thought I would take the opportunity to post my recently completed Space build here. The rocket is scratch built from plastic card and finished off with brass model engineering rivets. The rocket motors used to be fluorescent lamp holders in my aquarium. Tamiya Fine Surface Primer took care of the white (it's such a great product). An overview of the completed model - some 50cm high! The gantry was adapted from a toy crane that got broken. A close up of the intrepid astronauts - space suits courtesy of Das modelling clay The plucky inventor - still smiling after a double arm amputation, thumb surgery and a new jumper knitted from Milliput. A close up of the promotional material - knocked up in Powerpoint The model will be displayed on the Beyond the Box stand at the Nationals - the table is close to the Airfix stand in Hall 1. All the best Richard C PS I do produce serious models too from time to time
- 7 replies
-
- 11
-
-
- rocket
- Wallace & Gromit
- (and 4 more)