Search the Community
Showing results for tags '1:72'.
-
Reini's Century Series - F-104G Starfighter One of the many Hasegawa's Starfighter boxings. Here's the box contest. Hasegawa is my favourite F-104 kit in this scale. Some aftermarket is a must. These 3D printed ladders just seemed so nice that I couldn't resist. I usually make mask clear parts myself but for this I have ready made masks. Master pitot tube is a must, some PE to add some cockpit detail and resin wheels. I might still add a resin ejection seat, a Lockheed C2 seat in this case. And then this little innocent 'special' bomb. I think this is from Trumpeter's Vigilante kit. I won't be using the kit decals, I have Xtradecal set for Netherlands F-104. And as the decal set is lacking all the small markings, I'll be using a set from Armycast. This is my reference, a Dutch F-104 in 1984, carrying a dummy B43 nuclear bomb. Photo is taken from here: https://nimh-beeldbank.defensie.nl/foto-s/detail/edb2f47b-9a02-85e1-56ea-8b23609cc71e/media/00a62de9-dfb8-db2c-7679-10d4fcab765a I've made several F-104 in different scales already, here's one of them - a Norwegian CF-104 made from Hasegawa kit: I like all the Century Series fighters - but it's not hard to pick a favourite, it has to be the F-104
-
 Revell kindly asked me to build their 1:72 Typhoon ready for SMW 23 at Telford in what will be for a later release of theirs of the Luftwaffe's awesome Rapid Pacific scheme. Kit and decals provided, I had about 14 days, around full time work, to complete this build and thankfully, I got it across the line on the Thursday night before travel on the Friday early morning. Finished in SMS PL60 Blue Grey, FS35237, Hataka Barley Grey for the nose cone and Alclad metals (Silver and Steel?) for the exhausts. The decals were sublime and with a generous amount of MicroSol, went down a dream and sunk into all the panel lines and recesses. I left the canards as push fit so that they can be angled however I liked as the push fit of these were just that good! And to answer that one question, yes, all the art work is decals and totalled 10 decals to cover the whole top of the jet. She's no longer in my possession as it will stay with Revell to be taken on the show circuit as and when needed. Maybe I'll get her back one day? I've also included some pictures of it on the Revell stand, sitting on the incredibly nice reference book which will be with the kit in this Special Edition release. Also on the stand is my 1:48 SR-71, 1:48 F-86D, 1:32 Bf-109G-4 and Click together 1:32 Bf-109G-6 (weathered up), which I'll post up at a later date. Anyway, do enjoy and I'll try to answer any questions I can.
- 13 replies
-
- 39
-

-
- Revell Eurofighter Typhoon
- 1:72
- (and 1 more)
-
A little german two seater in the making. This is the good Fujimi offering in 1:72 scale. First I will work on the ejection seats. They are quite simple in detail. Cheers, Bas
-
I'll add another placeholder here. There might be some synergy in painting and assembling the Ju 88 and this Bf 110 side by side. I have this E model Profipack kit https://www.scalemates.com/kits/eduard-7083-bf-110e--148467 that I want to build and decorate as this Weekend kit box art scheme https://www.scalemates.com/kits/eduard-7464-bf-110e--1428087 It's fabulous! I have been in love with it and wanted to build it ever since I first saw it! It was my laptop backdrop for a long time! But there's a twist; I have decals for the plane in the background, and there are some decent online pics of the M8+AP too. The paint scheme looks to be identical, it only lacks the Oblt. Jabs's kill markings from the tail. V-P
-
This is the great Viking from Hasegawa. Good oldie from the seventies. I rescriped all panellines and added some detail from scratch. It will be an aircraft stationed on the USS Ranger. Cheers, Bas
-
This was a very nice build and I enjoyed it a lot. For this kit it was Ootb with some small details added and I engraved the panellines. Painted with AK 3 gen acrylics and weathered with oils. Cheers, Bas
-
 An assortment of shots (DSLR and iPhone) of my completed Sea King HAR3 from the Airfix starter set. Generally pretty good fit and detail although that canopy assembly and masking is never going to be easy on a 1:72 Sea King!!! Mostly build o.o.b. but a bit of Eduard etch used (notably the wipers and that front door / steps), plus a bit of scratchbuilding: plasticard antennae, the wire aerial and handrails, and some small pieces of wire and plastic rod to better represent the really complex rotor head engineering of the real one. It's not perfect but certainly better than the kit version. Bit more info: painted with Vallejo Air yellow acylic, which in itself is a decent paint... but I didn't realise until too late, just how hard it is to cover anything with yellow! Especially as I'd pre-shaded over the grey primer with black panel lines... about eight coats of yellow later, and pre-shading still dark as anything, I gave up and put another thin primer layer over it all before starting again with the yellow! Lesson learned though. (I subsequently read a great tip on here: prime with pink if you're going to paint yellow. Will definitely try that next time). I tried to keep the weathering really subtle, as these helicopters were generally kept very clean (although there are some images out there of quite dirty ones..). Assorted diorama bits include Noy's Miniatures modern aircraft hangar and ReedOak groundcrew figures (amazing quality). Thanks for looking!
- 55 replies
-
- 102
-
-

-
Hello everyone! Here is one of the three kits I finished in the very last days of last year! It's a Focke-Wulf Fw 190F-16/R16. The F-16 was a planned but unbuilt final variant of the F family. Over a year ago, when I decided to start a run of Fw 190s which has been going on and off since then, I spotted this variant in the Valiant Wings Airframe & Miniature No.7 book on the radial engine versions of the Fw 190 and what sparked this project was having a four-bladed propeller on an F-model. Seeing this project was feasible for me, taking into account the other modifications to make, I bought what I needed and only in October did I finally get on with it. I decided to use an Airfix Fw 190A-8 kit as the base since it was considered decent (despite some negative aspects) and, above all, cheap. I almost regretted it when I struggled with the poor fit around the nose area! Anyhow, I managed to pull through and had fun making the modifications and some improvements. This build dragged on for over two months because I kept taking on completely different builds simultaneously, something I will not do again... The Fw 190F-16 variant has three major differences to the A-8/F-8: 1 - The four-bladed propeller. This I made using spare wider blades from Eduard kits. The remaining parts were from the Airfix kit. I modified the spinner to have four perpendicular openings for the blades. 2 - A Ta 152 tail. I used an AML resin tail set for the Fw 190D. The forward section of this part had to be cut off as it was the fuselage extension for the D. I had to open up a bay for the tailwheel. 3 - Extensions in the wing root. I used scrap plastic and CA glue sanded to shape to make these. This version had the late-type blown canopy which was in the Airfix kit but the related headrest wasn't so I used a spare one from an Eduard kit. The blister for the underside loop antenna was removed and an aerial further back was made from stretched sprue as was the radio wire above. The outer panels of the wing undersides were sanded smooth and the outer guns cropped as they were not used by the F family. The book depicted an R14 subvariant with a standard torpedo. I decided to use a pair of Airwaves white-metal BT400s which I have long had in my stash, thus making this an R16 subvariant. I made the underwing FuG 101 radio altimeter antennae from sprue. One of the Airfix kit's negative points is the main undercarriage. I shortened the legs in the oleos 1.5mm and did the same to the doors. The main wheels were replaced with spare ones from an Eduard Fw 190A-5 kit I built earlier this year. The scheme, completely fictitious of course, was an attempt to make one for low-level attacks over water. I have made some other "what-if" naval attack aircraft kits but using greys so this time I went for a late-war green. I felt a wavy pattern would be better than squiggles and had the insignia in minimal (outlined) versions to aid in the camouflage. The kit was fully painted and varnished with brush. Some of the decals were from the kit, the rest being from spares or generic sheets. Despite some troubles, this was a fun project and I'm very pleased with the result and really glad I made it. For some reason, it looks mean and heavy with the four-bladed propeller. Thanks for looking and all comments are welcome Miguel
- 10 replies
-
- 29
-
-

X-15A2
IanHx posted a topic in Prototypes, Racers, Research, Record breakers, Special schemes megaGB
Here's my entry, ticking the prototype, research & record breakers boxes Wasn't expecting to find resin in the box, so that's a bonus. Would have started sooner, but covid's really done a number on me. No Telford this year for me- 22 replies
-
- 10
-
-
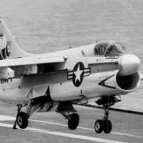
Hey folks, not finished anything for a l-o-n-g time hence not been around. Bought this in 1991 in a wee model shop my mate owned in Southport and it's been on the shelf ever since. Dragged it to the bench before Christmas to keep me out of trouble over the holidays - which it pretty-much has. Other than the ALQ pod and the mid-1980's Microscale decals, what you see here is exactly what came in the box. Definitely not my best work, but wonderful nostalgia trip (even painted it with Humbrol enamels). All comments, criticism and questions welcomed - Happy New year everyone. Ian.
- 11 replies
-
- 54
-
-
 Okay folks. This is going to be a combined WIP with my good friend and neighbour Shoey. Shoey's grandfather Ron Gibson (Papa) flew the MkIIc in Burma with 11 Squadron. Ron served with distinction in Burma flying his "Buccaneer" Hurribomber all year round (even through the monsoon season) and survived the conflict earning a D.F.C. R.H. Gibson D.F.C. now lives quietly in Adelaide South Australia....a very much loved and admired member of his family. For this build I am making a Revell 1:72 Burma Hurricane (I actually had one in the stash before knowing the story) with modified markings to depict exactly Ron's aircraft. Shoey is going to add something different. Being an RC enthusiast he is going to finish a full flying version of his grandfathers aircraft again with modified markings. The basic plane is built but together we're going for some extra authenticity with some of the paint finishes, weathering and panel lines So that's it. It's a two for one deal (one small static plastic one and one huge composite flying version).......and we both hope to do Ron justice with our efforts. More to come soon..... I think I have model envy already Ha Ha!
 -
I started this in the Gloster Meteor GB back in 2022. It is an ambitious conversion of the Xtrakit NF11/12//14, formerly Matchbox I think, into a target tug version. The airframe is pretty much the sam with the addition of a scratch built target towing pod and some other sticking out bits. Also the underside is challenging because of the yellow and black stripes. A real challenge to get over the ventral tank and nacelles. The build stalled not due to the paint scheme but the fact I lost one of the blue seat belts and then didn’t have any more. Then couldn’t find any online. I’ve now found one Eduard belts an ordered them. On time to get this one on the road again. Work to date is here
-
A new project. I bought this kit for a few bucks because it missed some parts; wheeldoor. At first I thought this was a kit to use as an weekend build, but the flaws in this kit are easy to fix, so why not give it a go. It takes some reshaping and I am using a better canopy. Here's the result so far. Cheers, Bas
-
This was an awkward build. Almost double bin in. What a bad kit. When finished I was quite surprised by the outcome, not bad at all. Almost build ootb. Painted with Revell Enamble satin series. Weathering done with oils. Cheers Bas
-
My last kit finished this year - 1:72 Hispano Aviación HA-1112-M1L Buchón. My interpretation of aircraft no. 71-5 "MAPI", serial C4K-9, 71. Escuadrón, Ejército del Aire, Gando Air Base (Gran Canaria), Ifni War (Spanish Sahara), 1958. Special Hobby kit built "out of the box" with some scratch. Thanks for watching!
- 16 replies
-
- 52
-
-
-
- Buchon HA-1112
- 1:72
- (and 1 more)
-
Very old and simple kit. Lacks all detail. I added some detail in the cockpit. Decals are very old Dutch decal and thick. All in all a nice model to build in between some more demanding builds. Cheers, Bas
-
This will probably take a bit of time, not just as it is resin, white metal and vac form canopies but the colour scheme of Aluminium over black/yellow target tug stripes as well as trainer bands, make it a bit of a challenge. And it is an relatively early Magna kit so I predict a fair amount of sanding and filler in the coming months. The Sturgeon was initially destined as an anti submarine aircraft but as the war finished it wasn't really needed. However post war the FAA needed a modern high speed target tug and the Sturgeon was redesigned to meet this need. It was carrier compatible and could land and take off at sea although the squadrons were shore based. It served the Navy well from 1950 to 1956. The Magna kit is a bundle of fairly well moulded resin parts with a bit of flash and some pretty big pour stubs. The shape looks reasonably good and the panel lines nicely restrained. A bundle of white metal metal parts for prop blades, undercarriage and some interior parts. They will need careful cleaning up but my experience of Magna kits is the white metal usually cleans up well. Detailed instructions and a number of options to build. Though apart from the natural metal prototype the scheme are all the same. There are no transfers but I think I should have enough in the stash. There's nothing fancy just roundels, serials and Royal Navy titles.
- 64 replies
-
- 16
-
-
Build OOTB. Nice kit to build, but not as good as the Hasegawa version. Painted with acrylics and Revell enable. Cheer, Bas
- 10 replies
-
- 49
-
-
This is the first gen from Fujimi. Nice model for its age. Build ootb and painted with AK acrylics. Cheers, Bas
-

A Brace of Stripey Hawkers! *Hurricane Finished*
Dunny posted a topic in Work in Progress - Aircraft
Hi All, With my Vickers Vincent languishing on the Shelf of Uncertainty (I'm not sure what to do about the missing 3rd crew position), I fancied a bit of a sneck-lifter build. What better, thought I, than a pair of Hawker's finest ground attack aircraft - the Hurricane IIc and Typhoon Mk.Ib?! 😍 The kits concerned are the Arma Hurri and Airfix Tiffie. Here's the Arma kit: There is but on grey plastic sprue (albeit with lovely detail): A nice little PE fret (and cockpit masks): Decals: The Airfix kit is somewhat more sprue-heavy: I've treated myself to a Yahu instrument panel: Interestingly, although it is not mentioned in the instructions, it appears that there is an option to build with the cannon hatches open (parts A8 & A9 on the sprues, if you are interested): Now the reason for the thread title is that I'm going to model both these aircraft in invasion stripes. The Typhoon is easy - schemes 10 a penny, but the Hurricane took a little more searching. Here's one example: This looks to be standard Day Fighter Scheme - I shall have to find the external fuel tanks somewhere (or 3D print a pair - easy enough). Anyway, should be a bit of fun! Thanks for looking, Roger- 78 replies
-
- 15
-
-
For the 1/72 scale Starfighters the Hasegawa is the best one - not by a huge margin but still best all around kit with best details. Now, Hasegawa only does CF-104, F-104G and F-104S - and not the early A or C models. But there are several early Starfighters I would like to do - so I wanted to try that how viable it is to backdate a Hasegawa F-104. This is my starting point, a Hasegawa CF-104. The F-104G and F-104S packings are very similar but with few notable differences. This kit has the correct wheel well covers for both A and C and if you want to do a F-104C in South East Asia configuration, this box has the RWR receivers as they were fitted on late CF-104's too. As normal with Hasegawa, they have a million reboxings, but I think all CF-104 boxings are the same apart from the decals. And they also have atleast one boxing with CF-104 and F-104G/S in the same package. Just something to take note, as Hasegawa has a bad habit of cutting away parts of a sprue that are not needed in the specific version that comes with the box. The sprues. Let's take little closer look on what we need to take into consideration when backdating this kit. Wheels and rims, the F-104A&C wheels are narrower than F-104G wheels with different rims. The real CF-104 most likely has the narrower wheels as it comes with the non-bulged wheel well cover, but that doesn't really matter as the kit only has one set of wheels for all the version. So they are the same for all Hasegawa F-104G and CF-104. Not that it matters hugely as the difference in width in this scale is most likely not a huge deal. But the rims are different, so that's something we need to take into consideration. In the picture, there's F-104C rims, and as compared to the kit part there is noticeable difference. Aftermarket parts are available so that is the most likely route I will take. Though I might try putty & hand drill first as the rims are quite simple. We will see. Wheel well covers. F-104G wheel covers have bulges, but as these are CF-104 covers they don't have them so they are correct for this build as is. But even with F-104G covers, they would be rather easy to sand the bulges away. Exhaust nozzle, the kit part is not hugely detailed but it resembles the one on the right more - which is incorrect for this build. We want the one on the left. Aftermarket parts are available, which is a good route to take especially if you want some extra details. I might have a go at trying to add some details for the existing kit part, though. Nothing to lose. Cockpit - now I'm not hugely well versed on the F-104 cockpit so I don't know the differences. There must be some but I'm trusting that Eduard has done the research for me and I am using a PE set to add (hopefully correct) details. But again, not that it will probably make a huge difference in this scale, atleast with a canopy closed build. Now the most noticeable difference is the tail - F-104A and C have smaller tail. But it doesn't look terribly hard to cut away part of the Hasegawa tail and rescribe. I mean - (with Jeremy Clarkson's voice) how hard can it be? Right, there should be the main differences (the ones that matter for this build atleast). While I have huge interest in the Starfighter I am by no means authority on all the differences on all the versions - so if you have something to share about this matter, please do so Now as with the specific version I will be doing, I am still undecided whether it will be a Pakistani F-104A or USAF F-104C in SEA camo. Differences are rather small with those two versions, but the SEA F-104C would require adding an refueling probe which I would probably need to scratch build. We can go into details once I'll decide what I will do, there probably will be some small things that I have forgotten here. Let's see how it goes
-
 This is the Heller 1:72 Arado Ar 196A which was first manufactured in 1979 - I had found an original boxing at a model show a few years ago. I'd expected the kit to be rather basic, as compared to current kits, so I'd searched for some extras. Fortunately it had been re-boxed by Revell so I was able to get: - a photo-etch set from Eduard (very comprehensive and including a complete new cabin and really nice detail to add to the floats) - a replacement cowling from Quickboost (a single piece avoiding the difficult seam in the kit parts) - new exhausts from Quickboost (the kit does not provide exhausts) - a replacement gun for the navigator from Eduard (fantastic detail but ever so teeny) - decals from Kora for two schemes aboard the Tirpitz (I'd expected the kit decals to be almost unusable, because of their age, but in fact they were missing) During the build I also bought a 'transport trolley' from Kora. I thought a floatplane on a trolley would look rather different - although buying it did change my weathering approach. I had originally thought of a heavily weathered plane as aboard Tirpitz but settled on an 'as new' approach showing the floatplane as if it had just rolled out and was ready for its' pre-delivery test flight. I did a WIP thread which is here: The proportion of p.e. to plastic was a new one for me and a challenge at times but I'm happy with the end result and if anyone has this kit I would definitely recommend the Eduard set. Here's the photos. all the best Mark The Eduard replacement cabin: The transport trolley - a little resin kit from Kora: Thanks for looking Mark
- 12 replies
-
- 40
-
-
Here's my first contribution to the GB. The strangely configured Beech Staggerwing which I'll be building as a Fleet Air Arm Traveller MkI. The boxing gives 4 options, an RAF, FAA (it does say RAF but the Royal Navy ID over the serial sort of gives it away), Finish and Chinese Nationalist options. Mine will be the FAA option in the US blues. Obligtaory sprue shot. Single sprue with minimal flash and most things reasonably well moulded but only time will tell. Nice transfer sheet and two tiny transparency sprues. And typical AZ instruction sheet showing vaguely where things go. Though to be fair on the other side there is a rigging diagram.
-
Quick project finished today - 1:72 SAAB J-35Ö Draken in special livery "1000 years of Austria". Revell kit (ex-Hasegawa) + Eduard PE set + Master Pitot tubes + some scratch. Thanks for watching!
- 17 replies
-
- 65
-
-
Hi guys , Italian WW II aircrafts, are one of my favorite topics, love their shapes and camos. The MC 202 was one of the more elegant one out of them ( in my opinion). Adding DB 601 engine ( made under licence) to part of MC 200 design , produce a very efficient plane which was more than needed by Italian pilots at that time. regarding what they were facing . Mc 202 could be considered as standard " work horse " fighter for RA between End of 1941 and middle of 1943. Thus, numerous camos schemes, depending on areas use, and also different building lines Macchi, Breda ..) . I have chosen to represent one of the first operational MC 202's by the RA. This unit was the first one to be fully equipped by the new fighter. On pictures ,these planes looked pretty new and cleaned up ( with slight exhaust stains) , ready to go on Malta operation area. Main features of Mc 202 first batches were : short antenna mast, slim compressor intake ( means without sand filter) and specific tailwheel end . Regarding camo, we are on a classical one for that period ie : verde mimetico 2 with gallio mimetico 3 and marrone mimetico 2 blotches . If I'm wrong on that, forgive me and correct it if needed. 😉 ( anyway I'm not sure to re-paint it !! 😄) I used Aeromaster paints,( yes Still have some !! 😁) and Airone hobby undercarriage set , which is quite nice indeed. ok guys enough talk, let's go on to pics ! Hope you'll like them ! best regards ! cheers !
- 41 replies
-
- 69
-
-
-
- Macchi 202
- Regia Aeronautica
- (and 1 more)