Search the Community
Showing results for tags '1:72'.
-
Ready for your inspection is my 1:72 Airfix Bristol Beaufighter TF. 10. It is built as it comes from the box, with the exception of Vallejo acrylics in the place of Humbrol, and resin wheels I purchased from a model show. It was a pretty straight forward build, no real surprises, no flash and a nice amount of detailing. As usual with my builds, I preshaded the panel lines before applying the top coat, and added some light shading patches after I was happy with the top coats. I'm really happy with the finished piece amd hope I've done the aircraft justice. Thanks for looking.
-
To be continued... V-P
-
"AUTUMN 1984 - STRIKE" AJ 37 Viggen, Swedish Royal Air Force, F6 Karlsborg Kit: Special Hobby AJ-37/SK-37 Viggen Duo Pack (#SH72411) Scale: 1/72 Aftermarket: Master pitot, Moose Republic decals, weapons from Airfix Viggen & Marivox Saab 105 Paints: Vallejo Model Color, Model Air & Metal Color - and Tamiya Weathering: Flory Models Wash, Mig weathering Products Very good - if somewhat complicated kit with couple of problem areas. Very nice details. Scratchbuilt display base. Built for Nordic GB. Build thread here: Thanks for looking! Comments & constructive criticism welcomed
- 17 replies
-
- 42
-

-

-
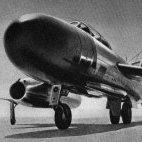
 Goood moorniiing Viee.... Britmodeller! This is my latest build, literally finished just now: Shenyang J-5, Vietnam People's Air Force, 932 Fighter Reg. Red 3020 (Le Hai) | Tho Xuan August 1969 Kit: Airfix Mikoyan-Gurevich MiG-17F 'Fresco' (Shenyang J-5) (#A03091) Scale: 1/72 Aftermarket: None (T-antennas were taken from Hobby Boss MiG-15UTI kit) Paints: Vallejo Model Color, Model Air & Metal Color, Tamiya Acrylics Weathering: Flory Models Wash, Mig weathering Products, Tamiya Panel Liners Really enjoyed this kit, mostly has good details - only thing that is obvious that is missing is the T-shaped antennas under the wings. But I was building Hobby Boss MiG-15UTI at the same time and luckily it has a set of two so I used the other set. Fit was great, only in the nose some extra care was needed. Painted with Vallejo Metal Color first (Semi Matte Aluminium) followed by Tamiya Clear Coat. Thin layer of Vallejo Chipping Medium applied to selected places, followed by thin layer of Vallejo 71.2289 US Dark Green. Camo spots painted with Tamiya XF-27 Black Green. Chipped the paint using small stiff brush, applied the decals & weathered lightly. And some comparison shots with F-105 Thunderchief: Hope you like it! Comments & constructive criticism welcomed
- 15 replies
-
- 41
-
-
This is not the first kit I build. There were kit before this one. There are kits I build with my father, kits of Sukhois, airliners and flying boats of east german origin. I recall a mighty Tu-2 on my shelf. I reach back in my memory and remember a silver J-35 as the first kit I ever got in touch with I remember Polish Łoś bombers, Czapla reconaissance aircraft and badly designed Yak fighter kits. I remember a Matchbox Hawker Fury, the fist "western" kit i came in touch with. I am not even sure if I build all those kits or I let my father build them for me for the better part. I remember the first kits I build on my own during a stay in Canada : the Monogram SR-71, the Italeri F-15. I would love to rebuild them both, however these are not the stories to be told here. The story told here is that of Lady Jessie and the Rhino. Lady Jessie was the kit my dad got me as a gift after our familiy got reunited after a year of separation due to work assignments of my parents. This coincided with relocation to Germany where I could at last pursue the hobby "properly" and paint the aircraft using paints from the whole Revell range. Lady Jessie an A-4F Skyhawk from Revell was the kit I decided would be my first serious build. I was actually quite proud of the build at that time brushed with shiny enamel colours fully decaled it was my whole pride. And while the front wheel broke of several time and the strut got shorter and shorter each time the model is still with me (found not so long ago in the attic). Sice the tooth of time nagged on the build, with fading decals, and apparent shortcomings of my build at the age of ca. 14/15 I intended to rebuild Lady Jessie as soon as I returned to the hobby. Sadly I could not find any modern kits in this livery in my 1:72 scale. And then this GB comes along. With the sipulation to use the same, or closest kit. I knew what I had to do. Take a trip to the e-bay, and lo and behold there was ONE auction where my Lady Jessie was offered. Boxed as I rememberd it from 1990. I shall build a new Lady Jessie as I did then OOB. However I shall improve the build as best as I can I want to give the Lady the attention he deserves and let her beauty shine. And then there is the Rhino, the Phantom the second model i build after Lady Jessie As far as I remember (I was fixated on carrier borne aircraft then) This one I also found in the attic in a surprisingly good shape and while I didn't find the exact same kit I found something even better from Revell (Isn't it funny most British modellers started out with Airfix kits, German modellers with Revell, french Heller I guess and italian probably with Italeri). They recently reissued the same mold, but with an even more striking livery. So this will make my shelf. I hold this kit in the highest regards, as it allows a myriad of options not found on most of the other kits in this scale: Lowered flaps, open cockpit, extended (well, slightly) speed brakes. And while the panel lines are raised (and I am NOT rescribing), this is still the best 1:72 Phantom for me. And here a group picture of the beauty and the beast.
-
Hello everybody, I would like to built the Mach 2 VC10 in old RAF decoration. It's not a easy model to build, there are some problems with injection but the plastic used by Mach 2 is easy to carve, to transform. So, let's go.
-
"WINTER 1983 - RECON" MiG-21F-13, Finnish Air Force, TiedLLv Kit: Revell MiG-21F-13 Fishbed C (#04346) Scale: 1/72 Aftermarket: Master pitot, Kuivalainen photo etch, Aires wheels, Quickboost nose intake, Galdecal recce pods, unknown decals (FaF roundels) Paints: Vallejo Model Color, Model Air & Metal Color Weathering: Flory Models Wash, Mig weathering Products Decent kit with some flaws & problem areas. Most can be corrected/improved but replacement wheels are a must, kit wheels don't even look like wheels. Scratch built display base. Built for Nordic GB. Build thread: Thanks for looking! Comments & constructive criticism welcomed
-
Hello everyone, here comes my second entry for this group build. A Super Etendard with spotting the 100 years of French naval aviation livery. As you can see I was crazyenough to order PE-parts again but no masks. This is going to be fun. The kit itself is not overlz complicated it is currently also the only Etendard readily available in 1:72 so my choices where slighly limited. the Syhart decals are as always a joy to the eye however if the Delta Ramex La Fayette is anything to go by,they will be quite fiddly to place. I also have a question for the seasoned modeller. How do I make sure I have the perfect transition and don't get any colour bleeding around the thin yellow line - the line is provided as a decal. My idea was to paint everzthing black, place the yellow decal and then mask the hell out of it, with flexible masking tape. but mazbe someone has a cleverer solution?
-
Right. So we got one extra week - and @trickyrich tricked me to build one more. Oh well, why not! So let's go with something that is doable in a week: Hobby Boss easy assembly kit. And so that it's not too easy - some Kuivalainen (Eduard) etch. Decals - not sure where I got those... This MiG-15UTI actually ties in nicely my Finnish planes in this GB. Gnat was the first proper fighter in the Finnish Air Force since the war that was atleast somewhat relevant at the time of it's purchase. It was quickly outclassed though - as the aviation industry was moving so fast. MiG-21F-13 followed - and while it did not replace Gnat as such (Draken did), it made it more or less obsolete in FAF. With the purchase of the MiG-21's, four MiG-15UTI's were also bought. It was used as interim trainer between the Fouga Magister and MiG-21F as no dedicated two seater MiG-21 trainer was available. But MiG-15UTI proved to be of little use in Finnish Air Force, there was no real need for such plane type. But, my point being - the thing that ties my Finnish GB builds together - Gnat, MiG-21F-13 and MiG-15UTI all served in the Finnish Air Force at the same time. Whats in the box. It's labeled as an 'Easy Assembly' kit - but it's still a proper kit nevertheless. Pretty nice detail, just maybe little less parts than normally. Like the wings are one part and so on. PE will detail nicely the rather spartan cockpit. Cockpit without PE... ... and with PE. All the extra bits, ready for primer. ... aand the fuselage & wings assembled! I better stop now so that I don't have to post this to the RFI area straight away
-
Hi everybody, after a cursed and protracted build I am happy to show you the finished Tiger, albeit I am not happy with the result. Too many mistakes and too many problems made it hard not to throw it into the bin. Please don't get me wrong, I do not complain about the kit. It is a little gem, it is just my obvious and blatant lack of skills that kept me from doing the kit justice. For anybody interested, here is the WIP. Enough said, here she is. Because of the problems I had with the green pattern I chose to represent a dusty vehicle, mainly to cover up all the bad areas. At least this worked out quite ok. The only disadvantages of the kit are IMHO the moulded on towing cable which was very hard to paint, and the rubber tyres. Two of the five were badly moulded, one of them is the spare wheel, where it is obvious. The fit of the parts is very good throughout. Overall the instructions are ok, but quite unclear and wrong in some places and you have to study them really carefully, which I didn't do right at the start. This resulted in breaking apart the completed chassis again after I attached it to the finished cabin. I glued the axles upside down and realized it only as I tried to see how the wheels would fit. Doh! I hope that I'll find a replacement for the lost saw which should be on the right side. Weathering was done with earthy grey pigments (wheels), the mud was done with Gunze Rough Sand, some streaks with oil colour, and the dust all over with a thinned down light earthy colour applied by airbrush. This was an experiment, I think the effect is a bit too strong but it's ok with me. All in all the result could have been better, but after all the problems it was the best I could do. Thank you very much for looking! Any comments are welcome. Have a nice day Nick
-
I decided to join on the 11th hour, and since there is not so much time left I will be doing a double build of a Czech JAS-39 C and D with some interesting livery.
-
My second contribution. Valom's recently (re-)released Blackburn Firebrand. A beast of a post war FAA Torpedo Fighter. I have a Mark 2 with a Sabre engine in the stash but until recently haven't seen one of the definitive TF 4 or 5s. I don't know if this is a new release but it's a bit mixed with some sublime engraving and resin but some indistinct moulding and an elderly looking sheet of etch. Although not a success by any matter of means, it is a pugilistic looking beast. Also my father worked on them while in the FAA but I'm not sure whether it was in Squadron service or on one of the support bases. Here's the box There are 3 plastic sprues, not really many injection parts, but certainly all the big parts. Some nicely moulded resin, although this picture doesn't really do it justice. Unfortunately, the top of the control column has gone amiss. A piece of etch and a couple of vac form canopies. Which is why I wonder if it's a really-release as Valom's have been injection moulding canopies for some time now. Nice transfer sheet with transfers for two early liveried aircraft. And a 12 page instruction sheet. I bought a mask set for it as well.
- 59 replies
-
- 12
-
-
Isn't this too weird 🙄? I'm linking here the background story from the last year's Sharkmouths GB, for a build I completely failed to even start, that includes a link to another old GB, where I actually finished the same kit, and that thread has all the kit related pics etc stuff. Anyways, I thought the Big Lanc build would benefit from a little 109 being built side by side with it. Or maybe before it... This is the last of my AZmodel Joypack Gustavs. Good to get rid of it, there'll be another Hasegawa Finnish Combo in my stash by tuesday So here we go again, hyvä 🇫🇮! V-P
-
 Another Wehrmacht AFV - this time their most numerous tank, used (and manufactured) from the first to the last day of WW2. Conceived as the "support" (i.e. infantry) tank, the Sd.Kfz.161 was initially armed with a 75mm howitzer that proved helpless against the armour of the British Matilda and Soviet T-34. Thus the later generation Pz.Kpfw. IVs (starting from Ausf.F2) were fitted with the long-barrel AT gun of the same calibre. Introduced in early 1942 the long-cannon Panzer IV became a dangerous adversary for the Allied tanks in North Africa and these four late variants (Ausf. F2, G, H and J) totalled for more than 7400 of some 8700 Panzer IVs built. Weighing about 25 tons they were powered with 300 BHP Maybach V12 petrol engine. The best 1/72 kit of the "late" Panzer IV on the market is the Russian Zvezda #5017 - the quite new (2018) tooling. There are 147 parts, crisply moulded and no sealing/sanding is necessary at all. Regrettably there's only one boxing available - the late (1944) Ausf.H "mit Schurzen". So as my idea was to have a Pz.Kpfw.IV in desert scheme (and Ausf. H manufactured from 1943 always featured the RAL7028 Dunkelgelb scheme) I had to retrograde the kit a little. Of course all skirt armour panels (and their support's numerous locating lugs) had to be omitted. Then the muzzle was shortened some 5.2mm (the Ausf.G had the KwK 40 L/43 gun whereas the one in Ausf.H was of KwK 40 L/48 type - 375mm longer) and the front sprocket wheels were modified (there were 12 spokes in Ausf.H). The hull side vison ports were added while the driver and gunner hatches were also backdated to the earlier shape. The antenna went from the rear left hull corner to the right hull side and the layout of several tools on the mudguards also had to be changed. Happily "my" Ausf.G was of the late type, thus the Zvezda-supplied single-piece commander's cupola hatch could be used intact. The well-known "red 7" belonged to the 8. Regiment of the famous Deutsche Afrika Korps 15. Panzer-Division. These 1942-production tanks sported the rare "late desert" camouflage of RAL8020 Sandbraun and RAL7027 Sandgrau - much lighter than the 1941 DAK scheme. The paints are (as always) brush-painted enamels: Humbrol 240 for Sandgrau and Airfix (yes, still alive after all these 50 years) M9 for the Sandbraun. Afterwards the Vallejo acrylic matt varnish was brush-applied overall. The digits are from the HobbyBoss Mi-4 helicopter, the Division red triangles came from the Unimodels Panzer III Ausf. J kit, while the black "ace of spades" emblems and red regiment emblems were brush-painted. The pictures are made by LG smartphone. Comments welcome. Cheers Michael
 -
NORWEGIAN STAR - CF-104G Starfighter (1:72) - 331 Squadron, Royal Norwegian Air Force, Late 70's. One got finished, so I got only two Nordic builds going on at the moment - better start a new one so I don't run out of momentum! This is 'Part Two' if you will - my double seater Super Sabre being part one. It will all become bit more clear once all the builds are all done. But for now, this will be about norwegian CF-104G getting airborne on a intercept mission - so a simple base will be included (eventually). This is my kit of choice - a Hasegawa CF-104. Hasegawa really is the way to go with Starfighters on a 1/72 scale - even if Italeri and Revell can produce a good results too. I prefer Hasegawa just because of the canopy that looks to be most precise - and can be displayed open. Details wise, it's quite good too - but Italeri is somewhat better on wing details. This is what I have to work with. Basic kit with some aftermarket stuff. Kit is showing it's age. It looks mostly decent but flash is quite evident in most of the sprues. After checking this kit out I realised that CF-104 apparently had non-bulged wheel doors - unlike the normal F-104G's. Early on Norwegian CF-104's didn't have the gun installed. Starting from mid 70's they received an update in the form of gun, RWR and better radar. I will be doing a late 70's plane . Clear parts. Aftermarket stuff. Not sure what makes the wheels 'Turkish' - as they were basically using second hand machines from other NATO countries. Looks normal G-wheels with optional 'F-16' nose wheel that some of the S-models had. CF-104 didn't have the wheel door bulges like the G - so I'm guessing these are too wide - but I'm suspecting the difference won't be noticeable. Have to do some comparison with the kit wheels. Decals from Xtradecal sheet (X72315). This will be green upperside and grey underside color scheme. I have the FS numbers written down somewhere - but good suggestions from Vallejo or Tamiya color range are welcomed. Thanks for checking - more will follow Oh, final thing - I tend to get bit carried away with my builds - so @RidgeRunner or @Giorgio N (or anyone with knowledge about Norwegian Starfighters for that matter!) feel free to stop me if I seem to be doing something that I shouldn't be doing
- 97 replies
-
- 18
-
-
- Starfighter
- Royal Norwegian Air Force
- (and 1 more)
-
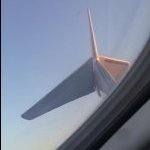
Okay, I've got a build for you that has not seen in this GB yet - it's a SAAB and it's called a VIGGEN! ... what? ... somebody else is building a Viggen too? Hard to believe, but no matter! Let's build it anyways, as it's not really possible to have too many Viggens. Been holding on to this kit for almost a year now - I got it as it was new. Very cool boxing by Special Hobby with two kits and a book. It's a big box for sure, but also quite full of stuff. So it's AJ attack viggen and SK two seater in this boxing. No parts for JA, I did check Also missing a tail so can't build two AJ's (SK had a high tail). I'm not particularly fond of the two seat Viggen - not the prettiest thing in the world but I'm sure it will get built eventually too. Good quality full color manuals for both planes, very tidy decals and a good reference book. High quality photos in the book. Good amount of plastic in the kit: Kit decals on the left, Moose republic ones on the right. Not sure of the specific plane yet, but it will be a splinter one. Apart from the possible decals - this is my only aftermarket part. Viggen has quite a few resin options - but they are quite pricey. As we all know, Special Hobby/Tarangus Vigge's are lacking in the weapon department, which is a big shame. So I'll be stealing some weapons from other kits. As can be seen from that special Airfix boxing of Viggen with two right fuselages - it's quite useless. But still useful as a donor kit. So I will be stealing RB05's from the Airfix kit and Aden gun pods from the Marivox Saab 105. Viggen was a single weapon platform - weapon load was programmed on the ground - but RB05 & gun pods was one of the only dual weapon options the Viggen had. In addition to having Sidewinders for self defence that is. So about the build - it will be a Special Hobby AJ37 Viggen in splinter camo during the cold war. It will be flying and will have a simple display stand. If possible might even be 'in action' - firing a missile. But that is still undecided. This will be part three of my nordic series - danish Super Sabre, norwegian Starfighter being the first two. So this will be about a striker aircraft as the previous two are about a trainer and an interceptor. I've heard some of the complications with this kit so we will see how much work will be included. But I guess 1/48 kit is worse, some of the problems fixed with this one? We will find out Splinter camo will be a challenge too!
- 105 replies
-
- 10
-
-
- Viggen
- Special Hobby
- (and 1 more)
-
Hello good people, Here are a few pictures of my just-completed 1:72 Sea Hurricane MK Ia by Arma Hobby. Its a pretty nice kit, well detailed, and pretty forgiving to build. I built mine to represent a machine from Royal Navy's training squadron No. 760, stationed at Yeovilton, England in early 1942. I'm not entirely sure if I'm correct, but I believe no. 760 was the unit where pilots trained for hurricat duty. Hurricats were hurricanes modified for catapult launch from modified transport ships sailing in the North Atlantic convoys. In case of air attack or snooping from FW Condors, a hurricat would be launched to intercept. The plane would then either be flown to land, or ditched in the water. Sound's like a cold and horrible way to die, to me. Photos of no. 760's aircraft show that they were pretty worn out, with lots of paint patches, and in some cases, whole sections of different aircraft frankensteined together into a flying machine. Here is a photo of the actual plane. And here is my interpretation. I found this model incredibly difficult to photograph, the FAA camouflage seems to absorb light. I'm too lazy to reset my photo booth, so these will have to do. and here is the Arma Hobby kit with its Airfix stablemate, built about 6 years ago, My model was painted with Hataka Red line paints. I found these to be pretty easy to use, but I thinned them with windshield wiper fluid. They are far more robust than Vallejo acrylics, but don't spray as well as Gunze and Tamiya, my typical go-to paints. Like Vallejo paints, though, the Hataka paint was great for hand brushing, and due to their robustness, I will be getting more for detail painting. Weathering was done primarily with oil dot filters. Thanks for looking.
- 39 replies
-
- 82
-
-
- Sea Hurricane
- 1:72
- (and 1 more)
-
Now this is a bit different. I picked this up several years ago on a visit to Hannants at Colindale as I noticed one of the liveries provided was for a Royal Navy glider. I recalled that I had it a few days ago and thought if I could dig it out of the stash it would be a quick build and get done now I'm almost finished my other contributions. It's only got 11 parts and a canopy, pretty much one colour, no etch, no resin and only 4 transfers to go on. So it was found in a pile on the top shelf and out it came. A simple simple set of instructions on one page. The colour call outs are in Czech but google translate helped out and the two I couldn't translate aren't used anyway. Simple sprue, the big problem is a number of fairly big ejection pins including one on each wing. Small but comprehensive transfer sheet and tiny clear sprue with a canopy and something else which doesn't appear on the instructions.
- 17 replies
-
- 2
-
-
- Royal Navy
- AZ Models
- (and 1 more)
-
Here is the last of my trilogy of Harriers. This is Harrier GR9, ZD406 finished in the 100th Anniversary of Naval Flying scheme from 2009. The kit is the standard Hasegawa kit in a special edition presentation box with the transfers for the Navy's 100 year anniversary. There's an RAF option in the box too. It's built OOB apart from some seat belts. I was a little disappointed as although it was beautifully moulded the fit wasn't quite as expected from Hasegawa and there was more flash, mould lines and some ejection pin marks than I have not previously seen on a Hasegawa kit. So there was much more sanding and filling needed than usual. There was a mould line all the way down the canopy that took a lot of care to eliminate. The transfers performed beautifully though. I've got a couple of Revell GR9s in the stash and I thought I'd build one of them next in standard colours but my heart dropped when I saw they were Hasegawa reboxings, not the reaction that usually happens. They were half the price of the Hasegawa boxing though. The airframe was brush painted in Xtracrylix Medium Sea Grey and finished with Liquitex matt varnish. The trilogy of Harriers
- 8 replies
-
- 24
-
-
- Royal Navy Strike Wing
- Hasegawa
- (and 1 more)
-
After the two Renaults shown few days ago this one is quite another piece of cake. And this is not the matter of size, as the WW2 16-ton Hetzer tank destroyer is roughly the lenght of Mondeo or Audi A4. The problem was complexity of this tiny kit by Ukrainian Unimodels. The whole package some 67mm long (87mm including the barrel) consists of 147 plastic and 16 photoetched parts ! And the Renaults mentioned above consisted of less than 20 parts each... The Hetzer was invented by the Germans looking for the cheap and effective tank-buster. It was based on the widened chassis of Czech CKD LT vz.38 light tank, used by the Germans as Panzer 38(t). Powered by 160 BHP Praga 6-cylinder petrol engine and armed with a 75mm AT cannon it showed great efficiency against both Allied and Soviet AFV in the last 2 years of war. Some 2850 were built (in Czech factories) until the VE Day and almost 350 after the war - 160 of these last mentioned were exported to Switzerland. After the StuG III, Panzer IV, Panzer III and Panzer V it was the "number 5" among the most numerous German WW2 all-tracked AFVs. The quite recent (2004 tooling) UM kit is available in 10 different boxings. Mine is the original #352 "tank hunter, early version". It's built OOB except for the drilled (1 mm dia) gun barrel and exhaust pipe as well as the decals representing a Hetzer fighting in Falaise area in August 1944. It is not "shake and bake" kit however. Making L-section fender hangers from the 1.5mm wide PE stripes will be my nightmare for several weeks The paints are (as always) Humbrol enamels: 93 for the RAL7028 Dunkelgelb, 117 for the RAL6030 Olivgruen, and 186 for the RAL8017 Rotbraun - painted with brushes. Afterwards the Vallejo acrylic matt varnish was brush-applied overall. The digits are from the Dragon Panther tank and the Eduard SPAD. The pictures are made by LG smartphone. Comments welcome Cheers Michael
-
Just after Christmas I decided to have a go at clearing some of the Harriers and Sea Harriers in my stash. I finished the three I started a few weeks ago but as I'm trying to complete several GB builds I have been tardy in photographing them and getting them here. The first is the elderly Airfix Harrier GR3. Here it is finished as XZ 997 from the HMS Hermes Carrier Air Group during Operation Corporate in 1982. This actual aircraft was flown on a bombing raid on 14/6/82 by Squadron Leader Peter Harris, loaded with laser guided bombs. The model is pretty much OOB but has the correct sized tanks from a newer Airfix Harrier and bombs from a Buccaneer kit. The build wasn't too bad for an elderly kit and I had less problems than with the Sword and Hasegawa kits I built a tiny the same time. It's painted Xtracrylix paints and matted down with a couple of coats of Liquitex varnish. The transfers come from a set from Combat Decals - HMS Hermes, Carrier Air Group, Operation Corporate. And here with the other two builds.
-
Second of three Harrier builds. This is the Sword boxing of the T4 trainer finished as WV 268 from 899 Naval Air Squadron in 1992 based at RNAS Yeovilton. The kit is finished in the 899 NAS 50th Anniversary Markings, transfers for which are in the boxing. Overall its a decent kit with some resin and an awful lot of etch. I felt every time I got somewhere I had more etch to stick on, including some which were practically microscopic. The intakes aren't very good as they don't have the dropped down doors, only closed as in flight. I replaced them with a set from Pavla but it took an inordinate amount of fettling and time to get them to fit. I would have preferred Sword had given options for the intakes rather than loads of tiny etch. Painted with Xtracrylix Dark Sea Grey and finished to a Satin finish with Liquitex Satin varnish. With some of his friends
-
Here is my third contributio, AZ Model's version of the first FAA model of the Martlet/Wildcat. These were aircraft redirected from Belgian and French orders for, at that time, the new Wildcat. They differ in they were engined with a Wright Cyclone engine and on arrival in the UK had to have their equipment changed to British equipment. Three options offered, including an erroneous RAF version, I'm also not sure that this livery is correct and the serial is definitely wrong. I'll look in the transfers stash and see if I have something more accurate. There are about 30 parts on two sprues, moulding is not too bad at times but there's a bit of flash and some pretty large moulding pins. Also there's a resin engine and a small clear sprue with a canopy and the two underside windows. Simple instructions. Some of the colour call outs are not right. Especially some of the interior colours and the undercarriage. And a nice transfer sheet albeit with probably wrong serials for the British one. Now to get some paint on.
-
A recent build finished about a month ago that I have just managed to photograph. This was the 2010 boxing of the Airfix Spitfire Mk1A and built oob. The kit is a lovely build with superb fit, sometime so tight that I could have omitted the adhesive. The images Thanks for looking. Stay safe. Graeme
-
I've always had a soft spot for Heller kits with their petite panel lines and great fit, so when I came across the box of the Caudron Simoun in the new style box, I bought it without hesitation. I had already purchased a set of decals for Air Bleu Caudrons (Simoun and Goéland) from Renaissance Decals, so decided to use those instead of the kit decals. As expected the little Caudron fitted perfectly, I only replaced the pitot tube with brass tube and wire and the exhaust stacks with brass tube as well. I cut out the flaps and elevators and positioned them at an angle. I also opened up the door and gave it some tiny hinges so it can be opened and closed, allowing a peek into the interior. I hope you like it. Peter
- 16 replies
-
- 37
-
-