Search the Community
Showing results for tags '1:48'.
-
Rockwell B-1B Lancer Revell 1:48 The Rockwell (now part of Boeing) B-1 Lance is a four-engine supersonic variable-sweep wing, jet-powered heavy strategic bomber used by the United States Air Force (USAF). It was first envisioned in the 1960s as a supersonic bomber with Mach 2 speed, and sufficient range and payload to replace the Boeing B-52 Stratofortress. It was developed into the B-1B, primarily a low-level penetrator with long range and Mach 1.25 speed capability at high altitude. Designed by Rockwell International, development was delayed multiple times over its history due to changes in the perceived need for manned bombers. The initial B-1A version was developed in the early 1970s, but its production was cancelled, and only four prototypes were built. The need for a new platform once again surfaced in the early 1980s, and the aircraft resurfaced as the B-1B version with the focus on low-level penetration bombing. However, by this point, development of stealth technology was promising an aircraft of dramatically improved capability. Production went ahead as the B version would be operational before the "Advanced Technology Bomber" (which became the B-2 Spirit), during a period when the B-52 would be increasingly vulnerable. The B-1B entered service in 1986 with the USAF Strategic Air Command (SAC) as a nuclear bomber. In the early 1990s, following the Gulf War and concurrent with the disestablishment of SAC and its reassignment to the newly formed Air Combat Command (ACC), the B-1B was converted to conventional bombing use. It first served in combat during Operation Desert Fox in 1998 and again during the NATO action in Kosovo the following year. The B-1B has supported U.S. and NATO military forces in Afghanistan and Iraq. The Lancer is the supersonic component of the USAF's long-range bomber force, along with the subsonic B-52 and B-2. The bomber is commonly called the "Bone" (originally from "B-One"). With the retirement of the General Dynamics/Grumman EF-111A Raven in 1998 and the Grumman F-14 Tomcat in 2006, the B-1B is the U.S. military's only active variable-sweep wing aircraft. The B-1B is expected to continue to serve into the 2030s, with the Long Range Strike Bomber to start supplementing the B-1B in 2030. The Model First released in 1983 this huge kit has been released three more times before this current incarnation, and this only has a new set of decals so be aware it will still have all the shortcomings of the original kit. That said, the moulds do appear to have stood up well as there is very little flash or other imperfections on the review sample. The parts look well moulded with no short shots and with the surface detail looking as fresh as when originally released. The clear parts for the cockpit windscreen and side windows are nicely tinted, although this does mean that even less of the interior will be viewable. The only real downside is that due to the nature of the semi open sprues quite a few parts have come off within the poly bags. Now, when I built this kit when first released, I’m sure it came with rubber tyres, in fact the undercarriage is about all I’ve got left of it and having rummaged in the spares box and finding them they were indeed rubber. Well in this release the tyres are moulded in halves, in some horrible, shiny, brittle black plastic which doesn’t look good at all and is a backward step in my opinion, especially as the original rubber tyres are still good after all these years. Hopefully some enterprising aftermarket company will soon bring out some nice resin to replace them. Also, over the course of time the B-1B has had several new weapons added to its armoury along with various pods and decoy units, none of which are included. It would have been nice if Revell had brought the kit up to date, but the cynic in me thinks that the parent company are perhaps only ever interested in reboxing older kits and bringing very little new to the modelling table. So, no matter how impressive this kit is, the modeller will have to add quite a bit of scratch building and aftermarket to bring it up to a modern B-1B. The clear instructions, (on better paper than usual), start the build with the assembly of the crew access ladder which is made up of the door, two hand rails and the sliding step section. This is followed by the nose wheel bay, made up of the roof, sidewalls, front/mid/rear bulkheads, nose leg latch and cradle. The four, three piece ejection seats are assembled, before the construction of the front cockpit from the single piece floor complete with side and centre consoles to which the instrument panel and associate coaming, joysticks, seats and rear bulkhead are attached. The rear cockpit is then assembled from the single piece floor, again complete with side consoles control panel, plus the front and rear bulkheads. The two completed cockpit sections are then fitted to the roof of the nose wheel bay. Before adding the cockpit/wheel bay assembly to the nose halves, each half has to have the side windows and portholes fitted. The nose can then be closed up around the cockpits, along with an appropriate amount of weight to prevent the finished model from being a tail sitter. The windscreen is then fitted, followed by the nose mounted radar bulkhead and radar array, and finished off with the radome, which can be left off if the radar is to be shown off. Moving onto the undercarriage, with the nose wheel assembled first. The styrene tyre halves are joined together before the inner and outer hubs of the two wheels are fitted. The two part oleo is then fitted between the two halves of the nose leg, ensuring the oleo section is unglued so that the wheels can be turned to give a bit of life to the finished model. The two part steering module is then attached to the rear of the leg, whilst at the front the lights and retraction link are fitted. Finally the previously complete nose wheels fitted to the oleo and the whole assembly put to one side as the rest of the build progresses with the main wheel bays, engines and bomb bays. The main wheel bays are formed from a single piece roof, two which the rear bulkhead, side walls, front bulkhead and central wall. The completed items are glued from the inside of the lower fuselage to which, for some odd reason only the upper sections of the engine pods are fitted into position on the underside. The instructions then jump to the assembly of the two rotary launchers and the AGM-69As, all 16 of them. Each launcher comes in two halves and fitted by the two weapon support rings, whilst the weapons are made up of two halves to which the tail section is attached and are then fitted to the launchers. Each of the three weapons bays is made up of a large u shaped moulding with roof detail included, to which the two sidewalls, filled with pipe work and other details are fitted. The two forward bays have the AGMs are installed, whilst the rear bay is fitted with a two part long range fuel tank. Each launchers and tank are attached to the front and rear bulkheads of each bay before the bulkheads are slid into position. Each bay is then glued into place on the inside of the lower fuselage. The whole assembly is then put aside to set properly. The two wings are each made up of upper and lower halves and when completed are slid onto the pivots moulded into the lower fuselage. The large upper fuselage section is then carefully attached to the lower fuselage. The two air intakes of each engine pod are formed from upper and lower halves which when glued together are finished off with the front face of the engined glued to the rear. With both lower pods assembled they are then fitted to the already sited upper sections and completed with the fitting of the intakes and two piece exhausts. The eight main wheels are now assembled in the same fashion as the nose wheels and put to one side. The main bogies each come in two halves which before joining are fitted with the internal shock absorber, followed by the four piece retraction mechanism. The wheels are then fitted, with the axles passing through the two brake pipe units. These assemblies are then put to one side to set properly. The tail is assembled from the two vertically moulded halves and finished off with the tailcone. The all moving tailplane is assembled, each side is made up of two halves with the shaft moulded to one side which is then passed through the hole in the assembled tailplane and slid into the hole moulded into the opposite side of the horizontal tail. The nose and tail assemblies are then glued to the fuselage centre section when finally it starts to look like a proper aeroplane. The model is then fitted out with the foreplanes, undercarriage assemblies, nose and main wheel doors, bomb bay doors, (each with four hinge beams), cockpit hatches, pitot probes, wing gloves, and aerials. The prominent vortex generators have to be made up by the modeller using, as suggested by Revell, the small number tags off the sprues. You’re probably better off making them from suitable styrene sheet or even etched brass. Decals The decal sheet appears to have been designed by Revell and printed in Italy by Zanchetti. They are well printed, in good register and nicely opaque but with quite thick carrier film, particularly on the air refuelling marking and the aircraft codes. The decals are quite matt in appearance but should settle down well with the appropriate solutions. You do get a nice selection of stencils, but I’m not sure if you get a full ship worth. The no walk lines can be a little awkward if memory serves me well. Two options are provided, with markings for the following Rockwell B-1B Lancer, 77 Weapons Squadron, USAF Weapons School, Dyess AFB, Texas, October 2012 Rockwell B-1B Lancer, 116 Bomb Wing, Georgia Air National Guard, Robins AFB, Georgia, July 2000 Conclusion Considering the age of this kit I’m pleasantly surprised how well the mouldings are holding up. The change to styrene tyres from the old rubber ones is definitely a mistake, but a well known aftermarket company has announced that they will be releasing resin alternatives, as I have been writing this review. They have also announced a raft of other upgrade sets for this kit, which will help go a long way in building a more accurate model of the BONE, although it would have been better if Revell had ungraded their moulds so that the modeller didn’t have to have further expenditure. Apparently you may also require a box full of filler too as the fit can be a bit wayward if you’re not careful. Recommended Revell model kits are available from all good toy and model retailers. For further information visit
-
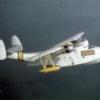 OOB.build,painted with mixed Tamiya acrylics and Vallejo acrylic varnish,through and Iwata HP-B and Neo respectively. Thanks to "Nachtwulf" for the combat flap info. There wasnt much interest in the WIP thread,but hope springs eternal that the completed project will attract some comment. Good or Bad.
 -
Mikoyan Mig-21MFN Weekend Edition Eduard 1:48 The history of the Mig-21 is pretty well known with the type being produced in numerous versions for untold number of air forces throughout the world. This mainstay of Soviet aviation and their allies is still in service in many smaller air forces providing the modeller with an amazing choice of camouflage and markings. The Model Eduard are really getting the most out of their moulds as this kit is of the upgraded version of the Mig-21MF reviewed HERE, the only difference that the Czech Air force had them fitted out with NATO standard avionics, so externally the only real way of telling the difference is the aerial fit. As such, you will have quite a few spare parts left over after the build when compared with the standard MF. Although this is the Weekend Edition, Eduard have still provided a set of pre-painted self adhesive seatbelts, which is nice to have as these are usually the only thing you need to add to a kit even if building out of the box. Decals What this kit does have over the other versions are the fabulous decals. You get three sheets in total. One with all the stencils, one with the Czech insignia, markings for the standard scheme and the wording for the special paint scheme, the third sheet carries the tail markings for the special scheme. All the decals are beautifully printed, in register, with good density and little visible carrier film. The two schemes provided are for the following:- Mig-21MFN, 41’ Fighter Squadron, Caslav Air Base, Czech Republic, October 2002 Mig-21MFN 211th Squadron, Czech Air Force, Caslav Air Base, July 12th 2005. Conclusion The Eduard Mig-21 series are all beautiful kits, both to look at and build, and this shouldn’t be any different. The tail decals for the special scheme could be a little fiddly, but the effort will be worth the result of having an interesting scheme in your collection. Very highly recommended. Review sample courtesy of
-
Lewis MkII WWI guns 1:48 Brassin Having released the Lewis MkIIs in 1:32 a couple of months ago, this month Eduard Brassin have now released them in 1:48. They arrive in the now standard blister pack with the resin contents held in place by a nice slab of foam, while the etch sheet is sealed under a taped down piece of card. Naturally the quality of the resin parts is superb with some exquisite details. There will be the need for some cleaning up of the parts once the parts have been removed from their moulding blocks. As with the 1:32 items the two guns are made up of the barrel and breech sections moulded as one, with the separate resin handle attached to the rear, along with a resin cocking lever, muzzle and ammunition drum. The etched parts are for the rear and forward sights. Brassin have also included four spare ammunition drums to add to the aircraft racks. Conclusion As with the previously reviewed 1:32 Lewis guns, these are superbly moulded and will be a great addition to your model. Very highly recommended Review sample courtesy of
-
 Mikoyan Mig-21MFN Eduard/Brassin Eduard/Brassin 1:48 With the release of the weekend edition of the Mig-21MFN reviewed HERE, it was only a matter of time before Eduard/Brassin released some detail sets for it. These three small sets are enough to lift the kit from the ordinary to something a little bit special. The Brassin set is to replace the kits ejection seat. The seat is built up from the main seat unit, to which the resin seat squab, backrest and headbox, and three side plates are attached. The PE parts are then added, these include the seat firing handle, seat release handle and a small rear mounted vane fitting. The seat is also provided with Eduards super fabric seatbelts, which while quite fiddly to assemble, what with all the PE buckles and fittings, they will look most realistic when fitted. The cockpit set contains a small sheet of parts, most of which comprise the pre-painted panels for the instrument panel and side consoles. The set also includes additional handles, levers, a new throttle box, ejection seat fittings, and a full set of seatbelts. There is also a part for the canopy and plumbing for the main undercarriage legs. Not bad for such a small sheet. The last item is a sheet of masks. These aren’t just for the canopy as they also contain the masks required to the various dielectric panels on the aircraft as well as for the wheels. Conclusion IF you really want to add that little extra to your Mig-21MFN then these three sets will certainly help, although perhaps having three different styles of seatbelts may be a little much. At least Eduard gives the modeller plenty of choice. Highly recommended Review sample courtesy of
 -
 One of the most colorful fighter squadron of German Luftwaffe was the "Jagdgeschwader 53". I have built some models from these with many work and effort. The color layout only decides in the end, even if the kit is very old or has lower quality. Some few months ago I was looking in my - actually from 23 volumes consisting (Die Deustche Jagdfliegerverbände" - and found in the part II (Sitzkrieg") "phoney war" an interesting template. It was a Messerschmitt Bf 109E-4, yellow "1" of 3. / JG 53 from OLtn. Wolfgang Lippert. On 23 November 1941, OLtn. Lippert baling out of his stricken aircraft, he broke both his legs when he struck the vertical stabiliser. He was captured and taken to a hospital. He died from an embolism after the operation without regaining consciousness. Wolfgang Lippert was credited with 30 victories. basic kit is from Hasegawa - a very old Bf 109E kit Decals from my private decal collection box corlor AGAMA/ XTRA Color changed parts: new position light on the wings (left/ rigth) new antenna wire and new aerial mast control cable rudder spindle vertical stabilizer the foto template my paper template in scale 1:48 Rollout:
 -
Its been a while, 3 moves in 6 months to 3 different countries and ultimately halfway around the world together with retirement, a new career, small daughter and a degree means that time has been tight. Anyway, after finally getting some modelling space and my workdesk, sundries and tools etc unpacked the first kit to hand is the lovely Academy F-4B Phantom in 1:48. I spent quite a bit of time on the Aires cockpit dry fitting, fettling and thinning to get it to fit. It is originally designed for the Hasegawa kits and as such is as much of a drama to get it to fit in this one as well. Their instructions are useless and are beyond vague when it comes to what to remove. You can get it to fit with some creative thinking, especially when it comes to squeezing the nose gear bay in (more on that later). So, cockpit finished, painted and matted down, next step is getting it into the fuselage.
- 15 replies
-
- 10
-

-
Hello chaps This is a very nice 1:48 delfin kit by AMK. The only aftermarket is the Eduard interior PE and the SyAAF decals. Enough has been said about the model and how it goes together in the WIP thread. For more pictures, please check my blog http://militaryaviation148.blogspot.com/2015/06/l-29-delfin-syaaf-130.html Thanks for looking and do not hesitate to comment. cheers, Vasko
- 12 replies
-
- 17
-
-
 Tamiya 1/48 Mitsubishi A6M2 Zero (Zeke) (x2) "Build Update #1" Hello Guys, This is my latest build that I started a couple of weeks ago, but haven't had the time to jump on here and post my build progress, until now. So, here goes.... I've decided to build two A6M2's at the same time, so that I can model one in the Aircraft carrier based all over Japanese Navy Grey/Green color and one in the ground based Japanese Navy Green upper and the Japanese Navy Grey lower. The Grey/Green version will have little chipping, but the Green version will have heavy chipping. The chipping will be done by using the "hairspray" technique. These will be my 18th and 19th model builds since starting modeling in January 2014, and, they will be my first ever attempts at Japanese WWII aircraft, so, I've been looking forward to doing these. They are also my entries into a group build that I am hosting on YouTube called the "For the Love of Freddy" GB. He's a fellow modeler on YouTube that has surprised many modelers, including myself, with his altruistic nature, by sending them large parcels full of models. He sent me 4 parcels in the last two months containing a total of 43 model kits, mostly 1:48 scale and some 1:32 scale. And, therefore, because of his kindness and generosity to myself and other modelers, I thought that I would start this GB, which I did on May 1st and it will run until August 31st. These two "Zeros" were kits that Freddy sent to me, so, I thought it was a fitting tribute to Freddy by building them. Anyway, that's enough of the introduction, let's get on with the build..... As always, I start my builds by washing the sprues in warm soapy water... Next, I assembled both drop tanks, one for each plane... I then put all the small parts onto cocktail sticks in preparation for painting... All parts were then taken to the spray booth for airbrushing a black base coat onto.... When the black base coat was dry, I then airbrushed Cockpit Interior Green onto the fuselage interiors and onto the cockpit tub parts.... I then made a start on detailing the cockpit tub and added the instrument panel decals, then assembled the separate parts to form the tub.... I then started on the radial engine parts and cowlings, and assembled them when the paint was dry... It was now time to assemble the cockpit tubs into the starboard side fuselage halves and then assemble the portside fuselage halves onto the starboard side... It was now time to assemble the wings and horizontal stabilizers onto both planes... First, I assembled the bottom wing sections to the underside of the fuselage assemblies... Followed by assembling the starboard side upper wing sections, then the portside upper wing sections, taping the wings to set the dihedral and to hold them in place whilst the glue set. I then glued the horizontal stabilizers into position... When the glue had set, I removed the tape and checked both planes to see how they looked so far... Well, that's it for the first update. Next, I will prepare the planes for priming and applying paint. Thanks in advance for taking a look and commenting, much appreciated and in the meantime, if you'd like to watch my "Build Update #1" video on YouTube, here is the link for that: https://youtu.be/PBuSMyQB9bY Cheers, Martin
 -
Hi, everybody. After several months of lurking around here and finding myself in awe of the quality of the builds on here, I finally decided I'd sign up and post my own efforts. I picked up Tamiya's 1:48 Lancaster on eBay, the other day. I've always had a thing for Lancasters, and the kit was relatively cheap. I couldn't resist. I'm afraid though, it seems I've bitten off a bit more than I can chew - I wouldn't consider myself to be the most accomplished modeller, and the equipment I've got to work with is...well, rudimentary at best. I really want to do this kit justice, so I'd love some constructive criticism, advice, tips, tricks or anything else you might be willing to share Anyway, here's the early going (apologies for the iPhone camera quality) Got some of that Eduard PE too, to spruce up the interior a bit. Heard a lot about it, but never used it before. Utterly fantastic, and quite cheap too. Reckon I'll get some more for the bomb bay - although the kit bay comes with lots of studs on it that need to be removed. Anyone have any tricks for removing them, or am I in for a lot of sanding?
-
Rivetting Tools 1:72/1:48 SBS Models There are times when a model really needs a good sanding and polishing to reduce/eliminate the seams where parts meet. This also causes the moulded detail to be lost. Now, panel lines aren’t too difficult to re-instate, but rivets are quite a bit harder. Well they were until the invention of the riveter of which there are now a few examples about. This new pair, one for 1:72 and one for 1:48 have recently been released by SBS Models of Hungary. Both riveters have an air of quality and solidness about them. The nicely moulded wooden handle is comfortable to hold and the brass rivet wheel, permanently mounted into the handle, should last a fair about of use. Operation is easy, just clean the area to be riveted, mark the line with a pencil, then, using a stiff straight edge roll the wheel along the pencil line. When you’re happy with the result give the area a polish with some micromesh and you’re done. Of course practice makes perfect so it might be an idea to try it out on a paint mule or the like before tackling a future masterpiece. Conclusion These tools are a real boon to those who wish to undo the loss of detail through sanding and really should be in every modellers tool box. Nicely made and comfortable to use, just what the modeller needs. Very highly recommended. Review sample courtesy of
-
Turned Hellcat Machine Gun Barrels 1:48/1:32 Master As if it wasn’t enough producing new sets for barrels in 1:350 and pitot probes in 1:48 Master Models have also released a raft of barrel sets for the Grumman Hellcats in both 1:48 and 1:32 scales. The sets are marked F6F Early, so I presume a -3, F6F Late, presumably a -5 and F6F Night Fighter. It’s quite interesting seeing the different styles of barrels used for each of these marks. As is the norm, the kit barrels will need to be cut off and a small hole drilled into the wing to accept the new brass barrels. All have a drilled out muzzle, which is quite amazing, particularly in the 1:48 sets. [AM-48-107] 1:48 F6F Early [AM-48-108] 1:48 F6F Late [AM-48-109] 1:48 F6F Night Fighter [AM-32-078] 1:32 F6F Early [AM-32-079] 1:32 F6F Late [AM-32-080] 1:32 F6F Night Fighter Conclusion With so many sets being delivered in such a short time it does get rather difficult to say something different for each review. But if you have a Hellcat in either of the scales provided for here then they really are a must have. Very highly recommended. Review sample courtesy of Piotr at
-
Pitot Probes 1:48 Master The latest releases from Master Models in their series of replacement pitot probes have recently arrived at BMs London offices. They are well up to their usual standard and very sharp, so care should be taken once fitted. They are so much better than the styrene ones found in the kits. [AM-48-104] – Has been designed for the lovely new 1:48 Folland Gnat T-1 from Airfix. [AM-48-105] – This pack has two probes for the L-39 Delfin for the AMK kit. [AM-48-106] – This pack also contains two probes that have been designed for fitting to the MPM kit. Conclusion Master Models must have a tremendous machining set up to be able to produce so many different pitot probes and to produce them with such finesse. The always look great on the finished model. Very highly recommended. Review sample courtesy of Piotr at
-
 Hi gang I picked this up when it was released and have been itching all that time to get it started. As Andrew (Caution Wake Turbulence) has stated in his thread the resin pit has possible fit issues that troubled the two previous Eduard Lightning boxing's. Eduard claim to have tweaked these issues so we will see. DSC_6123 by Snapper_city, on Flickr DSC_6124 by Snapper_city, on Flickr For an Eduard special boxing I think apart from the box cover all the schemes are quite bland and nothing to shout about. I built the cover scheme as a 1:72 Matchbox kit when I was a kid so decided to do one of the others for this one. The two above along with the NMF below were my favorites but in the end I have decided to go with the one below. I have no yellow in the cabinets so this should brighten things up a bit. DSC_6126 by Snapper_city, on Flickr Sprue shots in bags. DSC_6127 by Snapper_city, on Flickr DSC_6129 by Snapper_city, on Flickr DSC_6131 by Snapper_city, on Flickr The resin, etch (cockpit PE on reverse of packet) and paint masks. For better out of the bag shots check out Caution Wake Turbulence's thread. Some of the resin details are exquisite. DSC_6133 by Snapper_city, on Flickr DSC_6134 by Snapper_city, on Flickr Master replacement barrels which for some reason do not have the cooling holes along the barrels. No idea if this is correct or not. I'll have to get researching. I did also consider a vac canopy but decided against the extra work. I will be attempting this build around my 8 month old daughter who has made modelling time a scarce thing these days so fingers crossed the three months will be long enough to get it finished. Happy modelling.
 -
Siemens-Schuckert D.III - Weekend Kit 1:48 Eduard My collegeue has reviewed this kit before in its Profipak edition here. This is the same great plastic from Eduard but it is now released in a Weekend Edition. This does not have the photo etch parts and masks of the Profipak. The difference here with the weekend edition also is the decals. For this boxing two sets of decals are supplied. These are printed by Eduard and feature one small sheet of national markings, and one large sheet with the colour lozenge and rib tapes. The two aircraft options are; SSW D.III, Jasta 15, Chery-les-Pouilly, July, 1918 SSW D.III, 1611/18, Kest 4b Conclusion It is good to see this kit re-released, and in a weekend edition which is great value for you money. Recommended. Review samples courtesy of
-
- 1
-
-
- Siemens-Schuckert D.III
- 1:48
- (and 2 more)
-
 My daughter bought me the new tool 1:48 Spitfire Vb at Christmas time and last year I picked up cheap at a swap and sell the Malta Defender's boxing of the Special Hobby Spitfire Vc. I thought it would be instructive to build both of them "side by side". The Special Hobby kit was a bit trickier than the Airfix kit (no surprise really), although the Airfix kit did have its moments (the landing gear legs were particularly troublesome). I also did not make use of all of the photo etch in the Special Hobby kit - not being a great fan of it. Rather than use CA glue I used Humbrol Clearfix, which worked pretty well. I also tried a few extra bits of weathering that I haven'r tried before, some exhaust staining using dry brushed acrylics (may be a little overdone on the Vb?), cordite stains using some pencil graphite and some minor paint chipping using some flat aluminium acrylic. Both were completed as Malta Spitfires, although I know that colour schemes for these are a bit of a can of worms. First, the Airfix Vb finished as the aircraft flown by PO "Buck" McNair DFC RCAF with 249 (Gold Coast) Squadron RAF, Ta'Qali, Malta, March 1942. Brush painted Tamiya Acrylics, using XF53 Neutral Grey for the locally mixed grey colour. I almost regretted that because the paint was quite old and went on a bit "claggy" even when thinned. Decals were fine but needed some help to sink down into the detail using some brushed on Tamiya Acrylic thinner. Made grubby with some watercolours and finished with a couple of coats of brushed on Italeri Acrylic Flat Clear. Second one is the Special Hobby Vc finished as the aircraft of Sgt Claude Weaver of 185 Squadron RAF, who was shot down on September 9th 1942. There is a well known image of this aircraft crashed on a beach. I chose to go with Extra Dark Sea Grey over Azure, which from reading around on the forums is not completely unreasonable. I used Italeri Acryl Azure Blue for the undersides, the first time I have used this brand of paint on a larger canvas, and I am very happy with the results. It went on beautifully in thin coats using water to thin it without obscuring the fine engraved detail. While fragile it also touches up really well. Decals were a bit fragile, and I had some trouble getting them to settle over the lumpy detail on the underside. Had to resort to a coat or two of the Tamiya Acrylic thinner. Again some water colour to make it a bit grubby and highlight the detail, and Italeri Acryl Flat Clear to finish. And finally both of them together. Thanks for looking.
- 11 replies
-
- 20
-
-
Bereznyak-Isayev Bi-1 Mikro-Mir 1:48 Flying a fighter aircraft during World War 2 was an extremely dangerous profession by anyone's standards. Flying an experimental, rocket-powered, Soviet-built, wooden and fabric constructed fighter aircraft was practically suicidal! The Bereznyak-Isayev BI-1 was the brainchild of Aleksandr Bereznyak and Aleksei Isayev. The idea was proposed in July of 1941, and by September of the same year the first unpowered glider flight was undertaken. Because of the rapid German advance through Soviet territory, the factory building the BI-1 had to be relocated further to the east. This delay meant that the first powered flight didn't take place until May 15th 1942. On landing the undercarriage was damaged. The third Bereznyak-Isayev BI-1 prototype crashed on its seventh flight, sadly killing fighter ace Captain Grigory Bakhchivandzhi when it pitched down sharply during a high-speed run. Bakhchivandzhi was posthumously awarded Hero of the Soviet Union. During an investigation into the accident, the engineers concluded that the aircraft had become unstable at transonic speeds. Bakhchivandzhi had been in two other accidents during the development of the BI. He was the pilot during the first flight which crash landed. And during a grounded engine test in 1942, the engine exploded. In the explosion, the engine head was catapulted into the back of the pilot's seat, knocking Bakhchivandzhi against the instrument panel and injuring him slightly. To protect the pilot in the future, a 5.5 mm steel plate was fixed to the back of the seat. The sixth Bereznyak-Isayev BI prototype was fitted with wingtip ramjets in an effort to extend the rather pathetic 15 minutes of powered flight. They didn't help much and proved difficult to start. Only seven Bereznyak-Isayev BI prototypes were completed, although 50 were scheduled to be built. Each one of the seven prototypes had its own issues, and the engineers were constantly having problems with both the liquid-fuelled rockets and the stability of the aircraft itself. Additionally the aircraft were corroded by the very fuel which was designed to power them! The red fuming nitric acid would eat away at the fuel tanks and the aircraft's fabric skin. Both BI-1 and BI-7 were scrapped due to excessive corrosion. In the end the Bereznyak-Isayev BI project was abandoned, and it became yet another dead-end experimental aircraft - with the emphasis on mental. The model Micro-Mir is probably best known for their super collection of 1:350 submarine releases. They are now branching out and releasing aircraft in most of the major scales. Being Micro-Mir they won’t just be producing the more common types of aircraft, and this release shows just that. The kit comes in an attractive top opening box with an artists impression of the aircraft in flight. Inside, the kit is contained in a poly bag with a sticky flap, with the decals, etched sheet and masks contained in a separate poly bag. The grey styrene is rather soft and due to the nature of the of the aircrafts build there aren’t too many details, but what panel lines etc there are, are nicely defined. The smaller parts on the sprues do have a small feather of flash around them which will need to be carefully removed; this is just the way of limited run kits. The two clear parts are well moulded and pretty clear, but could do with a dip in your favourite varnish. The kit is pretty basic, but then so was the real aircraft and the build starts with the assembly of the cockpit, which consists of the floor, rear bulkhead, instrument panel, with etched panel and an acetate sheet for the instruments. The pilots seat is fitted out with a full set of etched seatbelts before being fitted into place along with the joystick and rudder pedals. Before closing up the fuselage the throttle quadrant is attached to the port sidewall. With the fuselage closed up the headrest can be fitted, along with the nose mounted cannon barrels, windscreen and separate canopy. The horizontal tailplanes are then attached and fitted with the vertical endplates, while right aft, the rocket nozzle is attached. The wings are assembled next, and consist of a single piece lower section, wheel bay and two upper sections. The completed wing assembly is then attached to eh underside of the fuselage and fitted out with the main undercarriage. This is made up of single piece oleos, single piece wheels/tyres, plus the inner and outer undercarriage bay doors. Finally the tailwheel is attached to the ventral fin, thus completing the build. Decals The small decals sheet is printed in house and contains just six Russian stars and two white number sixes. They look pretty well printed, in good register and appear quite thin, with little carrier film evident. To help with painting Micro-Mir has kindly included a small sheet of masks for the canopy and windscreen. The single colour scheme is a camouflage of black and green. Conclusion This is certainly one of the most unusual aircraft I’ve had to review, and had little knowledge of its existence. With care and acknowledging its limited run credentials it will turn out into a nice little model, looking good in any collection. Highly recommended. Review sample courtesy of
-
Welcome to my latest project: the Academy 1:48 F14A Grumman Tomcat 'Sundowners', limited edition. Now I know that this kit has come into some critisicm regarding the nose, but having researched the other kits available they all have thier own problems, so I went with the kit with one of the most striking schemes out there; and to be honest if it looks like an F14 then thats good enough for me! Like most of my builds I have upgraded the cockpit with the excellent Aires resin tub and photo etch along with thier exhaust cans. Other wise it will be straight out of the box.
-
Dornier Do215B-5 ICM 1:48 The Do 215B-5 Kauz III followed the lead of the Do 17Z-10 "Kauz II", with a streamlined solid nose that housed 4 x 7.9mm MG17 machine guns and a single 20mm MG FF cannon (some sources state two cannons). An infra-red sensor was also fitted, part of the Spanner-Anlage system that was intended to pick up the hot exhausts of enemy bombers, with a small Q-Rohr display screen installed in the cockpit. In practice, the device proved to be of very limited value, as it was very unreliable and could not differentiate between friend and foe. The Do 215B-5 entered service with 4./NJG 1 in early 1941, with around 20 aircraft eventually being modified to carried the FuG 202 Lichtenstein B/C radar system. While the clumsy aerial array knocked around 15 mph off the aircraft's top speed, the first "kill" was claimed in August 1941, with additional victories soon following. The Do 215B-5 soldiered on in limited numbers until 1944, with its original armament augmented by an additional pair of cannon mounted side-by-side in a pack under the nose. The model The kit arrives in a very attractive flip top box with an artists impression of the aircraft in its natural nocturnal environment. On opening, all the standard sprues are contained in a single poly bag with only the clear parts separately packed in their own bag. The five sprues of medium grey styrene are very nicely moulded, with no sign of flash and only a few moulding pips. Whilst the details such as the panel lines are very finely done there are quite a few flow marks in the plastic, although these should disappear under a coat of primer. The clear parts though are blemish free and remarkably clear which is a good job as there is quite a bit of detail within the cockpit area, in fact the whole kit is well stocked with detail. Construction begins with the fitting of the lower side console in the port fuselage part, followed by the throttle box, a panel full of levers and the radio panel. The two part instrument panel is then fitted, decals being provided for the instruments, along with a large trim wheel attached to a tripod structure. The pilots seating section is made up of the floor, two rudder pedals, each made up of two parts, the control column with separate yoke and the floor support frame. The assembly is completed with the fitting of the seat and compass housing, before the whole assembly is fitted to the fuselage side. The lower rear longeron structure is then fitted, as is the rear side window. In the starboard fuselage more switch panels, a map case, and auxiliary instrument panels are attached, along with the front and rear lower longeron structures. The three piece co-pilots seat is then assembled and glued into position. There are three bulkheads to be fitted to one of the fuselage sides and the tail wheel before the fuselage can be closed up. The rear gunners seat is then assembled and attached to the two support frames in the fuselage. A fourth bulkhead is slid into position just aft of the rear cockpit bulkhead, whilst the panels underside of the cockpit are also attached, the clear section having an optional cut out panel replaced with one that doesn’t have a machine gun opening, probably a legacy part from the previous bomber version. The large fuselage mounted fuel tank is then assembled and slid between the the front two bulkheads. Moving onto the wings; the two lower sections are fitted with two part radiators and fairings, before being glued to the single piece upper wing, followed by the separate ailerons and landing lamp cover. The wing assembly is then attached to the fuselage and the aircraft begins to really take shape. The kit comes with complete with two complete engines, which whilst not the most detailed, certainly give the modeller a good starting point for some super detailing. Each engine is made up of a five piece block, separate rocker covers, inlet manifold and a three piece turbocharger. The engines are then fitted with the two engine bearers and put to one side whilst the nacelles are constructed. Each nacelle comes in two halves and are fitted out with the engine mounting bulkhead, radiator, radiator inlet and outlet doors, main gear bay rear bulkhead, exhaust stubs, gear retraction jacks and linkages plus the upper and lower cowlings, which can be left loose once the engines have ben attached to their respective bulkheads. Each main landing gear is made up of two part wheels/tyres, the two oleos, complete with crossbraces are provided as a single part and fitted with the mudguard and its associated mounting beam. The completed units are then slid in to the front of the gear bays and connected to the retraction actuators. The completed nacelles are then attached to the wings and fitted with the two part propellers. Meanwhile the bomb racks are fitted into the still open bomb-bay and the rear machine gun for the cockpit is assembled from the gun, ammunition drums and spent cartridge bag. The machine gun is then fitted to the rear of the canopy, whilst on top, the aerial, DF dome and armoured windshield, which has an option of being enclosed, or with an opening for an external “telescopic?” gunsight are attached. The canopy can then be fitted to the airframe along with the underside rear cupola glazing. The solid nose cone is fitted out with the machine gun and cannon barrels, as well as the extreme nose panel. On the underside the bomb-bay doors can be posed open or closed and just aft of the bomb-bay the HF aerial rail is attached. The horizontal and vertical tailplanes are each made up of two halves to which the single piece rudders and elevators are attached along with the elevator control arms. The vertical tailplanes/rudders are then attached to the horizontal tailplanes and each assembly attached to the rear fuselage. To complete the build the aerials for the Fug 202 radar are carefully assembled from four aerial masts to which four dipoles are attached to each and fitted to the nose cone. Although injection moulded the aerials are quite slender, but for those who wish to have some that are more to scale Owl models do an etched set that can be used instead. Decals The medium sized decal sheet, designed by ICM themselves appears to be well printed and in good register, there is minimal carrier film although the decals are quite matt. The national markings, minus any form of swastika, are accompanied by a nice selection of stencils as well as markings for two aircraft:- Dornier Do-215B-5, R4+DC of Stab II/NJG 2, based at Leeuwarden in the spring of 1942 Dornier Do-215B-5, R4+SN, flown by Obit. P. Gildner of Stab II/NJG 2, based at Giltze-Rijen in the Autumn 1941 Conclusion Although I have bought and built a fair few of ICM’s 1/35 scale vehicles, this is my first contact with one of their aircraft, and to be honest I’m happily impressed. The kit is pretty well detailed straight out of the box, but yet gives the super detailers a great base to work their magic on. It will certainly make an interesting addition to anyones collection. Very highly recommended. Review sample courtesy of
-
Found this old'un from the back of the shed covered in a thick layer of dust. Made this 10 years or so ago, back when I still used enamels. Brush painted with Humbrol enamels and finished straight from the box to represent an aircraft of 80 Squadron RAF. One of the first models I attempted to make a but grubby using watercolours. Thanks for looking.
- 10 replies
-
- 18
-
-
- airfix
- spitfire f24
- (and 1 more)
-
Dassault Rafale M Revell 1:48 The Dassault Rafale is a new-generation ultra-modern twin-jet combat plane. It meets the combat requirements for the next century, combining in a single plane the multiple roles that otherwise would be carried out by many different types. The Rafale M is the carrier-borne naval version equipped with a reinforced undercarriage for catapult launching. Equipped with two SNECMA M88-2 engines (each with 75 KN thrust) the Rafale reaches a speed of Mach 2. Its long range, enormous load-carrying capacity, precision fire control and survivability give the Rafale exceptional mission effectiveness. In addition it is claimed one of the best combat aircraft in the world that can engage in simultaneous ground attack and air defence missions. The first production plane went into service with the French navy in 1999. The French Navy have since ordered 48 for the navy of which ten aircraft are operational on the Charles de Gaulle aircraft carrier. The model The kit comes in the standard Revell end opening box with a great picture of the Rafale M, tooled up for a bombing mission. This kit has been released before by Revell, but since being used on bombing missions helping the Libyan rebels during the Arab Spring uprisings the FN Rafale model has also been upgraded to include the GBU-12 laser guided bombs and their respective pylon adaptors. The kit itself looks superb on the sprues with finely moulded panel lines and screws and the excellently done flying controls which are only attached to their hinge line, leaving a fine, but perhaps slightly too large a gap at each end of the ailerons and rudder. The five sprues of grey and one of clear styrene are held in two separate poly bags, unfortunately that has meant that the clear parts have been slightly damaged, but this should be able sorted with a dip in Klear or other clear solution. There is no sign of flash, just the usual moulding pipson many of the parts. Due to restriction in moulding technology, the main canopy is slightly deformed on one side, which while annoying, may not be seen if the canopy is posed open. Having looked closely at the parts there is a tremendous amount of detail, both on the surface and with the undercarriage bays which will look great with some careful painting and weathering. The only real fault found was a sink mark on either side of the tail hook, in an awkward position which will require filling and rescribing. The build begins with the MB Mk16F ejection seat, which comes in four parts, the back panel, with associated black boxes and oxygen bottle, the two sides, centre section, with seat and back pads, plus moulded seat belts, and finally the head box. The next assembly is the cockpit, with the rudder pedals, instrument panel, HOTAS stick and throttle attached to the single piece tub. Into this the completed seat assembly can be fitted. Onto the completed cockpit tub the front coaming and rear decking are fitted, with the option of adding the canopy support strut if posing the canopy open. The whole completed cockpit assembly is then glued to the underside of the upper fuselage section. With the detail painting of the undercarriage bay interiors completed these parts are then glued into the lower fuselage section, at the same point, the two holes for the arrester hook part must be opened up. The forward canards are effectively in one piece, with a moulded rod attaching the aerofoil section. The canards are sandwiched, unglued, between the two fuselage sections as the whole fuselage is buttoned up. The exhausts are really well done with some fantastic looking detail within and without the exhaust petals. The final stage fan disc is moulded at the bottom of the exhaust tube, which will make for an interesting paint job. Once the exhaust tubes are painted they can be fitted to the rear fuselage along with the inter-fuselage structure, and rear sensor units. It may be an idea to leave the exhaust petals off until the rest of the painting is complete. On the upper fuselage, the spine aft of the cockpit is fitted, as is the vertical tailplane, made up of two halves and the two ILS aerials. The build continues with the addition of the nose cone with suitable weight fitted first, the intakes are then added, with two parts making up the main assembly, with the addition of two auxiliary intakes and a SPECTRA sensor on the starboard intake. Turning the fuselage upright, the two halves of each wing are assembled, with the addition of further SPECTRA sensors on the wing tip launch rails and fuselage spine and clear parts for the wing root lights. On the underside of each outer wing what look like actuator fairings are fitted along with two more SPECTRA sensors. On the underside of the rear fuselage the arrestor hook can be added to the previously opened up holes along with the fuel dump pipe. Moving onto the undercarriage, the mains are fitted first with the main leg, actuators, locking arm scissor links and the main wheels, made up of two very well detailed parts. The nose leg is fitted with the nose wheel steering unit, light unit, actuator and locking arm. To this assembly the scissor link with its associated recoil springs and catapult arm are attached. The two nose wheels are moulded in two halves, again with very nice moulded detail. The main and nose undercarriage doors are moulded with location pins for open display, the nose doors will need to be split into its three component parts. To pose the doors closed; these pins will need to be removed first. Nearing the end of the main build the nose sensors, in front of the cockpit are fitted along with the refuelling probe and pitot probe. The canopy consists of the windscreen, main opening canopy with its central and rear bulkheads and internal mirror support. On the underside of the nose the last four aerials are added. The final parts to the build are the options for the various weapons supplied. These are the two 2000l drop tanks, wingtip mounted Magic or Mica EM/IR missiles and either launch rails for further Mica EM/IR missiles, or the reason for this re-pop up to six GBU-12 LGB’s, their associated pylon adaptors and MER’s. To most significant part missing from this kit is the Damocles targeting pod as the Atlis pod included in the kit is not used on the Rafale. Decals The single, quite small decal sheet contains insignia for the following:- Rafale 28 of the DET-CEPA, (Test and Experimentations), 100 Years of Aeronavale – BAN Hyeres-Le Palyvestre July 2010. Rafale 32 – The first Rafale of Flottille 11F BAN Landivisiau – February 2012. Rafale 15 of Flottille 12F – R91 Charles de Gaulle used during Operation Harmattan – Libya 2011 The sheet also contains a full selection of stencils, warning signs and weapons markings. The sheet is very nicely printed with good register and quite matt in appearance. Conclusion This is a fabulous looking kit which from what I’ve seen on the web can be built into a superb model of an amazing aircraft. Without building it I can’t see any real problem areas during construction and have only heard of a couple of difficult fitting parts. The missing targeting pod is a shame considering there are quite a few pictures of the aircraft fitted with the pod on missions over Libya. Still, I’m sure the aftermarket companies will soon come to the rescue. Review sample courtesy of
-
Hello lads, I'm new to this forum and this is my first model build ever, I hope you like it. As a newbie, any suggestion or comment will be gladly received.
-
Douglas AC-47D Gunship 1:48 Revell The Douglas AC-47 Spooky (also nicknamed "Puff, the Magic Dragon") was the first in a series of gunships developed by the United States Air Force during the Vietnam War. It was designed to provide more firepower than light and medium ground-attack aircraft in certain situations when ground forces called for close air support. The AC-47 was a United States Air Force C-47, (the military version of the DC-3) that had been modified by mounting three 7.62 mm General Electric miniguns to fire through two rear window openings and the side cargo door, all on the left (pilot's) side of the aircraft, and the modified craft's primary function was close air support for ground troops. Other armament configurations could also be found on similar C-47-based aircraft around the world. The guns were actuated by a control on the pilot's yoke whereby he could control the guns either individually or together, although gunners were also among the crew to assist with gun failures and similar issues. It could orbit the target for hours, providing suppressing fire over an elliptical area approximately 52 yd (47.5 m) in diameter, placing a round every 2.4 yd (2.2 m) during a three-second burst. The aircraft also carried flares it could drop to illuminate the battleground. The AC-47 had no previous design to gauge how successful it would be because it was the first of its kind. The USAF found itself in a precarious situation when requests for additional gunships began to come in because it simply lacked miniguns to fit additional aircraft after the first two conversions. The next four aircraft were equipped with 10 .30 calibre AN/M2 machine guns. However, these weapons, using World War II and Korean War ammunition stocks, were quickly discovered to jam easily, produce large amounts of gases from firing, and, even in 10-gun groups, only provide the density of fire of a single minigun. All four of these aircraft were retrofitted to the standard armament configuration when additional miniguns arrived. The AC-47 initially used SUU-11/A gun pods that were installed on locally fabricated mounts for the gunship application. Emerson Electric eventually developed the MXU-470/A to replace the gun pods, which were also used on subsequent gunships. The Model The original Monogram kit of the AC-47 was released in the late 70’s and although it has been released a few times since the moulds appear to be standing up well. The kit comes in a large top opening box, with an artists impression of an aircraft strafing somewhere in Vietnam. On opening there is a large poly bag with all four grey styrene sprues inside, which hasn’t protected the parts much as there were quite a few that had become detached. At least the clear sprue was contained in a separate poly bag. The parts are well moulded, with only a little flash in places and a few moulding pips, but the details have stood up well. There are several flow lines, particularly around the windows, but these shouldn’t cause any problems with a bit of primer. The kit does have raised details as that was the way when it was first released, but in this case, according to several period photos I’ve been looking at they are pretty accurate, particularly the rivets lines. Construction starts with the pretty comprehensive interior, with everything being fitted to the long floor section beginning with the cockpit which is fitted out with the pilot and co-pilots seats, bulkhead, instrument panel, dual control yokes and separate throttle box. Just behind the cockpit bulkhead the navigator and radio operators positions are assembled with tables, seats, half bulkheads and a stack of radios. Moving aft there is another bulkhead and two sets of four seats, which come with the seatbelts pre-moulded into them. Right aft there is a third bulkhead is fitted and behind that the Elsan style toilet and sink unit are fitted. In-between the second and third bulkheads is where all the weaponry is situated, the three miniguns, each made up of three parts, four spare ammunition boxes, also made up of three parts, and two crates of what I can only assume are flares, one single and one double, with the single crate fitted in front of the rear bulkhead, near to the cargo door. This assembly is briefly set aside whilst work continues with the fuselage interiors. The side windows come in lengths of six for which the two in the aft positions need to be cut away, you will also need to cut away the flashed over window in the fuselage, nearest the cargo door. The cockpit mounted gunsight is then fitted to the port side and a hole needs to be opened up in front of the astrodome. On the starboard fuselage there is radio rack fitted, and tail wheel mounting, along with the full set of windows, cockpit side console and overhead console. The cargo door part needs to be cut with the forward section being discarded and the aft section glued into position. The cockpit/interior assembly is now glued to the port side, after which the minigun assemblies can be fitted either with all three guns firing out of the windows or two out of the windows and one out of the door, just check you references on the aircraft you intend to build. Three ammunition boxes are then placed behind each minigun; the fourth is fitted next to the double flare case which is placed on the starboard side, opposite the miniguns. The fuselage can now be closed up. Attention then moves to the wing assemblies. The lower centre section is fitted with a long spar which is moulded complete with the undercarriage bay rear bulkheads the outer lower sections and larger upper sections are then attached and the whole assembly fitted to the fuselage. The horizontal tailplanes, each comprising of upper and lower halves are glued together and also attached to the fuselage, along with the tailwheel, the leg of which is in two halves with the single piece wheel sandwiched between them. The engines are assembled next, with each single piece engine fitted with a propeller spindle, before being attached to the rear bulkheads and covered with the cowlings. These are then fitted to the fairings on the wings, whilst the landing light cover is also fitted to the leading edge of the port wing. Each main landing gear assembly is made up of the main oleo frame, retraction actuator/yoke, a pair of scissor links and the two piece wheels. These are then fitted into position in the main wheel wells. There is a choice of engine exhaust styles and once again you should check your references to work out which style fits the particular aircraft you are modelling. The astrodome, windscreen, DF aerial, HF aerial, VHF aerials and pitot venturii are fitted, along with the oil cooler intakes, cargo door ladder and the propellers, (ensuring you use the correct paddle blades, as both type are included in the kit), thus completing the build. If you wish to make a diorama using this kit then there are two crew members and a groundcrew figure included. Decals The decal sheet is nicely printed by Cartograph which is in register, with good opacity and with a thin carrier film, although on the matt side they look like they should settle down pretty easily onto a gloss coat without silvering. The sheet includes an alternative instrument panel decal should you not wish to paint the styrene part, a full set of stencils and markings for two aircraft. Douglas AC-47D, 3rd Air Commando Squadron, Nha Trang airforce base, South Vietnam 1968 Douglas AC-47D, 4412 Combat Crew Training Squadron, Hurburt Field, Florida 1971. Conclusion It’s great to see this kit re-released again as I remember having fun building it not long after the very first release. There’s nothing complicated about the build so would be a good model for anyone to try, although the more experienced may wish to add extra details it’ll still look great straight out of the box. Very highly recommended. Revell model kits are available from all good toy and model retailers. For further information visit or
-
Eduard Xuntong DB-3F/IL-4T detail set. 1:48
Shar2 posted a topic in Aftermarket (updates/conversions)
Xuntong DB-3F/IL-4T detail set 1:48 Eduard The Xuntong DB-3F/IL-4T has been out for some time now but it’s good to see it hasn’t been completely forgotten by the aftermarket companies as Eduard have just released a nice set of etched parts and masks for it. The kit is full of very nice detail out of the box, but some of this detail can look quite chunky and would be better suited to the more scale thickness of the etched brass. Detail Set (49700) The two sheets contained in the standard poly sleeve provide parts for both the interior and exterior, so no need for separate sets. The majority of parts are on a medium sized relief etched sheet whilst the smaller sheet containing the cockpit parts is mostly pre-painted and self adhesive. For the cockpit the set includes a raft of replacement placards and auxiliary instrument boxes, panels, vents, levers and flying control cable wheels for both sides of the pilots and bomb aimer’s positions. The main instrument panel is made up of two layers with the instruments printed on the backing plate, as other sets of this nature a drop of Klear or Aqua Gloss will be needed to represent the instrument glass. The pilots area also receives new or replacement parts for the throttle box, complete with throttle and mixer levers, rudder pedal plates and straps, trim wheels, control column frame, and engine instrument panels. The bomb aimers floor has two doors that can be posed open or closed that provide access to the aircraft from the external door beneath the nose. Both the pilots and bomb aimer’s seats receive a full set of harnesses. To the rear, the radio stack has new control faces provided whilst both the mid upper and ventral gun positions have replacement fixtures and fittings added, these include ammunition belts, handles, links, and brackets. Externally the set provides new wiring harnesses for the engines, frames for the landing lights and wing intakes, new panels and bulkheads for inside the landing gear bays. The main undercarriage legs are fitted with new brake lines, whilst the wheels have new brakes attached. The upper turret receives new outer vanes and the nose mounted machine gun is fitted with a new ring sight. Interior Zoom Set (FE700) This zoom set contains only the above pre-painted sheet and allows the modeller to build a well detailed cockpit without the hassle of getting bogged down with detail that might otherwise be deemed superfluous. Masks (EX442) Since the kit has so many heavily framed windows around the nose, not to mention the cockpit windows, ventral gun position and upper turret most modellers will be glad of this mask set which makes the whole task of masking up a doddle . Conclusion This is another great set from Eduard, who seem to be churning them out like it was going out of fashion, yet managing to keep the standard high. The pre-painted parts for the cockpit and bomb aimers positions are particularly good and should be pretty visible even through the kits clear parts, although the ability to have the access doors and hatches open should help this. Highly recommended. Review sample courtesy of -
Kit - Italeri (Esci) 1:48 Paint - All enamels over acrylic base-coats Decals - CAM 48-042 Extras - AGM-45's from Hasegawa weapons set, Mk82SE's from spares box. Douglas A-4F Skyhawk VA-152 'Mavericks' Assigned to the Air Group Commander CVW-8 USS Shangri-La Tonkin Gulf, Mid 1970 Built for the Skyhawk GB over at www.kiwimodellers.com, Not one of my best builds but alongside my Hasegawa A-4C from quite a few years back, it looks fine. Surprisingly for a kit that traces back to the very early 1980's this went together with little fuss, any problems were entirely down to my own deficiencies and impatience, and little to do with the 'plastic'. Thanks for taking the time to look and/or comment. As ever all comments, questions and criticism are welcome. Next, a trip in to the unknown for me, a sci-fi kit with my No1 son... AFN Ian.
- 18 replies
-
- 20
-