Search the Community
Showing results for tags '1:24'.
-
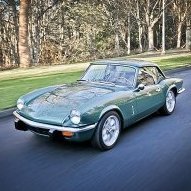
Hi, Here are some WIP pictures from the etype I'm building at the moment. It is actually near completion but I thought I would put the WIP photos separate from when I upload the finished kit. A great kit, with a lot of parts and decals and it fits together really nice. I went for Ammo Mig polished metal and clear coated with Mr Clear glossy. Interior was painted in Mr Hobby Russet. Some of the potential problems I found are the chrome pieces which are actually a bit fragile, i broke the rear view mirror support piece just by handling it. I also broke one of the rear bumpers in half although it was superglued when i pulled it off because it didn't fit right. Only fit problem I really had was the dashboard, I had to sand down the pedal attachment which goes on the back of it so it could click into place. These are niggling problems however, overall goes together very well generally. Apologies if some of these pictures are not showing the right way, I think the image hosting is setting them all in one fixed ratio.
-
I'll admit right up front: The idea for this vignette is not mine. I got it from Night Shift, of YouTube fame. Thanks Night Shift! 🙂 In one of his videos he built a vignette showing an abandoned VW Beetle. It looked as such a fun build I just had to build something similar. The basis for my build is a Tamiyia 1966 VW Beetle 1300 kit. Well, without further ado - here is my version.
- 21 replies
-
- 40
-

-
My workshop will be on the Ferrari 250 GTO. I am not sure which model I will choose yet: It would seem that the models of one car produced by different manufacturers will be similar to each other. It turns out that not really. I did a small comparison of the appearance of the F250GTO bodies made by Fujimi, Revell and Gunze. Below are some photos from this comparison: I leave the decision for later .....
- 62 replies
-
- 6
-
-
- Ferrari 250
- Fujimi
- (and 1 more)
-
Normally I am building models of aircraft, but I couldn't resist buying and building this kit for a change. My uncle owned a similar type of this typical tractor of the early 1960s, so it kind of reminded me a little bit of my younger days. The kit is constructed as an so called easy-click kit and theoretically you can put away the bottle of glue. Well, I recommend using some. Without painting, the model would definitely look like a toy. So I painted all parts, especially the rubber tyres and the chrome-plated parts forming the accessoryies of the engine cowling. I exclusively used Revell Aqua Colors, a mix of Smaragdgrün and Moosgrün with a little yellow for the body and Sand mixed with Alu for the above mentioned Gold-Chrome plated parts. For the other small parts different mixes of red, brown and other shades. This is not a tractor forgotten in the field and rusting and rotting away, but simply awell used one. The seat is already worn out and you can find a lot of traces from intensive use. Hope you like the short excursion to an agricultural subject. cheers, Norbert
-
I've had a couple of false starts with models I wanted to build, I hope this project will yield a couple of decent vehicles. I've had a couple of Revell Jaguar XK120s in my cupboard for a while, I bought two because I wanted to try building this kit two different ways. The vision: One car built as factory standard. This is based on a car I saw in an old magazine; light blue with a navy and grey interior, with rear-wheel spats. One car built as a bit of a tuned-up, example with a set of Dunlop alloys and no spats. This one will be Tamiya British Green with a tan interior. Here's a mock-up, the wheels and tyres came from K&R Replicas. It might take a bit of ingenuity to fix them to the axles. You can also see that the body needs a lot of cleaning up, those mould lines are just about the worst possible place. On the early XK the ventilation flaps in the front wings need filling in, as these were never fitted as standard (although I think some owners added them later). For the tuned up XK I want to replicate the look of a later car, where the sidelights were integrated with the front wings, rather than being separate, chrome parts. This is a nicely detailed kit, but the copyright information moulded into some parts shows that it is a Monogram moulding and it feels like it might be almost as challenging as the old Monogram Maserati 3500 kit I built last year.
- 74 replies
-
- 16
-
-
Hello! Attached some photos of a fun project involving Revell's 1:24 VW Beetle, a figure from Master Box and scraps from other kits. Aside from wanting to try a few new techniques out, I was keen just to have some fun and not stress on every imperfection. Thanks for having a look, and all comments more than welcome. CF
- 16 replies
-
- 41
-
-
Been almost a year since my last car build so dragged this one to the bench to re-invigorate any skills that I may have had before diving in to something more exotic / expensive... glad I did as it turns out. Made a bit of a hash of the deepening-out on the front window frame - went through the plastic at one point, also managed to stone-chip the paintwork on the roof when I dropped a tool onto it, and on final-assembly I snapped one of the front axle pins !!. Yep, definitely a six-out-of-ten build. That said, I like the blue (Tamiya X13), it looks very 'period' to my eye, and the car itself looks like it came off the production line yesterday... stunning looking vehicle IMHO. As ever thanks for taking the time to look and / or comment. All the best from New Zealand. Ian.
-
Good afternoon. Attached is the outcome of a long journey, my take on the fantastic Hawker Typhoon, in 1:24. This is my first build of this scale, stepping up from 1:48...and wow what a step up in commitment it was! I promised myself it would be an enjoyable OOB experience with some extras from Eduard, but none the less I got side tracked here and there with some mods. My take away? its its back to the safety of 1:48 for me...... Thanks for looking and as always, comments and feedback more than welcome. CF
- 40 replies
-
- 102
-
-

-
 Inspiration: jumps on you out of the blue from attic recoveries and lucky junk shop finds! I know I've recently spoilt myself rotten with a multitude of Eduard early war Spitfires, but I do have a weakspot for the odd nostalgia build - revisiting those kits built as a youngster when you find them up for grabs. I got the (boxed) 1/24th Spitfire MkIa at an auction a few years back before Airfix re-released them as part of their vintage classics range. I hadn't returned to model building at the time, but it was a silly cheap price as the decals are shot, but all the parts still sealed in the original bag. It was another "when I return to the hobby" purchase which has been sitting patiently in the wings ever since. I had previously built two examples. The first in the early 1980's is now long gone. The second built in 1988 when I was 16 survives and has been tucked away in various attics since the early 1990's. This weekend I got my hands on a mint 24th scale Spitfire Vb from a junk shop tucked away in the grounds of a small garden centre, just 15mins drive away from home. The box was still sealed, and for £35 I was quite happy. I was even allowed to open the box to check it was complete and not previously tampered with before handing the money over! So now my old surviving MkIa has been recovered and is now seeing daylight for the first time in many years. Considering it's been at the bottom of a box of built models it emerged remarkably complete: one prop blade snapped at the collar and the aerial mast broken off at the base (but still attached to the tail fin by a thread). Aside from a liberal coating of grime and paint/decal damage, the wings have lost their dihedral, and the rubber tyres have gone hard but are still in perfect shape. All the gun covers and engine cowling were fixed in place, but I'm sure I built, painted and installed the 303's and Merlin 🙃 Well I think she deserves a new lease of life. My aim will be to do a full strip down and refurb, and rebuild her in line with with my two newer Spits. She will again don her markings as LO-B "Bogus" from 602sqn, while the other MkIa will become Al Deere's KL-B "Kiwi". The Vb will of course take the guise of Jan Zumbach's gun toting Donald Duck RF-D. Hopefully I'll do these three ladies justice in the long run! Overall not too shabby for something that was brush painted with enamels and no aftermarket materials 33 years ago. The original Spitfire MkIa has had a bath to remove most of 30+ years of dust and grime. The engine cowling is part removed and the engine is complete underneath - the 303's in the wings are missing however! Going through one of my spares boxes I've found the main landing gear tyres from my first 24th scale Spitfire that I built in the early 80's. They are in surprisingly good condition, no wear or degradation. They may we'll end up being used on the rebuild if the current one's prove troublesome! I'm keeping fingers crossed that the Browning's will appear in a box somewhere too, but it won't be a heartbreaker if they've gone awol. Well she came apart without any real issues! 😊 A few things became apparent - the rudder pedals in the cockpit were missing, as were the 303's and ammo boxes in the wings. The pitot tube under the wing was also gone. After digging out my second spares box, I found the pedals, all the ammo boxes and 7 of the 8 Brownings.... plus one that's survived from the very first one I built in the early 80's (hence the 7 in gun metal and 1 in matt black). A bonus was finding 'fresh' main wheel hubs, again surviving from the first 24th Spitfire I built. Bizarrely, one thing that had survived has now vanished - the main radio mast! 😂 Still a good step forward. Now to plan the clean-up, paint stripping, and get studying the build instructions alongside some photo references👍 More photos and updates to come as the project progresses! Comments and suggestions always welcome 😎👍
- 58 replies
-
- 14
-
-
Fokker Dr.1 Triplane 1:24 Meng (QS-003) One of the most recognisable aircraft of the Great War, the Fokker Dr.1 triplane achieved a reputation well beyond the small number actually built. It was in service for not much more than six months from late 1917, until early summer 1918. It needed an experienced pilot to get the best from it, as it was slow but highly manoeuvrable. The all red aircraft of Manfred von Richthofen is the most famous of the Dr.1’s but several other aces also flew them. It seems that Wingnut Wings may have been working on producing aircraft in 1:24 scale, as the appearance and layout of all the sprues are very much in their style. Even down to the clear parts being sprue ‘C’, and the engine sprue ‘E’ which was always what they did in their 1:32 kits. Even the box art is by Steve Anderson, who did all the Wingnut Wings box art . I don’t suppose we will find out for sure, but circumstantial evidence suggests that Wingnut Wings DNA runs through this kit. That said, this is not a scaled up version of the 1:32nd Meng Dr.1 kit. The sprues and breakdown of the parts is completely different, as befits a larger model. Lifting the lid reveals seven polythene bags containing individually wrapped sprues (double in the case of sprue ‘D’) , six of which are in Meng’s usual light grey plastic, and one in clear. An A5 sized instruction booklet, four multi lingual cards outlining a brief history, a sheet of decals, a small sheet of fabric, and a little box of etched brass completes the package. Unusually construction begins with the assembly of the four-point harness, which is composed of pre-cut fabric straps and etched brass buckles. This is a ‘first’ in being supplied in a mainstream kit as far as I know, and should look extremely effective draped over the pilots seat. I’ve used aftermarket fabric seat belts in the past, they do look better than their etched metal equivalents, and I’d say that in this large scale they are essential. Construction then moves on to the rest of the cockpit, which is fully fitted out with a tubular structure, floor, seat, ammo box, instruments, and control items. This all builds up into a box structure, which is then fitted between the fuselage halves. Again, it is telling that it uses Wingnut Wings location method of an open hole in each side of the cockpit ‘module’ that locates over a raised circle moulded in the fuselage side. The inner fuselage halves themselves feature the long triangular plywood fairing that runs down the inside of the fuselage, and is such a feature of the Dr.1 cockpit. All the parts are beautifully moulded with no flash and very fine detail. The wrinkled fabric effect on the ‘Bulkhead’ behind the seat is a very nice touch, as is the provision of a couple of flare pistols. The fuselage underside has a moulded strip of stitching to apply in the same way as on Wingnut Wings 1/32 Fokker D.VII kits Looking at the wealth of finely detailed parts on this sprue, it is apparent how well suited 1/24 scale is. Everything is large enough to have strength, yet fine enough to appear exactly in scale, something that the smaller scales can struggle with. Externally the forward fuselage has a choice of square or circular inspection panels, the colour profiles at the end of the instruction booklet show which ones are appropriate for the particular options. The cockpit/midwing fairing is a large single piece that fits over the mid wing and onto the fuselage. The twin LMG 08/15 Spandau machine guns sit atop this fairing, with the choice of either solid plastic barrels, or some stunning fretted brass cooling jackets. I don’t know how they have been done, but the cooling jackets are finely etched (or milled) brass tubes, ready to slide over the plastic body and barrels of the basic machine gun mouldings. They couldn’t be simpler and will surely make into an amazing centre point of the completed model. Fine detail on the ammunition rounds and belt feed into the sides of each Spandau will enhance it further. Again, like the fabric seat belts this is the first time I have seen these pre-fretted brass tubes supplied in a mainstream kit. The wings are all provided as upper and lower halves, with internal ribs and spars moulded in to add strength. This ensures that there won’t be any repeat of the incidents of the slight warp that was found on the solid moulded wings in some of the 1/32 kits. All three wings are assembled the same way, with a drawing in the instruction book showing to open up flashed over holes in the leading edge to fit the stacking pads. Check which version you are building and follow the instructions to open up the correct pair. Two ‘Axle wings’ are provided for the undercarriage the main difference being short and long chord, and again it is pointed out in the instructions which one goes with which version. Interestingly there are two complete pairs of main wheels on the sprue D’s. D8 and D9 are the ones used by all four variants in the kit. The slightly smaller diameter D14 and D15’s are appropriate to the prototype Fokker F.1 as flown by Werner Voss and Manfred von Richthofen. In addition the F1 ailerons are present on sprue D, so I expect Meng will release a kit of this at some point. It won’t be possible to create an F.1 from this boxing as it only has the straight edged tailplane appropriate to the Dr.1. The 9 cylinder Oberursel UR.II was an almost identical copy of the French Le Rhone 9J, and was the standard engine fitted to the DR.1 at the factory. Some were retro fitted with captured Clerget 9B engines so be careful if choosing aftermarket decals. Here in the kit we have a very nicely moulded Oberursel, made up of few parts, but with separate cylinder caps and valves. All that the modeller needs to add is fine ignition wires running out to each spark plug. Most Oberursel powered Dr.1’s were fitted with the Axial propeller, although a Heine can sometimes be seen in contemporary photographs. The choice is yours as both types are provided in the kit, along with two further props that are not needed. The clear parts consist of several items, of which only one windscreen and the inspection panel cover are used. Interestingly an early reflector gunsight is included but not marked for use, as it is in the 1:32 kit. Etched parts. These come in their own little box, packed in a sponge 'wallet' with a lift off lid. Also in the protective sponge are the two beautiful Spandau cooling jackets mentioned earlier. The brass fret has no connection points to the individual components, instead all is held in place by a thin film of plastic. I really like this as it means you don't have to cut each part from the brass sheet, and clean up the inevitable 'nubs' on the parts. The two barrel ends and sights are provided, but most of the parts are buckles and connectors for threading on to the fabric seat belts. Options, Four are provided, but if you leave off the ‘LO’ text from option A it will make Ltn Hans Kirschstein's Jasta 6 586/17.This was passed on to Udet in May 1918, when his usual 'LO' marking applied over the black and white fuselage stripes. A. 586/17 Ltn Ernst Udet, Jasta 4, 1918. B. 152/17, Manfred von Richthofen, JG 1, March 1918. C. 577/17, Rudolf Klimke, Jasta 27, May 1918. D. 213/17, Ltn Kempf, Jasta 2, February 1918. Decals. The decals appear to be Mengs own production. They are neatly printed with on a sheet close to A4 size, covering all the various German crosses (Eisenkruez and Balkenkreuz) needed to complete any of the four options. The carrier film is minimal around the crosses, and naturally a little more extensive around the ‘LO’, ‘KEMPF’, and ‘kennscht mi noch’ texts, and also the anchors. The finish is overall matt, and everything appears to be in good register. Conclusion. An unexpected and surprise release this one. It is a beautifully designed and moulded kit, and should build into a very impressive model. Hopefully there will be more releases on the way, as its appeal will be increased if it can be displayed with a Camel, Se5a, Albatros DV, or Fokker D.VII to the same scale. The whole package is of very high quality, and a completely new kit that has nothing in common with Meng's smaller 1:32 scale release of the same aircraft. If you like early aircraft but are afraid of rigging, then this one is an ideal starter as it only has four very simple rigging lines to apply, and they can be easily done with stretched sprue or wire. And there is no complicated strut work either! Highly Recommended. Review sample courtesy of
-
This will be my first car as all my previous efforts have been AFVs, tanks or military aircraft where I can disguise my poor modelling skills as “battle damage.” This is a bit of a special project for me and I have been putting it off for some time to practice my skills on other more basic models. My aim is to make a scale model of the 1989 Trabant Kombi that I own. The Trabant has had a terrible press over the years for being basic, badly designed and poorly built. I am biased, but I think the Trabant is a very well designed little car that suited its market when it came out in 1963. It had novel features like independent suspension and a transverse engine and gearbox before many western cars. The downside was that the design was produced without any significant changes until 1991 by which time it was way behind western cars. It is probably also the first recycled car being predominantly made out of recycled cotton waste mixed with resin and called “duraplast.” It loses out massively on environmental points being powered by a 2 stroke engine. The build quality is basic, but I’ve own far worse modern cars. My 1999 Ford KA was a baked bean tin with an engine and wheels and my wife’s 2013 Dacia Sandero appears to have been designed in total darkness and assembled in a wind tunnel... Anyway, this is the real vehicle: …and this is the kit: The box contents laid out before I had the chance to mess it up. It’s a really detailed model for its size and generally all the parts are quite crisply molded, but there is a lot of flash around some of the smaller and more delicate pieces. I also ended up with two bodies as one got damaged in the post so I was sent a replacement. The inner wings and bulkhead. The engine bay is really well detailed, but some of the wiring is molded onto the wings which I hope to replace. The other slightly annoying thing is that the bulkhead is completely wrong and is already causing me some headaches. The underside of my Trabant has been hand painted using Hammerite underbody seal. It was a horrible and messy job to do so I remember it well! I wanted to reproduce the texture on the model so I painted on some Humbrol liquid poly and then gave it a brush with a toothbrush. I thought that the wheels would be very easy to put together but holes in the rims had filled with flash. Each hole had to be drilled out. I also added tyre valves to each wheel with a bit of wire. They’re such an obvious and easy to add detail that I don’t know why they weren’t an original detail. Cheers now!
-
 Here is the next model to cross my workbench. Or rather, here are the next models. One of the joys of returning to the hobby after a long absence is that I keep discovering cars I like that were produced in 1:24 kit form (which is my preferred scale). The Tamiya Fiat Abarth 695 "esse esse" was one such happy discovery last year and I should have known that there would also be a standard Fiat 500 kit out there; I found two of the Fiat kits for sale on eBay recently (you wait ages for a rare kit to turn up, etc. etc.). I knew the Abarth was complete, the Fiat was sold as complete but with some parts off the sprues, so my logic is that by building both kits together I can see what's missing (if anything, so far it does indeed seem to all be there). I love the Fiat 500 because it is so small yet well engineered and because it reminds me of holidays to Rome, where the classic 500 is still a common sight. Work has been underway for a couple of weeks as I'm priming and painting, particularly the bodywork, so here is the story so far: Obligatory box art photo. Unusually for me I'm sticking with the boxes for colour inspiration; on the Fiat I love the combination of blue bodywork with the red and white seats and I've found Fiat Capri blue, which I like even if it probably isn't 100% authentic. The Abarth is getting a coat of Ford Dove Grey, which is a light grey that doesn't seem a million miles away from the colour in the picture. This is the box for the Abarth, the differences between the two kits are in the black "B" sprue, the chrome sprues (I think), the tyres (wider) and the decals. The body is tiny. The good thing is that mould lines are very faint and easily sanded away. To cover its wide tyres the Abarth gets a set of wheel arch extensions. The instructions suggest attaching them after painting but it seemed more sensible to glue them on and spray them with the body as they are supposed to be one colour. This is the standard 500 after a coat of primer, checking for the fit of the engine cover and floor. Abarth at primer stage, the fit of the wheel arches isn't great (possibly my fault not the kit's), so a little filling is necessary. It's annoying that it's easier to see once primer is on, the black plastic tends to hide the gap next to the white plastic of the body. My solution was some automotive filler primer that came in a pen-type applicator with a fine nib; this was perfect for running a bead of filler around the join. First coat of paint on the Abarth. Annoyingly the can ran out so I'll have to buy some more. I'll give the body a rub down before applying the second coat; it is quite a tricky shape to sand, there's lots of raised edges to burn through if you're not careful. Looking a bit more purple under the lights, the standard 500 also has its first coat and needs rubbing down but I'll leave the paint a few days to harden first. As there's plenty of painted metal inside a real 500 I've painted the inside of the roof and pillars on both cars. Floor pan and rear bulkhead are common to both cars. The white area is where the part was held for priming, it won't be visible on the finished car as it is under the luggage compartment (which doesn't open). Note how Tamiya has different mounting holes for driver's and passenger's seats so you can't put the wrong seat in the wrong place, at least in theory). You can also see the spoon-shaped throttle pedal moulded into the floor. This is a bit disappointing but I doubt it will notice on the finished car. For the standard car I'll paint the floor Tamiya Nato black to represent the rubber floor mat. on the Abarth the floor will be body colour. Other side of the floor, plenty of crisp detail here. First part of the instructions is to assemble the twin-cylinder engine; here are the main engine parts painted flat aluminium. Fiat engine is on the left, the Abarth (on the right) has a bigger sump and different rocker cover. Painted engines next to one primed gearbox and one unprimed, the gearbox halves fit together so well it's practically a snap-fit. these parts are identical and interchangeable in kit form. You can also see the fan/dynamo drive pulley assembly; I thinned this slightly to reduce the thickness of the fan belt. Focus isn't great in this picture but you get the idea about the engines, standard on the left and Abarth on the right. The instructions suggest that the right-hand (as in this view) part of the standard engine should be in aluminium but all my research pictures have show the engine cowling painted black so that's what I've gone for. I'll add plug leads although it's annoying that there is no representation of the spark plugs or their holes in the moulding, it probably wasn't practical to incorporate that detail into the mould. The seats of the standard car are two-tone with white top panels and piping with the main part of the seat in red (my choice), tan or grey. To get the two-tone colour scheme I started painting the seats white; I'm going with gloss now and I'll tone it down with satin varnish later. Seats masked up, I then gave them another coat of white to seal the masking tape. Tomorrow I'll spray red primer followed by red paint. That's about it, but stay tuned for the next instalment.
- 92 replies
-
- 14
-
-
This has been complete for a while, but I wanted to take some decent photos and decided to build a backdrop for future photographs as well (appropriately enough the Fujimi 1:24 garage). As a kit it's OK, it's pretty basic, there is no engine and the underside is a complete work of fiction. It's a bit of a gimmick that you can steer the front and rear wheels to simulate the four-wheel steering of the real car, I'd trade that for some accurately modelled suspension, especially as I'm not sure the wheels sit quite right relative to the arches. There were a few little issues with the interior (seats needed backs fabricating and the dashboard isn't a great fit). Also I should have attached the front bumper to the body before painting. I've got two more of these kits in the stash to replicate the other two Preludes I owned, so expect more in this thread at some point in the future. WIP thread here if anyone is interested:
- 10 replies
-
- 13
-
-
I can't remember exactly when I bought this kit, but it could easily be fifteen to twenty years ago. Thanks to a messed up paint job it ended up being shoved into storage but I found it when sorting out my loft during lock down and decided it was high time for one last rescue attempt. Thanks to people on here for tips on stripping and repainting and for replacement decals. This is the thread covering the rebuild. I started it so long ago there are no photos of the early stage of the build. Anyway, I set up my "photo studio" to take some pretty pictures. A little bit of overspray from the interior and a little slip of the chrome pen. Headlamp eyebrows have flaked a bit, panel wash is a bit uneven. Slightly wonky ALPINE script Decals are a bit uneven and the wrong way around. For some reason that's all the photos I can upload at the moment but there are a few more to come.
- 12 replies
-
- 21
-
-
This is the last of my long-term builds; started over ten years ago and stalled due to house moves and other priorities. This is the WIP topic: As a Tamiya kit it goes together pretty well, except for the front bumper, which needed a lot of hacking about to make it fit and it's still not quite right. Although I started the build before I'd even heard of this forum, I picked up a few tips and ideas that encouraged me to add a few extra details as a result of reading the forum. The main thing was going find pictures of real Preludes and trying to replicate what I saw. Other issues were trying to get a decent finish on the paint, clear coat and the chrome and black trim. Anyway, I'm sure you want to see some "pretty" pictures. I'm glad I picked out the centre caps on the wheels (not called out in the instructions). The sunroof makes it easy to see the interior details, I added black pieces to represent the clips where you would fasten your seat belt. You can't tell that I changed the shape of the seat bolsters (which is probably good) but they looked a little under-nourished before (probably to make them easier to mould). Front end, it would take a lot of work to reposition the front grille. The pop-up lights are a nightmare too. I'm glad I added seat belts, it doesn't quite line up on this side but it's not too bad. Mirrors done with chrome pen and even give a bit of reflection. I think the rear 3/4 view might be my favourite. Profile isn't bad either. Underside, the white putty is supposed to be the windscreen washer bottle. Under the bonnet. I've added wires and vacuum lines, not necessarily all that's there but there wasn't any in the kit. I also added the windscreen washer filler on the left with the blue cap (a piece of plastic rod with a blob of filler on the end and painted blue). Radiator cap had a blob of yellow added to replicate the warning label. I also fabricated a power-steering pump out of a bit of sprue with a masking tape drive belt and another bit of sprue as the PAS fluid reservoir. I'm quite pleased with how it turned out, as a fan of 1980s and '90s Hondas, in particular the Prelude, I had to have this in my collection.
-
Hi there, a bit of an odd/obscure question but I've tried searching the forum and wider internet to little avail. How different are the Tamiya kits for the Toyota Celsior and Lexus LS400? I assume it's just a case of different badges and possibly colour options in the instructions? It also looks like the LS is LHD and the Celsior is RHD. I did see a nice RFI thread for a Toyota Celsior build, so I know that it comes together into a nice model and I know a shop that has a couple of Celsior kits on the shelf (how long have they been there?), but I'm also tempted by a LS kit I've seen on eBay. Any suggestions or perspectives on the kits or other kits of the same subject are welcome.
-
Between 1998 and 2008 I owned a number of Honda Preludes; three third generation and one fifth generation model. I've not seen any models of either type although I understand there is a rare kit of the 3rd gen Prelude out there somewhere. This Tamiya kit of the 2nd generation Honda Prelude was picked up from a small model shop in Evesham when I saw it at a reasonable price. The appearance didn't change much between the 2nd and 3rd generation models, although few parts were carried over and an uncle of mine had one of these 2nd gen cars many years ago. The main parts of the body were sprayed dark blue - a similar colour to my first Prelude. It looks a little grainy, not sure if it's supposed to be like that (IIRC it's a pearl or metallic finish and needs lacquer). Engine bay needs another coat, body was united just to check fit. More grain on the boot lid. The instructions call for the underside to be painted mostly the same colour as the upper body. Inner wings will get a coat of satin black and I think there's a silver exhaust heat shield to paint and the petrol tank probably needs some colour too. Interior parts mostly painted, the instructions called for two-tone grey, which again is very similar to the car I owned. I think it was brushed with Tamiya acylics. Bumpers in metallic grey. Not sure how to do the indicators, it's a pity they're just moulded in. Suspension and dash top, pity about the broken tie rod, not quite sure how to fix. Cooling fan reasonably well picked out against the radiator matrix. Engine, I'm tempted to try adding plug leads to bring it to life. I think I experimented with dry brushing silver on the flat aluminium gearbox casing to give it a bit more life, I think it looks OK. Decals and glazing, still in the plastic bag. I think the digital dash (oh so '80s) was for the Japanese market only. Nice satin-finish for the wheels, but they need some black paint to pick out the surround to the "H" on the centre cap. Where now? Finish the body; light rub down, another colour coat, clear coat. details Paint the underside Assemble the interior Assemble the underside Final assembly.
-
This has been sitting in an unfinished state for many years since I messed up the paint on the body. I chose yellow for the body and picked up a can of Humbrol enamel spray from the model shop when I bought the kit. Unfortunately it went on so thick that it looked like I'd used household gloss paint. At least I can check out paint stripping on the sprue before attacking the main body. In the past I've tried sanding back and respraying but it probably needs stripping back to the plastic. There is also a crack in the windscreen pillar, I hope I can glue and fill it so that you can't see the join (the photo hides it pretty well). I like the clear plastic undertray that allows some of the suspension and engine detail to be seen. Pity about the glue and finger print. Maybe a bit of sanding will save things, I might just try and use some satin black to paint over the marks while leaving at least half the tray clear. Onto the more positive stuff; I'm really pleased with the front and rear screens, the frames were probably painted in Tamiya X11 or Humbrol Silver. The rest of the build is pretty much complete. It looks like most of the other parts are painted, if I can just get the body done to an acceptable standard then it should be an easy job to finish as the kit seems to go together really nicely (typical Tamiya quality).
-
While going through my loft I found some models I put together when I was between about 12 and 16; about 28-32 years ago. I think it's fair to say that my desire to get things finished far outweighed my patience and desire to do a good job. I also found some models that I must have started and maybe even finished at least ten years ago. As I'm new here I thought it might be good to put them all in one thread. My preference is for 1:24 or 1:25 scale kits and I think Tamiya was the easiest brand to get although I have a few others. I tended to get the cars that appealed to me, rather than following any more carefully thought out collecting strategy. The newer ones will come in a while, when my phone has recharged and I've taken some photos. Here are the really old ones, I'm a bit nervous sharing these (warts and all). From left to right (oldest to most recent); Hasegawa Buick Wildcat; Tamiya Porsche 911 Turbo "flatnose" and Tamiya Mercedes-Benz 500SL 6.0 (not sure if that's the correct designation). They were all brush painted, probably with Humbrol enamel as that's pretty much all I could get at the time, from a distance they don't look too bad but up close they're pretty rough. Here's a close up of the Buick; complete with runs, hair in the paint, poor masking and excessive glue. There are similar flaws in the 911, it's also lost the lip to the spoiler and part of the rear suspension. I also had some odd ideas about decal placement. Underneath the Porsche. Probably the best view of the Mercedes. I didn't bother with a test fit so the engine is too high and the bonnet doesn't actually sit properly. That rear spoiler fitting isn't pretty! I'm actually still quite pleased with how the interior looks, main flaw is that driver's side door trim that isn't located correctly. I'm not sure what to do with these. I'd quite like to strip the Buick down and give it a decent paint job. The Porsche, it would be nice to add back the missing/broken bits. The Mercedes, maybe just leave it as it is. I hope you will see from subsequent posts how my skill has improved even if only slightly.
-
This is my recently completed 1:24 scale panel van (the one with the jägermeister box art). This kit has a number of firsts for me- -The first non-aeroplane kit I've ever built -The first non military kit I've ever built -And the first kit I've ever uploaded on Britmodeller All in all it I think it went rather well, with the exception of the doors that didn't seem to fit (the drivers door was too tight and the passenger door left a huge gap along the back of the door). However as I am the owner of a old beetle I can confirm that the doors never close quite right so it could have been intentional on revell's part.
-
Airfix 1:24 Grumman F6F-5 Hellcat - Finished
Starspell posted a topic in Work in Progress - Aircraft
So, my latest adventure into the wonderful hobby of model building. The new Airfix 1:24 F6F-5 Hellcat: Going to be doing it in the "Operation SUNFISH" scheme, (only just because I think the other schemes look less interesting, just being blue [;)]) As usual, I just dived straight in without thought of photos and have only now thought to take any! This is being built OTB with the exception of the guns. Bought a replacement brass set (tho can't remember who from!) The cockpit, fuse and wings went together without many problems. Only issue I faced was when I joined the fuse and wings together and found the fuse was slightly larger than the gap in the wings! No doubt an oversight on my part, but nothing some sanding couldn't fix. Bit of overspray in the cockpit where I got carried away with the rattle can Have now just finished up the engine, added the extra detail with 0.7mm copper wire as suggested in the instructions..............question, what colour should the copper hoses be? Black?? Thinking I might leave it copper colour to give a bit of 'character'. Thats it for now.............more to come..............thinking I have lots of 'free time' due to the current corona situation Stay safe out there.- 28 replies
-
- 11
-
-
- Hellcat F6F-5
- Airfix
- (and 1 more)
-
Tamiyas kit, built (more or less) right from the box - I did swap the tyres from the RoG La Ferrari which are the same size but a lower profile. Paint is all Tamiya and all from rattle-cans - Grey Primer, then White Primer then Pure White and finally two light coats of Pearl White, all sealed in with two coats of TS-13 Clear. I used Tamiya three-part polish to bring-up the shine but due to my questionable photographic skills that doesn't show in the pics (d*mn*t). Interior is very dark grey and 'wine red' - my own mixes and I'm really pleased with the final look. Realised immediately after taking the photo's that I'd forgotten to put the exhaust tips on, so please don't mention my 'deliberate error' - as I type this they are now in-place ! Last word is the badges - self adhesive enamel that were sent to me by BNA Model World in an order from a couple of years ago 'just to try' - they're superb and I've no idea who the manufacturer is so when they're used-up that's probably it. Thanks for taking the time to look and / or comment, have the rest of a great weekend all, best from NZ. Ian.
- 10 replies
-
- 10
-
-
Taking a little break from the F1 cars and building something from my dream garage. This is the Hasegawa 1:24 Lamborghini Miura SV. It's the original red molded kit that I primed and changed to metallic green. I really liked this kit - proportions look great and the wheels are beautifully detailed. Foil transfer emblems also do a great job of enhancing the exterior of the kit. The only issues with the kit were some light sink marks around the headlights that I was able to level with some Tamiya Liquid Primer. Built box stock. The colour is Mr. Color Metallic Green #77 which was then clearcoated with GX100 Super Clear. It has a bit of a pearl in it which changes the colour depending on the light source - it can get very turquoise in some light and very green in natural light. I was trying to match one of the first factory restorations that Lamborghini's Polo Storico did. I think the metallic pigment is a good size for this scale, but my primer base could have been sanded smoother - the roughness of the primer showed up a bit more than I thought it would in the metallic. I stripped the chrome off the wheels and knockoffs, painted the wheels aluminum and used Alclad polished aluminum for the knockoffs. I love the wheel design and Hasegawa did a fantastic job replicating them. Window trim was all done in Bare Metal Foil with a Molotow Liquid Chrome pen for some of the chrome details like washer nozzles and door handles. There's half an engine in the kit, but it's all but invisible once you put the body on - you can just barely see the white air filters through the louvers and the glass at the back of the interior. Here's the interior before it went behind the glass. Interior was painted with Vallejo Air Golden Brown and Sand Beige. I used embossing powder for the carpet which was then painted but I feel it looks a bit too 'sandy' as opposed to fluffy. It looks okay through the glass. Some nice touches from the Hasegawa kit here including the foil transfer for the shift gate. I've been doing the grey background studio style shots for my builds so far but thought I would try some photographic backdrops to see how the model would look on 'location'. I found a few hi-res photo backgrounds online and then went to the 5 storey parkade next to my office and took photos of the pavement and sidewalk from above. I printed them out, mounted them on some foamcore and set them up as ground and background. I'm enjoying the photography as much as the build - I think my favourite part is seeing the reflection of the environment in the gloss of the body. Downtown location: At the parkade: Some back street in France maybe: And a shot of my elaborate outdoor studio: 😉 Thanks for looking, comments, questions and critiques always welcome. Martin.
- 40 replies
-
- 33
-
-
Straight from the box, Tamiya's Subaru BRZ 'Street Custom' - Started about eight months ago and finished over the last ten days. Paints are all Tamiya, TS-21 Gold stripes & X-5 Dark Green. I sprayed a light coat of TS-65 Pearl Clear, then decalled the body and sealed all that in with two light coats of TS-13 Clear. The interior is NATO Black, Dark Yellow and Flat Earth. Feel free to make any comments or ask any questions. Best to all here from NZ. Ian.
-
Thought I'd try a Blederunner theme and fool around with LEDs and electronics while doing so. This whole thing started with Fujimi's 1/24 (or maybe 1/25) Deckard's Sedan and the corresponding PE set by Paragrafix. Thought I would a couple of LEDs and ended up making a scratchbuilt base and building, adding 40 LEDS, a 5inch TFT display to play a video I edited with a series of ads and a Raspberry Pi Zero to run everything. A shot of the electronic mess that runs it: And a video to show it in action:
- 23 replies
-
- 42
-
-
- Bladerunner
- 1:24
- (and 1 more)
(250x229).thumb.jpg.48a57772b41ed148fdc8d15e3c202763.jpg)

a.thumb.jpg.58d92d116b0315dc55d352fd191d65e4.jpg)