Search the Community
Showing results for tags '144'.
-
First ever Group Build entry so be gentle on me! Took advantage of this kit being £6 on Amazon, the box shows why it's so cheap Current update on build: First time I've built a conventional airliner so this should hopefully be easy, all out of the box with BA decals too
-
Built this more or less OOB, only additions were antenna and fin cap extension. Kit is the MPC boxing of the Airfix DC-9 using USMC decals from Draw Decal.
- 11 replies
-
- 15
-

-
 This was purchased at Telford last November, basic build was quite quick ( no real issues) and final painting + decals in June / July. Two thinned brush-painted coats of Daco WP blue for the fuselage, my own mix of Mr Hobby grey / white for the wings and decals for the leading edges and coroguard. Authentic Airliner decals for the cockpit but not for fuselage as their spacing is slightly out from the Daco window deacls. and alongside another from the WP fleet which will be "Crested Butte" - unfortunately the purple paint has gone very gritty, so will probably have to wait until after Telford this year to get another tin of paint The fuselage decals are VERY large - recommended to use Daco's own setting solution but only had Microsol/set so a few wrinkles!!
- 15 replies
-
- 11
-
-
Hi All, I'm working on the re-released Airfix Vanguard (144) in the BEA red square scheme. Im conscious how those plastic strip windows (which I think it comes with) always look a bit cack. Can anyone offer ideas of how to fill in windows a different way? I'd like it to look as pro as possible, as it's going to be a father's day gift. Ideas welcome. Chris
-
 I finally decided on a build for this GB. By chance in fact, I was scouring the stash for another kit and found a bagged Revell BAe 146 and remembered a decal sheet I got from MODeller for 32SQN. It will fit nicely into my VIP aircraft theme. I have a couple of these kits but never attempted one. I will add pictures when I find the decal sheet.
 -
Finished this OOB except for decals and a scratch built antenna. Decals are from F-DCAL. Builds nicely with little fuss unless you are ham fisted painting it Special crumpled sky background for pictures Build thread here
-
On a rare occasion I do finish a model. This time it came out like that: (some final adjustments:) and here we go: Ok, enough. Off to the scrapyard Full story can be found here http://www.kampfgruppe144.com/phpbb3/viewtopic.php?f=3&t=3271. Short story: Panel lines (Matchbox-style) were filled, some brass bits from upcoming Shelf Oddity set added. And then there was miserable process of filling and sanding and filling and sanding and filling and sanding and filling and sanding and... which seemed to have no end. But finally I got to dust off my airbrush. Metal parts are AK Xtreme Metal (easy and foolproof). Kit decals turned out to be excellent (save for NACA tail band), panel lines were reinstated using pencil and shaky hand and this is it.
-
Hi everyone, My name is Leszek, I am writing to you from Poland. This is my debut on britmodeller forum. You can check examples of my earlier work here: https://imodeler.com/members/lejgo_inc/ Some time ago I unpacked the GWH box with Victor inside and decided it is a good kit, that can be further improved. I did that by designing this set Good overall fit (intakes being the only exception), nice details (u/c doors, speed brake are fine straight out of box) and well thought out parts division... I plan to build XL158, XL164 or XL512 B.2 Victor in anti-flash white. This is the Blue Steel aircraft. Two questions are bothering me. 1. While Blue Steel was carried, fairings were installed in place of bomb bay doors to fill the gaps. I suspect the missile was not carried at all occasions - my guess is bomb bay doors were replaced and the aircraft assumed the look of plain non-BS Victor. Is my guess correct? 2. Antennas at the top of fuselage. Which ones should be present on an early 60's airframe? The rear blade antenna is visible on most photos, but then there is a photo of XL161 in camo and white belly carrying all those aerials. Are there any rules when and which antennas are used?
-
Hi guys, can I join in the fun with a 1/144 Meteor from Hong Kong models? This was issued as part of package with their 1/32 and Max (Galgos) kindly let me have the tiddler. Pictures of the sprues to follow David
-
I started this conversion some time ago (before the Revell kit was announced and released) i spent a lot of time refinishing the fuselage as I kept stuffing it up. Decalling is almost finished, still need to sort out the engines paint wise and add the gear. The decals are from Hawkeye Models, sheet designed by Scott G on a request from me. The tail kangaroos are from their A380 sheet and fit quite well. They just need the tip of the tail trimmed once the decals are dry. Quite happy with how this is turning out Just spent about 40 mins trying to lineup the nose cargo door decals Aarrrggghhhh! Oh that will have to do....
-
 A very very long time ago I started on a B737-200 I wanted to set myself a challenge so I decided on a project to build a B737-200 Combi fitted with a gravel kit etc. and with all the doors open being loaded up in the snow of the Canadian north....... Over a few weeks I collected together a kit, some AM stuff etc. as a starting point: The Airfix engines are known to be a poor representation of the -200 engines (narrow pylons being the first issue!) hence the braz resin engines. All was well until I looked at the Braz engines in the above shot.... which had degraded silicon bits from the mold down their tail-pipes... not good! but Hannants were their excellent selves and we quickly determined that all 2 of their remaining stock had the same issue so they went back for a refund. A bit more online retail therapy and I had some Nazca decals and the authentic airliners resin engines (lovelly things): I know the extratech PE is for a different model of B737 but I was using it for the common parts.... A few weeks later after some scratch interior building, cutting a cargo door opening and I was thinking about the cargo door itself: But in the end the windows just didn't look right and the internal detail on the whole aircraft was poor, the windows are in the wrong place on the model, the doors are wrong and the nose shape and cockpit windows are also way off..... Skip forward 3 years and I started using 3D printing at work to build replicas of skulls (useful for teaching anatomy). I've been modelling aircraft in 3D programmes for years (used to sell them for flight simulators) and remembered I had a 727 model somewhere.... the fuselage isn't that different so it might be easy to adapt it to make a 737-200. Skip forward another year of messing around in Blender, 3DStudioMax, ZBrush, Polyworks, Rhino and all manner of other 3D programmes I work with and I had a set of STL models that I was happy with. So this Christmas I borrowed our newest 3D printer from work and this is what we get: These are my external shape masters.... but there was a problem. It was cold the day I went out and left these to print (18hour print time at 40micron layer size) and I wasn't thorough enough with the glue (pritstick) on the glass build plate so I ended up with the left side's nose lifting off the build plate and warping (bugger!): Now printing a new left side wasn't an issue but it takes a lot of plastic and 9 and a bit hours! so a quick edit in blender and I printed off just the nose section from just forward of the left door: Might have been a bit OTT with the glue this time as it took 3 hours soaking in warm soapy water to get the damn print off the glass! Next up: how to perform rhinoplasty (nosejob) on a 737.... Marked up and chopped off the dodgy nose: Lined up and glued the new nose on using the right hand side as a guide: A bit of Perfect Plastic Putty (wonderful stuff!): Have just sanded off the excess filler and it all looks spot on. Next up printing the internal details masters, molding them all in silicon and then casting the rough resin detail masters from these molds. I'll then add all the small details, panel lines etc. on those resin casts as the 3D printer plastic is very hard and therefore difficult to sand etc. More later. FB
- 17 replies
-
- 5
-
-
- 3D Printing
- Scratch
- (and 3 more)
-
I've been stuck with the model making equivalent of writers block recently so I decided to finish a model I started a while ago to give myself a little push in the right direction. Usually the idea of a pink model with hearts on would really put me off but for some reason I actually liked this. However as soon as I started I hit problems. I applied a little too much pressure to the tiny canopy and managed to snap it clean in half. After cursing rather a lot i decided my plans would have to change. The only way to mask he issue would be to paint the canopy, and so it turned into a display model. In my imagination this MIG would be being displayed somewhere where it appears to be a little out of place. Maybe this would be in the middle of a roundabout or next to a car park or outside an entrance to somewhere. It would have a really harsh, solid looking concrete base like so many MIGs seem to be displayed on. Anyway that's the idea, here's the pictures
-
 This is the thread for the continuation of my tomcat STGB fail: http://www.britmodeller.com/forums/index.php?/topic/234957812-revell-1144-f-14a-vf-84-the-final-countdown-cat-shot-update-12-5/ Updates to follow. . . .
 -
Kit & Decals: Hasegawa (LK102) Scale: 1:144 Hi fellas, Here's a model I finished recently of one of the YS-11T anti-submarine training aircraft of the 205th Kokutai TSQ J.M.S.D.F. stationed at Shimousa. The aircraft was used to hone the submarine finding skills of J.M.S.D.F. personnel. Thanks for looking! Vinny
- 16 replies
-
- 19
-
-
Kit: Revell (04261) Decals: Rib-Hobby Scale: 1:144 Hey guys, This is my latest addition to the shelf. It's the Revell (Zvezda) B.787-8 Dreamliner done up in the China Southern special scheme. Great kit, that went together really well. Decals are by Rib-Hobby. It was my first time using this manufacturer and they're very thick but good to work with. Happy Modelling! Vinny
- 17 replies
-
- 14
-
-
- 144
- Revell 787
- (and 1 more)
-
This is the thread for the continuation of my tomcat STGB fail: http://www.britmodeller.com/forums/index.php?/topic/234957812-revell-1144-f-14a-vf-84-the-final-countdown-cat-shot-update-12-5/ Updates to follow. . . .
-
In the Tomcat STGB1 I built this from the early revell kit, it turned out ok but at best it's a little rough around the edges. For the USN GB I built this santa catfrom the dragon kit and the fightertown decals. So I've spent plenty of time mulling over what I'm going to build for this GB; with the release of the res-im flap and slat resin kit it seemed appropriate to dig out the dragon carrier deck. I've both the revell A & D kits but after watching the "The Final Countdown" on Netflix I'm going to do the early Jolly Rogers film scheme in the A kit. So here's the revell F-14A and the dragon carrier deck kit, the resin wings, some reference material and a pair of Ozmods pilots to finish it off. If I get all this lot finished I may have a go at either the F-14A in the flanker scheme from Fightertown decals or black lions F-14D with a TARPS pod.
-
Hi all, long time lurker first time poster here. I've finally decided to post a build here and, it's yet another first for me. This will be my first 1/144 scale model ever, so will no doubt be quite the experience for me seeing as I usually model 1/72, sometimes 1/48. I've spoilered the images because they are pretty big As always to begin with some obligatory sprue and box shots: Even at this scale the detail is so fine and there were no imperfections like flash or warping present so Eduard did an amazing job here. Using the "standard" measurment of a 10 pence piece you can get a sense of how dinky this kit really is: I've actually had this kit sitting in my stash since before November so, in anticipation for finally getting around to it, I got some extra special stuff. I initially was just going to get the 2 photo-etch sets but then I saw that Luftwaffe get-up and fell in love so had to have it. In future I'll get another phot-etch set and do the other kit in the box at a later date (maybe I'll update this thread when I get around to it): First job was to paint the interior. Eduard's instructions call for Mr Hobby H309 "Green". I looked this up and found that Humbrol 116 "US Dark Green" was the equivalent. I took one look at the pre-painted Eduard PE and realised that Hu116 would be FAR too dark for it. So, considering that, at this scale, you'll barely notice it I decided to do the interior as Humbrol 78 "Cockpit Green". Again this is probably wrong but I don't mind too much: Then it was onto everyone's favourite part of modelling; bending tiny fragile bits of phot-etch! Kidding aside this was so incredibly fiddly, the flight stick pinged off into oblivion but it still looks the business: Sod's law dicated that I actually found the flight stick! After gluing it to the cockpit I suddenly noticed the chair had gone missing. I looked EVERYWHERE for the thing but the carpet monster had already had it. Not much I can do, just hope that no one really notices (which they won't at this scale unless they are really looking hard). So with that all done I glued the fuselage together and then glued the rear ailerons as well. The wing is only dry fitted at the moment to get a sense of how tight the fit is (answer: VERY tight): The fit was good, if a little tight and you can see I did a bit of a poor job with the cockpit as there are some considerable gaps around there that will need to be filled. Again the 10p comes out for scale: Leaving it here I need to fill some other tiny gaps and clean up the seams then get ready for painting. Thanks all Update 2
-
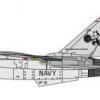
F/A-18B RAAF, 1:144 Revell + resin - update 21-11
Neal posted a topic in Work in Progress - Aircraft
This was my entry to the Hornet STGB; Revell 1:144 F/A-18D, backdated to a 'B and modified to represent the hornets of the RAAF, specifically A21-106 as shown here http://www.adf-gallery.com.au/gallery/Hornet-A21-106/DN_3A21_106 The build stalled waiting for the retrowings resin cockpit. It'll be parked up covers over the intake and exhaust with the wings folded and the canopy open. I've the retrowings resin control surfaces along with the ozmods resin fuel tanks. The retrowings cockpit arrived a couple of weeks ago; my Tomcat for the USN GB is finished and the nights are drawing in so I thinks its time to dust this one off as the winter project. -
Here's my entry the Revell 1:144 F/A-18D, backdated to a 'B and modified to represent the hornets of the RAAF, specifically A21-106 as shown here http://www.adf-gallery.com.au/gallery/Hornet-A21-106/DN_3A21_106 Here the box shot, and the novascale decals. The decals are APLS prints which I've never had to deal with before. The RAAF roundels look really crisp but the blue flashes aren't all that great, but we'll see how we go. I've also the retrowings resin control surfaces and cockpit set along with the ozmods resin fuel tanks and bomb carriers on order. I think it'll be parked up covers over the intake and exhaust with the wings folded and the canopy open.
-
 Hello, I am new to the forums and relatively new to model kit building. Just finished this and would appreciate any tips/criticisms you may have! Thanks TBM
 -
In with this one, hope to start this soon but need to get my F-15 builds done for another Group build, so it may be slow progress at first. Anyway box and other shots below, two choices for this but leaning towards the Dyess one as a Bone with the bat symbol on its tail seems to suit the aircraft.... Nice box art Bagged sprues, no comments on the background,... Updated Resin Cans Decals
-
Guys, Anytime Baby!...... Forgive the pics, camera went on strike so my phone had to double job...very hard to photograph a gloss black aircraft (any tips?) the famous F-14A Black Bunny of VX-4, painted with Humbrol gloss and matt black with Humbrol metalcote on the wing seals and exhausts and tamiya clear on the HUD. As always all advice gladly accepted.