Search the Community
Showing results for tags '1/8'.
-
Hi guys, well here we are again with another classic 70's motorbike build. This time I was given this kit by the brother of the owner of the actual bike in the pictures. I have carried out restoration work on the motorcycle and as the bike is almost finished, I have been asked to build a replica of the bike, so I will be painting the model black and adding the white pinstripes as their is no decals in the kit, wish me luck with that! The kit is nicely molded but is really not designed to be painted as it asks you to add soft vinyl parts during the assembly, making painting an added chore due to having to mask up more parts which would have been fitted later. The instructions are hard to follow and vague to say the least, but I will muddle through the best I can. It will only be a loose replica, as I won't be scratch building the crash bars and the kit has chrome wheel rims and exhausts where the real bike has alloy rims and stainless exhausts fitted by the owner. I may strip the chrome off the exhausts and add heat tarnish to the header pipes, also the fit of the rear engine cover where the carbs attach looks a poor fit, but the gaps are correct as the real bikes air filter housing was also a poor fit. Finally the carbs are a fiddle to fit correctly on the real bike, so I made sure they fitted correct on the model and true to the real bike, they were a pig to get looking right, too many angles to glue at the same time. Wish me luck with this build, I'm going to need it!
-
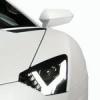 Hello everyone, I came across this forum while doing some research (Google image search), and found the work of roymattblack. I originally had bought my Aventador as a decoration for my living room, so the goal was to complete it asap. I was already halfway through and about to connect the engine part to the passenger cabin when I saw what Roy did to his kit. Wow! I loved the tiny little details he added and was so inspired that I started taking my almost completed rear part apart again. I did more research and found more and more things looking wrong on my model. I did build a couple of Revell planes some 15 years ago but didn’t plan to dive too deep into the diecast thing again. Fiddling around with those super tiny water decals for the cockpit buttons and windshield wiper arm was already way more than what I had planned. I went and bought some colors, but the first results were not very satisfying. Turned out I had bought the wrong silver color, mine looked almost white and not shiny (Revell 06 AFAIR). I went back and bought more colors and more stuff, my normally super clean homeoffice turned more and more into a messy place, and the sheer number of small tasks waiting to be completed seemed overwhelming, but I loved it. I took the engine further apart and added more detail, mostly inspired by Roy and the great work this guy had done. My vision is just a little impaired, so I had recently bought a lens lamp which is an enormous help. I’d say this kit cannot be properly build without one. I will keep posting progress as it unfolds. First part that I build with more love to detail was the front axle: custom battery cable (+) and paint job, active suspension (still looking for a way to get black Öhling decals) My workplace(s): redone engine: By the way: I did manage to press the exhaust manifolds, probably the most illfitting part in this kit so far, into place without altering the attachments by the use of sheer force and super glue. It still holds I'd like to add that I mainly focus on the visible parts since most of the engine will forever be hidden under covers. I did add some extra piping but no fuel lines or oil filters. What amazes me is the fantasy you can bring into such a project. The brackets on the airintakes are made of gift wrapping band Fitting test: Visibility tests: Fitting & visibility test: Progress:
 -
Hello all, On request from Poul and Rich, I’m posting a WIP on my Pocher F12 engine duobuild. The build has been stalled for about 6 months mainly due to other builds getting my full attention. But I need to continue work on these as the parts take up a lot of real estate space in my work area, as you will soon notice. A colleague had acquired this kit but he isn’t a modeler so he asked me to build it for him. As I had the same kit in my stash as well, I started both kits simultaneously, as I would otherwise probably not build my own kit anytime soon. I also thought that it wouldn’t take that much more work to build two identical kits (or so I believed…I’d soon find out how wrong I was). Here are some pics of the kit and the parts. Some of these parts are really massive….
-
I was looking into this kit while evaluating what might be next and found very lttle information about it here in the forum. So I thought why not start an official discussion about this upcoming kit, possible release dates, first reviews and misc. stuff. Contributions welcome. Found this image on twitter of the actual kit car as shown @ Nurnberg toy fair early 2016. All other images lurking around are CAD renders. I saw a discussion somewhere based on these Images. I for my part highly doubt the cockpit will be as detailed as in the renders. I found old renders of the Aventador and the kit looks not at all as detailed. What I read is that the release date should be at the beginning of June 2016, which would be now. But as far as I know it wasn't released yet? Also didn't find any reviews, and the reviewers usually get the early preview models (or not?). I guess I will wait for a possible Spyder kit, preferrably in blue. Nonetheless I'm interested in what is about to come.
-
 I bought this a couple of years ago and have wanted an excuse to dig it out of the stash for a while. I'm going to be building it as an operational combat variant in camouflage with lighting. There's some nice detail on the base. The main torso parts came in a poly bag already off the sprue, I popped them together to give a better idea of the size.
- 24 replies
-
- 1
-

-
- Iron Man
- War Machine
- (and 2 more)
-
I really hope DeAg release this in the UK at some point: http://deagostini.jp/site/lcl/pretop/index.html Mike D.
-
Hi folks, I'm not sure why I put off finishing this for a month, it didn't actually take all that long to do the final assembly, wiring and scenics. But it's done now! (click for bigger/more pictures on Flickr) The kit is from Industria Mechanika, and is a resin cast of a 3D-printed master of a model by a guy called Mike Jensen. My original plan was to do something a bit shinier and cleaner, but I found that the surface was basically too complex to polish, and opted for a weathered finish instead The inspiration was District 9, and more specifically Neill Blomkamp's earlier short Tetra Vaal, so I modelled the surroundings after Soweto. I remodelled the sniper rifle from the kit-supplied anti-materiel weapon to something a little bit more futuristic and police-like, and hollowed out the head and neck to light the eyes. The paint is decanted Tamiya and Alclad lacquer, and various acrylics over the top of that. Markings are a mixture of sprayed and various Gundam kit decals. On the scenic front, the concrete is florists' foam (never again!) the catfood tins were made from thick foil with laser-printed labels, and the bees are H0 scale from Busch - only 10x larger than they should be for 1:87! More details of the build here: http://www.britmodeller.com/forums/index.php?/topic/234939124-drone-sniper-resin-figure/ Thanks massively to the people who commented on the build thread, I got some key suggestions from there which really helped shape this project! and a few close-ups: Incidentally, I spent a lot of time looking at photographs of the poorer areas of Soweto, particularly Kliptown, to get the colours and plants looking right, and felt kind of crap afterwards, like I was taking advantage of other people. I opted to donate some money to Kliptown Youth Program, it's not much, but hopefully better than doing nothing. If you want to help out, see here: http://www.kliptownyouthprogram.org.za/ Cheers and thanks for looking! Will
-
Hi folks, I figured I should stop ogling the Industria Mechanika kits and actually build some of them I've been cleaning up the Fichtenfish but I wanted to have a go at the sniper when it appeared since it's big and cool and an antidote to this fiddly 1/144 scale hovercraft I've been building. I'm a total resin novice, I've used a couple of resin aftermarket parts but that's it, so please point and laugh or suggest things to save me from my own stupidity according to taste I started by soaking the bits in warm soapy water, scrubbed them with an old toothbrush and rinsed them off. They smelled a bit like lacquer thinner in the box, now they don't, so hopefully I got the mould release off? First impressions are pretty good - with the pour plugs removed you can dry fit the legs, lower and upper body and he'll stand up on his own two feet without the base. Which means the pose really is as natural as it looks - nice Click for bigger I did some more clean up and put the major bits together with 5 minute epoxy, using the base as a work stand. He's pretty big - would make a good Eva There was one difficult mould line on the back of the left calf - the right one is fine, the left one had a step which goes right through the socket. I've made some progress on cleaning it but there's still more material to remove/fill. Those hamstrings are cool though. I also put the two main gun components together - had to adjust the slides on the sprung part of the stock, and I also broke the lower spring guard which is very delicate, but it was easy to repair. I'll leave the spring out for now since it can just pop in the guard later. The gun is a little bit soft in detail, so I scribed some of the concave angles to sharpen them up a bit, and I've tried to do all the clean-up with a file to get lots of hard edges. There's a mould line running through the ridges on the top of the body which will be a bugger to clean up properly, I suspect it's better to ignore that one, or remove them completely? I really like the sight, I haven't messed with that at all apart from paring down the hood over the optics to get a thinner edge. Oh - there's a long barrel and one of those boxy muzzle brakes, but there's no point fitting that now since I'd only break it I suspect I'll replace the resin barrel with metal tube anyway. As you can see the gun comes to hand nicely - no issues with fit, both hands grip where/what they should. I think the clip is really a bit close to the torso and hips though, it's not a big issue but since I'm wondering about making the gun a little bit more sci-fi (different muzzle + barrel - maybe suggesting it's somehow a coil gun?) I could remove the clip, or most of it, and have an energy hose from one of the sockets on the drone's back? So primer and more cleanup next. I also have some big unanswered questions, like how to paint it, and can I light it? For the light, the head is really small so the only options I can think of would be: a) Drill out the eyes and run optical fibre through to the channel on the back of the head, and have an SMD LED there, or curve the fibre around into the body or a backpack somehow? Like predator dreads I really don't want to be hollowing out the body though - too much chance to stuff it up and the surface is too smooth to spoil. I also can't see how to run the wires to the base without drilling out everything which would imply some kind of button cell in a backpack? Have an opaque visor over the eyes, with an LED glow behind it? Same issues with the wires, but it could work. On the paint front, I'm not sure whether to go metallic (like the Geth) or something more like District 9/Chris Cunningham/Cerberus armour from Mass Effect - lots of hard white plates with orange or red contrast and black/metallic detail underneath. I really like the idea of hard white, but looking at the figure in close-up there's a lot of what looks like moving "musculature" and maybe less plating than I thought. I'm also not sure how either of these would gel with weathering - I quite like the idea of a clean and shiny robo-soldier in a dusty derelict environment, but that would need a soft touch on the weathering and not give me anywhere to hide with the paint job... I suspect there's a lot of masking in my future Apologies for rambling, hope I can keep some momentum going on this one since it feels like I've been doing military stuff for ages now. Cheers, Will