
Search the Community
Showing results for tags '1/72'.
-
A two-for-one with this post. I was given two of the same Heller kits (from 1993) and told I could have them for free if I returned one in its completed state. As with any Heller kit I've made, there was no issue in part fitting and the only (minor) issue was that the decals had to soak for a little longer than usual. The Polish version is painted in Vallejo's Model Air line (a brand of paints I've had almost exclusively bad results with) in German Braunviolet, and the Romanian in AK's Real Colors' Grau (1941). I haven't been able to find any colour photos of the olive drab that Poland painted their planes in, but I've read that it was very similar to the Luftwaffe's Braunviolet (which on its own is hard to track down a match for). This is also my first attempt at making a staging setup for my photos. At the time of this photo, it was a work-in-progress, and it remains so. ----------------------------------------------------------------------------------------------------------------------------------------------------------------------------------------------------------------------------------------- The Polish PZL.23 Karaś, (translated as the Crucian Carp) was a light bomber and reconnaissance plane. Another two-for-one post, this time one is done in the Polish paint scheme and decals (drab) and the other in those of the Royal Romanian Air Force (olive and yellow). The Karaś was produced after the Polish-Soviet war of 1919-21 after the importance of aerial reconnaissance became evident. A new light bomber was also required, so PZL combined the two roles into the Karaś. At the time of its production, it was quite advanced, but the 1930s saw rapid improvements in aviation, so it was nearly considered obsolete by 1939 and the outbreak of the Second World War. At the time of Germany's invasion of Poland, the Karaś was Poland's primary light bomber and recon craft. It was a single Karaś that conducted the first bombing raid on a German factory on September 2nd, and columns of Karaś bombers were responsible for taking out nearly 30% of invading land vehicles. Unfortunately, they had minimal fighter support and their light armour ensured that they suffered heavy losses. After Poland's capitulation, many of the remaining Karaś craft were shipped to Romania to use against the Soviet Union in Operation Barbarossa.
- 16 replies
-
- 35
-

-
- PZL.23 Karaś
- 1/72
- (and 1 more)
-
Here all. Here is my recently completed build of a Savoia-Marchetti S.55 Torpedo Bomber of the Regia Aeronautica Italiana using the Dora Wings kit in 1/72 and was built as part of the World War 2 Twins GB. Built out of the box with only a figure and rigging added and mounted on a sea base. Build log here: This thing is big for me, taking the space of 4-6 of my 'normal' sized subjects... Stuart
-
Although the Wallace was fine, after the trouble I had with the Shark both in terms of the wing struts and also the poor location points, I am a bit hesitant to try another biplane but as this is the last viable Frog kit I have I will give it a try - I have a Sea Fury and Master that I have been using for spares and a Gloster Whittle that is so inaccurate that I can't be bothered making it until I am desperate for something to build. It is a Donetsk Toy Factory offering which I bought many years ago, but fortunately in this instance they seem to have been rather better at moulding the plastic than they were with the blurry box art! There is not a lot of flash for once, likewise ejector pin marks, and all the bits are there and intact except for the "axle" pins on the landing gear legs which have broken off. That is not a problem anyway as I have decided that I will build it as a pre-war floatplane. This will be the 4th Swordfish I have built starting with the ancient and not very good original Airfix offering from about 1958, followed by a Matchbox one and another of the Frog kits, all with wheels. As you can see Frog went for the "frame" type strut arrangement this time which should be a lot easier, although that can cause a slight problem in terms of appearance with the non prototypical horizontal troughs and frames, but a bit of work with a file should minimise the visual impact. Also, there is not as much rigging as I expected as, other than one wire from the cabane struts to the inner wing struts, only the outer bay and the floats will need a full set of wires. Another reason why I decided to risk it is that I have found 2 sets of original Frog decs for the floatplane version. This will be OOB except for the cockpit interior and the forward firing gun which Frog missed, and an Aeroclub Lewis for the rear seater - it seems that both the Lewis and Vickers K were used and I am not entirely sure what the kit part is meant to represent - probably a Lewis! If I am lucky it may end up looking a bit like this one from the Cocardes Frog site. Though with rather less extra detail added! Pete
-
The Northrop F-89 Scorpion is an all weather twin-engined interceptor designed and produced by the American aircraft manufacturer Northrop. It was the first jet powered aircraft to be designed for the Interceptor role from the outset to enter service,as well as the first combat aircraft to be armed with air-to-air nuclear weapons in the form of the unguided Genie rocket. First flew in 1948 and entered service in 1950. For this GB, I plan to build Revell’s 1/72 F-89D/J kit. I will be finishing it as the aircraft shown on the boxart, a F-89D from 61st Fighter Interceptor Squadron from Ernest Harmon AFB, New Foundland, 1957. Why this one? I like the look of the aircraft with the large wingtip rocket pods (containing a 104 ‘mighty mouse’ FFAR rockets) and more importantly it has a big smiley face on it.
- 38 replies
-
- 20
-
-

KP 1/72 Spitfire PR Mk.XI from a newbie
Beardybloke posted a topic in Reconnaissance and Scouting GB
After lurking on and off since lockdown, this GB was the final thing that persuaded me to sign up, as I've had a photoreconnaissance Spitfire on my wish list for a while. Hopefully I'm not too late to the party! I don't get a lot of time to do modelling as I've got two pretty busy jobs (one as an Army Reservist), and two young children, as well as trying to get a home office sorted for my other half and finish decorating and upgrading the house from the move two years ago. I do occasionally get some time when working from home and sat in on meetings where I need to listen more than contribute... I've gone for a KP PR Mk.XI; it's my first experience of a KP kit and from first glance, I'm impressed. The mouldings are crisp and the shape looks good, confirmed through a quick comparison with an Airfix Mk.I, though I haven't measured it against a set of drawings - ultimately, it looks like a Spitfire without any major oddities like the slightly-too-fat Academy Mk.XIV. I'll probably be doing the 541 Sqn version with full invasion stripes as on the box art, although I may do the 400 Sqn RCAF version with underside stripes only. First steps are going to be the initial painting of the interior parts, which I might be able to get done today... -
I am a late starter for the GB as I could not decide on my build. So here it is The box contains two kits, one part started and the other untouched, I may do both if I have the space. As you can see I have decals for both QANTAS and the RAAF. I also have another QANTAS sheet for the later ochre cheatline scheme which I am tending towards.
- 33 replies
-
- 21
-
-
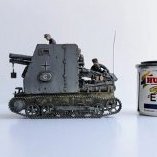 First post here, here's my most recent diorama. The base is made from ceramic coasters, styrofoam and air-drying clay. The sunflowers are actually pre-painted photoetch by Eduard, and the large green bushes are pre made. Otherwise it's mostly scratch built. The kubelwagen is made by S-model, and all the figures are from Preiser. Included a couple of work-in-progress shots of them at the end. I made this diorama/vignette base to display several different models, so the vehicles and soldiers not glued in place. The figures have stakes under their feet so they can also be moved around. Here's the whole dio, in my hand! I linked them from my Reddit profile, hope it works!
 -
Hi All. With the Centurion complete, I thought I'd knock out this MiG-15 using the Eduard Profi Kit in 1/72. This will be built OOB with the wheels up, the only possible addition will be to add a pilot. Box art. Three sprues of plastic. Instructions, clear sprue, PE, masks and decals. Stuart
- 12 replies
-
- 12
-
-
Hello all. Here’s my latest from the shed, not my usual fare, but a change is as good as a rest they say. The SR.A/1 jet flying boat fighter concept was brought about because of the success of Japanese water borne aircraft during WW2. In 1943 the Air Ministry funded the development of three Saunders Roe designed aircraft which were completed after the war had finished. The first flight being in 1947. After evaluation the aircraft was not deemed capable of matching the performance of land based aircraft and was not ordered. Two of the aircraft crashed during testing and were lost. The pilot of one was rescued by the occupant of a support launch who dived into the water fully clothed after the aircraft suffered a landing accident. He pulled the pilot free from the cockpit of the sinking aircraft saving his life. That pilot was Eric ‘winkle’ Brown who became one of the most famous test pilots of the time. The kit was typical short run, taking a bit of work to get it together. I replaced the supplied flimsy PE nose grill with silver nickel rod, other than that it was built from the box. It was finished in a mixture of Humbrol 27001 and 27002 and sealed using Xtra color varnishes. The base is from coastalkits. A nice change from the norm I enjoyed the challenge of this build. Here are a few pics, hope you like it. Thanks for looking. Pete
-
Evening all. I'd like to join in with Airfix's recent small-scale Mossie in its bomber guise. I'm going for the airframe on the box art because 1) I don't need any AM decals but mainly 2) Its the subject of a big poster I had on my bedroom wall when I was a model-mad teenager. Of course at the time, I dearly wanted to build a model of it so its great to now have that chance. Thanks Airfix! Here's the usual box & sprue shots. Here's the poster which I bought from the RAF Museum shop in the late '70s. It is, of course, one of Charles E Brown's wonderful wartime air to air photos. At the time, my friends all seemed to have rather different posters on their bedroom walls. Many involved models but were definitely not de Havilland or Airfix products! I'm planning to build this one out of the box but we'll see how that goes when I get to the bomb bay doors/fairing and the tailwheel. Here's hoping this thread gets further than my last one. I posted the same sort of photos for an Airfix 1/48 Chippy in the last DH GB then found out later the same day that we were moving house imminently. That stalled my modelling until now. That move went well so I'm confident I can actually start building this time. All the best, Phil.
- 18 replies
-
- 11
-
-
 With the Fokker in its later phase, it's time to look at a second build for this GB. After getting clearance from the group admin, I've opted for doing another float plane (as I have a few), a Savoia-Matchetti S.55 torpedo bomber of the RAI in 1/72 using the Dora Wings kit. In my view, this aircraft fitted nicely into the 'twins' GB nicely, it had twin hulls, twin booms and twin engines, the only question was whether it fitted into the 1935-1945 window but after looking at reference, it looks like these aircraft were in their endgame from 1935 and consigned to reserve by 1939. The stuff... The box Lots of plastic Glazing, decals, PE and resin engines. Glossy instruction booklet Never built anything from this manufacturer before so it will be interesting to see how this goes. I do have a civilian version of this also in the stash , so this'll be a pathfinder. I'll start this as soon as the Fokker is all but done, so shouldn't be too long. Stuart
 -
Although the Special Hobby kit is a better option, the Sword F84F is quite buildable. I 3D printed a correct ejection seat as the kit only includes the early seat. The incorrect wheels were replaced with some new ones I designed and printed as well. The build saga is here.
-
 For this GB I'm going to build a "Sexy American Singles in South American Service" subject, a Bolivian P-51D. Sexy American Singles in South American Service involves building American WWII single-engine aircraft to represent eight South American nations. So far, I've built representatives from Chile (A-24B); Argentina (F4U); Brazil (P-47); and Uruguay (F6F). Bolivia will be the next addition. I had hoped Arma would have their P-51D out by now, but since they don't I'll use this Airfix kit I picked up. One day I want to build the Korean version from it, but for now she'll be Bolivian. I will use decals and the profile from Aztec:
- 26 replies
-
- 10
-
-
Hawker Hurricanes around the world
ModelingEdmontonian posted a topic in Work in Progress - Aircraft
I'm embarking on a project with the goal of representing a Hawker Hurricane in the markings of each Allied country that did not use more-or-less standard UK markings. First stage of this goal will be to represent a Hurricane with markings from every continent. Probably as follows: Africa: Egypt; Asia: Iran; Australia; Europe: Yugoslavia Poland; North America: USA (actually RN plane, but US markings in Operation Torch); South America: Argentina. Second stage will be to complete the rest (mostly other European markings--e.g., Soviet Union, Belgium, Netherlands, Portugal, Turkey, Poland, Ireland). I am excluding the UK, Canada, New Zealand, and even Norway (which seem to have only flown aircraft with RAF markings, but I would love to be corrected). Third stage will be five Axis versions--Romania and Finland as actual operators of the type, plus captured versions from Germany, Italy, and Japan. Along the way, I will be building most marks and many different kit brands, although I have no particular goals in this regard. I will post a photo of all my kits once I get them. Since this is an ambitious goal given the pace at which I build models, they will almost all be OOB and there will be minimal weathering and other detailing. The point will be have fun and produce interesting Hurricanes!- 634 replies
-
- 13
-
-
- 1/72
- Hawker Hurricane
- (and 1 more)
-
So: Hasegawa F-104G, still bagged Paulus Victor decals Master pitot tube New Ware mask Humbrol 116 Some images from the net Should give me a model of RDAF F-104G R-699, US serial 63-12699 first flight June 5 1964, to Denmark November 1964 (NMF?) painted green October 1 1969 and a bit (a lot?) worn at RAF Gutersloh in September 1975, which fits the theme? Just waiting for Quinta 3D cockpit decals but we've got 11 days still? Chris
- 28 replies
-
- 16
-
-
 Hi all I thought even though I have a few builds on the go, 2 Beaufighters and a Seafire, I have been drawn to this little cutie. Well I do like a yellow Aircraft. I didn't finish a Biplane last year so thought I would put that right early on. Looks quite a lovely kit. I would like to thank the guys who responded for info requests in the WW2 aircraft section amd uploaded some lovely photos and info. They are @Work In Progress @JWM @dogsbody @marvinneko and @KRK4m Thanks guys I have made a start, the resin engine is together with the cowl panel fettled and dry fitted at the mo. Cockpit sidewalls with added 0.3 mm Brass wire Painted and cockpit floor and seats painted with spares box PE belts and kit supplied resin control columns added Pleased with it so far Thanks for looking. Chris
- 102 replies
-
- 18
-
-
So I was swithering whether to start this build now or wait for three weeks for the 60's Group Build over on What If Modellers. Its Fairey obvious that I have decided to start it now as I intend to have this finished by mid to late April in time for the Scottish Nationals and with my build rate, the sooner I start the higher the posibility of finishing in time. So what is this Project 75, which by itself sounds like something from a cheap sci-fi novel of the 1950's. The answer is the first kit in 1/72 by Aerocraft, the Fairey Project 75 to GOR. 339 which ultimately led to the TSR.2. The model is a nice and clean high resolution, 3D printed hollow model in multiple parts with lots of printing supports as you would expect from a kit in this medium. The fuselage parts look like this when removed from their supports. Here they lack any interior or the nose and tail cones which are cleverly designed only to fit into the relevant part due to a key printed into their ends. The above picture was taken on an A3 cutting mat to show the scale which is comperable to a 1/72 scale TSR.2. The undercarriage, seen below, is well designed, allowing the tyres to be painted separately from the rest of the bicycle style main undercarriage. The face that there are outrigger wheels in each engine naseles reminds me somewhat of the Sud Aviation Vautour. The Print Supports I have kept as they may be useful for any sci-fi project I may undertake in the future, we shall see. More later as it's too cold outside right now to prime the nose section prior to painting. Gondor
- 49 replies
-
- 8
-
-
- 1/72
- 3D printed
- (and 1 more)
-
 Hello Britmodellers, Here's my take on the Airfix MiG 17. I wanted to build a slightly different machine than the famous '3020' so I did some decal juggling there. A few grainy pics show '3012' in a heavily weathered condition. It took me two tries before I ̶g̶o̶t̶ ̶f̶e̶d̶ ̶u̶p̶ ̶w̶i̶t̶h̶ ̶i̶t̶ / got the effect somewhat acceptable. Other modifications were the KK-2 bangseat, reshaped inner wing leading edges and brass gun barrels. Thanks for watching! Luka
- 11 replies
-
- 42
-
-
 About a year ago I made a return to model making after a break of almost half a century. The model I chose to start with is a 1/72 scale Short Stirling mkI, which I will complete as N6086, "MacRobert's Reply", LS-F of XV Squadron. I want to display her, at the squadron base at RAF Wyton in Cambridgeshire, being bombed up on the morning of 18th December 1941, for a daylight attack on the battleship Gneisenau in the harbour at Brest. I have made a start by laminating two sheets of 5mm foam board to make a 10mm thick A2 sized base, which I will populate with the Italeri Stirling, a couple of vehicles from the Airfix Bomber Re-Supply set, Flightpath bomb and accumulator trolleys plus whatever figures my painting skills allow. The proverbial blank canvas. I want this to be a fairly quick base build, in contrast to the airframe which has been keeping me occupied for the last nine months, so I'm thinking of using abrasive paper, suitably primed and weathered, to represent the concrete taxiway and scenic scatter material for the grass areas. Anyone who has seen my WiP for the Stirling will know I'm on a steep learning curve and my ideas often run ahead of my current abilities, so we shall see how this turns out. I am already fretting over things like "What size were the concrete slabs that formed the perimeter track at Wyton?" and "How dark a green colour would the grass have been in December?"! I think I'm going with 25' squares for the slabs, based on the 50' width of standard taxiways later in the war and from looking at photographs of aircraft parked at Wyton on the 60s and 70s. As for the grass, I'm going with dark green for winter in East Anglia. More pictures next week! Onwards and Upwards, chaps. Murray
 -
 This is my initial entry to the GB. It is well on its way and has been languishing on the Shelf of Doom for some time. I started it almost 2 years ago and was last touched in September 2022. My aim is to finish it this time around, I have until 17 Jun to complete it as I will be away in Europe when the GB finishes. It will be finished as 140111 as it appeared at a Fincastle competition. I started with this. Made a started the CP-140 mods to the kit and did the cockpit I have completed most of the assembly and am using an Eduard etch set for the wheel wells and exterior It now is at this stage, now to find the rest of the etch set and parts to finish it off!
 -
https://www.scalemates.com/kits/remus-play-kits-messerschmitt-bf109f--177344 I came across one of these while looking for something else on the 'Bay recently and it prompted a few memories. Remus was a pocket money toy range sold in general stores and newsagents. My memory is that they were displayed on one of those rotating racks that were quite common back then. Most of their products were bagged or carded and hung from the arms of the rack. Being in my late teens in the second half of the 1970s, when these toys were most common, you could say I was aware of the brand but not interested in it. That is, until the day I climbed to the first floor of Boots the Chemist in Falkirk and came face to face with a FROG Gladiator. Only it wasn't. Boots used to sell toys, and records for that matter, and what I was looking at was a rack of Remus toys with about half a dozen FROG kits hanging from it. At quite a good price too, as I remember. I didn't buy any then, in fact I've never owned a Remus kit so I don't have any insight into the quality of the parts or the decals. I do know that the company must have commissioned alternative box art as later kits were different from the earlier ones. I wonder what the rest of the story behind these kits is? Anyway, this is a place holder for the time being. I'll post photos and make a start when my La-7 and Airacobra are a bit more advanced. John
-
My first kit in over 50 years. Thoroughly enjoyed it. Made some mistakes but all part of the fun! For a starter kit I was impressed by the quality of the fit.
- 10 replies
-
- 32
-
-

-
Nice kit, new mould from 2016 I believe, went together really nicely, a very enjoyable build, painted with Xtracolor enamels.
- 14 replies
-
- 46
-
-
With the Jet provost done and the other activities out of the way, it’s time to get back in the saddle and do some more modelling. For a bit of a mojo boost, I watched Top Gun, Top Gun Maverick and The Final Countdown on DVD’s. So tonight, out came the Airfix F-14A Tomcat (blueprint box) and the Revell F-14D Super Tomcat from the stash - both 1/72. I’m going to try to build them both together stage by stage (rather than build one and then the other). The Revell is better in detail as it’s a much later kit, but the Airfix one still has a certain charm to it - even with the raised panel lines which I’ve decided to leave to see how it turns out. So, the first stage was to build the two cockpit tubs. The Airfix one is much longer then the Revell and both have raised detailing in the some consoles in roughly the same depth. The ejection seats are worlds apart in detail, so I might see if I can 3D print something a little more interesting for the Airfix kit. Otherwise the offices are fairly well detailed considering….. Both tubs were painted with Tamiya XF-19 Light Grey (as it’s what I had to hand) and are drying off. They will both receive other colours to highlight the consoles and IP’s. I’ve also bought an extra set of Airfix F-14A decals which offers two options - TopHatters and the Black Aces - to go with the Bounty Hunter and Grim Reaper options for the kits.
- 44 replies
-
- 12
-
-
This is the Italeri kit (Testors boxing) built as an LC-130F of the United States Navy. It represents 148321 which crashed in 1971 at an ice runway 860 miles (1,380 km) from McMurdo Station as a result of two JATO bottles ejecting improperly and striking one of the aircraft's propellers. In 1987 the aircraft was dug out of the snow and had temporary repairs carried out allowing it to be flown out to McMurdo Station and thence to Christchurch, New Zealand. It re-entered service and spent several more seasons doing antarctic work. The aircraft was retired to Davis-Monthan AFB sometime after 1998 and still resides there as far as I know. I used the Cutting Edge ski conversion as well as some scratch building of antennas and the fairing behind the nose wheel well. The flaps are from Attack Squadron and I replaced the engines with units form Ron's Resin. The decals came from the Max Decal sheet.
- 12 replies
-
- 40
-
-
-
- 1/72
- Conversion
- (and 1 more)


.thumb.jpg.2c282efcc138b7cf7f1e1586a9c534d2.jpg)
