Search the Community
Showing results for tags '1/72'.
-
Just pulled this from the stash. Success rate has been a bit hit & miss in past blitzbuilds. Plan to build it in two 12hr session starting Saturday, finishing Sunday whilst following the; One Day Cricket final at Lords (Go Hampshire) The Giro The Monaco GP Indy 500 Super League Magic Weekend (Go Rhinos) Decision taken to complete as the Belgian option as it only has three main colours (Dark Green and Dark Brown over Aluminium) as opposed to the RAF option that uses 5.
-
I'm getting started! Being in Australia gives me a good head start. I'll be making this: And eating this: I may well be joined by @emily for this build, she's never done a Blitzbuild before so this will be fun! Also keeping a watchful eye on proceedings (or maybe pro-seed-ings ) will be Pippin and Snowy. Wish us all luck!
-
 Here is my Airfix Hawk T2 of 25 Sqn at RAF Valley. Thought the new squadron would a nice way to start on the Hawk stash. Still find getting a nice gloss finish a bit of a battle and this is my first effort with the gloss black. Additions for this kit were the Air Graphics decals and baggage pod, aftermarket metal Pitot Probe and scratch built wing tip missiles and aerial behind the cockpit..
 -
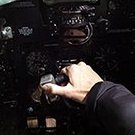
Gazelle HT.2 XX410 Westland Helicopters Ltd, Yeovil, October 1975 The Gazelle is a tiny thing in 1/72, but the impact it had on my life was anything but tiny. I joined Westland in July 1975 as a Flight Test Engineer. At the time Gazelles were flowing off the production line - mostly Army AH.1s, but amongst them a few Royal Navy HT.2s (the RAF HT.3s had already been delivered by then). I learned about flight testing on these little sportscars of the helicopter world. XX410 was the first HT.2 that was my responsibility to manage through its production flight test schedule. We flew in the co-pilot’s seat on the left (the pilot has the right hand seat in a helicopter). FTEs were encouraged to take the controls from time to time, which is where the HT.2 scored over the AH.1 as it was fitted with SAS (Stability Augmentation System) which made controlling the little blighters just about possible – as opposed to almost impossible on the AH.1. I just remember the whole thing as great fun and I could hardly believe I was being paid to do this. Anyway, here’s a scan from my flying logbook which shows some of the other things we also got to fly in: The model was built many years ago. Long before airbrushes – deep in the Modeldecal era. My guess is 1978. It’s been in the attic for a long time (in fact in 3 different attics over the years) and it was great to see it again for a photoshoot.
-
After the endless struggle of the Revell Hudson, I wanted a quick and trouble-free build, so here’s my version of the 1/72 Airfix Bristol Beaufighter TF. X. As most builders seem to, I chose to depict NE829, flown by No.144 Squadron from RAF Banff in Aberdeenshire. Built straight from the box, this is a great little kit, with a fit good enough to negate the use of (almost) any putty . The engineering is - as with a lot of these 1/72 Airfix kits - clever enough to make simple constructions out of complicated forms. It’s been noted that the 3-part engine cowls are the least satisfying aspect of the kit, but the seams either line up with colour transitions or are covered by the exhaust or supercharger air intake - a nice detail, I thought. Although 1/72 isn’t my preferred scale, I was attracted to the rugged look of the Beau, with the big Popeye forearms of the Hercules engines and the rather worn look it had in most of the source photos I found. Using Tamiya paints throughout, I built numerous thin layers to break up the large monochrome expanses of the fuselage and integrate the weathering into the paint scheme.
- 12 replies
-
- 28
-

-
- Airfix
- Beaufighter
- (and 1 more)
-
Hi gents! While waiting for the primer to try on the endless sanding repetitions on my YF-105A Thunderchief conversion, I a going to do something I rarely do, start a second project at the same time. Well actually, I do it all the time, but I just never publish it at the same time! Nevertheless, I'll begin first with the backstory. Several years ago, I ran across an interesting conversion by a modeler named Bill Dye. I never met Bill, but I he apparently loved to kitbash and convert, like I do. What I first found was his YF-96A conversion YF-96A Build I decided I'd have to build one of those, one day, but as is my norm, other things intervened. Sometime later, I ran across this pic: : The bottom aircraft is actually the second YF-84F, modified with a solid nose and wing intakes. I decided I'd like to build on of those, because I had never even seen a picture of one before. While researching THIS aircraft, I ran across another build started by Bill Dye of the same aircraft. Sadly, he never posted finished photos of the build, and I do not know where he is, or how he is doing. In any event, he (unknowingly) encouraged me to do this project. Here is a link to his version: Bill Dye's YF-84F While my research pointed me in a slightly different manner of conversion than Bill's, I will still use his technique of chopping out the needed cockpit cutout as a whole panel, and transferring it from the Heller F-84G kit to the Testors/Italieri RF-84F kit. Which is exactly how I'll begin, sawing two cuts 58mm apart across the Heller fuselage, and then laying out tape the long way to mark those cuts. The front saw cuts were 12mm wide, centered on the fuse join line, and the rear saw cut was 14mm wide, also centered on the fuse join. Almost all my panel line cuts are made the same way. First a tape line is laid out if needed. Then, a sharp #11 X-Acto blade is run along the guide, followed by a couple of passes with my Trumpeter scriber, and then finally, the saw: This usually leaves me a nice, clean cut-out, reducing sanding later. Next, the same procedure is repeated on the T/I RF-84F fuse, using the same measurements: Of special satisfaction to me is the fact that this is the same RF-84F kit that I had previously swiped the turtledeck from to build the YF-105A, the other work still in progress, which is why the little triangle of plastic is missing from above. Saves a kit! There are a couple of reasons why I decided to modify the RF-84F vs the Heller kit as Bill did, and I'll explain these later. Also at this time, I glued all the camera windows in place of the RF-84F for added strength. (Turns out only the single window further back really mattered!). Then, I sawed off the camera nose, just a hair ahead of the nose gear well: Next all the protrusions on the RF-84F kit had to be removed from both fuselage halves, in the area between the lines marked. This included the front wing supports only: For the cockpit I'll use a resin copy of, IIRC the CMK Academy F-84G cockpit set. I made several resin copies of the tub years ago, against future need. They are not all exactly the same as the "G" model, but they provide a good jumping off point, faster than scratch-building a cockpit. I also used a cut down and modified version of the Monogram F-105D as the instrument panel, also as a starting point: When the bare cockpit tun and IP are painted, they are glued into the cutout cockpit section from the Heller F-84G kit, after a little knife work to fit the rear tray of the cockpit into the fuse section. The rear was reinforced underneath with a bit of scrap plastic card, and everything was glued together with clear Loctite Go2 glue, which is sort of a thick, flexible CA glue with no bad fumes. While no good for areas requiring sanding, it's the bee's knees for nose weights and stuff like this, as it sticks to most everything and is water resistant (future sanding). Well, that's it for this time. Hopefully, I'll be back soon with either this or the YF-105A or something... Ed
-
Also completed today is the HobbyBoss EasyKit version of the Curtiss P-40B. This kit looks the part, mostly, but lacks some details: the cockpit is very simplified and there are no doors for the landing gear fairing. But, it makes for a quick build and I had fun with it. Brush painted with Vallejo Air and finished in the AVG markings of Greg "Pappy" Boyington of later "Baa Baa Blacksheep" fame using Print Scale decals.
- 11 replies
-
- 35
-
-
Well, as promised over on the YRF-84F Build Thread here are the finished pics: Again, thanks to fellow modeler Bill Dye, who inspired this build. As usual, it's not perfect, but it's better than the one I had before... Ed
- 13 replies
-
- 21
-
-
Hi, The other day I was wondering why in the recent past I have had so much trouble obtaining a 1/72 kit of the venerable Caribou (which also, coincidentally, happens to be my favourite transport aircraft). As far as I'm aware only Hobbycraft from Canada has ever brought one out to relatively modern standards, but it seemingly disappeared years ago. Any thoughts among fellow Caribou enthusiasts on what the chances are of this kit returning to shop's shelves? Also, does anyone know what happened to the molds for this model kit? Jay Pic by Bidgee
- 18 replies
-
- 3
-
-
- Hobbycraft
- 1/72
- (and 1 more)
-
As I'm on a role, here's my Airfix Chinook HC1, 78 Sqn at RAF Mount Pleasant from circa 1987. As all my kits, 1/72, built OOB with after market decals. Not great photo's as they were taken on my ipad.
- 13 replies
-
- 44
-
-
 Finished towards the end of 2018, this was a kit that I'd had in my stash for close to 10 years. Had held off on building it telling myself "one day, when I get better at this hobby and won't make a mess of it". Finally got tired of waiting and just bit the bullet. As I recall, the build was relatively trouble-free and I really enjoyed seeing it come together. I built the Austrian Air Force scheme because it was the only one available from the box, I did not manage to source alternative decals in time. Since then I've managed to get my hands on the more recent boxing by Hasegawa, this time with Swedish markings - can't wait to build and paint that one! This is a completely OOB build, weathering was kept subtle as I read somewhere that the Austrians kept their jets pretty clean. As always, thanks for looking
- 19 replies
-
- 34
-
-
As I wait for hopefully what will be my next big bird, I figured give a crack at a scale that I'm not anywhere near used to doing. I got this as a going-away present from my shop at Mildenhall (rather than the bog-standard cricket bat everyone gets) and now that I feel a little bit more able, I'm going to attempt to tackle this beastie. I'm also going to take a page from @clive_t for the bare metal, but instead of using plumber's tape, I'm thinking what would be better than something used on actual aircraft? And so, on the suggestion of a coworker, I'll be coating her in what we call in the maintenance world "speed tape!"
- 27 replies
-
- 12
-
-
Hi, I'll join with this kit; It's Typical 90's Italeri kit, raised, and simple details, based on prototype of the Tiger. But, a good friend of mine gave me this kit, and what way to honor him better than to build it, right? The build is straight forward, and coming rather quickly. After the cockpit and few sub assemblies I thought.yhis going to be a quick build But a dry fitting session afterwards proof the otherwise This gonna be fun.. Cheers, Mario
-
Slowly adding to my Lightning collection. This is Airfix's 2a with a few additions I've picked up over the years. CMK engine and electronics bay; Barracuda cockpit, wheels and exhausts; Master probe; Xtradecals markings. Think that's everything 🙂 . Having said that the refuling probe may have come from a Sword kit. Tim
-
Here's my 1/ 72 Gloster Javelin probably an ex-Frog/Novo Soviet kit boxed without a manufacturer's name or model name. The box top simply translates to “For Assembly, model aircraft, 1:72 scale”. The drawing indicated it was a Javelin and hence I threw in a Model Alliance decal sheet and laboured long nights to cope with clunky plastic and flash. Anyway here’s the result. I wanted to do an RAF 64 Sqn machine that visited India in 1963 for Exercise ‘Shiksha’ with IAF Hunters (along with USAF F-100s and RAAF Canberras). I used the reverse masking technique for the wing walk lines. I've posed it with its archrival the 1/72 A Model Yak 28 Firebar.
-
Hi all I have been working on this little gem of a kit. This is a lovely kit to put together and looks the part. Slightly simplified without some scoops etc on the top of the fuselage but very pleased with it. Built OOB apart from a small whip aerial on the lower port forward fuselage and the headlights were drilled out with a round burr and painted and filled with lazer bond glue. Brush painted with Humbrol enamels. Great Value for money Kit from Airfix Hope you like Thanks for looking All the best Chris
- 23 replies
-
- 56
-
-
My 1/72 Novo lightning with aftermarket decals, handpainted with home enamels. next to my Novo Hunter of the Chilean airforce.
- 3 replies
-
- 10
-
-
- 1/72
- EE Lightning
- (and 1 more)
-
 I found aftermarket decals for the Argentinian Dagger with the much-loved scheme. the painted over yellow stripes with green (ending up being torquois) to cover the American SEA camouflage. The Only game in Moscow in 1/72 was a bagged Novo Mirage III, the nose of which was tapered down and a new under nose pitot added. I painted the drop tanks in sand camo as they had been borrowed from the Chileans. I then placed it next to my other Novo Mirages of the RAAF and Israeli Air force (Shahak). The base is homemade.
- 13 replies
-
- 30
-
-
 Hi, I just finish this kit. I built it straight out-of-the-box. This is a very nice kit with nice details. It is easy to assemble with no major problems. Painted using Tamiya paints. Let me know what you think. Thanks.
 -
Hi all, After having had a bit of a hiatus, this is my second posting within a few weeks so I can get on with it when I put my mind to it 😝 This time round, I chose a kit I've had in my stash for a while - the Italeri Hs 129. This is actually the first Italeri kit I've built and apart from the odd bits here and there that took more effort, the kit went together well and I think it has really good levels of detail for 1/72. I bought this kit because the Hs 129 has always intrigued me - purely because of it's shape - as it has an almost triangular fuselage which is very unusual. There was also a good choice of schemes to complete the kit in - a couple of Eastern front schemes, a Romanian version and then the one I chose which was Hs 129 B-2 - 4 (Pz.)/SG, Castel Benito, Libya 1942. I was drawn to the mottling for this scheme used to blend the aircraft into it's surroundings in the desert environments. I've never done any amount of mottling before so decided to bite the bullet and give it a go - hopefully I've done it justice So here goes - my Libyan tank buster - hope you like it and as always you're feedback and comments are greatly appreciated. Kris
- 27 replies
-
- 49
-
-
Hello modellers. My last model is done. Modest model and some hard work in the fittings parts. An old traditional Hasegawa 1/72 model. I used Eduard photo etch interior and masks. Tamiya acrilic mixes. I choose JE+HK 2/KG.6 version, found in Melsbroek, Belgium1944. I hope you enjoy it. Cheers!
- 17 replies
-
- 60
-
-
Hi! Concerning the Hasegawa F11F-1 Tiger what can be done with the area behind the seat in the cockpit? It's rather empty under the canopy... Cheers / André
-
Hi, I start building Fujimi Fg.1 and Revell F-4F phantoms about a year ago, and the plan was trying to do a WIP of the build.. which you can see on the link I failed miserably. The build is heavily influenced by @giemme's amazing phantom builds. @Gene K intake are also use, and this build wouldn't be happening if without his help and of course his intake patterns.. I also received many helps from other BM members who provide me with info regarding the subjects... Thanks guys! Fujimi 1/72 F-4 Phantom II Fg.1 Revell 1/72 F-4F Phantom II The Phantom on the background is Hasegawa 1/72 RF-4E which I also finished after being the shelf queen since 2008ish... Partially detailed by Eduard F-4E PE set. My wife think I had enough Phantom.... Cheers, Mario
-
It is my last built: an Airfix Dornier Do17Z - 3U+FU Libya 1941. This kit has some difficulty and wrong panel lines. I adjusted some points and rivet all skin. I used Tamiya mixes. Cheers!
- 37 replies
-
- 78
-