Search the Community
Showing results for tags '1/48'.
-
New Polish company decided to release new tool plastic kits of PZL W-3 Sokół helicopter. Firstly in 1/48 and then later in 1/72. Company have normal site, but it is empty now.
-
Hi, Here's my Tamiya P-38J. What a great kit... I know because I built a P-38H of theirs and I enjoyed it immensely. I'll build this as one of Robin Olds' aircraft in the 479th FG. It is part of my project to build at least one aircraft of each FG of the 8th AF. The project is off to a good start with a P-47M of the 56th FG completed in the P-47 GB of 2023, this year hopefully this P-38 and a P-51 in that STGB. That would see at least the 3 main types covered. Cheers, Stefan.
-
I’ve been thinking about making one of these for a while, so here goes. I remember watching these taxying past one of the viewing lay-bys at Wattisham in the late 80s; might try and dig out some old Kodachrome photos if I can. Onto the kit, I’m hoping this Academy USN F-4J is suitable? One thing missing for the RAF version is the two long antennae on the intakes - anyone know where I can get some, or the best way to scratch build those please? A couple of aftermarket bits I’ll be using. I’m glad I bought the cockpit set as the kit has no instrument decals and requires one to paint them. The Xtradecal are good too, enabling you to make any of the ‘Tiger Sqn’ coded Phantoms. Thinking I may do ZE 353 ‘E’, though not really decided for sure yet. If I may, I have a couple of questions - need some advice please! Firstly, would I be correct to use the kit decals (US Navy) for stencils? Or do I need to source RAF ones? (from an FGR2 kit, perhaps, or different again)? Now it’s time to go down the rabbit hole … Are these Tamiya greys close enough? Can you believe it was 40 years ago this summer that these entered RAF service!? I was 13 then, makes me feel so old! 😟
- 41 replies
-
- 9
-

-
- 1/48
- Phantom F-4J (UK)
- (and 1 more)
-
 My entry for the group build will be Revell's 1/48 F-84E, and as the title suggests, the markings I decided on are the colorful markings for Col. Robert Scott's thunderjet he flew when he took command of the 36th Fighter Bomber Wing in Furstenfeldbruck, Germany in 1951. Scott gained fame as the highest scoring ace of the CBI theater in WWII with 10 kills. As the commander of the brand new 23rd FG, he flew hand-me-down AVG P-40s adorned with leftover Flying Tiger decals, so when he was assigned F-84E-10-RE 49-2299 as his personal aircraft with the 36th FBW, he figured it appropriate to pay homage to his WWII days and applied several Flying Tiger motifs to the aircraft. Decals are from an excellent Cutting Edge sheet, although the national insignia and stenciling will need to come from elsewhere, likely a newer boxing of a Revell F-84G in the stash since the decals in the E box have started to yellow. The only AM I plan to add at the moment is a resin seat from Quickboost.
- 24 replies
-
- 13
-
-
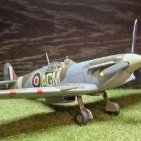
My modelling subjects are varied but it is always something about each one that captures my interest and takes me on a path of research I love. And this like the others is no exception. A fondness for RCAF Spitfires and the crews that manned them. Gathering up the usual kit with aftermarket extras, it was finally time to start this. It was started in late August and now to the point of the final decals, weathering and topcoats. It is coming together more or less as I had hoped. But first a short intro to the pilot. F/Lt Andrew Boyd Ketterson of Montreal, KIA 4th of March 1944 while taking part in Ramrod 623. Ramrod - Short range bomber attacks to destroy ground targets, similar to Circus attacks. The internet provides access to the RCAF Operational Record Books of various squadrons with key information. His aircraft on that day, Spitfire IXc MJ306 and was taken on by 412 squadron in November 1943 making this a later build IX. F/Lt Ketterson flew this aircraft most frequently since it's arrival to the squadron and had "HOT-BOX" painted on the forward panel. A wise modeller was quoted once as "Research, time well spent". And this fits the bill. Most internet uses of an edited version of the following picture of Ketterson state the aircraft as MJ306 VZ*K, including Robert Bracken's book, Spitfire-the Canadians. But the un-cropped version of the image clearly shows the individual aircraft code is not a K but looks to be an M. The usual cockpit prepping with a few extras applied, including the Snapshot Barracuda IX cockpit upgrade and some fine beading wire added. Tamiya cockpit green with shadowing and highlighting. Trying a technique to simulate the sheathing applied to the propeller blades. Taping off where the sheathing was attached and painting on a heavy coast of Vallejo Model Color paint, color choice not important, just shown for contrast. Painted and weathered with the usual colours and hopefully showing evidence of where the sheathing was positioned. Yes it may not be in scale but shown for effect. Ultracast exhaust and one piece upper cowling used. Thinned Vallejo "Buff" used for the lighter colour of the exhaust staining. Bare Metal Foil used on the wing root before painting and my attempt at chipped and eroded paint work. Wing walkway stripes masked off and painted on to give a diminished look. Wing roundel painted on using Tamiya Masking Sticker and Olfa circle cutter. Small touch ups applied after to show field maintenance. New aircraft codes cut and airbrushed. Exhaust staining. Work continues and a few more weeks the final reveal will be ready. Thank you for looking in. Craig.
- 14 replies
-
- 21
-
-
- Eduard
- Spitfire IXc late
- (and 1 more)
-
I'm really pleased to be able to support @TEMPESTMK5 and join @RidgeRunner as a co-host for the Mustang STGB - I reckon it will be the highlight of the STGB calendar this year. My own build for the GB to use Eduard's Mk.IV Profipack to build "out of the box" 3 Squadron RAAF Mustang IVa KH716 as based at Fano, Italy in late 1944/early 1945. Here's the familiar sprues, with the beautifully detailed parts:: And here's the paint/decals call-out showing my scheme, which features the unit's iconic Southern Cross on a light blue background tail markings.: KH716 was flown by 3 Squadron's CO at the time, Squadron Leader Murray Nash DFC and Bar. Here's an Australian War Memorial image of the real thing (note the underwing bomb): The official caption reads: "FANO, ITALY. 1944-12-16. NO. 3 SQUADRON, RAAF. SINCE THE ALL AUSTRALIAN FIGHTER BOMBER SQUADRON IN ITALY HAS SWITCHED FROM KITTYHAWKS TO MUSTANGS, THEY HAVE BEEN CARRYING OUT LONG RANGE RAIDS OVER YUGOSLAVIA IN SUPPORT OF TITO'S PARTISAN TROOPS AS WELL AS CONTINUING TO BLAST ENEMY STRONGPOINTS ON THE NORTHERN FRONT IN ITALY. PICTURE SHOWS THE SYMMETRICAL LINES OF THE MUSTANG FIGHTER BOMBER WHICH IS PROVING VERY POPULAR WITH THE SQUADRON." This will be the second of my occasional 3 Squadron RAAF themed builds, after a Kittyhawk I'm currently finishing up in the (already finished up) Desert GB. If all goes to plan I'll also do a F-35A and a Mirage III in 3 Squadron markings in those STGBs later in the year. So I'm looking forward to building this one and doubling my 3 Squadron collection! But I'll have to be patient and likely won't make a start until a little later in the GB as I have two other GB builds on the go. But I wasn't going to miss this one! Cheers, Gerard
- 13 replies
-
- 15
-
-
I’m guessing this is the Italeri kit with new decals based on the price but will be happy to be proven wrong. https://www.hlj.com/1-48-scale-f-a-18f-super-hornet-us-navy-special-paint-tam38104
-
This Kit has been such a pleasure to make .... 5th model now... think i'm getting the idea. 🤓 BUILD DIARY
-
AJS37 Viggen 37104 - F15 Söderhamn June 1996 The Box The goodies The decal set by Moose Republic and the reference book Research has started. If all goes as planned, I will be starting on it mid december. Is there anybody around who would like to do a parallel build? See you soon, Sam
-
I believe anyone can still join, so here's my entry. (Another) Ju-88. But this one had a big old gun sticking out the bottom. Good old Dragon, lovely looking kits at the end, but it's the journey to that point that will try kill you. Let's see what this one has in store for me, personally my monies on the engine nacelles to wing fit being awful. Lots of plastic inside, plastic looks hard with very little flash, but a few really awkward sink and ejector marks on the cockpit parts. Guess more awaits further down the road. Also seem to have a complete spare canopy sprue included. Hooray! Some AM, resin seats with molded on belts (good thing too, kit seats all have ejector marks on them...), wheels because it's the only other thing I view as a must buy after seats/seat belts and a mask set, a lifesaver for these WW2 flying machines with their conservatory front ends. Let's hope this build goes better than my 2023! I also need to get the new light fitting up in the new place, so going forward the picture quality will improve sometime soon.
- 17 replies
-
- 13
-
-
- Dragon DML
- Ju-88
- (and 1 more)
-
Hello guys, this will be my next project: a Curtiss Wright Interceptor. I've looked around at this forum and found a RFI that's setting the bar pretty high.. I will do my best to meet it.. Progress will be slow, so bare with me..
-
My aircraft WIP started off with a couple of 1/48 RAF Phantoms I was building, but somewhere along the way I started putting together a background to photograph them with. This turned in to a hair-brained scheme to build a Hardened Aircraft Shelter (HAS). I live near Wattisham and have taken some photos while passing of the site, and using google maps I got started on some plans. A full size hanger in 1/48 would just be too big, so a single aircraft HAS seemed do-able. So this is what I was aiming for: Most of the build so far is on my other thread, so I won't repeat it all here. Suffice to say it got rolling with a bit of rolled up cardboard: The main structure is about 76cm x 45cm. But then add the apron in front, doors, vent at the back, annex, etc, etc. Its got pretty big.
-
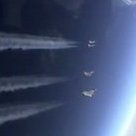
 On the 10th May 1961 Convair B-58A Hustler msn 59-2451 named 'The Firefly' set a world speed record of an average of 1302.07 mph for more than 30 minutes, winning her crew Majors Elmer E Murphy and Eugene F Moses, and 1st Lt David F Dickerson, the Bleriot Trophy outright. On 26th May she flew from New York to Paris in 3 hrs 19 mins 51 secs averaging 1089.36 mph winning the McKay and Harmon trophies. On 3rd June 1961 this stunning aircraft took off from Le Bourget and crashed shortly afterwards, killing all three crew members. When I was a teenager the Convair B-58 Hustler was my dream plane. No matter that it had already been retired, the B-58 really looked like it was doing mach 2, even on the ground, and I wondered whether I would ever see one for real. Quite a few years ago I did build the Italeri 1/72nd TB-58A however the kit I really wanted was the huge 1/48th Monogram B-58A Hustler first issued in 1985. I did snag one on eBay for £16.49 plus £6.00 p&p and it has been taken out and looked at many times since. Now I feel like building it and have already started:- Hustler007 by Ghostbase, on Flickr I have detached most of the parts, given a first dusting of white primer, and cemented several of the sub-assemblies. Hustler001 by Ghostbase, on Flickr Caracal Models CD48059 contains markings for 'The Firefly' while she was at Paris in May 1961. I also have the Osprey Combat Aircraft 130 "B-58 Hustler Units" as a reference. Hustler002 by Ghostbase, on Flickr I have started painting some areas. The undercarriage wheel wells have been sprayed with Tamiya zinc oxide. I have used Humbrol metalcotes on some panels on the wings, also Humbrol acrylic metallic silver on the delta wing leading edges. Hustler003 by Ghostbase, on Flickr Why the Brasso? I intend to use a mix of paints and silver foil to try to replicate the metallic panels of the bare metal Convair B-58 Hustler. I recently purchased a Lifecolour metallic paint set so maybe they will be tried out too. Hustler006 by Ghostbase, on Flickr The top of the wing section so far, being Humbrol metalcote polished steel and matt aluminium. Hustler005 by Ghostbase, on Flickr And the underside of the wing section. Hustler004 by Ghostbase, on Flickr I should say that I am a 'grasshopper' scale modeller. I have several projects on the go and I just jump from one to the next as befits my whim and this will likely be the same. Could be a long project however I have wanted to build this for a long time now. Michael
- 25 replies
-
- 14
-
-
- 1/48
- B-58 Hustler
- (and 1 more)
-
 Hobbyboss 1/48 may do the lower of the two kit schemes. Tamiya 1/48 which I think will be in this scheme Revell 1/72 which will be in this scheme I’m going to build all three together as a way of making sure I don’t let this GB get away from me
- 26 replies
-
- 13
-
-
As part of a pack of 1/48 decals I got a set of USAF RF-4C decals & quite fancy building one. So far it looks like Testors did an RF-4B or C kit and Italeri do an RF-4E. So my question - how close is an E to a C? Different engines, but is that visible? thanks in anticipation of any info!
-
 I've long had a soft spot for the P-40. And so although this is not my normal genre (what's that spinny thing at the front?) and not my normal scale (in fact my first 1/48 build), I'm keen to make a second contribution to the GB by modelling 3 Squadron RAAF CO Bobby Gibbes' Kittyhawk IA ET953, code CV V. Arguably the GB doesn't need another Kittyhawk, but I reckon it does need a RAAF one! I'll use the Hasegawa kit. With its familiar sprues. Complemented maybe with some etch. And with decals from Novascale. (Anybody used Novascale decals before?) Of course there is a bit of conjecture and discussion online about this aircraft's markings. Some photos show the aircraft with what look to be white squadron letters and others what is thought to be blue or red. So at some point in the brief 3-4 month career ET953 had as Bobby Gibbes' personal aircraft (by about September 42 he was flying a Kitthawk II/P-40F) at least some of the markings were changed. And then there's the type A rounders under the wings but type Cs on the fuselage, which photos do seem to confirm. (I found a link to the IPMS NSW magazine with a great article exploring the markings of Gibbes' desert Kittyhawks here - https://drive.google.com/file/d/1ljyz_249Morhw_JOlF6CsrQeUL2bbmFD/view ) Here in Aus a Kittyhawk has been restored to represent ET953, which features white squadron codes but the undersides look to be light Mediterranean blue with period incorrect type D roundels on the wing undersides. Pics here. So I think I'll stick with the scheme as on the decal sheet (dated August 42), which seems to have a nice representation of Gibbes' famous nose artwork of a kangaroo kicking a helmeted daschund... It's getting late so I might post some more info about Bobby Gibbes (an ace pilot in more ways than one) and 3 Squadron as the build progresses. But for now, I've made a start with the cutting of some plastic, and am already paying close to attention to all the other terrific P-40 builds in this GB for guidance and ideas! Should be a fun build! Gerard
 -
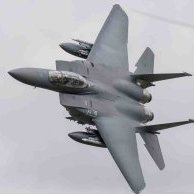 So it's been a little while but time to update on the next project, yep another F-15! This one is a late C model courtesy of the 1/48 Eduard F-15 kit which is an upgraded Academy kit. The upgrades include nice decals, resin wheels, ACES ejection seat and most importantly some very nice exhausts. The kit also includes some PE including colour PE for the cockpit which all together make it quite an attractive bundle. The only slight caveat is that it is still the academy kit which does have some fit issues especially regarding the engine intakes and nose-to-fuselage join. As most of the essential bits are already upgraded, I'm not planning too many additional items however, this will be lit up with some LEDs which always requires some additional thought/patience/sanity-check on a 1/48 scale model. Subject of choice will be a blue aggressor machine from the 65 AGRS at Nellis similar to this one (but not a twin seat version). Decals for 65 AGRS machines are courtesy of an old Afterburner set I bought ages ago (as who doesn't like some more Aggressor options!) and as this will also be an in-flight display, I'll need a pilot . Right onto the kit and straight into the first issue - which to be fair I knew when I bought the kit second hand. The cockpit had been started but it looks like initial efforts to assemble the PE elements had not gone well and subsequent attempts to rectify the situation with copious amounts of super glue had also not gone well. Even the cover-up paintwork failed to improve the look which was probably the point the previous owner decided to call it a day. Anyway, never shy of a challenge (and knowing that a closed canopy will hide a multitude of sins) I set about removing the super-glued paint as best I could with chemicals and assorted files/sanders. All the front cockpit PE was trashed so I purchased another set and set about to recover what detail I could. As you can see, there was not a lot left to play with. Some clever paintwork required here I think or more likely for my skill level, just rely on the seat and pilot covering up most of the issue. The new PE for the front IP should also help. Talking of the seat, at least the Eduard resin one is nicely detailed and some additional PE should detract nicely from the melty-mess of the rest of the cockpit. More to follow soon, intake heaven (not).
- 13 replies
-
- 3
-
-
- 1/48
- F-15C Eagle
- (and 1 more)
-
-
Who doesn't love a Beaufighter?! I do, and the RAAF sure did.. The Beaufighter was one of the RAAF's most effective combat aircraft in the South West Pacific Area during WW2, initially operating a mix of British built Mk VI and X aircraft (designated locally as the Mk IC), before from 1944 taking delivery of 364 Mk 21s built locally by the Department of Aircraft Production (DAP). One of those will be the subject of my build, A8-27 DU-A, 'Rockabye baby', operated by 22 Squadron. The basis for my build will be Tamiya's 1/48 Beaufighter kit, in my case the Mk VI night fighter boxing. Believe it or not this will be my first Tamiya build! All I have read online suggests it builds beautifully. You can pretty much build a Mk 21 Beau straight from the box. The Mk 21's most obvious external difference to British Beaus is the nose fairing for a Sperry autopilot (which from memory was never actually fitted to production aircraft), and is included in the sprues - despite Tamiya never offering a RAAF Mk 21 Beaufighter boxing. But I do have just a little aftermarket! CMK offers a Mk 21 conversion kit for Revell's Beaufighter kit, from which I am using the decals and the hedgehog exhausts. The Brassin set for the Mk X (which the Mk.21 was based on) yields masks, a preprinted instrument panel, and PE seatbelts. Buying the two sets worked out to be better value than buying the bits and bobs individually, even if I have a few left over bits for the spares box. As well those sets I also bought separately some rather lovely CMK resin wheels. One of the decal sheet options depicts A8-27 as it appeared with 22 Squadron on the island of Morotai (in modern day Indonesia's North Maluku province), where they were based from January 1945 until the end of hostilities. The nose art is pretty grim - it shows a Beaufighter about to strafe a caricatured Japanese solider, with the pilot hanging out the cockpit window grasping a club - but would have been perfectly acceptable at the time. 22 Squadron has an interesting and decorated combat history (including the RAAF's only Pacific theatre VC recipient). It had been the RAAF's only Douglas A-20 Boston unit until November 1944 when most of its A-20Gs were lost or damaged on the ground in a Japanese air raid on Morotai. As a result the surviving Bostons were handed back to the US and the squadron re-equipped with Beaufighters in January 1945, operating then alongside 30 and 31 Squadrons and their own Beaufighters as part of the RAAF's 77 Wing through to the end of the war, including supporting the Australian landings on Borneo. It's a tough, muscular looking aircraft, the Beaufighter - apparently the crews use say it was two big engines followed closely by a small aircraft! - and it looks just right in RAAF foliage green. Looking forward to building this! Gerard
-
My entry to this GB. Wanted to try something in NMF as practice for something later in the year, and was thinking of getting a Su-11 in all it's flying stovepipe glory at one point. Other suitable kits I have are in need of added extra's, mostly decals and a few other bits (TrumpyBoss 1/48 F-100 and it's undersized main wheels spring to mind here, not even looking at that intake shape....). But ran across this kit at a hefty 55% off RRP, and immediately remembered how anything not a Lightning is by definition an inferior machine, and I should buy it immediately. So, box shot as it sits on work desk, freshly delivered. Want to do the box art machine, from the No.56 Sqn Firebirds aerobatic team. Trying to go for a mostly clean plane on this attempt, want to nail down my NMF skills before I beat the hell out of the XB-35 in June. I have a Cutting Edge M.B Mk 4 seat at home just itching for a permanent home, so that will be the sum total of AM for this kit. I might get creative with the pitot tube, not sure what I want to do just yet though, probably some brass rod would be my initial thoughts on the subject. Paint wise, I have a selection of Alclad II, Tamiya LP-70 Gloss Aluminum and Mr Hobby Super Metallics to play around with. Any suggestions what Tamiya or Mr Color would be a good match for the red, I'm all ears. Have Tamiya XF-7 Red, Mr Color C327 (FS 11136 - thinking this would be a good match personally) and C385 (IJN Aircraft Red) in my collection, but could get other reds in the Tamiya and Mr Color range easilly enough if needed. This will probably be a slow starter, need to get my other GB entry in the WW2 Twins closer to the finish line before I crack on with this beauty.
- 8 replies
-
- 8
-
-
- Airfix
- EE Lightning
- (and 1 more)
-
My first build for the GB will be Tamiya's venerable Mosquito FB,VI in 1/48 scale, this will be my second build of this kit as I did one in 418 Sqn RCAF several years ago, I also built an older Airfix 1/48 one for the last "Less Than A Tenner GB" which was actually a nice build. Here's a picture of this time's box and contents; I have worked for Rolls Royce for more years than I care to remember and before some idiot decided to close it I was on their Ansty site just outside Coventry which was used by Standard Motors during the war to produce around 500 FB,VI's so when I build an FB.VI I like to build one that was built on that site, which means building one from either the HP, HR, RF or TE range. Now Warwickshire (my home county) also has a Royal Auxiliary Air Force Squadron and during the later stages of WWII it flew Moqsuitos on intruder missions and bomber support missions as part of 100 Group and after a couple of months on F.II's it was equipped with FB.VI's and I have found some of their serial numbers that include aircraft built by Standard Motors at Ansty so the build would have two local connections. I have found serials as I say but as of yet no photographs and if I can't find any I will need to either just build one in it's known codes and serial in the squadron's standard camo or build another Standard Motors built aircraft that I do have both the markings for and photographic evidence. I have several options in the decal stash to choose from and also have an Eduard Brassin Look set that I picked up at Telford somewhere, I shall post pics of this and any final choice of airframe later. Off topic but important to me is the fact that this will be my first build without my modelling buddy for the last 13 years, Mabel my black lab who we had to say goodbye to on Wednesday. I tend to do a lot of my modelling in our front room sitting on the floor and she would come and lie next to me, or actually sit on me which is about as comfortable as you imagine, to keep me company. It has been difficult losing her and sitting on the floor to build something will be very strange without her, so this will be for her, Mabel's Mossie if you will. This is her towards the end; Sorry for going off topic but thanks for looking in and any help, comments or criticisms will be gratefully received. Craig.
- 129 replies
-
- 37
-
-

-
http://www.mpmkits.net/2015/10/siebel-si-204-148-pripravujeme.html
- 83 replies
-
- 1
-
-
- mpm
- special hobbym siebel
- (and 2 more)
-
After many hours of reading in this quite busy GB I figured I might have to give it a go myself. Looking through the shelves at my local store I found a Tamiya Beaufighter that I’ve been wanting to build in the past. Ever since getting back into the hobby during the pandemic though, I have had massive issues with actually finishing my builds. Usually I have a good flow until the first error, and then it just dies out. So, my main goal with this one is just to have a finished model built straight out of the box. No fancy detailing or complicated schemes. Just a “simple” gray/green. I apologize in advance for any inaccuracies. The added social pressure of all you knowing what I have started should hopefully help me keep the focus on this one and not be tempted by all the other shiny boxes in the stash. Bags will probably remain unbroken until my local groups build night this coming Tuesday. Thanks for stopping by. Hopefully I'll have an update soon.
- 14 replies
-
- 11
-
-
Hi 🙂 I will try to get this one finished! A nice, quite simple kit, to be built OOB, I hope.
-
The rather interesting JU 52 from Revell shows the "passenger" door forward hinged. If you are going to be dropping meat bombs over Crete, I would imagine that a forward hinged door may be a tad inconvenient. Was the door removed for paratrooping or has Revell got it wrong? Maybe correct for civil versions but not military?