Search the Community
Showing results for tags '1/48'.
-
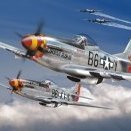
Way back when ... when I could walk to my LMS, had recently discovered big H and their wealth of AM stuff ... I built several Hassegawa 1/72 P51s using MicroScale (I think) decals. These included spectacular schemes like Big Beautiful Doll with its Black and White chequers and Jersey Jerk with its red and blue diamond nose. Well, I'm not planning to rebuild Doll, but I could build Jerk - or I could build another P51 from the 356th Fighter Group (the same fighter group as Jersey Jerk). I will change scale by using Airfix's new(ish) 1/48 P51. My copy of the kit offers Jersey Jerk out of the box. Other stuff? Some AeroMaster decals offering companions for Jerk, and some seat straps. Airfix's newer kits lack crew (fairly normal these days), but also lack attempt at belts (not so acceptable IMO). This is yet another build that will not start until the new year. Mid-January is the best I can hope for ...
-
Hello everybody... So I'm going to try this again. I have the correct kit this time, i purchased the over-tree’s kit of this. Which does include the correct wing for my plane. To remind everyone these are the decals I will be using. These were a gift from Craig - @modelling minion and his friend in Serbia. I will be doing white 44 as it is my favorite #. For all that are following my “Der Adler” build. You are welcome to follow along. This includes @Sturmovik, @opus999, @f111guru, and @Gondor44. I will start sometime over the next few days. If anyone has questions, comments, good stories or jokes please go ahead and ask or tell them. Dennis
- 56 replies
-
- 12
-

-
- Bf.109G-10
- Yugoslav Air Force
- (and 1 more)
-
FM Models 1/48 Breguet Alize I commenced the build in March 2018 and have just completed it - as I said in the WIP it is an older limited run kit so you need to be prepared to put a bit of work into it to get a nice model but saying that it is the only 1/48 Alize available although pretty hard to find one now.. I have always found the Alize an interesting aircraft and this kit sat in my stash for years until I saw an excellent build by Mssr Gaudart on a French website Master194.com - unfortunately the build has disappeared from that website which is a shame as it had a lot of useful reference photos as well as informative build of his model. I did a lot of modifications to the kit and scratch built the wing fold rather than use the resin wing folds that came with the kit - all detailed in the WIP. BERNA decals were used to finish her as number 17 of Flottille 4F in the type A camouflage scheme Alize service history & information on the aircraft can be found here - http://www.ffaa.net/aircraft/alize/alize.htm Happily there is still an airworthy Alize in France & plenty of photos of the aircraft easily found on the internet via Google - there are several preserved examples in various museums. The Alize model photos are the best I could do on my iPhone. WIP LINK - https://www.britmodeller.com/forums/index.php?/topic/235035388-fm-breguet-alize-the-gallic-gannet-rfi-posted/ CJP
- 43 replies
-
- 78
-
-

-
Hi all, I’ve been on a bit of a 1/48 ww2 fighter run where I’m trying to complete all my favourites. This one is Tamiya’s Mk.1 Hurricane where I chose to depict P2831 ‘LE.K’ flown by R.J. “Dickie” Cork of 242 Squadron based at RAF Duxford, August 1940. I chose this squadron since it was known as the ‘Canadian’ squadron. Everything is out of box except the Xtra decals. Thanks for looking.
- 14 replies
-
- 34
-
-
-
Looking forwards building some kits for this years group builds. First up, Mustang! I picked this kit up from my dad's stash. I have built one earlier (A-36 Apache) but it's so many years ago that I don't remember how the kit was. Sure looks nice though. Let's see what's in the box: Next up, we'll get started with the cockpit.
-
This is the third kit I've built from this manufacturer. For limited run resin, their gems. They do a nice job of using different types of resins to accommodate the build of the kit; hard with fine lines for certain parts, softer to allow for some flex on others, etc. Unfortunately, one of the landing skids was broken from the start. So I tried soldering on this kit. I think my results were a bit mixed from the perspective of fine detail, but no doubt the parts are much stronger and able to absorb handling. BTW - all these pics were taken with a Galaxy s9+ phone and several photog lights. In less time than it usually takes me to set up one shot on my Canon DSLR?!? I'm either dong something right with the phone, or VERY wrong with the Camera. this is a jig I used to get the rotors lined up. It was a scrap piece from a previous project, and made lining up the blades pretty easy. Drilled holes for the brass rod in preparation for the new landing gear Getting the angles correct for the legs. you can see the solder at the bottom. You can also see the the one good skid just to the right. Test fitting the struts to the airframe. You can see the high quality finish on the resin parts (I have no affiliation with the company, I'm just impressed with the finish and fit of these kits) Skids are bent and matched for solder Still some final sanding and shaping, but not too bad for my first try!!! Cheers, Mark
- 6 replies
-
- 20
-
-
- 1/48
- Attack Squadron
- (and 1 more)
-
Hi All, Here is the 1/48 scale Britten Norman Islander released by Valom in 2018. This is the original boxing finished in the markings of Mount Cook Airlines in New Zealand in 1988. Since the kit and scale were new there were no aftermarket decals so the Mount Cook Flight Seeing decals were home made. WIP thread here in Islander Colin W
- 10 replies
-
- 26
-
-
Hot on the heels of the Hurricanes, I decided that the next build would be a Hellcat. Me being me though, I couldn't decide which one. Then I thought, why not do all of them! The F6F-3 has progressed the furthest and the fuselage will be closed up tonight. The other 2 have had the basic interior green applied. All of them have had the cowlings and wings built up so far. Sean
-
Last of my three recent finished models is this F-16 aggressor of the US Navy from the Eduard (Kinetic) kit. Difficult kit to build but looks the part when finished! Paint job was fun to mask too! I used AK paints for this build. Thanks for looking! Chris
- 11 replies
-
- 29
-
-
-
Hi All, I finally crossed the finish line with this build which took the better part of 2+ years on and off with a long hiatus in between due to the arrival of my daughter... I had long started the build before she shattered our idle existence so the scheme I selected turned out to be quite prophetic 😄 In any case the plane is built from the highly regarded old Tamiya 1/48 scale kit, and to be honest there are better kits out there now that are far more detailed out of the box. I made significant modifications to the kit cockpit and scratch built a lot of additional detail to compensate for the fairly basic detailing I started with. I also re-built the incorrect wheel bays from scratch which represented the most significant bit of scratch building I have yet undertaken. Aftermarket bits are limited to a set of Eduard Steel series seatbelts and a Falcon Vacform canopy (also my first time working with these). I used Vallejo Metal Colour acylics for the NMF applied using a multi layer shading technique to generate some subtle variation in the metal finish. I was after a realistically worn dull oxidized look that's seen in period photos. Markings are from a Lifelike Decals set. More details in the build thread linked below. Build Thread Thanks for looking 🙂
- 19 replies
-
- 40
-
-
-
With the arrival in the stash of the new Airfix Spitfire XIV I decided to dispose of my old and bloated Academy kit. Since I had a spare Airfix Mk.22 fuselage I decided to bash the two together and come up with this! While it has a couple of shape discrepancies (mainly around the tail) it at least looks a bit more like a Griffon Spit should!!! Thanks for looking, Chris
-
After almost finishing the Eduard 1/48 Fokker DVII (it is standing forlorn on the shelf like an abandoned puppy, waiting for me to gather enough strength to eventually complete its wooden propeller), it is time for something different. Not too different though, as it is still German and propeller driven, but this time it is the ICM 1/48 Dornier Do17-Z10 Kauz II night fighter. I guess many know the Do17 "Fliegender bleistift" history, a surprisingly fast light bomber in its day, but the Z10 night fighter version was a rare one indeed. Built to test the new infrared Spanner Anlage sighting system, it featured a infrared beam transmitter in the nose that would illuminate the target, and a sight scope for the pilot to aim at the target image displayed there. The beam transmitter and receiver/sight scope is easily seen in this picture, together with the armoured windscreen: Unfortunately for the Luftwaffe, the Spanner Anlage proved worthless as the range in which the targets became visible to the pilot was way too short to make it useful. The pilot would probably be better off replacing the infrared sight scope with an ordinary telescope, and try to find the British bombers himself like an old skool pirate. Yarrrr. So the Z10 ended up with just 10 examples being built, making it an interesting curiosity in airplane history. The kit is ICM 1/48 DO 17Z-10, which has gotten very good reviews, so I`m praying for an easy build here. This is both my first ever W.I.P and a project to learn new techniques, so if you are going to follow this I`d suggest you buy some Guinness at the bar, as lager could go flat and taste horrible in the time between updates to this thread.
- 38 replies
-
- 10
-
-

-
- Dornier Do17-Z10
- ICM
- (and 1 more)
-
 So after kick starting my modelling again with a little 1/72 Fw-190 I've decided to tackle one of the 1/48 scale planes in my stash. I'm using Tamiya's well regarded 1/48 scale P-51D kit. I'll be using some third party decals (From Lifelike Decals) to represent the particular aircraft in question (linked below to avoid any copyright issues) http://www.warbirdregistry.org/p51registry/images/p51-4463807-2.jpg So last year I built up a Spitfire Mk1 with a lot of effort put into scratch built detailing and I'm aiming to do the same here. The Tamiya kit is quite simple out of the box surprisingly. I started with the cockpit as per generally accepted practice... There is good detail here but plenty of scope for improvement. Most of the detail is actually molded into the fuselage sides, as such suffers from being quite shallow. Using a pile of reference pictures I found on the net of some hyper detailed flight sim models (they obviously did their research) I set about improving the overall 3D look of the cockpit and adding various missing details and doodads. I felt a bit apprehensive at first carving away the nicely molded (if shallow) detail but soon got into the swing of it. I made decision to stick with the relatively shallow looking sidewall structure though, as trying to fix it would require cutting away all the detail and starting from scratch. The goal anyway wasn't to get absolutely accurate, but at least represent the busy-ness of the real deal. The end product is probably going to be quite anachronistic with regards to the instruments anyway. Here is the right hand side sidewall. Almost all the Tamiya molded detail was cut away and replaced or modified in some way. The switches are all formed from lengths of copper wire glued into drilled holes and cut to length. The oxygen hose is a length of copper wire wrapped tightly with lead wire. There is also a little hand crank to be fitted still but I'll do that after the increasingly daunting task of painting all this up... Left sidewall. Similar story here. The jutting out thing is the flare pistol barrel, which I struggled with for a bit, it's a bit overscale overall but I'm happy with it. There is a flare case I molded from Milliput yet to be fitted. The round knobs on the throttle quadrant were also made from Milliput. Cockpit floor and IP. Oddly enough Tamiya don't provide a IP decal for the instruments. I've had to order in some Airscale 1/48 scale instruments for this, Given how long stuff takes to arrive on our shores I'll probably be held up a bit when I get to this point. And finally the missing bits off the sidewalls, the crank made out of tiny slivers and punched discs of styrene and the Milliput molded flare case. It's my first try with the stuff and an overall average effort but good enough given it's size. Next up will be the seat, rudder pedals and the area behind the cockpit with the radios and battery.
- 252 replies
-
- 19
-
-
A swell as my RNZAF 'stang I'm building another Tamiya kit (this time from the Korean War boxing but have yet to decide if it will be finished in that time frame or another from the many sets of decals that I have available. The interior green has been sprayed and main instrument panel finished with Eduard etch. Apart from the panel, the other fuselage and wing parts are at the top of this shot: Mike
-
This is my entry into the What-if section of this Group Build, you could say I was somewhat inspired by @Kallisti ‘s various builds of American aircraft in FAA colours. Apologies if this is treading on your toes! I also happened to make a little Monogram 1/72 version of this aircraft when I was younger and not brave enough to adorn it with the yellow and black stripes. (That might give a hint of what I am going for). In the mid 1940s Westland started development of a carrier strike aircraft, with an engine layout similar to that of the Bell P-39. This resulted in interest from the Air Ministry and official specification N.11/44. The prototype W.34 was powered by a Rolls Royce Eagle H-24 engine, which was later cancelled. The aircraft was then planned to be powered by either a Rolls-Royce Clyde or Armstrong Siddeley Python. The Clyde was later cancelled but the airframe was planned to be fitted with a Napier Nomad, which was also then cancelled. Hopes rested on the Python to power the aircraft. (This where we differ from reality) After protracted development of the costly Python turboprop, the Wyvern was coming in over budget. The first prototype of which flew in 1949 and needed many modifications. The then Labour government had major economic issues to contend with and was looking in to all ways and means of cost cutting. This resulted in a defence white paper of 1950, in which Minister of Defence Emanuel Shinwell advocated the cancellation of Westland W.34 in favour of a cheaper, more versatile aircraft. The logic being that a Strike fighter was unnecessary with superior jet aircraft coming into play, Sea Hawk etc. It was decided, to the chagrin of the FAA, that the more conventional multi seat Douglas Skyraider AD-5 aircraft would be purchased to fill the gap of the cancelled Wyvern. This would be able to fulfil the role of a Strike aircraft, as well as that of COD. It’s wide fuselage meant that the aircraft had potential for further role changes in the future. Therefore, an order was placed and all squadrons that the Wyvern was intended for were equipped with the Skyraider AD-5. In keeping with the naming of other strike aircraft being named after mythical beasts, the Skyraider was dubbed the 'Cockatrice' in FAA service. The only differences being that this aircraft had the capacity to carry a torpedo and unguided rockets. This aircraft served well into the 1960s and served with a degree of success during Operation Musketeer in Suez. Along these lines the Whif model I shall be exhibiting will be a FAA ‘Cockatrice’ of 827 Naval Air Squadron based aboard the HMS Eagle during the Suez crisis. This shall be modelled using the Revell/Matchbox 1/48 Skyraider and using decals for the 1/48 Wyvern from Berna Decals. This shall of course be in that classic EDSG over Sky, with Yellow and Black Invasion stripes. I shall start on this as soon as I finish my P-40 STGB commitment… I am very much looking forward to it Cheers, Ash
-
 I guess you guys starts to get tired about me starting WIP:s left and right and then just stall them...so here's another one! I've not forgotten about the Bf110 or the P-47N yet, they just got pushed to the back burner for a while. The Spitfire VIII will get finished soon, since a the C4 competition is getting closer by the minute. The first weekend in September my local IPMS chapter run it's yearly competition and I did my first stint as a judge there (don't laugh!) Very inspiring, and all though the 1/48 jet class was packed with excellent models I decided that I should enter one there next year. So that leaves me with just about a year to finish this: This box was definitely made to lure me in. It's Airfix red, it's got a big honking (very) british piece of metal, rockets and a sharkmouth. The only missing thing was probably a evocative nose-art of some sort, but that would probably be a bit too much. The Airfix kit looks great, but I couldn't help myself to some aftermarket candy: I was satisfied with this for a while but then I decided to just order a few more parts, but since Hannants doesn't do instant delivery to Sweden I'll just have to wait for a little while longer for the rest to arrive. It's quite a large beast this one? Meanwhile I was pondering why and where my builds stall. They usually proceed quite ok until after the decals are placed, and then I burn out on the subject. This leaves me with quite a few kits on the shelf of doom that are fully painted and decaled, just missing final weathering and all the small/loose bits. With that in mind, let's see how to tackle this one. Surely I must begin with the loose bits! That means all weapons, pylons, antennas, landing gear and maybe also the canopy must be finished before the fuselage is joined. It also seems that the air brake hangs loose, so let's start with that. Airfix in the year 2012 was using another inejction moulding company then their present ones, and those guys really liked thick ingates and hard plastic. As an extra bonus some sink marks and those pesky ejector pins must be dealt with. Razor saw is a must to get the parts out from the runners. I decided to enhance the air brake using some plastic strips and will start to add bundles of wires, pipes and hoses to the bay itself, while pondering how to paint the tanks and pylons. White yes, but maybe I should add some brown to it to be able to play with shading? Sounds like I'll need to do some testing...
 -
Hello, all. This is my first WIP post here at BM. I’ve been slowly working on this since February. As the tags say, this is the Accurate Miniatures 1/48 F-6B kit, which is really just a P-51A with a camera in the back. I’ve got a bit of a “thing” for these early Mustangs, and the kits in the stash to prove it. For this build, I’ve added details from Ultracast including a seat, prop, and wheels. I decided to do some scratch-building in the cockpit/camera area, though admittedly amateurish compared to some of the work done here. The plane was flown by Maj. Russ Berg, who ended up retiring from the USAF in 1970 as a Brigadier General. Without further ado, the photos: Invasion stripe masking in-progress. Masking complete. Fuselage was a bit of a challenge. Wing tanks and exhaust done in Alclad, prop blades and spinner in Tamiya. Underside painted and faded, and wing tank fillers masked. Covered up all my work! Masking tape and sticky-tack sausages for a slightly feathered demarcation. First photo in my Christmas present from the wife: portable photo booth. Starting color modulation. By all accounts, this was a fairly heavily weathered plane. There we are, much better after blending it all. Of course, the invasion stripes were scrubbed off the upper surfaces. Here’s my attempt at representing that. I’m pretty happy with how the effect turned out. If I were to do it again, I’d have made the color difference less stark on the invasion stripes to be over-painted. Questions, comments, and constructive criticism welcome!
- 3 replies
-
- 6
-
-
- 1/48
- Accurate Minatures
- (and 1 more)
-
First model of the year, built this for the Mustang GB - thought I'd post it here too. Kit: Accurate Miniatures P-51A Mustang (No. 3402) Model: North American P-51A Mustang, Burma 1944 (USAAF) Scale: 1/48 Paints: Vallejo Model, Air & Metal Color Weathering: Oil paints, Flory Models Wash, MIG Streaking Effects, Vallejo Weathering Effects, pigments Build thread: Fun build, good details and things fell apart mostly fine. Had lots of fun with weathering. Here are some pics: Comments & constructive feedback welcomed!
-
This was my last model of 2019, finished right before Christmas. Eduard’s latest 190, the A-8 version, vastly superior to the “old” moulds from 2010 or so, is a pleasure to build and should provide a rewarding experience to all kind of modelers. the model tries to depict Rudy Artner JG.5 plane. It’s my own interpretation from the few B&W photos coupled with some educated guessing. Painted with Mr. Hobby 74/75/76, MRP 04 and Real Colors late 81 for the green stripes. decals came from Sky models and Xtradecals for insignias. Besides the box contents I used Bregun wheels and Aber brass guns and Pitot tube. Hope you enjoy, wishing all a splendid 2020!
- 27 replies
-
- 53
-
-
 W. Nr. 2187, flown by Ofw. Fritz Hartmann, 9./JG 2, Poix, France, Fall 1942 Eduard Weekend Edition OOB, Painted with Mr Color Laquer paints, Weathered with oils and pigments. Overall pretty happy with it, but a bit miffed that the W&N Galleria matt varnish has 'spotted' a bit, and a few of the stencil decals have silvered a little. Varnish is probably my fault. Peter
 -
 Well as it's New Year's Eve still in the UK, no doubt many BMers are planning for their night of excess and partying but somebody has to keep the ship afloat eh? So instead of nipping down to Tescos for a dozen tinnies of IPA and a couple of packs of Rennies, I've been finishing off my oft-stalled Airfix Defiant build for your delectation. Well somebody had to take one for the team didn't they!!? Now this build started off as L7009, the "Cock o' the North" from 141 Sqn, except like the "cock o' the south-east" that I can be at times I applied the wrong camouflage pattern, (it's a 50/50 choice so there's a 90% chance of stuffing it up as we all know!). Needing a victim that was wearing a Scheme 'A' outfit to the party, I consulted my many references and found a picture of the machine I wanted to replicate. It was a 264 Sqn machine, L7005 PS-X. OK OK, despite all my good intentions I managed to find conflicting evidence for this kite's serial number, with the majority of my books giving it a serial of L7006, so that's what I initially marked it up as. @AndyL, like a knight in shining armour, rode to the rescue pointing out that the Sqn ORB gave PS-X as L7005 so I waxed off the 6's and put some 5's in their place. Anyways if you want the peruse the WIP it's here, but if not then it's straight onto the piccies for those with those "ooh shiny shiny" afflictions!!!!! So here's to wishing you all a happy, healthy and prosperous 2020. Stay safe out there. Chris
- 12 replies
-
- 44
-
-
-
 I picked this little gem up from IPMS 2019 from the @dora Wings stand and instantly wanted to build it. I've always had a fascination with this aircraft from the first time I saw one in the movie "The Rocketeer", flown by the main protagonist Cliff Secord.... so a little history on the worlds fastest and deadliest aircraft of the early 1930's... The 1932 R-1 and its sister plane, the R-2, were the successors of the previous year's Thompson Trophy-winning Model Z. Assistant Chief Engineer Howell "Pete" Miller and Zantford "Granny" Granville spent three days of wind tunnel testing at NYU with aeronautical engineering professor Alexander Klemin. The aircraft had a very peculiar design. Granville reasoned that a teardrop-shaped fuselage — especially as seen from directly above — would have lower drag than a straight-tapered one, so the fuselage was wider than the engine at its widest point. So on to the kit itself from Dora Wings This will be the early version of the GeeBee with out the extended tail behind the cockpit, but essentially the same aircraft of the R1 & R2 variants 5 sprue's in total with a tiny cockpit. The polymer feels similar to that used by Mikr Mir but feels solid with lots of detail You get a decent decal sheet to make either NR2100 or NR2101 with masks templates for the interesting paint scheme for the GeeBee. The photo etch plat is very nicely detailed too. Bit of a close up to the photo etch, detailing for the Wasp radial engine, the wing struts and the cockpit harness Very simple instruction sheet too, Construction should start on Sunday when I have a chance to put some decent time into it. Shouldn't take too long either? Thoughts and suggestions are always welcomed.
- 63 replies
-
- 9
-
-
-
- 1/48
- Dora Wings
- (and 1 more)
-
Build completed as part of the Film, Fictional and Speculative GB: Here we have the old Matchbox Skyraider built as an aircraft of the Fleet Air Arm during the Suez crisis. I rescribed the whole thing and brush painted it with Xtracrylix. Decals used were the Berna Decals set for a Westland Wyvern. Markings are from an aircraft of 827 NAS based aboard HMS Eagle. Please see WIP for more back story and build details: Cheers, Ash
-
Time for the end of year round up - always surprising and some I had forgotten finished this year. For example the Harrier GR.5 I was sure I finished in 2018, but I actually finished it at the start of this year. Thanks for all of the help, support & advice. Happy New Year to all! Monogram AV-8B converted to Harrier GR.5 Revell / ESCI Viggen ESCI A-7E built as A-7D ‘Scrappy’ Revell FGR2 PM Models MBB / Siat Flamingo Academy F-16 Contrails TSR2 Italeri TSR-2 Zhengdefu EF-111
-
 Hello all; I hope you have a great Christmas and are looking forward to the new year. There's a long story behind this build, literally a 12 year effort across two continents. The full story, as usual sits on my website. The short version is that this one started as a build for a friend; he wanted a super-detailed RAF Boston. I ran out of enthusiasm and interest long before it was finished and it became a shelf queen. For some reason I kept the carcass though, and eventually, after a move to Australia, I retrieved it from Canada on a return visit and finally finished it a couple of months ago. As usual, comments and critique are welcome. Thanks for looking. Mark.
- 10 replies
-
- 31
-