
Search the Community
Showing results for tags '1/350'.
-
Well as a bit of a MOJO restorer I am making a start on this one with York nearing completion hopefully by next week for Perth Scot Nat's and Great Western having some fit issues also other things from real life I need to get back at the bench but in short bursts with a puppy to train and not much time on my hands for now. I know @Faraway built this kit a couple of years back when it first came out and I liked the look of it, so it has been in the stash for only a little while now and it looks like a short build one (Famous Last Words) So made up the hull and some of the superstructure parts and the main guns for now we will see how far I can get with this out of the box. Thinking of going with the green lower hull colour rather than the red oxide one. Stay Safe beefy
- 9 replies
-
- 11
-

-
- Mojo Restorer
- 1/350
- (and 1 more)
-
My first surface ship and first go at an ocean. I'll be doing more, a nice break from a lifetime of aircraft. White Ensign PE set. Inspiration for ocean and technique credit to "Studio Blue Ocean" of Youtube Things I have leaned from this project 1) rigging is hard 2) I still hate photoetch 3) creating the sea was as satisfying as the ship, but I unsealed her, ripped her out and repainted the hull and the entire sea 3 times before I was happy. I know she is supposed to fly a black flag from the rear mast but I forgot. I will get around to it! Shot against white card outside with sun dipping in & out of cloud, the white balance was doing odd things but you get the gist. Thanks for looking!
- 16 replies
-
- 43
-
-

-
I started on a Mikromir submarine a long time ago. The build halted when it came to the etch parts. A bit of short run with fuzzy placements of parts. The instructions for the photo etc was a bit vague to put it nice. Some time there was a pic of the etch part and the plastic part it should be mounted to. Nothing to say where. I skipped lot of the small part as they were to small to be handled and I doubt that some of them would not stay as the attachment points was to small for glue to hold. Anyway, it is ready for paint.
-
- 6
-
-
- Submarine
- Soviet S-class
- (and 1 more)
-
I have this very small model of the UB I. It is little confusing of the producer of the kit. U-boat Laboratorium or Kombrig? Even more confusing is it when it get to the instructions. This is what you get but it is not up to date with the kit. Parts 26, 27, 28, 29 and 30 are not included in the kit and as you can see that the etch fret included (At the right top of the pic) is different to the picture in the instructions and has no part numbers on the fret. But I'll do my best to get it together.
-
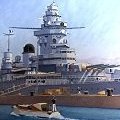
 Following on from the Fujimi Fuso c.1944, I present the Fujimi Kongo - also at 1/350th size also of 1944. I'm nearing the end of another ship and starting to look at what is next. I haven't seen a build log of the Kongo here - if anyone has recommendations to read please let me know! It will likely be a bit of time before I get my teeth into this. Planning will be important. The kit will be a hopefully straight forward out of two box build: Fujimi 60049 sometimes 600499? nominally October 1944 - 38 part build sequence with 22 sprues no photo etch apart from a chain. Pontos detail set 35020f1 with 10 A3 pages of instruction, 309 pieces of brass, 134 pieces of resin and 7 sheets of brass plus a wooden deck. But looking through the details I see some steps are marked x28 (!?!?) so my sanity may extend far enough and it is possible aftermarket guns may be acquired. Anyway here is the kit: stand and 1:1 paint scheme taken out. It looks not dissimilar to the Fuso which is good - i.e. very well engineered compared to Trumpeter or Tamiya from what I have seen. The paint scheme suggested is the same as for Fuso i.e. H17 Hull and H83 structure. Which would mean two models with the same paint jobs which I'm not super keen on. Kongo is the last of the foreign built Japanese capital ships built in Barrow in Furness in the UK. Roughly analogous to the battlecruiser HMS Tiger, the class had slightly larger (14inch vs 13.5 inch) guns, and by WW2 was almost unrecognisable compared to her 1912 launch. The debate about are they battlecruisers or fast battleships appears ongoing. More history will come but this is kept here for my memory. http://www.combinedfleet.com/kongo.htm
- 33 replies
-
- 10
-
-
Hi, this is one of several ship models I've completed over the last couple of years. The very nice Bronco kit is a joy to build. I had a good reference photo of Chih Yuen in an interim paint scheme (the Elswick builder's grey hull (originally all-grey) with the yellow/buff superstructure and funnel elements. I added what appeared to be a strake around the upper hull missing from the kit, opened up the numerous casemates/ports on the poop (as per the photo), raised the foremast derrick/boom (as per photo), and added the stern davits and various boats (as per photo). Crewless at the moment - looking for some suitable 19C figures. Highly recommended kit. Cheers, GrahamB Damn - just noticed a loose rope on the aft boom.
- 9 replies
-
- 29
-
-
-
- Bronco
- Chinese Navy
- (and 1 more)
-
Back after a bit - attempting to build my first resin model: Atlantic Models 1/350 HMS Laforey but being built as HMS Loyal. Paints are/will be Sovereign Hobbies Colourcoats series - also a first step away from Acrylics. I washed the hulls and glued them together with loctite super glue, and attached the rudder and propellor shafts. I've primed the hull and deck with Mr Surfacer 1500 and painted the deck NARN-54 RN Dark Deck Grey. I might highlight some raised parts of the deck later in RN Green. Taped off the upper hull and applied NARN 42 anti-fouling red. Pulling back my Tamiya tape and I see some of the primer has lifted. Oops. I guess I didn't clean it enough. Might need to rethink my taping of the hull lower hull again (I was going to have a black line around the hull. TBC.
-
Having become bored with my more elaborate builds, I thought it might recharge my modeling mojo to take on a simple Japanese destroyer – and perhaps actually finish it! Tamiya’s of the 1/350 scale IJN Kagero seems like a perfect choice. If it lives up to the Tamiya reputation of great fitting parts, assembly should be a snap. Just to keep things interesting I picked up the Infini brass upgrade set for it too. I’m hoping to complete this one fairly quickly with a minimum of the scratchbuilding which tends to bog down my projects. We’ll see, but this should be a fun, straightforward build! True to form, Tamiya’s Kagero hull parts fit beautifully and the hull went together quickly. My only quibble here is the split hull design. While the waterline/full hull option here is nice, molding the lower hull separately builds in a bit of extra effort to integrate the lower and upper portions. I definitely prefer the simpler single hull approach of their earlier USS Fletcher kit. That said, the join was pretty good and only a little Mr. Surfacer 1200 was needed to blend things.
-
I have had the “I Love Kit” boxing of HMS Ark Royal III in the stash for a little while. After struggling to finish my build of the KGV, I had planned to leave it there for a couple of years and focus on clearing some of my aircraft backlog, but my unexpected success at SMW has given the motivation needed to make a start on it. Unlike my previous build on this site, I am starting this log at the very start of the project. So far I have the model, and the Tetra Model Works detail up set and aircraft detail set. I am of course looking at other aftermarket from Micro Master, Black Cat, and others. I did use quite a few items from North star on the KGV, but they seem to no longer be active, which is a shame. I have not yet decided when or where I will be depicting this ship, though I am leaning towards depicting her as she was towards the end of her life, the worn paint scheme seems to be an interesting challenge. As far as can tell, there were not many significant changes to her through her short life, so I will get on with the build and hopefully when I know a bit more about her, I will be able to nail down a date and configuration. Here are the obligatory box shots. In terms of references, I only have the British Warships of the Second World War by John Roberts and a copy of the Profile Morskie plans at the moment. I have of course also searched IWM for every picture they have along with scouring Google for anything else available. Detailed photos do seem to be particularly hard to find for this ship though. As others have said, there are some issues with this kit, some more significant than others. On the less significant end, I honestly don’t think that the level of detail is much better than the Tamiya KGV kit which is 30 years older. A lot of the parts are simplified, and will need to be replaced, and surface detail is lacking with scuttles and some basic hatches, but not much else. They also seem to mostly be in the wrong place. In terms of more significant issues, the first thing I noticed when I first looked at the parts, is the thickness of the hull pieces, which is particularly visible around the cutouts at the bow and stern. In the second picture you can also see some of the oddly shaped scuttles and one of the backwards hawsepipes. Pretty much all of these cutouts seem to be too tall, significantly larger than in the plans, but many are also not quite in the correct place. I would like to try and do something about this plastic thickness issue and the general sizes of the cutouts, and I have some ideas, but I will need to do some testing before messing up the model. I have reduced the side profile from the John Roberts book to 1/350 and made some comparisons to the kit. I believe that the length is okay, but it seems to be too tall (~4mm), and too wide (~6mm). Also, the bow profile is quite different. Interestingly though the stern is much closer. The error seems to be mostly in the top two decks which appear to have been stretched upwards, and possibly outwards as well. With the exception of the bow profile, which needs to be more bulbous and less pointy, I really don’t think there is anything I can do to correct this, short of binning the whole lot and scratch building it instead. Anyway, I doubt many people will pick up on these issues. I am sure there are various other things which I will find during the build, but for now I thought I would point out the main things which I need to think about. I don’t want to seem entirely negative, and I am happy that there is a kit of this ship, but if I can spot these issues with my relative inexperience and lack of resources, I don’t know why Merit would not have bought copies of the shipbuilders plans to get these basics correct. I suppose on the plus side, it will give me more of a challenge than if I was able to build it straight out of the box. Anyway, on that note, enough moaning, onto the build… Cheers Peter
-
 Hi, It's my old Big-E, that I'd built twenty years ago, I have removed the planes and the island, changed the aircraft, rebuild the island, and applied the wheathering... It's the Enterprise in 1986-88 (Carrier Air Wing 11). . . . . . . . . . . . . . . . . . . It's the last aircraft carrier I built...
 -
 1:350 Klingon K't'inga Class Battle Cruiser I.K.S Amar As seen in Star Trek The Motion Picture This is the POL950 Model complete with the add on Lighting kit. Polar Lights did a really good job with this kit as i believe the planning team created this with advice & direction from the 1/350 Resin Studio model Creator over in the US. Fit is really good for something so large 60cm in length. Looking forward to Polar Lights's later release POL997 'Kronos One' LIGHTS ON: LIGHTS OFF: Back ON:
- 6 replies
-
- 17
-
-
-
- 1/350
- star trek 1/350
- (and 1 more)
-
Finished the Polar Lights NCC 1701 Built this in 2020 just before my 1/1500 Star Destroyer build. Has full LED lighting - with Sequenced Strobes and Nav Lights. Built the base with 3 Switches, so Lights could be selected. Warp Drive, Photon Torpedoes, Nav/Strobe etc. Took a lot of wiring and soldering that's for sure. All ran on a plug in mains 240V 2A PSU - Used aluminium hollow tube for the stand and wiring. The Hanger deck is fully lit, just cant seem to find any pictures of it the hanger deck at the moment
-
Hello everyone, A few years ago I built HMS Illustrious escorted by HMS Kent; I thought I'd try a 'then and now' and build HMS Ark Royal escorted by HMS Zulu. They'll be in the med shortly before Ark Royal was lost, I think that's plausible as they were both stationed there. I've been gathering bits for the last year or so and am finally ready to start putting them together; Got some bits from Micromaster, which are absolutely beautiful, along with the detail up set from Tetra Model Works for Ark Royal and the WEM set for Zulu along with a quad 2pdr from North Star. Also the Ark Royal boats set from Atlantic models and some replacement 4.7 inch turrets from Shapeways along with a few 3D printed bits and bobs of my own design. When I built HMS Hood I made a spare 4 in gun mount for the X position on Zulu. One thing I'm struggling to find is individual PE ladder rungs in 1/350 - I've seen them before but can't find any at the moment does anyone know where I can source some? Going to be a long build, but hopefully I'll be able to make a start next weekend, probably on Zulu first. Cheers Nick
- 12 replies
-
- 12
-
-
- 1/350
- Royal Navy
- (and 1 more)
-
Yes I know I am starting another but this should be quick. Well I attended the Scottish National model show at the weekend another great show and picked up some bargains while there I got myself three of these kits WW2 Multi-purpose boats Tiny things. So in the lull of that quiet time on the Saturday afternoon I built one for a bit of fun I timed myself building it 28 minutes and 40 seconds nice little easy kit. But when I got it back home I noticed some differences with the box art to what you actually build a little soft on some details so I raided the spares box of PE and plastic rod and have ended up with this so far Stay safe beefy
- 23 replies
-
- 15
-
-
This is the Bronco kit in 1/350. They pretty nicely detailed with photo etch included for the rails. These are a little fiddly but do look nice on the completed kit. In fact it was the photo etch that caused this kit to end up on the shelf of doom a few years ago, but I decided to either finish it or throw it out. Two options are given, U 37 an U 40. I chose to do U 37. The submarine had a long and successful career, embarking on 11 war patrols between the outbreak of WW2 and April of 1942, sinking 55 ships at 211,000 tonnes. After this, she was designated a training vessel in the Baltic, where U 37 would serve out the remainder of the war. Unlike many U boots, U 37 suffered no casualties through the entire war. On May 5th, her crew scuttled her in Horup Haff. I guess she got this colour scheme during her training days, as the Baltic tends to be a bit icy. Colours used were White Ensign Models schlickgrau 58 for the conning tower and upper hull with schiffsbodenfarbe III for the anti fowling. Decks were stained black with white being sprayed in a rough manner over the 58 grau for the camouflage.
-
Having finished HMS Roberts, I decided to go both backwards and forwards in time. So here is my next build: IJN Fuso with the premium kit c.1944. Some mixed feelings about doing an IJN vessel, but the mix of photo-etch and modifications needed should be almost a halfway house between a Trumpeter kit (where photo etch is included) to doing a Pontos upgrade kit (which involves a lot of modifying pieces I think). But my Japanese will need to improve (or my usage of google translate is about to increase a lot). There are 4 photo-etch plates, with brass (?) gun barrels. First thoughts: the points of contact with the sprues seems so much more thought out in Fujimi than in Trumpeter, and looks like a lot less sanding is needed.
-
Well with time on my hands this week and waiting for stuff to dry in-between the S-Boot build i have started on this kit hull and deck made up with deck painted ready to apply a lot of decals first up also lower hull red on. Stay Safe beefy
-
 After 1 year of absence, i finally return. This time i want to recreate the Preparing phase before the launch in the Aircraft carrier Kaga. it took me quite a while to gather material and also research, in the end i think i did a decent job recreating the scene. Thanks for watching and cheers from Vietnam
- 67 replies
-
- 106
-
-
-
- 1/350
- Aircraft Carrier
- (and 1 more)
-
My other build is a kit thats been in the stash for quite a while, picked up for $8 at a local show. USS England, a Buckley class Destroyer Escort, was quite successful serving in the Pacific. Between May 19th and May 31st in 1944, she sank 6 Japanese submarines.
-
 At a loose end at the mo' so I thought I'd kick off with the box art and all the little bits and bobs, that will go to make this nice little ship. I thought it might make a change to a 'Flower'. That's about it, except I couldn't resist this close up, Bens 3D printing is superb. I'll start in January, meanwhile I hope you all have a Merry Christmas and an even better New Year. See you all in '23 Jon
- 107 replies
-
- 20
-
-
-
Hi, First post, recently I got into modelling (1 SMS Viribus Unitis so far). I decided to build Trumpeters 1/350 HMS Roberts - an Abercrombie type monitor with 1 2x15 inch gun turret. I've pre-painted the base of the hull (if this is the right phrase?) in black, then overlaid a red for the main hull. Now I've assembled the super structure to paint as one in camouflage then to add in the detail parts/ final PE parts that are probably too fragile to be handled frequently. It is a beautiful kit with the brass parts built in to the design so no having to scrape things off. only extra PE is brass barrels from a Hood upgrade set (I wanted elevated here)
-
A couple of months ago I did a scratchbuild tug. It certainly had some character but ended up looking pretty cartoonish and while I like it it doesn't fit the diorama I'm doing. So I decided to do one from some plans. Built originally in 1907 I'm not building this particular boat but using the plans to get something that looks more accurate than my "by eye" earlier attempt. She will be up alongside the much larger Sunderland Steamer from my other build log - which in turn will up against HMS Prince of Wales. I'm not even sure if a tug this small would have the grunt to move a 10,000 merchant ship but for the sake of artistic license she will emphasise the size of the other two ships in the diorama. In 1/350 she's not very big, just 47mm bow to stern. But here goes. The scaled hull formers from the plans, these are just in thick printer friendly paper. Hull form assembled I stuffed the hull form with foam core to bulk it out, then trimmed down to fit. More so the putty would be thinner and not require as much curing time as anything else. roughly covered in Milliput, finger prints and all. Sanded down and with a deck made of scored card glued in place.
-
So this is my third concurrent ship build..but this ones really tiny, a 60' harbour tug. I thought about buying a kit but I'm going to try scratch build this out of whatever I've got lying around. If it's terrible I can always buy one later to go into the final diorama. My only reference. Quick hull form to use as template to cut the foam core that will bulk the hull. four rough pieces of foam core the foam core layered together and covered over with milliput. Smoothed out to close to the hull shape, currently drying on the windowsill. Should be dry enough to sand down and smooth the hull in a few hours. As always, I build messy and tidy up later Plan is to smooth out the hull, use some more putty to build up the hull curve above the waterline. I'll use bits and pieces of PE I dont need from the other kits and raid my bits box for the rest. Hoping I can get this done (excepting painting, too hot to airbrush atm) in two to three days.
-
To go alongside the Merchant ship conversion I'm doing is HMS Prince of Wales. This is Tamiya kit, so far with Eduard PE. Crew figures are from North Star. I wont repeat the story of what's going on here, that's in my other thread. Short version is this is PoW calling in at Gibraltar after her short stint with Force H in the med in September '41. Not a whole lot to show here so far but I guess every build log has to start somewhere I've done a bit of assembly and some prep work. Roughly how the two will be positioned The kit's fine, a little tidying up of injection mould lines. Not massively detailed but that's fine as I'll be adding in what I can from the PE kits and some scratch build if I need to. I would dearly love to add wooden decking (I know, I really should have made this choice before I assembled and base coated) and some detail parts from Micro Master or Blackcat...but I also like to set a deadline and budget for these things or they drag on forever. Sadly I'm already at £250 of my £350 budget for the whole diorama and I still need to get resin and a perspex case cover. So we'll see ... once I get further down the line I might decide to stretch my budget a bit and get some resin pom-poms and deck detailing sets. I am planning on having a lot of crew figures in this one, maybe around 200, engaged in various activities. Transferring stores from the merchant, off duty crew relaxing forward of the A gun, re-embarking after going ashore at the stern, servicing the Walrus and various other maintenance tasks as the mood takes me. Many of the small boats will also be in the water.
-
I've not done historical models for a long time, mainly doing fantasy and sci-fi stuff for various RPGs and table-tops over the past 25 years. But recently I've decided to do a naval diorama, you can see my thread on that here : I need a merchant ship for this, but there's not many kits available. So I need to convert the Trumpeter 1/350 liberty ship to the older "Sunderland Steamer" class, this was the design used as the basis for the much more numerous and famous Liberty, Victory and Park classes mass produced during the war. As a pre-war merchant vessel "class" there's no real single design for these. Four holds, central boiler and turbines. Super structures varied but mainly had the bridge forward of the funnel and passenger accommodation. I've decided this will be an unspecified vessel of the Blue Funnel line in late '41, she's seen multiple North Atlantic convoys and is now en-route to the Pacific. She has been DEMS armed but not fully re-painted from her line colours, this seems to have been not un-common for lines that had colours which pretty matched the Admiralty rules for north Atlantic convoys. You can see my research and decisions in the thread above.
- 37 replies
-
- 3
-
-
- merchant navy
- 1/350
- (and 1 more)


