Search the Community
Showing results for tags '1/35 tamiya'.
Found 11 results
-
Hi All, here my new project: Schwerer Panzerjager Elefant Sd.Kfz. 184 in Italy during spring/summer 1944 from 1st company of 653rd Heavy Panzerjäger Battalion. The kit no 35325 is spectacular with great details and perfect fitting. My interest is no 113 as it had some interesting features: - Zimmerit coating on left side different from right side; - a white vertical stripe on front side of fighting compartment. I found some good pictures on Panzerwrews Volume 13 and some useful technical details on the following books: Anyway I'd like to improve with: - photoetched details from Aber 35123; - Pak 43 L/71 from Aber 35 L-140; - Zimmerit coating from Atak 35056; - Working tracks from Master Club 35003 They tuned! Ciao Filippo
-
Hi All, finally GI from Panzer Art is painted (AK acrylics for clothes and W&N oils for face). Now Citroen vignette is really completed. Feel free any comments. Ciao Filippo
-
Hi All, I need a to take a break from my Steyr 2000a a very time consuming work. So I decide to point at a quick built with no scratch, no photoetched and so on. I was attracted by this nice picture of a DAK Kubelwagen. To me it is interesting as it lacks right front mudguard and has baloon tyres on rear station. Besides I want to test a heavy desert weathering. I'll use Tamiya Kubelwagen kit no. 35213. OFTB with minor improvements with plastic cards. The only addition is top canvas from Def Model kit no 35064. It's nice with a inner detailed frame (it could be improved but I'll try to resist). My target is to complete the model in a month! We will see. Merry Christmas Ciao Filippo
-
I am building this with aftermarket Aber barrel, Tamiya single link tracks and Eduard PE grills. I am using the scheme on the box, ambush camo for tank turret number 301 of the 9th Pz Div. I will use the commander figure and maybe get 2 more for the driver and front gunner.---John
-
 Hi All, here an article and the pictures of my Jagdpanther I made some years ago when no Dragon, Meng od Takom kits were not available. Hope you like. Sorry for bad pics! ciao Filippo A Girl For Everyone Panzerjäger Panther für 88mm Pak 43/3 (Sd.kfz. 173) Jagdpanther Final Production 9.SS-Panzerdivision “Hohenstaufen” Lake Balaton area, Hungary, March 1945 Introduction Looking at Jagdpanther pictures it is not so easy identify the different versions even if there were only three ones: early, late and final production. In effect, in relation to different production runs, we can identify at least seven different configurations of the exhaust pipes. My idea is to add on a short description to the pictures of the model in progress to provide an accurate reference with all equipments in the correct locations. I also try to add to the model some other significant details which were typical elements on the real “beast”. This is not a definitive word! Starting from my very little historical knowledge and experience as a modeller, my great desire is simply to share with other modellers and military enthusiasts a way to identify the fine and subtle differences within this german tank-hunter. Description Final production Jagdpanthers had the follow features: - Deleted left driver’s periscope - Hole on saukoft blende for Pak 43/3 L/71 hoisting adaptator - Pak 43/3 L/71 composite two sections - No zimmerit paste application on vertical surfaces - Bolted and redesigned armoured collar - Relocated tools (some on port side of the superstructure, some others on the rear hull) - “Pilzen” (3) sockets for 2 tons crane - Larger diameter self-cleaning 660mm rear idler wheel - Same rear deck grills as Panther Ausf. G late - Crew compartment heater mounted on left engine cooling fan - Welding exhaust pipes - Flame concealing mufflers on exhaust pipes - Stowage bin deleted on left side superstructure - New circular access door to water tank - New circular access door to fuel tank - Circular intake on deck engine with only 4 bolts - Bolts on deck engine with only 18 bolts - MG 34 ball mount as Panther Ausf. G late The model The model comes from Tamiya range (kit no. 35203). It is a typical Tamiya high level model although some details are missing (periscopes on roof superstructure), undersized (flame concealing mufflers on exhaust pipes and rear idler wheels) or inaccurated (gun mantlet bottom area and gun collar). To reproduce a final production run I had to introduce the modifications I mentioned before even if this version is more simple than others: no port or starboard tools brackets and, above all, no zimmerit. I began looking at scale drawings from “Schwere Jagdpanzer – Entwicklung – Fertigung – Einsatz” by W. J. Spielberger, H. L. Doyle, T. L. Jentz. These references are absolutely perfect as always are Doyle works; are many scale drawings in many “Jagdpanther” books but if you want to be sure till minute detail select scale drawings by H. Doyle only. So I simply looked at the scale drawings and “translated” on model the areas where I must to add, modify it or delete elements. In general to me building a model shares moments of esaltation with others of pure frustration. The latter I feel when I have to remove pieces from the sprue and control, clean and prepare it for the sub assembly. So I try to do these operations very quickly in order to avoid the frustration bring me to leave everything on the work bench for … months. During the cleaning phase I ignore the instructions and put all the prepared elements in a box. In case of Tamiya Jagdpanther this work has been done in a three evenings. The joining is, as usual Tamiya style, almost perfect so I do not stay too much to talk about this phase. I added a light texture bouncing the whole model with a rounded dental burr turned at low speed in a motor tool. The fusion effect is more evident on gun mantlet so I decide a different approach: a coat of Tamiya liquid cement and when dry a light treatment with sand paper and fine steelwood. The torch cut effect on the edge of the plates was achieved with a rectangular dental burr used as a chisel at low speed in the same motor tool. At last I added welding seams. I do not use pyrogravure as in my opinion it gives an effect which is completely wrong and unrealistic. I prefer a different approach glueing a very fine plastic strip in place and burring it with the previous rounded dental burr turned at low speed. Then I clean the weld seam with fine steelwood, add a liberal mount of liquid cement to give an uniform texture and repeat the burring. When all texture and welding seams are completed I: - add the wire for Bosch light on left fender; - insert two plastic rods and two disk (made from Punch and Die Set) to reproduce two towing rope locations; - remove the cleaning rod and spare aerial stowage leaving only two location strips; - add the spare track brackets from The Show Modelling set dedicated to Panther Ausf. A; - relocate towing clevis, wire cutter and engine starter crank handle on the rear hull; - remove the circolar access cap to water tank, remaking it with a fuel tank from another Panther and repositioning forward. According to Doyle’s drawings fuel tank and water tank caps were identical in dimensions; - reduce bolts on air intake guard from eight to four; - reduce bolts on engine deck to eighteen filling the recesses around the kits bolts and then reproducing new bolts with esagonal Punch and Die set; - completely scracthbuild the hatch retainer on the access engine door; - add three bolts for additional armoured antenna must; - add cast numbers on gun collar and on commander periscope structure using Show Modelling spare numbers from my previous Jagdpanzer IV L/70 (V). The last work was done on flame concealing mufflers. As mentioned before they are a little undersized (Dragon Panther Ausf. G are better). However I used them but fully reworked and completed the lower side as showed in “Germany’s Panther Tank The Quest Combat Supremacy”, by T. L. Jentz and H. L. Doyle, page 57. I also reworked from spare photoetched parts the upper metal retainers as Tamiya’s ones were too thick and out of scale. Tracks My first idea was to install Model Kasten working tracks. So I did a very tedious job to prepare it: assembling (five pieces for link for 186 links), painting with Humbrol Matt Black, pre-shading with Tamiya Brown, weathering with a little silver dry brushing. When I tried to install them I realized that Friul Model 660 rear wheels were too large as are only suitable for Friul Model tracks. So I put Model Kasten tracks into the spare box and mounted Friul tracks giving the same weathering: painting black, pre-shading with brown, weathering with a little silver dry brushing and adding different shade of brown and orange powder to simulate dust and rust. Another problem: I paid little attention and mounted spare tracks upside down on rear deck so it was impossible to insert pin secures. On the real beast no secured spare tracks meant lost spare tracks. I imaged a field solution from a member crewman who was aware everything (a fuel tank, a wheel or a piece of track) was preciuos than gold. The Jagd had lost almost all pin secures so I imaged he decided to use some chains found somewhere to secure spare tracks to the tank. I did a heavy weathering with earth and sand pastels to uniform spare tracks and chains to the rest of the tank. Painting The assembed model was given a base coat with Tamiya grey fine primer in order to uniform the different materials used in this project and to find errors and imperfections. The inspiration was given by a color drawing from “Jagdpanther” by Wydawnictwo Militaria. The caption said ”Jagdpanther Sd.Kfz. 173 of 654th Schwere Heeres Panzerjager Abteilung, France, Alsace, end 1944”. The picture seemed to me coherent with my Jagd project: no tools brackets, no zimmerit, 660 rear idler wheel, heater left fan, late mufflers. Perfect; the painting process begin!. For years I used Humbrol enamels but this time I tried Tamiya acrilics. At first I pre-shaded the model with Tamiya Black XF1 in order to evidence the details. Then I gave a base coat of Tamiya Desert Yellow XF59 with a generous amount of Tamiya White XF2 (I do not remember the ratio, maybe 30% of white) spraying into the areas which were the black color gave the grey primer came out. In this way I made a very strong contrast between black areas and sand yellow areas. At this stage I added another coat with the same mixture (XF59 + 30% XF2) to the whole model making no differences between black areas and sand yellow areas giving a subtle pre-shading areas visibile under the sand coat. The muzzle brake was left in black coat. As camouflage colours I used Tamiya Red Brown XF64 and Dark Green XF61 both lightened with 30% Flat White XF2. In general the diluition ratio is 50% paint mixture with 50% Tamiya thinner. The stripped camo scheme was a terribile work. I reproduced the general 1/35 line and size of Jagdpanther on a transparent plastic card; next I riproduced with Tamiya yellow tape the camo scheme using the general 1/35 line as templete; carefully I removed the tape and put on the model with some little adjustments. Then when spraying the camo colours I paid attention to cover the green camo zones when spraying red brown and viceversa. At the end I gave the whole model an overall coat with Tamiya Buff XF57 to reduce camo contrast and add a first weathering effect. Apart from the Balkenkreuz the model was almost finished when arrived my copy of the “Combat history of Schwere Panzerjager Abteilung 654” by K. H. Munch. I read it and it seemed to me no final production run Jagdpanther were issued to 654. What could I do? I needed an unit which could be equipped with very late Jagd. I was thinking about 9. SS-Panzer Division in Hungary in March 1945 but I needed an help. I send a post with some pictures to Missing Links Constructive Comments and to Mirko Bayerl in particular. He kindly gave me the answer and said that it was very difficult to find a organization chart for the Jagdpanther in Hohenstaufen in Hungary. He thought that Jagdpanthers were attached directely under command of II.SS.Pz.Rgt. 9 in two kompanie and were more or less “Girls for everyone”. He would suggest no tactical numbers but only the Balkenkreuz somewhere in the middle. An the end I found an Abteilung for my Jagd and a title for this article. Thank you, Mirko! I have to admit the camo scheme remains a guesswork. However looking at some colour drawings of a Jagdpanzer IV L/70 (V) from the same unit an hard egde three tone scheme could be possible. Weathering The chipped effect was achieved with Humbrol Matt Black 33 only with a very fine pointed brush. The rusted lines were done with brown pastel powder. To simulate dust and earth I brushed the wheels with diluited white vinilic glue and when still wet overcoat them with baking soda. I must admit this method does not satisfied me: the making soda remains here and there but not where I want to stay! The rubber on wheeels was pointed with Humbrol Gray 112 and weathered with an heavy coat of Humbrol Matt Black. Marking I have no pictures of 9.SS-Panzer Division and Jagdpanthers in particolar. So I added only the Balkenkreuz from Archer Transfers range and nothing else. Appendix on pictures (1) Cast number (2) Hole on saukoft blende for Pak 43/3 L/71 hoisting adaptator (3) Driver’s periscope with no rain guard (4) New armoured collar (5) Close defence weapon system (6) Pilze (one of three) socket for 2 tons crane (7) Bolts (2) to secure sight to superstructure roof (8) Bolt (1) to secure sight to superstructure roof (9) Fighting compartment exhaust armoured fan (*) (10) Bore evacuator (11) Pak 43/3 L/71 composite two sections (12) Hull MG 34 dust/rain cover chain attachment (13) Tow cable attachment (port side) (14) Cast number (15) Pilze (one of three) socket for 2 tons crane (16) Fire estinguisher (17) Shovel location (18) Circular intake on deck engine with only 4 bolts (19) Bolts on deck engine with only 18 bolts (20) New circular access door to fuel tank (21) Bolts for command tank antenna (22) Tamiya rear idler wheel (**) (23) Flame concealing mufflers on exhaust pipes (24) Towing clevis and wire cutter repositioned (25) Welding exhaust pipes (26) Friulmodel larger diameter rear idler wheel (*) Some Jagdpanther completed by MNH, Hannover at the end of Novembre ‘44/beginnings of December ’44 had the fighting compartment exhaust armoured fan mounted over the collar gun (see Aberdeen Proving Ground Jagdpanther) (**) Tamiya rear idler wheel has a correct shape but has a shorter diameter Items - Tamiya Jagdpanther, kit no. 35203 - FriulModel working tracks, kit no. ATL-08 - FriulModel rear idler wheel, kit no. AW19 - Aber photoetched from spare parts - The Show Modelling, kit no. 056 - Tamiya acrilics XF1, XF2, XF57, XF59, XF61, XF62, XF64 - Humbrol enamels 33, 112 - Archer Transfers, kit no. 35043 - Harder & Steenbeck Evolution airbrush - Olympus Digital Camera C-2500L References - Combat history of Schwere Panzerjager Abteilung 654 by K. H. Munch, J.J. Fedorowicz Publishing Inc - Jagdpanther, Janusz Ledwoch, Wydawnictwo Militaria - Panther variants, 1942 – 1945, New Vanguard no. 22 by H. Doyle T. Jentz, Osprey Military - Schwere Jagdpanzer – Entwicklung – Fertigung – Einsatz by W. J. Spielberger, H. L. Doyle, T. L. Jentz. - Germany’s Panther Tank The Quest Combat Supremacy, by T.L. Jentz and H.L. Doyle, - In the firestorm of the last years of the war, II. SS-Panzerkorps with the 9. and 10. SS-Division “Hohenstaufen” and “Frundsberg” by W. Tieke, J.J. Fedorowicz Publishing Inc - Achtung Panzer no. 4, Dai Nippon Gaiga - Panzer Tracts no. 9, Jagdpanzer – Jagdpanzer 38 to Jagdtiger by T. Jentz, H. Doyle - Panther Model Fibel no. 448, Model Art - Jagdpanther II. Lehr Rgt 130 by G. Jansson in AFV Modeller no. 1 nov./dec. 2001
 -
Hi All, this a vignette I made +/- 20 years ago in classic Verlinden way. Jeep is from Tamiya as two figures with Verlinden heads. Accessories are a mix Tamiya/Italeri + homemade sandbags. Hope you like. Ciao Filippo
-
Hi All. Here my Stu.G III early prduction I made some times ago. The model is from Tamiya range, kit no 35197 built straight from the box. I only added some photoetched parts from Royal Model such as metal rail on deck and Friul Model tracks. The ammo boxes, drum, jerrycans and weapons came from Tamiya accessories. The non standard, civilian skis are an artist guesswork which added some colour and came from Dragon set. The winter camo scheme was made with Tamiya acrilics. Washing was made with Black Humbrol and coloured pastels (brown, yellow, black and light earth). The antenna on port side came from the first idea to depict a Stu.G III from Funklenk Abteilung 302. Later I change my mind and “attached” this assault gun to 2nd battery of Stu.G Brigade 202 which fought its fierce battles in Kurland pocket in march 1945 till the end of the war. Sorry for bad pics! Hope you like. Ciao Filippo
- 20 replies
-
- 18
-

-
- 1/35 Tamiya
- Royal Model pe
- (and 1 more)
-
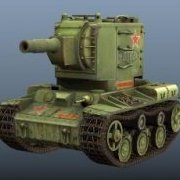
Hi All, here my Tiger Ie from 1/35 Tamiya. In june 1944 six Tiger, starting from Paderborn, were transported to Gumbinnen (East Prussia) with crews from Pz. Ers. Ausb. Abt. 500 to join the rest of GD battalion. The tanks weared a two tone camouflage pattern and lacked of turret numbers. You can find two pictures and a colour profile in superlative "Tiger in combat" by W.Schneider. Here some pics of my interpretation. For painting I over sprayed whole model with a Tamiya XF1 black base. Then, in a cloud pattern, the first camouflage color: XF60 lightened with 30% of XF2. On wheels and rear hull the preshading process is more evident. With Tamiya masking tape I reproduced the camo scheme: a very tedious job! At the end I airbrushed a light coat of Tamiya XF64. PS: It belong to my dirty period, too😉 ! Hope you like. Ciao Filippo Appendix to wip pictures (1) locations for canvas rain guard (2) pins for commander’s hatch padlock (3) welding seam for two pieces 40 mm turret roof (4) Bolts to secure gun to turret roof from inside (5) “Pilze” socket for two tons crane (6) Close defence weapon (7) Loader’s hatch “key hole” (8) Loader’s hatch Tiger II type (9) Bolted turret ring guard (10) Escape hatch with two bolts (11) Stopper on gun mantlet (12) Monocular gun sight T.Z.F.9c (13) Bolts for secure driver’s and radio operator’s hatch (14) Spare tracks to improve protection (field modification) (15) Spare tracks as improve hull protection (field modification) (16) Hull side extensions cut (17) No “star like” nut on armoured hub (18) Handhold to allow the crew to open the radiator cap without special wrench (19) Starter with double view for Maybach HL 230 P 45
-
I was in two minds whether to start up this thread but here goes. I've started a new project. Simple little build of an old kit. Some simple little modification, mainly some stowage and a 3.7cm gun fitted. Tarps are made from a putty I found in hobby craft, only downside... it needs baking in the oven to set. Allowing it to air dry some on the kit actually acts like it has plastic cement between the two. ive actually progressed on from this point, but no photographs yet. also cutting an artillery loader up to fit as driver.... it's a tight fit!!!
-
Lining up my next build, utilising this old beast that I found on ebay just before Christmas. M106 - 1 by phil da greek, on Flickr A classic (that is old) Tamiya kit, some modification and scratch building will hopefully turn it into a Israeli "Keshet" M106A2 carrying a 120mm mortar. Work will begin soon on completion of my "240 Robert" build in the non military vehicles section, so probably by Easter! Thanks for looking.
- 18 replies
-
- 3
-
-
- 1/35 Tamiya
- M106A2
- (and 1 more)
-
Here is my Tamiya Tiger1 and Panther and Revell Jagdpanther . The flash has darken the colours a bit ,got the Miniart Normandy Tank Crew to go with the Tiger ,going to weather them later . Just checked i started the Panther in July 2015 ,pretty good going for me ,2 years to finish a kit .