Search the Community
Showing results for tags '1/32'.
-
 Decided it's time to clear out some of my old stash, instead of selling perhaps i should build thes as that was what i originally intended......I think? So here goes: BF-109 G6 will be the late variant. He-111 H6 will be KG26 1H+GP ? JU88 will be a C-2 perhaps 4D+FH ? My problem for the outset is going to be finding RLM paints. I have all the required Luftwaffe RLM colours: 65, 70, 71, 74, 75, 76, 81 and even 02 but these are all MM enamels. I really would like to use acrylic even if its lacquer based like tamiya and Mr Hobby Colour (gunze). But i am skeptical on using MIG or Mr Hobby Aqueous. although they do RLM colour ranges. Vallejo is a non starter as i think there colours for RLM especially the model Air range are not that accurate. also i want paint that is tough after 24hr of curing like Tamiya. Open to suggestions.... Is the Mr Hobby Colour the way to go as it's probably tough and durable like tamiya?
 -
Started the Hobbyboss 1/32nd IL-2M Sturmovik. Unsurprisingly starts with the cockpit Then slotted the bulkhead in place with the seat, but still need to add the belts and weather down later Peter
-
 Hi all, As a kid I had Airfix's 1998 catalogue and, as a James Bond book and movie fan, I lusted after the 1/32 DB5 with the wild idea of adding my own cobbled-together Bond gadgets to it. I never entertained any idea of buying any other car model, only a silver DB5 - probably just as well, as 12-15-year-old me wouldn't have done it justice. Unfortunately I never found the kit and moved on. Now, with the recent re-release of it as a Starter Kit and having found it for almost half retail, I had to get it. Just as well it was half price as it's the 1967 mould and this is NOT worth NZ$34.99. So, armed with as many DB5 photos as I could download at work, I got started on my first ever car kit. The aim is to replicate the Goldfinger car with guns extended, tyre slasher out, and a suggestion of the other bits and bobs (except the bulletproof screen - my scribing game isn't up to that). As of this evening it appears thusly: It's hard to see in the photo but, along with the scratched control panel-armrest, I carefully sliced the top of the gear change stick almost off and painted a red "knob" for the ejector mechanism. The panel is from a 1/48 P-40 - not close to the real prop, but good enough for a closed-door, 1/32 scaled car. Likewise the rubber boot at the base of the gear stick is from a big Heller Super Frelon chopper. I'm having fun! Humbrol #11 is not the match for Aston Martin "Silver Birch" I've been led to believe, so I mixed the two included pottles with a dash of Tamiya Sky Grey. I think it's turned out well. You can see the painted body in the background, I'll wait til it's done to share a better pic.
 -
 Hi everyone It seems that for a while know I have been struggling to find any enthusiasm for my projects. My 1/48 new tool Airfix Mk 1 Spitfire has stalled due to a broken part, my new tool 1/48 Hurricane has also stalled (just lost interest), my JP has been put away for another day (lack of enthusiasm) and I have several GB's that I've joined (again no get up and go there either) so what to do? I have the 1/32 Tamiya Spitfire Mk XVI in my stash so I'm going to start her as my long term project. She will be build mainly OOB except for RB productions Sutton Harness, some fuse wire, some resin stuff I have floating around and after market decals / masks (not too sure which markings yet) so wish me luck as I make a start. Cheers Iain
 -
I've just finished this one It's an amazing kit, and falls together perfectly, but I found it really hard to paint with so much detail. It's the Tamiya IX kit with Kagero decals for a 316 sqn aircraft, flown by Gnyś. Other extras were the Barracuda cockpit parts and stencils with an Ultracast pilot.
- 21 replies
-
- 40
-

-
Evening, I tried to start this thread a while ago, but managed to mess up the pictures, let's hope it all goes a bit better this time. So after the Tamiya Spitfire I fancied something a little simpler so went for the venerable Hasegawa FW190-A5, which went together very nicely indeed: So after that I needed some inspiration regarding the next victim to be sacrificed on the alter of my ineptitude... I had some time, after all, Susan was away in 'Nam*... Well that was a pointer and it narrowed the choice down to an F100D - but I bought the Thunderbirds version and want to do a 'Nam aircraft, but need some pylons etc, which in theory I could get from the leftovers when I've built the F105D, but I've got the Hobbycraft boxing and the transfers are broken and there's no colour guide. That left just one option, so having confirmed the policy with my SpAd Frankie, I made a start. *Yeah, about that... no, she's not been running missions out of Da Nang, although she was in 'Nam... that is to say Chelt'nam... yes, she was at the literary festival. That's right, it's two Spads together... Having gone through the usual pre-choice process of fondling plastic and looking at instructions, I headed full bore for the toilet bomber... I mean seriously, they give you a proper loo to build (parts 13 and 15)! It was only after I'd made the decision to build, that I realised that the markings for the bog-bomber were not included in this version, sad times indeed. I'll still be going for a Navy aircraft, partly to escape having to do another SEA USAF scheme, and also because the oil leaks and weathering shows up so well on the white and grey. So on we go... as usual, it starts with the really exciting stuff... yup, a stack of control surfaces. Don't worry, I won't bore you with a picture of that. So how about the engine? Plenty of bits: Which build up pretty nicely. I thought I'd try to add some wires and pipes, so had a quick scout online to look at some pics... now that is one huge hunk of metal, and the oft cited fact that this aircraft could carry the same ordnance load as a B-17 is astounding. A combination of Vallejo Dull Aluminium and various shades of black, rust and weathering. I kind of think that I can assemble and paint the main airframe before attaching the engine, I think this will negate the necessity for masking it as I might have a couple of panels open which could prove a bit of a hassle. So on with the cockpit then... And some pretty spurious colouring on the buttons, particularly when one looks at the real thing and sees that they are all black, oh well, it'll show up well... Next up the IP. Now for the last few years I've had a real problem with Trumpeter's IPs. One is provided with a plain flat back panel, a great transfer of the dials to set against it, and then a solid transparent part which is in effect the whole IP. Now I've never managed to figure this out, I've tried to paint around the dials; disastrous. I've tried to drill out the dials to show the transfer of the dials; really disastrous. I've tried to put the transfer over the transparent part... best not mentioned at all. But this time I had an inspiration... I dropped Maskol into the recessed dials and painted the whole thing black. Managed to lift out the Maskol and then clean up the clear bits with a toothpick... the results? Well you can be the judge, but I don't think it came out too badly at all: Well that's about all for now. I've got a stack of work on for the next week, but then Susan's away for Singapore for a week and then Delhi for a week, so that should be a fortnight of pure plastic fun, without having to watch any dancing/singing/jungle etc. So hopefully more to follow soon. Thanks for looking, Peter
-
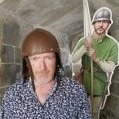
Airfix 1/32 Multipose German Infantry 1939-45 (04582)
-
Basically OOB, with the additions of Additional items: Airwaves AEM034 Floor Plate Waffle Pattern Peak Dale 45cm Necklet Chain Silver Plate Painting Profile: Vallejo Model Air 71073 Black (Metallic) = engine, chassis, exhaust Vallejo Model Air 71072 Gun (Metallic) = engine, exhaust Vallejo Model Air 71063 Silver (Metallic) = engine, exhaust, footplate Vallejo Model Air 71069 Rust (Metallic) = sump, exhaust Vallejo Model Air 71057 Black = chassis, tyres, number plates Vallejo Model Air 71001 White = hoses Vallejo Model Air 71003 Scarlet Red = coachwork Vallejo Model Air 71084 Fire Red = coachwork Vallejo Model Air 71085 Italian Red = coachwork Vallejo Model Air 71077 Wood = ladders Vallejo Model Color 182 70828 Woodgrain (Transp) = ladders Vallejo Model Color 178 70864 Natural Steel = drive shaft, cog teeth Vallejo Model Color 172 70996 Gold / Vallejo Model Color 173 70878 Old Gold = framework, lights, horn, connecting pipes Alclad2 ACL-107 Chrome = bonnet Humbrol Acrylic 33 Matt Black = fan belt, radiator grille Humbrol Acrylic 16 Metallic Gold = radiator, helmets, framework, lights, horn, connecting pipes Humbrol Acrylic 53 Metallic Gun Metal = metal tyres Humbrol Acrylic 191 Metallic Chrome Silver = headlights Humbrol Acrylic 61 Matt Flesh = skin tones Vallejo Model Color 19 70927 Dark Flesh = skin tones Vallejo Model Color 20 70845 Sunny Skintone = skin tones Andrea Color 2nd Base / 2nd Light / 2nd Shadow = skin tones Vallejo Model Color 48 70898 Dark Sea Blue = uniforms
-
Well, it's been a long haul but I'm finally calling this done, Tamiya's 1/32 F-4J finished as ZE352 74 Squadron RAF 1988. I bought the kit originally to do an FG1 conversion but with a kit being announced shortly after receipt decided I didn't need the pain of all that cutting and filling. As we all know the UK J's were delivered in a funny colour so I wanted to emulate that but also wanted to do a scheme that was a bit out of the ordinary, ZE352 in 1988 seemed to offer this, she was bit worn and tired, had a replacement panel in RAF Barley grey and some zap graffiti, so this is what I was aiming to achieve: I added some aftermarket - GT Resins F-4J cockpit and seamless intakes, Eduard exhausts, Yellowhammer decals and used some old Reheat ejection seats that I have had for ages as I wasn't so happy with the GT ones (detail was a bit muzzy). Painted in Xtracolour X127 for the Flint Grey and some assorted greys from the paintbox for the rest. I apologise for naff pictures, I'll try for some better ones if the sun ever comes out again. These are from earlier in the build; The hot section was painted with AK Interactive True Metal paste and some Baremetal foil. The red lines are to emulate the RTV sealant commonly seen. All comments good and bad welcome. Dave
- 20 replies
-
- 25
-
-
 1/32 Matchbox Sea Venom (one and a bit kits), which will be completed as a Flygvapnet (Swedish Air Force) J 33 Venom (N.F.51). Derek
 -
The Humber Snipe 4 x 2 four-seat Open Tourer was built from 1941 to 1944 by the Routes Group, Coventry and used by the British Army as a Staff car. Field Marshal the Rt. Hon., the Viscount Montgomery of Alamain KG, GCB, DSO made extensive use of two of these vehicles. The first was M239459 and named ‘Old Faithful’, used from October 1942 to October 1943 in the Western Desert, then Sicily and Italy. This car was left for his successor, General Sir Oliver Leese. M239485 was his second Snipe and took him through the final stages of World War II. I copied this scheme from 'Old Faithful' as she was painted at IWM Duxford some years ago. However, this scheme was not introduced until April 1944 so maybe the museum got it wrong or transposed the scheme from 'Victory Car' to 'Old Faithful'.
- 12 replies
-
- 12
-
-
Hello Paul, i would like to commision this decal sheet for my 1/32nd Tornado. I have many pictures of the aircraft and its tail if they are needed. Best regards, Rob
-
I'm just doing the Aires exhausts for the Revell 1/32 Tornado. Looking online for photo references prior to paining, images seem to show the burner much closer to the tail end than they are in the resin set. Is this just an optical illusion in the images because of the more end on angle of the shot? The resin set are certainly comparable in length to the kit plastic, but not sure that tells me much. Any further information much appreciated Simon
-
As in the title, I am looking for RAF decals for either the GR.1 or GR.4 for the big Revell Tonka. Does anyone know of a good set or any at all? Rob
-
Hi guys, I will be building the Pacific Coast Modeller 1/32 Macchi MC.200. It will be build straight out of the box. Well SOB means resin engine, cockpit and some PE parts as well. The only extra will be the decals. Pictures will follow later. Cheers,
-
I thought I'd posted these when I originally did them (back in October 2012), but I cant find that thread. I recently found these four figures amongst my spares, where they came from.... but have just completed them.
-
After my 1/32 Italeri Sopwith Camel, I decided that I really enjoyed working in this scale. With that in mind, I have decided to have a crack at Revell's MkIIa Spit which I bought off a member on here with some alternate decals and some Eduard masks. Here goes and as always, I am only learning and will appreciate all comments and advice, good or bad. :-) Dean
-
Following on from my 1/72 scale WW1 fighters, I decided to up the scale a little with this kit that I found for £12.50. Hope you like it, still learning but starting to get a little better.
-
 OK Guys, The Hasegawa 1/32 Fw-190 A5 will be my entrance for this GB. I have got some goodies with it as well. There are two resin gun pods from Eagle cals for under the wing. This is the rüstsats U12. With this I also have the decals from eagle cals with one of the schemes for Lt.Erich Hondt's Fw-190 A5/U12 from 2/.JG11. Here are some pictures of the model and goodies. the Box. And the goodies with it. Here are the underwing gondola's with it's manual. And the decalsheet that is needed for it. This is the scheme I will use. Now we need to wait for a week before it starts. I still need to finish two Ju-88's and a Yak 3. Luckely I managed to finish my Saab Draken yesterday. So that one is now out of the way. Cheers,
 -
1/32 Revell Hawker Hunter FGA.9 / Mk.58
thehennessyguy posted a topic in Work in Progress - Aircraft
Brandon Hennessy 04/09/2016. Hey guys. Started a 1/32 hunter the other month and having a steady pace with it so thought i would throw it up and see how it goes ! enjoy i've sprayed the camo and the wing tips along with the black nose cone. the canopy also received a good dipping with some AK Gauzy which I'm loving at the moment Thanks for looking Brandon -
OK Guys, After some correspondence (and acceptance) with dazdot I am going to start this model.It will not go into the voting, because it is more than 25% done before it starts. It is a shelf queen and was restarted with the start of this GB. I started this build in a different model site (Large Scale Modeller) and lost interest/time with it until last week when I was searching for a resin seat and found it in this box. It is a 1/32 Hasegawa Fw-190 D9 with a conversion set from Renaissance and a MDC cockpit set. There are some more goodies in the box, but I am not sure if I will need it. Here are some pictures from before the restart. The box. the Renaissance conversion set. This is original for a D-13 conversion, but there is not much difference between the D-11 and D-13 nose. And the decals will be from Eaglecal. This is the scheme I will be building. And here are some pictures of the build then. The new nose on. This was the text used on the other build " I have sawn of the nose and replaced it with the one from the conversion set. The brake was on a panelline and very easy to do with a fine saw. Then came the trouble. because the brake line is on the edge of the firewall, you can't use some plastic plate to strengthen it. Now it's secured with only some super glue. When I will put the fuselage together I will see how to strengten this." Here is a picture of the painted insert for the engine. This gave the nose more strength. Here is a picture of test fitting the rest of the nose parts. And here is the cockpit of MDC. That is a nice piece of resin. Now it was on to the wings and these are different than a D-9. Here is what I said in the other build. "I have made the gun holes in the wings for the MK-108 canons. The ones in the A-8 kit are to small for the fitting of the masters MK-108 gun barrels. So I had to improvise with some plastic tubing." This was the last done before it became a shelf queen. Cheers,
-
 Revell 1/32 Arado AR196A-3 Seaplane "FINAL REVEAL!!": Hello Guys, Following on from my "Build Update #6" posting, I assembled the canopy onto the fuselage, attached an EZ-Line antenna, glued all the light lenses into their locations, glued the pitot tube and counter-balance weights onto the underside of the wings, along with door handles on the canopy frame sections, and, fitted the engine cowlings and engine bay doors in their open positions to complete her!! So, here are the "Final Reveal" images of my completed Arado AR196A-3...I hope you enjoy the views as much as I enjoyed building her! And, forgive me for the number of photos that I have posted, I couldn't make my mind up which ones to select and it was taking me too long to choose, so in the end, I just uploaded all of the photos. Well, there she is. I hope you enjoyed the views as much as I enjoyed building this fabulous kit, which I must say, is fabulous value for money! Now, I have to start designing and planning part two of this build, which will be the diorama to set this plane into. I have 4 ideas presently "floating" around my head (no pun intended), but first, I need to sketch them all out and calculate my material requirements and costs before deciding which design idea I go with. I'm a little anxious as I've never built a diorama before and have no clue where to start, so, I guess watching some fellow modelers "How To" vids are my next step! If you didn't see my "Build Thread" for this model, here is the link to it: http://www.britmodeller.com/forums/index.php?/topic/234980467-revell-132-arado-ar196a-3-seaplane-my-first-post/ In the mean-time, if you'd like to watch my "Final Reveal" YouTube video for this plane build, here is the link to it: https://youtu.be/ZRKU-k-M-BE And, on my YouTube channel you can find my "In-Box-Review" and "Build Update" Videos, for this build, too: "In-Box-Review" video link: https://youtu.be/MxfUpfYJDyU "Build Update #1" video link: https://youtu.be/nJ4rEbxFcv8 "Build Update #2" video link: https://youtu.be/Z_NoWew9Qus "Build Update #3" video link: https://youtu.be/AUQsz__kKyE "Build Update #4" video link: https://youtu.be/FpnxQFUASbU "Build Update #5" video link: https://youtu.be/iyCPzT-H_wU Thanks again to everyone that has followed this build thread, and, for the kind and encouraging comments that you have left me, they are all greatly appreciated and keep me motivated to continue! Happy modeling guys! Have Fun! Cheers!! Martin
- 52 replies
-
- 39
-
-
A wee while ago, a guy came up to buy a painting from me, and he then began to ask about the numerous(!) Spitfire models I had out on display. Within ten minutes, he'd convinced me to build a model for his brother, who is a massive Spitfire fan. I met with the guy's brother, and his spec was simple: build a Battle of Britain-type Spitfire. During the course of the discussion, he'd mentioned reading Geoffrey Wellum's book, First Light, and had watched the TV-film made from it. That helped make my mind up for the colour scheme, as I knew the RAF's Battle of Britain Memorial Flight Spitfire IIa had worn Wellum's markings once. Anyway, this was the end result - Revell's big Spitfire IIa. A fun build, although I hated the fact that the seat was in so many parts (I mean, seriously?!). The kit's inaccuracies weren't a bother on this one, as P7350 has the metal ailerons and circular oil cooler anyway. I enjoyed it so much that I've actually bought one for myself - and might do another one after that!
-
Hello All, I HAVE UPLOADED NEW PICTURES SEVERAL YEARS ON FROM IT BEING BUILT - SORRY FOR THE FLUFF I would like to introduce my build of the Polar Lights reissue of the Aurora 'Batmobile'. It is a nice little kit, as with all oldies it responded well to a little 'TLC' no real challenges other than getting the body good enough for the gloss black which was from a Halfords rattle can over Tamiya fine surface primer, I made my first decal for this kit for the 'Bat Licence Plate' as it was probably called. All the chrome was removed and repainted in Plasticote Chrome over gloss black, but I have recently bought some Alclad, so will be giving that a go on future builds. I apologize for the many photos, but everybody loves this car... it's the law!!! Thanks for looking, Comments and critters welcome, tune in next time... same bat time same... well, you know the rest Cheers, Andy.
- 27 replies
-
- 9
-
-
- Polar Lights
- Batmobile
- (and 1 more)
-
Hey Folks, check out this great painted fugires of our new 1/32 sets