
Search the Community
Showing results for tags '1/24'.
-
 Seeing as this GB is now running till the end of the month and I haven't got anything else GB wise till middle of Feb I thought I'd throw another quick oob into the ring. I started last week but I've only just got round to posting, so here we go. Tamiya 2001 Subaru Impreza from 2001 probably going to be in Richard Burns markings. TS50 spray can and Tamiya hairy stick acrylics for the rest. Should just about be able to get this over the finish line and add it into the gallery before the end
 -
Like in 2021 I forgot all about the yearbooks until now. Unlike 2021, I remembered it in time, so here's my builds from 2022. As the title suggests, I achieved my average of 3 builds for the year. None of them are terrible, but equally none will trouble some of the (very modest) creative geniuses who reside in the vehicle section. 2022 got off to a good start though, with a Jag XJ-S almost completed. It only took a few days to finish this one, so I got off to a flying start completing Hasegawa's excellent Jag kit: By Easter I had gone to the brown side and completed another piece of British automotive engineering, this time Aoshima's MGB. The rubber bumper cars were about the only ones on the road when I was young, so I had to go with that. And being a '70s car I felt I had to go with the most '70s colour imagineable. The wheels were a real sanity test - I ended up spreading them over 4 weekends to avoid going cross-eyed. And then things slowed down... a lot. Revell's VW van goes together surprisingly well for a multi-part body, but the paint scheme took quite a while as the green and orange needed different colour primers, not just colour coats. It's also not the simplest kit around, so this one took me until October to complete. As I'm only halfway through the next kit, there is a possibility already that 2023 may be below average. But I hope you all like 2022's offerings
- 10 replies
-
- 20
-

-
By mid-1942 the Focke-Wulf Fw 190 was becoming a formidable challenge to the early marks of Supermarine Spitfire. Rolls Royce engineers were already developing a variant of the Merlin, incorporating a two-stage supercharger. Supermarine themselves were developing an improved airframe for the Spitfire, which would incorporate the Merlin 60 and 70 series engines. This new airframe was the Mk.IX variant and formed the base for the Griffon engine. The C Type wing was also known as the universal wing. The undercarriage was redesigned, making it more stable, and the blisters removed from the upper wing. The Mk.IX was usually armed with two 20mm Hispano cannons and four .303in (7.7mm) Browning Machine Guns. This kit was developed by Airfix as a successor to the 1970 Superkit of the Mk.1a, which itself had extra runners added in 2001 to produce the Mk.Vb.
- 20 replies
-
- 54
-
-

-
 This forerunner of the modern car will be my second choice for the GB and hopefully Mrs Benz and her sons will make an appearance too, though I must warn you that my figure painting skills are not that good but we will how they turn out. Here are the box and content shots. by John L, on Flickr by John L, on Flickr by John L, on Flickr by John L, on Flickr
- 42 replies
-
- 12
-
-
Kit Number 24364... https://www.spotmodel.com/product_info.php?products_id=57827 Oh, yes.... I'll be having one of those... best, M.
-
Looking at my Ferrari F60 F1 build for this GB I have realised that there is going to be a lot of time waiting for paint and decals to dry, so I thought I'd add another build in to keep me occupied. I've chosen an iconic rally car as I don't think even I can get parts mixed up between these 2, but let's see as they're both red 🤣 Had the kit for a while now off @Anteater and I'm finally going to get round to making a start So this is my place marker for the 1967 Monte Carlo winning Mini Cooper S 😀 Busy weekend ahead playing trains at the GCR, but hope to make a start on both builds Monday
- 49 replies
-
- 11
-
-
 Committing to this Fujimi kit, which I commented in the chat thread. My third favourite racing car. Long time resident of my stash, I hadn't appreciated the history of that race. . . . . . until I watched this DVD, and read the book. Knowing the true story of the finish of the 1966 Le Mans race, rendered ending of the the film a huge Hollywood anti-climax for me. Showing the politics of Ford at the time, it acknowledging the massive efforts of driver Ken Miles, and raises Carroll Shelby to legendary status. With hindsight, I'd prefer to build Miles' car, but this is the kit I've got. Please, no suggestions for after market decals - I'll build the kit as it is.
- 47 replies
-
- 11
-
-
 Having been talking around this one for a while now, I’ve sort of talked myself into this one. So I’ve decided to go ahead and build a large scale Hetzer now instead of waiting for the GB, if it does happen. Of course in the process of building the Hetzer I’ll have to mold it fabricate quite a few sub components that will be of use for any 38(t) chassis so I’ll just build a Marder or a 38(t) for the GB when (if?) it happens
- 35 replies
-
- 2
-
-
- 1/24
- scratch build
- (and 1 more)
-
I know quite a few of you have seen the build, but before I start here it is in all its 'glory'. As with all my RFI threads, all comments and constructive criticism are welcome. After all, I've spent almost 6 months looking at this in close-up so I'm fully aware it's not perfect! This is the first car I've built which didn't come with a complete body; with this one you have to assemble the panels to get the boxy VW van shape. This one, like the majority of my builds, is done straight out of the box so is naturally simpler than some of the masterpieces others put on this site. Before I started I wasn't confident that I would get a good result from it, particularly since it has opening doors all round. Fortunately Revell have done a good job of both the design and production of this and it went together pretty well. The main issues encountered were with the rear access door which was a little warped and needed micro-magnets to hold it in place... and then I went and snapped it anyway so had to do a repair. That repair wasn't as successful as the front bumper repair, but fortunately still isn't too noticeable. As for the kit itself, if you're into VW vans (I'm not, but still a nice looking model) then this one is well worth building, just probably not if it's your first car model. This one was the Jaegermeister livery as detailed in the box, but there are also instructions for a plain version too. Paints are Halfords primers, then Tamiya British Green and Orange topped off with Humbrol Clear. I was quite scathing about the Humbrol Clear in the thread, but to be fair it isn't a bad clear provided you take into account its limitations - namely it does not like humidity so you really want to be clear-coating in summer on a dry day otherwise it clouds up. Fortunately you can get rid of the clouding by giving it another coat of clear on a dryer day. The big plus of the Humbrol Clear is that it is very gentle on decals, certainly much better than Tamiya or Mr. Hobby. The interior is clear-coated Halfords Grey primer. Onto the build, and once again I've probably got a few too many pics here. But at least it should give a pretty good indication of what it looks like now its finished. As you can see from some of the photos, my new photography toy is a sheet of dusty black perspex... I'll start off with a walk around the van. The driver's door does try to close in too far but can be positioned with care. But here's the doors-closed look: Front left 3/4 view Driver's Side Rear left 3/4 view Rear View Rear right 3/4 view Passenger Side Front right 3/4 view Front view As I mentioned earlier, the doors also open, although it is being displayed all shut up. But here's some pics with the doors open anyway: Side views first: And then from the back And finally a couple of 3/4 views from the loading doors side I'll finish off with some close-ups of the insides, those bits you never really notice. First of all the engine bay, not a patch on those which have been detailed up but it's a dark hole on this colour van anyway so not particularly visible. The load bay is quite simple to do, but seems to have more character to it in the photos than you see in the real life model. The second photo, taken through the side doors, also feels large to my eyes. And onto the last compartment, the cabin. At least with the opening doors you do get a chance for a slightly better view in here, but still not the easiest place to get a good shot of. And that's it. Thanks to everyone who followed and I hope you like it.
- 26 replies
-
- 37
-
-
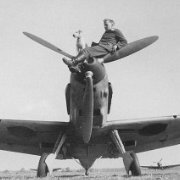
Hi Everyone Following on from the excellent little 1/48 P-51D from Redshift Aug 28, I thought I would post a similar themed model from the distant past. My Dad made it back in 1969 just before Airfix released their brilliant 1/24 MK Ia and it's been collecting dust pretty much since then. As the you might have guessed this is a hand carved 1/24 scale wooden Spitfire made from Jelutong, which is like Balsa but more dense and thus easier to carve. Judging by the condition of the model it's also a very stable wood because it’s been in a loft space with the cold and hot extremes all these years. The canopy is from a single piece of acrylic. Modelling back in the 60’s was very much a case of getting some plans (in this case Model Allied Plans) and making it from scratch for some model makers at least. Who would have thought we’d be blessed with the kits available these days. For many years it was finished in just varnish and it looked amazing, but at some point it was decided to hand paint it as a 611 Sqn Spitfire from 1943. About the same time the wheels were also replaced for the Airfix ones. There’s couple of cracks here and there but she’s fine other than that. My part in all this is that I’ve got the photography gear and the Britmodeller account but Dad will be delighted to see it online after all these years. Keep it in the family so to speak, hope you enjoy it. Kind regards Trace
-
Happy to reveal my first finished model and share my excitement with you. Accidentally saw this beatiful kit on a flea market and decided that it will be a nice starting point in my new hobby. My lack of skill made this kit less beautiful than it was when i first saw it in the box but at least i tried not to ruin it completely Here are some photos made in process: I know control stick is glued backwards here. Already fixed it 😀 And here is a finished model: And finally it is on my shelf. First but not last Lessons learned: More putty and sandpaper. I thought paint will cover all this small gaps and imperfections but no. Next time if i see something wrong when the model is primed i should definitely fix it. My brush and airbrush skills suck so much. Should practice more before making next model. Less is more when it comes to weathering. I see Emil like a workhorse and like it more weathered with scratches dirt stains etc and was afraid to make such a big plane too boring but saw here so many clean nice models so should try it next. And I don’t know if it is just me but i like to see Emils and Hurricanes really dirty working machines and some Spitfires or Mustangs associate more with polished clean sport cars. I can’t really see the cockpit. Made this fuel and oxygen pipes or hydraulics near rudder control but cant see it at all. Do you paint cockpits lighter or are there any other tricks? Or do you make this details knowing that they will be buried there and not visible at all? At least it was fun to make them and to know they are there. Anyway even with all the flaws and my poor skills I just love it and enjoyed the process. So that’s all I will be grateful for your critique and advices.
- 25 replies
-
- 43
-
-
Hello, here is my representation of a JG26 5th Staffel Bf109E - using the Airfix 1/24 109 kit. Along the way I made modifications to the cockpit, wheel wells, and flaps but it goes together well and I think has pretty good proportions for such an old model. I've used custom decals since there are no after market sets for the markings I wanted to represent - and critiquing my own work I'd say that for starters, the canopy cable needs to look taught and secondly the gunsight clear part is too thick. For some reason Airfix don't supply this as a clear part and I didn't spend long enough making a suitable replacement. Anyway, here it is: Build thread can be found here: Thanks for looking.
- 12 replies
-
- 37
-
-
-
I started this kit some years ago but home and work life have kept me too busy to do much. I'm not a particularly skilled either so when I have had time at the bench progress has been very slow. Inspired by the excellent work showcased here by others, I figured it was time to reveal my efforts and hopefully pick up a tip or two along the way. I'm very much a large scale fan (all of the kits in my stash being 1/24 scale), and I want it to represent an aircraft of the fifth staffel of Jagdgeschwader 26... more about this later. Obviously, this is the kit I'm using: Sadly I didn't get pictures of the early work... but here is my start on the cockpit: I recognise that something will have to be done about the wheel wells... but I have cut out the flaps so that I can set them in a part down position. Being somewhat enthusiastic to test out my new razor saw, I realised that I hadn't quite thought through exactly how I was going to deal with these once I'd cut them off! It is a bigger gap than I'd imagined it would be 🤨. And as for these awful exhausts... they definitely have to go.
-
I'm really not sure what made me buy this one to be honest. I'm not a huge VW van fan so I can only presume that I had an idea it would be fun to take onh the challenge of a multi-part body. Then I got it, saw that it's going to be a bear to spray and had second thoughts. But, all challenges must be faced and it's time to face this one. First thing to note is that I am just following the box art van, so it is being done in the Jagermeister green and orange colour scheme. The alternative plain blue scheme would be much easier to paint, but this kit comes with a lot of nice looking decals and it would be a shame to waste them. I got a bit of a start during autumn last year with some Halfords satin black on the underbody, then it was a case of masking off to get the engine bay done in the same Tamiya British Green as the body. Aftr that I gave the dark green a clear coat with Humbrol Gloss Clear Varnish... which went well - I hadn't appreciated quite how sensitive this stuff is to temperature and especially humidity so suffered an attack of blooming on the wheel arches in particular: Fortunately another coat on a better day significantly reduced the bloom and it should be acceptable now, especially as it will be hidden in the engine bay. The other bit of work I tried at the end of last year was filling in the VW badge recess on the front. For that I used the Vallejo white filler which seems to suffer from severe shrinkage, even worse if you try and wet sand it. This was after the second fill, a third fill still didn't sort things out as it continued to shrink back over winter. Following Jeroen's advice I got some Humbrol grey filler which appears to have worked much better, it hasn't had any primer on it yet so that will be the acid test I guess. Fast forwarding to this year and I finally got the main body parts off the sprue so thought I'd have a rough build to see how it looks. I will definitely need to drill out the holes in the roof and/or scrape paint of the pegs, but overall impressions are that this may well go together better than initially feared. This is far and away the worst angle (which could be improved very easily with some masking tape holding things together better) so I'm cautiously optimistic. So that's the introduction. I have a feeling this one is going to be a bit of a long haul, but the good weather at the weekend meant I got some important early bits primed so it felt like a bit of momentum was coming back into this, although obviously I will have a certain brown sports car to finish first
-
 Well model builders, giving a go at converting an Italeri BJ44 to an FJ45 Land Cruiser: The FJ 45, on the left seems to be ubiquitous around the world, but less commonly seen in the US - they are considered something of a treasured find if you come across one of them. Italeri makes a 1/24 kit of the BJ 44, which is also commonly seen, but also, less so in the US. I like pickups, so am going to convert the BJ to an FJ. This will also include a complete rebuild of suspension, axles, engine swap and so on. First steps, comparing the two in a diagram: You can see the most obvious difference being one has a covered area in the back and the other (what I am building) is a pickup. An important feature of both tho, is the rear, wrap around corner windows - thereby eliminating the idea of "just" cutting off the unnecessary roof behind the cab, and instead, cutting off the roof over the cab, and cutting and reusing the rear portion of the roof and back doors: I've got to say, I use Tamyia tape for so many things in addition to masking - among them, setting guidelines for cutting! Embarrassed to say, keeping these cuts on the straight and narrow - more of a task than a guy expected - they're mostly straight lines along flat surfaces - maybe too much coffee that day! When all was said, puttied, sanded, and so on, the cab turned out fine - barely discernable splice! The Italeri kit doesn't have too many parts - at all. The floor pan, truck bed, bottom of the engine, and chassis are all molded in one piece - not what I'm looking for. Rather than fret, a quick trip to the junkbox, and a replacement frame was found. Feeling full of confidence, I cut apart the cab floor, filled some gaps, added the rear facing corner edges (cut from the rear of the kit provided part), added a firewall, and thought we're good to go! As part of my ongoing effort to create my own heavy duty Dana 60 axles, back to the junk box I went - finding idlers from a Bradley and various bits to make up the diff cap, and pinion, then evergreen and alu tube inserts. Had a nearly built engine on hand, which is fine - as the hood won't be openable, but you will be able to see the side of the block and headers between the chassis and fenders, so I need something, and a small block Chevy is a fairly common conversion - funny bit of info, the small block Chevy is lighter than the Toyota I6 - how about that? The Toyota engine BTW is a great runner - I just like adding the V8 😀 Then began trying to get the body to sit correctly on my donor chassis. Problem number one is that the area of the chassis beneath the cab isn't flat - and the base of the cab is - easy enough to fix, but would require some thought - then, I noticed - the FJ and BJ trucks share a similar body mound, below the center of the grill - note the pic in the upper right with the red circle - and that brutal gap.....🤨 How would that get resolved??? Well - a different donor chassis was selected, and a piece of the Italeri part was cut up and modified: As you can see in the left, this was not a pretty job. The Italeri kit part (uni chassis/floor pan) was pretty chunky and not at all realistic. I cut everything in front of the floor pan off, and happily, kept the remnant part handy. I cut the cast in-place, bottom of a motor, out and separated what looks like a chassis from the "flat" front part. Then went about splicing the cut up Italeri part to the other chassis. I didn't take pics of all of this - the process included adding several segments of thick fill material to make what looked like a really big, blocky chassis. Once the glue was set up, went back and cut off all the blocky parts and began filing, shaping, and sanding until it looked something more like a credible chassis. Unhappily, the Italeri kit - does not include a transfer case! 🤨 annoying - instead, the kit would have you insert the drive shafts into opposing ends of a skid plate. The kit isn't bad at all, but the level of detail/parts count, might suggest it's aimed at newer model builders, which is great - wish I'd have found this years ago! But now, well, I want to build in more detail. So, I'm going to make up a NP 208 or 205 transfer case facsimile to suit my project, will add a doubler, and attach it all to the transmission. I will eventually make a skid plate below the transfer case, but mine will be made from thick styrene rod to represent steel tubing, not adapting the kit part. The next tasks will include narrowing the rear part of the chassis, and making the front axle. From there will being locating and marking the axle centerlines relative to the chassis and fender openings. This will ride on front and rear four link suspension so we have a long way to go. Thanks for having a look, and on we go - Cheers Nick
 -
After enjoying building the 1/24 Spitfire Vb recently I decided to extend the masochism by tackling the Hurricane. This one went together ok generally, although the cowlings weren't a good enough fit to be removable. The redundant Spit Mk1 propeller and spinner were used instead of the Hurri's oversized bulbous one, which I never liked. The glaring errors were all my own; once I'd decided to replace the spinner I searched on line for more suitable markings, and I came across the Science Museum's L1592. Unfortunately I'd stencilled these on before I realised the original is a rag wing, so 0pts for research. My other error was to place the fuselage roundels too far to the rear, meaning there wasn't enough space on the starboard side to fit the KW-Z squadron code. The only solution was to apply it in Z-KW format, but as few others are going to see it other than me and the BM bretheren it's a compromise I can live with, it was never going to be an IPMS Nationals contender anyway: And to finish with, some shots with its 1/24 cousins: Thanks for looking J.A.
- 11 replies
-
- 37
-
-
Whilst going around in circles debating what to do with the engine in the '29 RPU, I gave in to temptation and started this. First issued in 1966 as the 'Little Deuce', a companion to the 1/8 scale 'Big Deuce': https://public.fotki.com/drasticplasticsmcc/mkiba-build-under-c/monogram-instructions/show-rods/monogram-little-deu/ Like the RPU, it suffered a Tom Daniel redesign in 1970, as 'Son of Ford'. The Pontiac engine lost its six carb setup, replaced with fuel injection and, for some reason they referred to it as a Boss 302 in the instructions 🤨: https://public.fotki.com/drasticplasticsmcc/mkiba-build-under-c/monogram-instructions/show-rods/monogram-son-of-for/ This Early Iron reissue came out in 1973, with most of the TD silliness removed. It still has the fuel injected Pontiac, but I have a resin repop of the Little Deuce engine from Drag City castings, so I'll either use the intake from that, or scratch one like it. The kit has been out a couple of times since; in the '80s a small block Chevy replaced the Pontiac and it was last reissued in 2011. What's in the box... blurb on the instructions: Fenders and chassis are moulded as one piece, but it has a nice dropped axle, split wishbones and '39-48 Ford hydraulic brakes. Not shown, the same horrible Good Year Rally tyres as in the other Early Iron kits.
-
I tend to lurk on the site, and in that time, I've built a few things here and there but never shared them, which I realised it quite selfish, and doesn't really contribute, so I am biting the bullet and showing off a couple of buiIds. So here goes! I finished this kit about 7 months ago, but actually started it back in 2017. Yep, I'm a slooooow builder... I picked this up at Antics in Plymouth for the princely sum of £49.99, which was frankly a bargain. Whilst building it up I realised that I was going to need a bigger workbench: this girl is a bigg'un! I added some Airscale placards, Eduard Brassin cannon (Which don't fit properly) and some PE to the cockpit that you frankly can't see. After breaking the lower undercarriage, (don't ask!) surgery was needed to repair it, so some SAC metal landing gear was grafted on so the plane could sit on its' tyres again. The kit was painted in a combination of Xtracrylix for the camo, Tamiya for the metal bits and engine, and Mr Hobby for the white bits. I also decided to go with a very worn example. I know that this aircraft was one of the tidier examples, but I wanted the lok of an aircraft that has been very busy recently! typhoon_3_4 by DaTinz, on Flickr typhoon_side by DaTinz, on Flickr typhoon_engine_close by DaTinz, on Flickr typhoon_top by DaTinz, on Flickr typhoon_underside by DaTinz, on Flickr undercarriage_detail by DaTinz, on Flickr gun_port by DaTinz, on Flickr cockpit_detail by DaTinz, on Flickr
- 19 replies
-
- 62
-
-
-
I had it in mind to build one of these Early Iron kits for this GB. I've settled on the '30 Ford Touring, because I remember my dad building it in the '70s. Mine is the 1994 reissue, but the box art and contents are the same as the '70s one. In the interest of getting a GB subject finished, I'm doing this one OOB as a late '60s/early '70s street rod, so no cans of worms will be opened, no mods or re-engineering to sap my enthusiasm. That said, I really hate these wheels and tyres, so I'll be leaving those loose until something better turns up. Unstarted, patrs still bagged.
-
Finally finished! I started this a good while ago, took a break and then had to find all the bits (in four separate boxes!) to finish it. The kit is Revell's 1/24 Audi R10, which comes with decals for Le Mans cars. However I wanted to do an American Le Mans Series (ALMS) entrant, so it needed new decals (Studio 27) and a few mods, mainly to replace the flush front wings with the heavily-louvred items seen on the ALMS cars. Then the engine and bay were detailed, as was the cockpit, plus double dive planes on the nose, scratch-built headlights and wheels from Le Mans Miniatures. I think that's about it. RFI (ish) is here: https://www.britmodeller.com/forums/index.php?/topic/235093097-revell-audi-r10-alms-2007/ This is the engine as built from the kit - it's OK as a starting point, but missing some key components. Also the gearbox is a bit notional:
- 17 replies
-
- 26
-
-
I'm joining in with this one if you'll have me It should be a fairly easy build and hopefully I can get it done by the deadline I'll probably go with the all over BRS red scheme as I have the paint for it, but not the blood and custard for the BR one as on the box It was new and unstarted and I've just glued the engine and chassis together last night ready for painting More pics later hopefully Ian
-
So my second entry for the GB and I'm finally building something other than an aircraft this year! Hopefully suitably big and British - 7 litre, V12, 720HP monster, 4.8 metres long and loud as hell. I prefer the look of the open rear wheel Le-Mans version but this is what I have in the stash and I'm going to build it OOB. I'll be adding the cancer stick logos for historical accuracy (I think they come supplied in the kit) - hopefully I'm OK posting those logos/pics on BM? Build to start / sprue shots / etc. once I get the two tiny MiGs off the workbench!
-
I bought this for a fiver from someone who'd done most of the build. Without knowing their vision, I merely finished it off. One of the few Airfix 1/24 kits I'd not built before, it was a challenge that should stand me in good stead when I build another. Without any further ado... XV788 Flying Officer Paul Meade No.1453 Flight, Port Stanley, Royal Air Force, Falkland Islands, 1984.
- 13 replies
-
- 32
-
-
I am on a bit of a 1/24 trip at the moment, but this one is out of my comfort zone because it's made of plastic! So I'm prepared for things being a bit clunky and soft, but I have MANY resin delights in the stash, so we'll see how long it takes before I'm missing the smell of polyester. Anyway I had wanted to do an R10 for a while, and though Le Mans Miniatures does a really beauty in resin, it doesn't have an engine and I kind of wanted to have that option. The Revell kit hasn't been out that long, and in fact is due a reissue sometime, but for now these kits are going for daft money. Luckily enough, I followed a few on TheBay and spotted one in France which looked like it had been started and maybe missing a few bits. So it cost £20-ish but seems to be complete and with only the parts cut off the sprues and nothing glued or painted. Result. Here is the box and the bits: So it's more 'Tamiya' than 'MFH', but I think it will build OK. The decals look like Cartograf and include some nice CFRP elements too. The car is a 2006 Le Mans car, which is a fairly plain scheme (all photos mine unless stated): The 2007/2008 scheme is better - this is the Le Mans winner: The plan is to do an ALMS car however, and thankfully the Studio 27 decal sheet is still available: But the Studio 27 sheet gives you the impression that you just add decals to the Revell Le Mans car to make an ALMS version. Sadly it's not so. The ALMS cars featured dive planes and prominent wheel arch louvres (photo below via Audi Sport), so they will need to be included in the build. There is a resin conversion set out there, but it's long OOP and one store in Singapore still shows it in stock despite them confirming they have none! Anyway, those bits will need to be made (circled below) More in a bit. I think I'll be doing Tom Kristensen's 2007 Sebring car, because it's TK's car after all!
-
This is the MFH 1/24 Ferrari 488 GTE of Clearwater Racing, Le Mans 2017. I saw this car at the 2017 Silverstone WEC round and loved the colour scheme. Though I am also a fan of the Risi and JMW schemes, when MFH released this version, it was a done deal. It's a resin body/white metal details curbside kit but still has a LOT of detail, right down to individual PE panel fasteners and bonnet latches. Paint is Zero Paints' Clearwater Racing set. And the sun came out!
- 12 replies
-
- 26
-


.thumb.jpg.cfc129272ffec824439b15e6013d5952.jpg)
