Search the Community
Showing results for tags '1/24'.
-
Looking at some of these with tens of builds, I feel as though my pace needs to pick up a bit. Generally I aim to build the same number as I add to the stash in each year. In 2023 I added three kits to the stash.... and have completed a grand total of two models this year. There is one which is borderline as to whether it will complete by the end of the year so not too much of a disaster yet. Incidentally, because I finished so few, I'm using the full four pics for each. So starting the year, I was halfway through Tamiya's excellent 1/24 Mercedes 300SL and managed to get it completed in March. This is bordering on being the best kit I've tackled yet (very close between this and Aoshima's Lamborghini Countach) so it deserved some effort to do it justice. Hopefully you'll feel it was worthwhile. Most of the rest of the next six months were taken up with another Tamiya kit, this time their Monte Carl Rally Alpine which, although decent, does show a few signs of its age and despite being a simpler kit took a bit more work to get a half-decent result. But by September it was complete and ready for its RFI. Much harder to see the interior on this one, so I'll use a WIP pic : As I mentioned, it remains to be seen whether I get the third model completed before the year is out, or whether it will be in 2024's set. I I do get it done, I'll add it here. But, despite not having a lot to show, thanks for looking at the little I did produce.
-
Now I know we've got another one of these started here recently, and that is the first one I've seen built, but in the spirit of public transport where nothing arrives for ages and then two come at once it's time to make a start on my Nissan March (or Micra as we call it in the UK). The recent warm weekend has told me that I need to have something else to paint as there's only one more set of spraying to do on the Alpine, so better start prepping the next one. But first, why a Micra. Well, my first car was a K10 Micra, in fact I think it was probably in the first shipload judging by the way it was badged as a Datsun rather than a Nissan. He she is, freshly washed in all her glory: Now ideally I would have been building one of these, but I couldn't see any evidence of a kit for one. So that left me with a choice of two from Fujimi, a K11 which (to my eyes at least) looks a bit out of proportion from the box art, or this K12 which will be the second of my 'models which share a name and not much else with cars I've owned' series. It's my first Fujimi kit and quite a simple kit so once I get started it should only be a matter of 3 or so months I predict. It's that getting to the start of assembly which will take the time... Looking at the kit, the body shape appears to me to be pretty good. Instead, what really narks me is the massive seam line which runs across the front of the bonnet just above the badge to make sanding it just that little but more tricky. Not to mention that there appears to be some roughness to the plastic around the badge too On a more positive note though , I've looked over the body and as far as I can tell there are very few sink marks, just a small depression next to the seam line on each of the rear corners, and more annoyingly one right around the badge on the bonnet. I've stuck some masking tape over the badge and added some filler to either side of the badge, but I will not get rid of the depression completely. At that point I left the filler to harden properly. And about 10 seconds later I realised I haven't rinsed the parts yet to remove any release agent. Ah well, something to remember after I've sanded the seam lines and filler. And that's my start on this. Thanks for looking.
-
I am by no means a good modeller of figures , but now and then I like to try to paint a figure. Here's my latest atempt: Feline Female ( Catwoman) I was inspired by The Golden Age Catwoman of the 40'es. The figure is a slight conversion of the Masterbox 1/24 Francoise figure. I made the 'mask' of Greenstuff and painted it with acrylics. Cheers Hans J
-
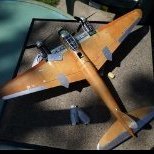
Hi all! For this build I'm going large with Trumpeters 1/24 Fw 190D-9. I'd been umm-ing and ahh-ing about getting this kit then I saw one on display at the model show last weekend and it looked fantastic fully built and like I said in my K-4 post I'm very much into my late-war german aircraft at the minute. Upon opening the box I immediately realised I'm going to struggle to find somewhere to display this when I'm done, its some size- though it doesn't look any more complicated than my 32nd scale kits which is nice. I have the Red Fox Studio instrumental panels on the way and some Montex paint masks as I don't want to risk decals silvering on something this size, the scheme is 'Brown 10' of 7./JG26 flown by Waldemar Radener- I was able to find some useful drawings by Arkadiusz Wróbel. And some artwork I found on twitter posted by The Aviation Art of this Dora. Excited to start- thanks for looking in!
- 50 replies
-
- 12
-

-
I probably won't get into this fully until next year as I think I'll struggle to get it fully painted before winter hits. But hopefully I can make some good progress with the paint so I'll be about ready to build when the time comes rather than having to wait until I can spray the paint on. This one is Tamiya's Monte Carlo Alpine A110 kits which seems to get released in small numbers every few years. It's one of those kits which on first glance doesn't appear to have much to it, but looking at the instructions (and some other builds on here) I'm pretty certain it will be quite a detailed car once done. I've not decided whether to do the #22 or #28 car yet, still got a bit of time to decide on that. But to start with, here's the contents: As I said, it doesn't look much with just the two sprues, plus clear, chrome and bodyshell. But in true Tamiya style those sprues have made good use of the real estate available with quite a few parts on them. First job has been to get primer on the wheels and bumpers as they will be sprayed silver - if I go with the Silver Leaf that has quite a long curing time so I want that to have as much time as possible before the weather turns. No photo as it's only the pieces in primer. I've also removed the rear grilles from the chrome sprue. The instructions would have you paint the body colour in the grooves between the chrome grille bars (yeah, right!, like that's going to happen with a rattle can) so I've stripped the chrome. These will be painted body colour then when the time comes I plan to go over the grille bars with BMF - I'm hoping this will be much the easier method. And then it was onto the body, Last weekend I gave it a quick blow over with primer just so that any mould lines would show up better. There are faint lines which run along the top of the front and rear wings, then as is typical much stronger lines in the hard to reach places such as at the back of the windows and around the front of the body which were a particular pain to sand without losing any detail. This is the end result after sanding the lines back: Today it got put into primer. No mould lines reappearing apart from a very faint bit which should be behind the bumper, and no new lines appeared either so at this stage I'm quite happy with how it turned out. That's it for now, I'd love to make some more progress but next weekend I'm likely to be focussing more on the 300SL I think as that one NEEDS to be painted before winter. Thanks for looking.
- 158 replies
-
- 16
-
-
Should finish my current GB in the next couple of days, so I've made my choice to join in with this GB and thought I'd add my placemarker. Tamiya Subaru Impreza from the 2005 Monte Carlo rally. I've built other Tamiya Imprezas and hoping that this version will go together just as easily. Will be oob as I've not got much time left.
-
Evening folks, With the summer holidays here, there's been some welcome additional modelling time and this was finished off over the weekend. I was given this by my dad who had in turn been given it by an old family friend - I think it is an original issue, and if not it's a very early issue of this classic kit from Airfix: I just wanted to build this more or less as it comes and enjoy it. However, I couldn't let the gaping hollow wheel bays pass so made some simple mods by adding plastic card sidewalls and some Evergreen stiffeners to at least make them sort of passable: Other than that, I used some Eduard belts for the pilot's seat, Barracuda wheels as the kit's had dried out and cracked when I tried to apply them to the hubs, and some aftermarket decals from Techmod to represent Von Werra's machine who crash-landed not far from me in Marden, Kent - and became 'the one that got away'. Although old and basic by modern standards, this kit is a joy and went together pretty well. Surface detail is sublime and the super-detailer could really have a field day if they were so inclined. I really enjoyed it as nostalgic build from days gone by and that's what it's all about! Evolution: here is the 109E alongside the G-model: like the Spitfire the basic airframe had huge potential to evolve and did so as the war progressed: Paints were all Xtracolor enamels with some weathering using Mig-Ammo pastels. A really enjoyable build - don't overlook these oldies as they scrub up really well! All the best, Tom
- 39 replies
-
- 84
-
-

-
This one is a bit of a mixed bag, there are some parts of it I'm really pleased with how they came out and some parts I'm quite disappointed by. Probably most disappointing is that I had quite a few issues building the suspension up and as a result there is a very slight tripod to it, although it does appear to be settling a bit so I'm crossing my fingers in about a year it will be firmly on all fours. I also made a bit of a mess of the interior, particularly putting in the door cards, but am most pleased with managing to get magnets fitted to the engine cover so it doesn't fall off, and indeed fits straight into place if you get it somewhere near. Anyway, if anyone wants to see the build thread it's here. And if you want to see too many photos, they're here. Hope you still like them when you've waded through them all. One thing to note, when I was brushing off the dust I knocked off one of the metal transfer Alpine wing badges, which seem to be notorious on this kit for their complete lack of stickiness. By some miracle i found it clinging to my glove at the end of the build so it's not UV resined in place. Anyway, on with the photos and I'll start with a close-up of the engine. That great big glob of clear resin which catches the light is actually invisible (or near as) in real life and I hadn't even noticed it until I blew the photo up on screen . Next to the engine bay was another bit I was pleased with how it went - the grille bars. This is all moulded as one piece, but stripping the kit chrome, spraying it body colour then foiling the high points seems to have worked quite well. I've already mentioned the interior, but one reason I think I might get away with the mistakes I made is that it's only the back which is easily visible through that large rear window. Of course, that does make photographing the interior quite tricky, and these are the best photos I could manage. Back to the whole thing, and time for the usual 360degree trip around the car. I also tried to get it taken in natural daylight, unfortunately the sun was too high in the sky to fall into the conservatory when I was taking this so it's much softer light than I was aiming for. And finally, the bit where you'll have to forgive me indulging myself with a few angled shots for artiness's sake. And this one is to my eyes the best shot of the lot which makes it even more annoying that it's of the worse side of the model/ Hope you all like it and didn't get too bored of the photos. Overall I'd say this is a good kit despite being over 25 years old, but you need to have your wits about you as there are some ambiguous parts to the instructions. Unfortunately I didn't always have my wits about me, hence some of the lower quality parts to this build. There's also a curious lack of stickiness to the metal transfers which others have mentioned before, but the decals are top notch. If you want to build an Alpine, I would steer you towards this kit. Thanks for looking.
- 23 replies
-
- 28
-
-
I have finally time come back to bench. Now I have little bit more time for my hobby. Lancia S4 is soon in RFI section, so I can start new project. Short history Alpine was manufacturing this car between 1963-1977 and variety of engines was used. Tamiya kit contains decals for Monte Carlo rally -71 car, but I think I will make my build for another race. There are already fine examples in this forum builds from this race. I am still looking options, first I was thinking option for Corsica, but -71 event was cancelled and if I am correct next event car had wider body. So I am still thinking options. Car was raced in Tour de France also. And here is link to one option for my build: 1969 Tour de France car And in 1968 A110 was raced in Le Mans. Maybe I choose between these options. So below are mandatory pictures from parts. I would say this is typical Tamiya. Engine looks good and with small detailing it's possible make fine model. Only thing I can complain is these chrome parts. I think I just remove chrome and get those painted. Good think is that wheels don't have chrome.
-
The Revell etype is now finished. I made a small WIP thread with some WIP photos also if anyone is interested. Painted in Ammo Mig polished metal and clear coated with Mr. Super Clear. Interior painted in Mr Hobby Russett. Silver/red in my opinion is a colour scheme that always comes out well. It’s a new tooled kit so everything fitted well for the most part. Plenty of details out of the box for the engine bay and a lot of decals to dress it all up. Recommend this kit for anyone else wanting to build a 60’s classic.
-
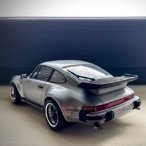
My just completed car kit, a diversion from the usual aircraft with the challenge of a gloss finish. No clear coat, just polishing. Quite nice details and definitely recommend it. Only the side windows cut out as a deviation from the instructions. My knowledge of Porsches and the 911 was pretty much zero before this build.
-
Built the Kinetic 1/24 P-47D finally, back in 2021. Thought at the time, I'd also add a bit of Mastebox 1/24 'Pin-Up' Theme to go with it. Not sure my Pin-Up girl is quite 'Pin-Up' though? My First attempt on Female figure painting and it's not as easy i'd thought it might be. Not sure her lipstick is too convincing. P-47D needed a lot of mods to get the Main Gear alignment to be correct. Kinetic Model if built OOB would have massive toe-in which looks very wrong. I did use aftermarket resin tires and metal barrels for the 8 x .50 MGs
-
This is actually the first 38(t) I’ve built a 1/24 Scratchbuilt Hetzer. I’ll be reusing the masters I made for the running gear on this build to make a 1/24 38(t) I’m also going to build either or both a Grille and a Marder. Now to go figure the best way to cast 24 sets of road wheels …
- 10 replies
-
- 7
-
-
- 1/24
- Scratchbuilt
- (and 1 more)
-
Hello all, I've not produced anything in this part of the forum before so feel a bit like a trespasser. As a first step in fulfilling a long-standing desire to produce my own version of a Gemini space capsule, I'm posting this placeholder to ensure that this is the next subject I do after my current Wasp build over in the aircraft section. That way there's no backing out.... 😁 The spacecraft in question will be the Gemini X mission flown by John Young & Michael Collins, July 18-21, 1966. As well as photography, the build will be based upon use of the following research materials: Carrying the Fire: Michael Collins, W.H.Allen 1970 Forever Young: A Life of Adventure in Air and Space: John Young & James Hansen, Univ. Press of Florida 2012 Gemini X Mission Report NASA 1966 Gemini X Notebook: Michael Collins 1966 Gemini Familiarization Manual Vols. 1-3 SEDR 300 NASA 1965 Transcript, Gemini X Voice Communications (Air-to-Ground, Ground-to-Air and On-Board) NASA 1966 Gemini X Mission Highlights NASA 1966 Project Gemini: Technology & Operations NASA SP-4002 1969 Gemini X Technical Debriefing Vols. 1-2 NASA 1966 On the Shoulders of Titans NASA SP-4002 1969 NASA SP-4203 1977 Gemini Operations Handbook: Spacecraft 10 Vols. 1-3 SEDR 300 NASA 1966 Gemini Technical Memorandum NASA 1966 Gemini X Final Flight Plan NASA 1966 Summary of Gemini Extravehicular Actvity NASA 1966 Interim Report, Manned Spaceflight Experiments, Gemini X NASA 1967 Of particular value in this reasearch and from which many of the above are drawn has been The Michael Collins Papers collection held at Virginia Tech. Michael Collins Papers, Ms1989-029, Special Collections, Virginia Polytechnic Institute and State University, Blacksburg, Va. More in due course.... Tony
- 3 replies
-
- 10
-
-
- gemini space capsule
- 3D printed
- (and 1 more)
-
Just finished this one eventually after having it half built on the shelf for months concentrating on the other WW2 diorama, Very happy with the end result though Fujimi garage accessories, and Aoshima 1/24 scale MGB
-
I have earlier posted about my VW Beetle build in the Diorama section, but as suggested by another member I'll show it here as well. Or rather, I'll post one teaser picture here and then a link to the original diorama thread. Please click the link below to watch more pictures in the diorama thread.
-
Hi I don't normally do build diaries but I just wanted to see what you guys think. Here is just a little insight into a WIP I'm looking at doing soon, I’ve wanted to build the Defender from the tv series Death in Paradise for some time so I brought the Revell Land Rover to look at doing after my next project. But last week our JRT passed away very suddenly, so I needed something to destroy and something to keep my mind from wondering, so I dug this out and a 1/24 metal version I had (hence the destruction). So heres some photo of what I’ve done over the weekend to try and convert a Land Rover into a Defender, please leave feedback good or bad was to what you think. Kit I'm going to use The donner kit that I took apart.
-
[First of all I'm afraid this one is a little picture heavy - 23 pics - so if you have a slow internet or don't like lots of photos of averagely built models you may want to skip this one! But I did enjoy a bit of a photoshoot with it last night, even if it did take the best part of two hours to get done.] It's taken a while to get here, nearly 6 months, but I've finally got this one finished. I've yet to see a badly built version of Tamiya's 300SL, and having built this I can see why - it's a very detailed kit with few flaws, even though some of the tolerances are a bit tight. But there's nothing in there that's wrong, so very little I can blame Tamiya for the issues as opposed to myself. If you're in the market for a 1/24 Gullwing you can't go far wrong with this one. Unlike some of the superbly built versions I've seen on here mine is very close to being as you get it from the box, the only additions being embossing powder to represent the carpet and Bare Metal Foil where there wasn't kit chrome (e.g. window surrounds, door handles etc.). The only bit about the kit which was annoying were the bumpers which had a prominent mould line at the ends, especially annoying for a chome part so I ended up sanding that down then covering the bumpers in Bare Metal Foil. Anyway, enough about the build, if you want to see the whole thing it's here: So onto the photos. First of all, a snap of what you're missing when the model is complete - Tamiya have you build the entire spaceframe chassis which looks complicated but actually assembles very nicely. It's all hidden though unless you leave the undertray clear (I didn't) so let's move onto a trip around the car: And back to the beginning with a more stylistic shot Of course, the most striking feature of the real car is the Gullwing doors, and the kit accommodates this by allowing you to pose them in the open of closed positions. You've seen them closed, now for the open pose: Unfortunately, in the latter parts of assembly some of the embossing powder came lose and static clung to the rear window. It's barely noticeable until the camera decides to cruelly highlight it Of course, one of the benefits of having opening gullwing doors (and bonnet) is that you can get a half-decent shot of the interior. Can't get any closer - the camera was tucked under the doors for these shots. There's also quite a nice engine under the bonnet. This is what you end up with out of the box, other people have made a more complete job by adding additional wiring etc, but that's just not for me. And finally, onto the arty shots. First of all I decided to try my hand at a 'real-world' style shot. I wasn't going to bother putting this one up as I think it's fair to say I need to work on getting the backgrounds right, not to mention it was late and I didn't check that the camera had focussed on the front of the car rather than the windscreen so it's actually a bit of a rubbish shot. But we all have to start somewhere and hopefully it gives the idea of what I was aiming for. (in fact, the more I look at this, the worse it becomes So onto some better shots. First up the 'angles' And to round things off the 'reflections' I think this one is my favourite. Thanks to everyone who has waded through all of these, and apologies to all who lost the will to live, but I did enjoy both building and photographing this one so I hope and least some of you enjoy the pics too. And especial thanks to all who liked, commented and encouraged through the build.
-
So I'll be joining the GB with this oldie from Tamiya... Unfortunately I paid slightly more than the original purchase price from Beatties on a popular online auction site (that's inflation for you). I've no idea when this particular plastic was minted but given Beatties shut up shop in 2001 I think, so I guess before then. The moulds go back to 1979 but this is the more 'recent' 1980 version (motorised). I won't be including the motor, batteries or wheel guide as I have no intention of trashing my paintwork against the nearest skirting board! The decals seem to have had a hard time of it, though I've got a replacement set, but I'm not sure it includes all of them, or parts need painting with it? In terms of plastic, there's nothing that looks too taxing (other than the paint work}... Hopefully it'll build up well, it's an interesting looking Le Mans car!
-
It does feel as though we've had a load of very nicely built and modified Mercedes 300SLs on here, especially from Crazy Crank. So time for me to redress the balance with a not-so-well built and barely modified version of Tamiya's kit. First impressions of the kit are that there is a lot in here compared to your standard 1/24 car. I've not done a sprue shot before, but here's what you get: Nice to see plenty of bracing for the body, but it did mean quite a bit of cutting and filing to get all of it off. Once that's all cut off the bodyshell doesn't feel anything like as stiff as it did so definitely a good move on Tamiya's part putting that in. I gave it a guide coat a few weeks ago just to show the mould lines (there is a prominent one on the top of each wing running front to back plus some smaller, but more annoying ones, front and rear. It looks as though I've got them all sanded off now, so it sits here awaiting the start of the proper painting process. The bonnet has also had a start made to it. First job is to remove the ejector marks on the underside. There's quite a few, including some in the middle part. For these, I chose to sand them out rather than fill them as I've heard that clearance under the bonnet is minimal at best, so I figured it was worth grabbing myself a little bit more space, even if it is just a fraction of a millimetre. I've also sanded the inside of the bonnet bulges as far as I dare for the same reason, and I'm going to give the underside of the bonnet minimal coats - it doesn't matter if this part of the car looks very slightly different to the rest. And the other bit which I've started painting is the interior tub. Lots of masking here, some such as for the interior you can see, and some such as inside the wheel arches is less visible. Again, quite a lot of ejector pin marks and these were also sanded flat. Unfortunately, because this part is moulded in the silvery plastic, the ejector pin mark stays visible long after it's sanded flat, so you just have to hope you have them when primer is applied. And in case anyone is wondering, the barbecue skewer is just there to hold it up for painting. So that's a start. The hope is that I can get this painted well before winter as I'd like to get another bodyshell done too before the weather turns. Thanks for looking.
- 125 replies
-
- 16
-
-
Does anybody know of a good 1/24 scale Lancaster Mk III kit for a reasonable price?
-
The backstory .. 21+ years ago, I acquired the Airfix 1/24th Hurricane Mk 1, which I began with so much enthusiasm and grand plans. So much for that, and due to various reasons, it was put in the loft, where it laid quietly waiting for the build that never came until late 2021 when I decided to pick up the modelling tools again. I wasn't sure if the kit had survived a house move 10 years ago, but it had. I wasn't sure how well it would go together, but the trials and tribulations can be found in the work in progress Here I've now decided that I'm calling this finished, but before the pictures .... There are some areas that I'm not entirely happy with, such as the tailplanes due to the fit and my rusty skills The decals are the originals that came with the kit and there is some silvering on the fuselage ones, despite using decal softener and fixer The tail fin red/white/blue are painted on rather than use the decal Weathering is a mix of oils and pastels and I wanted to attempt to give it a look to represent constant sorties and the toll it would take on the airframe So onto the main event ...... Thank you for taking the time to look and your comments/feedback are welcomed. Keith 😁
- 14 replies
-
- 35
-
-
-
As usual, I just cannot stay focus on one build and have to start another. Working on the SeaKing in the GB now and decided to start this year’s 2nd build, a 1/24 Nissan March. It’s not going to be any March but one that will resemble my wife’s previous car. This is going to be a big project for my skill level to build this March. Looks like I need to learn to draw the rims for 3D printing and possibly draw the front grill and body kit. Well, I shall start the build as I go along….. Change to this…
-
Just finished this monster. Lots of fun with files, wire cutters, knives, and even a metal saw. Really impressed with this kit. Thanks for looking!
-
 So my second GB entry will be this mini-beast... 3.0 litre, V6, mid-mounted with 4WD in a Metro shell, group B rally madness at it's finest. The kit itself looks pretty comprehensive which is a good thing if you like 6R4s as unlike Spitfires there's no exactly much in the way of choices out there (maybe a resin kit or two). The instructions are in a nice glossy booklet with colour in parts. Decals seem good - I've got some aftermarket window masks from Hiroboy (plus their Zero-paint set, I hope it's a good match the white seems somewhat yellowed but that maybe just the thinners). All the sprues are individually wrapped. There's a small PE fret, some rubber parts, seat belt material, chrome parts and a metallic MG decal/sticker. It comes with two sets of wheels (I guess the second set are for the RAC decal version). The parts just keep coming... Finally the tiny body shell (Plymouth GTX for comparison), which is individually wrapped and packed in a small box to help protect it... Now I somehow have to fit all those parts into it!
- 24 replies
-
- 15
-


(250x229).thumb.jpg.48a57772b41ed148fdc8d15e3c202763.jpg)