Search the Community
Showing results for tags '1/24'.
-
 So my second GB entry will be this mini-beast... 3.0 litre, V6, mid-mounted with 4WD in a Metro shell, group B rally madness at it's finest. The kit itself looks pretty comprehensive which is a good thing if you like 6R4s as unlike Spitfires there's no exactly much in the way of choices out there (maybe a resin kit or two). The instructions are in a nice glossy booklet with colour in parts. Decals seem good - I've got some aftermarket window masks from Hiroboy (plus their Zero-paint set, I hope it's a good match the white seems somewhat yellowed but that maybe just the thinners). All the sprues are individually wrapped. There's a small PE fret, some rubber parts, seat belt material, chrome parts and a metallic MG decal/sticker. It comes with two sets of wheels (I guess the second set are for the RAC decal version). The parts just keep coming... Finally the tiny body shell (Plymouth GTX for comparison), which is individually wrapped and packed in a small box to help protect it... Now I somehow have to fit all those parts into it!
- 24 replies
-
- 15
-

-
So here is one of my entries for the GB: I do like an oddity and an ugly duckling so I think this fits the bill, also I'm a bit of a Roland fanboy so it's cool to see some of their advertising back when they weren't the global company they are today. So the Dome Zero was a Japanese attempt at a super car, in true 1970s wedge styling. The 'RL' stands for 'Racing Le Mans' for this racing version. Unfortunately they didn't fare too well, with both getting the approvals for the road version into production or the Le Mans racing versions, This kit is a model of the 1979 entry, with decals for no. 6 and no. 7 cars, Neither had a great run and both failed to finish the race (no. 6 one running out of fuel at lap 40 and no. 7 with engine issues at lap 25) - but god loves a tryer as they say, and so do I. Finding reference material is a little on the hard side, but the company is still in existence working in racing, I'm not sure if the 1979 cars still exist, they were possibly recycled for the future Le Mans attempts with the wedge shaped Zero reappearing in 1980 and 81. I did find a few YouTube videos: https://youtu.be/VryFfXFG15Q https://youtu.be/Vo9w7Ci8vxA https://youtu.be/ZRaKzEqu3QI In terms of design it has an open cockpit at the front to aid driver visibility but testing showed large amounts of wind buffeting in the cockpit, so the roof was modified leaving a large gap to the back for ventilation. The main image shows the roof in the 'open' configuration (no it's not a growth out of the guy bending over) which I guess is how the driver would need to clamber in and out. Anyhow onto the kit... It's not an overly complex affair, Scalemates shows it dates back as far as the actual car to 1979, though it appears to have had a few tweaks along the way, being originally motorised, then a static model and at some point having some extra engine detail added (maybe then). This particular kit is from the latest reprint (2002). The instructions are a fairly typical old style folded paper sheet in black and white. The parts aren't too numerous given the age of the kit, nicely with most individually bagged... The chromed parts actually look quite nice too. There is quite a detailed engine (Cosworth DFV) though I think most of it won't be visible when finished, although it looks like the rear section will be hinged. The decals - I had worried they had yellowed with age but it seems it was just the greaseproof sheet that yellowed. There seems to be a bit of a crease in one corner and some scratches on the big spoiler decal but hopefully they are useable. I noticed there is some gunk in the shell (dried mould release?)... guess I should give it a wash before painting. The white plastic parts have yellowed slightly with age too. I decided to make a start, the chassis still bears the marks of being 'electrified' with a battery compartment and what appears to be some kind of slide switch for locking the front wheels (parts in top right of bellow image)? Annoyingly they left the battery cover which doesn't sit flush so I'll attempt to build something from plasticard to fill the two holes in the chassis more flushly. I glued the front suspension arms piece in place - hopefully I can gently bend them enough to fit the wheel hubs in later without snapping them. For the body I glued in rear spoiler as it might need a little filling before paint (actually from one of those video clips it shows that the spoiler isn't attached to the extended rear sides in real life). I also fitted in the small parts behind the light fittings and two side intake ducts - these will need a bit of filler towards the front edges. I've also 'protected' the rather fragile pointy bits towards the ends of the front body shell part from me damaging them with some bits of lolly stick and masking tape. The main part of the engine block I've built up too prior to paint (see above) and done some dry fitting. It seems that the whole rear wheels / section is attached to the front via 3 mounting points on the engine block so maybe a bit fragile (the rear shell has a hinge though attaching it to the front). I think I'll attach the inner tub to the chassis before painting (I generally like gluing stuff together before paint), though it seems I might need to add some additional sides to stop the inside of the side vents, etc. being visible from outside. It's hard to know what would be visible without any reference photos - I imagine it would be pretty bare bones for weight saving but feel they would have had some kind of sides to seal the cabin? The instructions aren't overly clear on colours - e.g. the interior of the shell isn't mentioned and the instructions seem to call out that the interior should be white and silver. Given the age of the car, clues in the paint guide and general modelling appearance I'd guess the construction would be an aluminium monocoque tub with space frame front/rear and sheet aluminium panels for the chassis/underside with a fibre-glass / GRP body. I'm not sure I agree on the instructions calling out white on interior (think this maybe more to reduce the amount of painting needed) I feel if the aluminium panels were painted they would be black to reduce any possible glare/distraction for the driver, also in one of the videos linked above it briefly shows it as black with some unpainted aluminium parts (though that is the later car).
-
I know quite a few of you have seen the build, but before I start here it is in all its 'glory'. As with all my RFI threads, all comments and constructive criticism are welcome. After all, I've spent almost 6 months looking at this in close-up so I'm fully aware it's not perfect! This is the first car I've built which didn't come with a complete body; with this one you have to assemble the panels to get the boxy VW van shape. This one, like the majority of my builds, is done straight out of the box so is naturally simpler than some of the masterpieces others put on this site. Before I started I wasn't confident that I would get a good result from it, particularly since it has opening doors all round. Fortunately Revell have done a good job of both the design and production of this and it went together pretty well. The main issues encountered were with the rear access door which was a little warped and needed micro-magnets to hold it in place... and then I went and snapped it anyway so had to do a repair. That repair wasn't as successful as the front bumper repair, but fortunately still isn't too noticeable. As for the kit itself, if you're into VW vans (I'm not, but still a nice looking model) then this one is well worth building, just probably not if it's your first car model. This one was the Jaegermeister livery as detailed in the box, but there are also instructions for a plain version too. Paints are Halfords primers, then Tamiya British Green and Orange topped off with Humbrol Clear. I was quite scathing about the Humbrol Clear in the thread, but to be fair it isn't a bad clear provided you take into account its limitations - namely it does not like humidity so you really want to be clear-coating in summer on a dry day otherwise it clouds up. Fortunately you can get rid of the clouding by giving it another coat of clear on a dryer day. The big plus of the Humbrol Clear is that it is very gentle on decals, certainly much better than Tamiya or Mr. Hobby. The interior is clear-coated Halfords Grey primer. Onto the build, and once again I've probably got a few too many pics here. But at least it should give a pretty good indication of what it looks like now its finished. As you can see from some of the photos, my new photography toy is a sheet of dusty black perspex... I'll start off with a walk around the van. The driver's door does try to close in too far but can be positioned with care. But here's the doors-closed look: Front left 3/4 view Driver's Side Rear left 3/4 view Rear View Rear right 3/4 view Passenger Side Front right 3/4 view Front view As I mentioned earlier, the doors also open, although it is being displayed all shut up. But here's some pics with the doors open anyway: Side views first: And then from the back And finally a couple of 3/4 views from the loading doors side I'll finish off with some close-ups of the insides, those bits you never really notice. First of all the engine bay, not a patch on those which have been detailed up but it's a dark hole on this colour van anyway so not particularly visible. The load bay is quite simple to do, but seems to have more character to it in the photos than you see in the real life model. The second photo, taken through the side doors, also feels large to my eyes. And onto the last compartment, the cabin. At least with the opening doors you do get a chance for a slightly better view in here, but still not the easiest place to get a good shot of. And that's it. Thanks to everyone who followed and I hope you like it.
- 26 replies
-
- 37
-
-
 Looking at my Ferrari F60 F1 build for this GB I have realised that there is going to be a lot of time waiting for paint and decals to dry, so I thought I'd add another build in to keep me occupied. I've chosen an iconic rally car as I don't think even I can get parts mixed up between these 2, but let's see as they're both red 🤣 Had the kit for a while now off @Anteater and I'm finally going to get round to making a start So this is my place marker for the 1967 Monte Carlo winning Mini Cooper S 😀 Busy weekend ahead playing trains at the GCR, but hope to make a start on both builds Monday
- 49 replies
-
- 11
-
-
 Committing to this Fujimi kit, which I commented in the chat thread. My third favourite racing car. Long time resident of my stash, I hadn't appreciated the history of that race. . . . . . until I watched this DVD, and read the book. Knowing the true story of the finish of the 1966 Le Mans race, rendered ending of the the film a huge Hollywood anti-climax for me. Showing the politics of Ford at the time, it acknowledging the massive efforts of driver Ken Miles, and raises Carroll Shelby to legendary status. With hindsight, I'd prefer to build Miles' car, but this is the kit I've got. Please, no suggestions for after market decals - I'll build the kit as it is.
- 47 replies
-
- 11
-
-
I probably won't get into this fully until next year as I think I'll struggle to get it fully painted before winter hits. But hopefully I can make some good progress with the paint so I'll be about ready to build when the time comes rather than having to wait until I can spray the paint on. This one is Tamiya's Monte Carlo Alpine A110 kits which seems to get released in small numbers every few years. It's one of those kits which on first glance doesn't appear to have much to it, but looking at the instructions (and some other builds on here) I'm pretty certain it will be quite a detailed car once done. I've not decided whether to do the #22 or #28 car yet, still got a bit of time to decide on that. But to start with, here's the contents: As I said, it doesn't look much with just the two sprues, plus clear, chrome and bodyshell. But in true Tamiya style those sprues have made good use of the real estate available with quite a few parts on them. First job has been to get primer on the wheels and bumpers as they will be sprayed silver - if I go with the Silver Leaf that has quite a long curing time so I want that to have as much time as possible before the weather turns. No photo as it's only the pieces in primer. I've also removed the rear grilles from the chrome sprue. The instructions would have you paint the body colour in the grooves between the chrome grille bars (yeah, right!, like that's going to happen with a rattle can) so I've stripped the chrome. These will be painted body colour then when the time comes I plan to go over the grille bars with BMF - I'm hoping this will be much the easier method. And then it was onto the body, Last weekend I gave it a quick blow over with primer just so that any mould lines would show up better. There are faint lines which run along the top of the front and rear wings, then as is typical much stronger lines in the hard to reach places such as at the back of the windows and around the front of the body which were a particular pain to sand without losing any detail. This is the end result after sanding the lines back: Today it got put into primer. No mould lines reappearing apart from a very faint bit which should be behind the bumper, and no new lines appeared either so at this stage I'm quite happy with how it turned out. That's it for now, I'd love to make some more progress but next weekend I'm likely to be focussing more on the 300SL I think as that one NEEDS to be painted before winter. Thanks for looking.
- 158 replies
-
- 16
-
-
After enjoying building the 1/24 Spitfire Vb recently I decided to extend the masochism by tackling the Hurricane. This one went together ok generally, although the cowlings weren't a good enough fit to be removable. The redundant Spit Mk1 propeller and spinner were used instead of the Hurri's oversized bulbous one, which I never liked. The glaring errors were all my own; once I'd decided to replace the spinner I searched on line for more suitable markings, and I came across the Science Museum's L1592. Unfortunately I'd stencilled these on before I realised the original is a rag wing, so 0pts for research. My other error was to place the fuselage roundels too far to the rear, meaning there wasn't enough space on the starboard side to fit the KW-Z squadron code. The only solution was to apply it in Z-KW format, but as few others are going to see it other than me and the BM bretheren it's a compromise I can live with, it was never going to be an IPMS Nationals contender anyway: And to finish with, some shots with its 1/24 cousins: Thanks for looking J.A.
- 11 replies
-
- 37
-
-
Whilst going around in circles debating what to do with the engine in the '29 RPU, I gave in to temptation and started this. First issued in 1966 as the 'Little Deuce', a companion to the 1/8 scale 'Big Deuce': https://public.fotki.com/drasticplasticsmcc/mkiba-build-under-c/monogram-instructions/show-rods/monogram-little-deu/ Like the RPU, it suffered a Tom Daniel redesign in 1970, as 'Son of Ford'. The Pontiac engine lost its six carb setup, replaced with fuel injection and, for some reason they referred to it as a Boss 302 in the instructions 🤨: https://public.fotki.com/drasticplasticsmcc/mkiba-build-under-c/monogram-instructions/show-rods/monogram-son-of-for/ This Early Iron reissue came out in 1973, with most of the TD silliness removed. It still has the fuel injected Pontiac, but I have a resin repop of the Little Deuce engine from Drag City castings, so I'll either use the intake from that, or scratch one like it. The kit has been out a couple of times since; in the '80s a small block Chevy replaced the Pontiac and it was last reissued in 2011. What's in the box... blurb on the instructions: Fenders and chassis are moulded as one piece, but it has a nice dropped axle, split wishbones and '39-48 Ford hydraulic brakes. Not shown, the same horrible Good Year Rally tyres as in the other Early Iron kits.
-
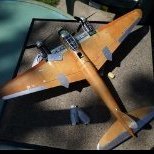
I tend to lurk on the site, and in that time, I've built a few things here and there but never shared them, which I realised it quite selfish, and doesn't really contribute, so I am biting the bullet and showing off a couple of buiIds. So here goes! I finished this kit about 7 months ago, but actually started it back in 2017. Yep, I'm a slooooow builder... I picked this up at Antics in Plymouth for the princely sum of £49.99, which was frankly a bargain. Whilst building it up I realised that I was going to need a bigger workbench: this girl is a bigg'un! I added some Airscale placards, Eduard Brassin cannon (Which don't fit properly) and some PE to the cockpit that you frankly can't see. After breaking the lower undercarriage, (don't ask!) surgery was needed to repair it, so some SAC metal landing gear was grafted on so the plane could sit on its' tyres again. The kit was painted in a combination of Xtracrylix for the camo, Tamiya for the metal bits and engine, and Mr Hobby for the white bits. I also decided to go with a very worn example. I know that this aircraft was one of the tidier examples, but I wanted the lok of an aircraft that has been very busy recently! typhoon_3_4 by DaTinz, on Flickr typhoon_side by DaTinz, on Flickr typhoon_engine_close by DaTinz, on Flickr typhoon_top by DaTinz, on Flickr typhoon_underside by DaTinz, on Flickr undercarriage_detail by DaTinz, on Flickr gun_port by DaTinz, on Flickr cockpit_detail by DaTinz, on Flickr
- 19 replies
-
- 62
-
-

-
I started this kit some years ago but home and work life have kept me too busy to do much. I'm not a particularly skilled either so when I have had time at the bench progress has been very slow. Inspired by the excellent work showcased here by others, I figured it was time to reveal my efforts and hopefully pick up a tip or two along the way. I'm very much a large scale fan (all of the kits in my stash being 1/24 scale), and I want it to represent an aircraft of the fifth staffel of Jagdgeschwader 26... more about this later. Obviously, this is the kit I'm using: Sadly I didn't get pictures of the early work... but here is my start on the cockpit: I recognise that something will have to be done about the wheel wells... but I have cut out the flaps so that I can set them in a part down position. Being somewhat enthusiastic to test out my new razor saw, I realised that I hadn't quite thought through exactly how I was going to deal with these once I'd cut them off! It is a bigger gap than I'd imagined it would be 🤨. And as for these awful exhausts... they definitely have to go.
-
It does feel as though we've had a load of very nicely built and modified Mercedes 300SLs on here, especially from Crazy Crank. So time for me to redress the balance with a not-so-well built and barely modified version of Tamiya's kit. First impressions of the kit are that there is a lot in here compared to your standard 1/24 car. I've not done a sprue shot before, but here's what you get: Nice to see plenty of bracing for the body, but it did mean quite a bit of cutting and filing to get all of it off. Once that's all cut off the bodyshell doesn't feel anything like as stiff as it did so definitely a good move on Tamiya's part putting that in. I gave it a guide coat a few weeks ago just to show the mould lines (there is a prominent one on the top of each wing running front to back plus some smaller, but more annoying ones, front and rear. It looks as though I've got them all sanded off now, so it sits here awaiting the start of the proper painting process. The bonnet has also had a start made to it. First job is to remove the ejector marks on the underside. There's quite a few, including some in the middle part. For these, I chose to sand them out rather than fill them as I've heard that clearance under the bonnet is minimal at best, so I figured it was worth grabbing myself a little bit more space, even if it is just a fraction of a millimetre. I've also sanded the inside of the bonnet bulges as far as I dare for the same reason, and I'm going to give the underside of the bonnet minimal coats - it doesn't matter if this part of the car looks very slightly different to the rest. And the other bit which I've started painting is the interior tub. Lots of masking here, some such as for the interior you can see, and some such as inside the wheel arches is less visible. Again, quite a lot of ejector pin marks and these were also sanded flat. Unfortunately, because this part is moulded in the silvery plastic, the ejector pin mark stays visible long after it's sanded flat, so you just have to hope you have them when primer is applied. And in case anyone is wondering, the barbecue skewer is just there to hold it up for painting. So that's a start. The hope is that I can get this painted well before winter as I'd like to get another bodyshell done too before the weather turns. Thanks for looking.
- 125 replies
-
- 16
-
-
I had it in mind to build one of these Early Iron kits for this GB. I've settled on the '30 Ford Touring, because I remember my dad building it in the '70s. Mine is the 1994 reissue, but the box art and contents are the same as the '70s one. In the interest of getting a GB subject finished, I'm doing this one OOB as a late '60s/early '70s street rod, so no cans of worms will be opened, no mods or re-engineering to sap my enthusiasm. That said, I really hate these wheels and tyres, so I'll be leaving those loose until something better turns up. Unstarted, patrs still bagged.
-
 Research AP-101C-0601-3A Wasp HAS 1 Illustrated parts manual T. L. Ciastula: The Development of the P.531, The Aeronautical Journal / Volume 68 / Issue 642 / June 1964 D. B. Bathurst: Maritime VSTOL — The Development of Small Ship Helicopter Operations in the Royal Navy, SAE Transactions Vol. 83, Section 3: 740525–740863 (1974) L. B. Bryson, F. E. Heenan, C. A. Johnson: Helicopters in the Royal Navy, The Aeronautical Journal / Volume 76 / Issue 740 / August 1972 J. H. Stevens: Scout and Wasp - Westland's All-British Helicopters, Flight International June 1964 Adrian Balch: Westland Scout & Wasp, Warpaint Series No.110, Guideline Publications. 2017 Larry Jeram-Croft, Terry Martin: The Royal Navy Wasp: An Operational & Retirement History, Pen & Sword Aviation 2018 A placeholder so I can't bottle out of doing this at such a large and (to me) unfamiliar scale once the Sea Vixen builds are completed.... 😁
 -
 Having been talking around this one for a while now, I’ve sort of talked myself into this one. So I’ve decided to go ahead and build a large scale Hetzer now instead of waiting for the GB, if it does happen. Of course in the process of building the Hetzer I’ll have to mold it fabricate quite a few sub components that will be of use for any 38(t) chassis so I’ll just build a Marder or a 38(t) for the GB when (if?) it happens
- 35 replies
-
- 2
-
-
- 1/24
- scratch build
- (and 1 more)
-
Finally finished! I started this a good while ago, took a break and then had to find all the bits (in four separate boxes!) to finish it. The kit is Revell's 1/24 Audi R10, which comes with decals for Le Mans cars. However I wanted to do an American Le Mans Series (ALMS) entrant, so it needed new decals (Studio 27) and a few mods, mainly to replace the flush front wings with the heavily-louvred items seen on the ALMS cars. Then the engine and bay were detailed, as was the cockpit, plus double dive planes on the nose, scratch-built headlights and wheels from Le Mans Miniatures. I think that's about it. RFI (ish) is here: https://www.britmodeller.com/forums/index.php?/topic/235093097-revell-audi-r10-alms-2007/ This is the engine as built from the kit - it's OK as a starting point, but missing some key components. Also the gearbox is a bit notional:
- 17 replies
-
- 26
-
-
I bought this for a fiver from someone who'd done most of the build. Without knowing their vision, I merely finished it off. One of the few Airfix 1/24 kits I'd not built before, it was a challenge that should stand me in good stead when I build another. Without any further ado... XV788 Flying Officer Paul Meade No.1453 Flight, Port Stanley, Royal Air Force, Falkland Islands, 1984.
- 13 replies
-
- 32
-
-
I'm joining in with this one if you'll have me It should be a fairly easy build and hopefully I can get it done by the deadline I'll probably go with the all over BRS red scheme as I have the paint for it, but not the blood and custard for the BR one as on the box It was new and unstarted and I've just glued the engine and chassis together last night ready for painting More pics later hopefully Ian
-
This is the MFH 1/24 Ferrari 488 GTE of Clearwater Racing, Le Mans 2017. I saw this car at the 2017 Silverstone WEC round and loved the colour scheme. Though I am also a fan of the Risi and JMW schemes, when MFH released this version, it was a done deal. It's a resin body/white metal details curbside kit but still has a LOT of detail, right down to individual PE panel fasteners and bonnet latches. Paint is Zero Paints' Clearwater Racing set. And the sun came out!
- 12 replies
-
- 26
-
-
So my second entry for the GB and I'm finally building something other than an aircraft this year! Hopefully suitably big and British - 7 litre, V12, 720HP monster, 4.8 metres long and loud as hell. I prefer the look of the open rear wheel Le-Mans version but this is what I have in the stash and I'm going to build it OOB. I'll be adding the cancer stick logos for historical accuracy (I think they come supplied in the kit) - hopefully I'm OK posting those logos/pics on BM? Build to start / sprue shots / etc. once I get the two tiny MiGs off the workbench!
-
I'm really not sure what made me buy this one to be honest. I'm not a huge VW van fan so I can only presume that I had an idea it would be fun to take onh the challenge of a multi-part body. Then I got it, saw that it's going to be a bear to spray and had second thoughts. But, all challenges must be faced and it's time to face this one. First thing to note is that I am just following the box art van, so it is being done in the Jagermeister green and orange colour scheme. The alternative plain blue scheme would be much easier to paint, but this kit comes with a lot of nice looking decals and it would be a shame to waste them. I got a bit of a start during autumn last year with some Halfords satin black on the underbody, then it was a case of masking off to get the engine bay done in the same Tamiya British Green as the body. Aftr that I gave the dark green a clear coat with Humbrol Gloss Clear Varnish... which went well - I hadn't appreciated quite how sensitive this stuff is to temperature and especially humidity so suffered an attack of blooming on the wheel arches in particular: Fortunately another coat on a better day significantly reduced the bloom and it should be acceptable now, especially as it will be hidden in the engine bay. The other bit of work I tried at the end of last year was filling in the VW badge recess on the front. For that I used the Vallejo white filler which seems to suffer from severe shrinkage, even worse if you try and wet sand it. This was after the second fill, a third fill still didn't sort things out as it continued to shrink back over winter. Following Jeroen's advice I got some Humbrol grey filler which appears to have worked much better, it hasn't had any primer on it yet so that will be the acid test I guess. Fast forwarding to this year and I finally got the main body parts off the sprue so thought I'd have a rough build to see how it looks. I will definitely need to drill out the holes in the roof and/or scrape paint of the pegs, but overall impressions are that this may well go together better than initially feared. This is far and away the worst angle (which could be improved very easily with some masking tape holding things together better) so I'm cautiously optimistic. So that's the introduction. I have a feeling this one is going to be a bit of a long haul, but the good weather at the weekend meant I got some important early bits primed so it felt like a bit of momentum was coming back into this, although obviously I will have a certain brown sports car to finish first
-
Hi all, I’ve had another silly idea pop into my head! How can I get a Seafire III from Airfix’s 1/24 Spitfire IX? I’ve made my best guess at everything I’d need · Mk V nose/cowl · Modified cannon panels (including removal of the 50cal stub) · Scribed wing fold lines · Removal of the second underwing radiator, to be replaced with an oil cooler · Fuselage strengthening plates and lifting points · A-Frame arrestor hook Aside from that, I believe everything else is in the kit to make a Seafire III, specifically the 4 blade prop, 6 stub exhaust, later elevators and later armoured windscreen. I’m sure I must be missing something – it would also be nice if there was a conversion for the nose at least! Cheers Ben
-
I did some scratch building on this all over as it was a very basic kit.
- 16 replies
-
- 70
-
-
-
 Well model builders, giving a go at converting an Italeri BJ44 to an FJ45 Land Cruiser: The FJ 45, on the left seems to be ubiquitous around the world, but less commonly seen in the US - they are considered something of a treasured find if you come across one of them. Italeri makes a 1/24 kit of the BJ 44, which is also commonly seen, but also, less so in the US. I like pickups, so am going to convert the BJ to an FJ. This will also include a complete rebuild of suspension, axles, engine swap and so on. First steps, comparing the two in a diagram: You can see the most obvious difference being one has a covered area in the back and the other (what I am building) is a pickup. An important feature of both tho, is the rear, wrap around corner windows - thereby eliminating the idea of "just" cutting off the unnecessary roof behind the cab, and instead, cutting off the roof over the cab, and cutting and reusing the rear portion of the roof and back doors: I've got to say, I use Tamyia tape for so many things in addition to masking - among them, setting guidelines for cutting! Embarrassed to say, keeping these cuts on the straight and narrow - more of a task than a guy expected - they're mostly straight lines along flat surfaces - maybe too much coffee that day! When all was said, puttied, sanded, and so on, the cab turned out fine - barely discernable splice! The Italeri kit doesn't have too many parts - at all. The floor pan, truck bed, bottom of the engine, and chassis are all molded in one piece - not what I'm looking for. Rather than fret, a quick trip to the junkbox, and a replacement frame was found. Feeling full of confidence, I cut apart the cab floor, filled some gaps, added the rear facing corner edges (cut from the rear of the kit provided part), added a firewall, and thought we're good to go! As part of my ongoing effort to create my own heavy duty Dana 60 axles, back to the junk box I went - finding idlers from a Bradley and various bits to make up the diff cap, and pinion, then evergreen and alu tube inserts. Had a nearly built engine on hand, which is fine - as the hood won't be openable, but you will be able to see the side of the block and headers between the chassis and fenders, so I need something, and a small block Chevy is a fairly common conversion - funny bit of info, the small block Chevy is lighter than the Toyota I6 - how about that? The Toyota engine BTW is a great runner - I just like adding the V8 😀 Then began trying to get the body to sit correctly on my donor chassis. Problem number one is that the area of the chassis beneath the cab isn't flat - and the base of the cab is - easy enough to fix, but would require some thought - then, I noticed - the FJ and BJ trucks share a similar body mound, below the center of the grill - note the pic in the upper right with the red circle - and that brutal gap.....🤨 How would that get resolved??? Well - a different donor chassis was selected, and a piece of the Italeri part was cut up and modified: As you can see in the left, this was not a pretty job. The Italeri kit part (uni chassis/floor pan) was pretty chunky and not at all realistic. I cut everything in front of the floor pan off, and happily, kept the remnant part handy. I cut the cast in-place, bottom of a motor, out and separated what looks like a chassis from the "flat" front part. Then went about splicing the cut up Italeri part to the other chassis. I didn't take pics of all of this - the process included adding several segments of thick fill material to make what looked like a really big, blocky chassis. Once the glue was set up, went back and cut off all the blocky parts and began filing, shaping, and sanding until it looked something more like a credible chassis. Unhappily, the Italeri kit - does not include a transfer case! 🤨 annoying - instead, the kit would have you insert the drive shafts into opposing ends of a skid plate. The kit isn't bad at all, but the level of detail/parts count, might suggest it's aimed at newer model builders, which is great - wish I'd have found this years ago! But now, well, I want to build in more detail. So, I'm going to make up a NP 208 or 205 transfer case facsimile to suit my project, will add a doubler, and attach it all to the transmission. I will eventually make a skid plate below the transfer case, but mine will be made from thick styrene rod to represent steel tubing, not adapting the kit part. The next tasks will include narrowing the rear part of the chassis, and making the front axle. From there will being locating and marking the axle centerlines relative to the chassis and fender openings. This will ride on front and rear four link suspension so we have a long way to go. Thanks for having a look, and on we go - Cheers Nick
 -
It's 10 months since I started this so quite a long winded build. But to start the new year I managed to finish this one. If you want to see the build thread it's the link below. All comments and constructive criticism are welcomed, I'm still on the learning path in many respects so always good to be aware of other ways I can improve. This is the first Hasegawa kit I've built, and the design of it is impressive with lots of detail and everything fitting together well apart from one piece which got bent between the factory and me. If you like the Jag XJS then I would definitely recommend this one. The only issues I had with it were to do with the age of the kit which let to quite a few mould lines and flash on some of the sprues, in particular the chrome sprue which was a tad annoying. And the body in particular has more than its fair share of sink marks, almost certainly down to it having been used for the racing version too with patches in the boot and windscreen scuttle being especially prominent. The only other minor quibble was the attachment for the steering arm to the suspension was a bit loose and kept jumping off, but a small piece of cotton acting as a retainer sorted that out. My build is in no way perfect (particularly at the back), but I hope you'll agree that it's one of my better efforts. Maybe next time I'll have learned a few extra bits and get one step closer to perfection, but overall I'm pleased with how this one turned out. It's only the second car I've used Bare Metal Foil on and there's quite a bit so it certainly gave me practice. For the colours, I followed the instructions for that lovely Jaguary creamy interior, but totally ignored the red or grey options in the instructions instead using Tamiya Deep Metallic Blue. Have to say that I really like this colour and there is another car in the stash which I've earmarked for the colour too. But I'm sure you didn't open this thread for a wall of text, so onto the photos. Maybe too many photos, but the XJ-S is a surprisingly photogenic car Starting with a fairly bland shot, the top down one. If nothing else, it shows how those bumpers which look so massive in the build look much more in proportion when it's built. After that, time for the obligatory tour around the car: Next up, a few detail shots. First of all the wheels, these were a lot more work than they look so I'm putting a pic in just for that. Also, the angle and colour combine to scream Jaguar (at least to me). Next up the engine. The whole kit has been built straight out of the box (what you see here is what Hasegawa gives you) so it probably doesn't give the full viper's nest look of the real thing as I didn't fancy wiring it up. And if you can see through all the dust which magically appeared, this was the best shot I got of the interior. If you're desperate to see the interior of a model of an XJ-S I do have better pics in the WIP thread! Another plus of this colour is that it does look stunning when the sun hits it. This pic doesn't do that justice but I hope it gives an idea of what I mean. After all that, I decided to have a play around with the camera for a few more 'artistic' shots. For the past few RFI threads I've tried angling the camera and this one is no exception. And finally I decided to see what would happen if I went mad on the shutter time and (deliberately) severely overexposed it. The result is one of my favourite shots of the lot. If you're made it this far, thanks for looking. And thanks also to everyone who liked and commented in the build thread - always encouraging.
- 18 replies
-
- 33
-
-
-
I really liked building the 1/32 Fokker Dr.1 Triplane, so why not give the 1/24 a go? So far I really like the kit. Excellent fit, good engineering and good mouldings. No flash, no sink marks. Here are some pictures for you. First, this is how I paint leather. Primed with a light tan base, then a dark oil colour applied with a sponge. The stark contrast will be toned down with the subsequent layer of, in this case, quite heavily thinned uniform brown. The final result. I wanted it to be pretty pristine and not worn. For a worn look you go easier on the last coat of paint. Here's the cockpit, as you can see. I read that the seat belts are very fiddly, and they are, but not that taxing. The glue on the back is a bit annoying, as it sticks to the tweezers more than it sticks to the places it should stick to. But the result is very convincing, me thinks. This is quite a fast build, so I got around to the engine as well. I like the colour of copper, and saw a picture on the internet where some parts (I have no idea whatsoever what they are called) were made of copper, so that's what I opted for. Here are some of the separate parts, with a light weathering with fresh motor oil. The wires to the spark plugs are made of copper wire. And put together, front ... ... and back. Just a little putty needed on the dorsal side of the fuselage. And as a preparation for the rigging I had to make some turnbuckles. I was sure I had some in my stash, but obviously not. I think these turned (pun not intended) out well. That's copper wire and heat stretched plastic tubes. You can do it with stretched Q tips, but the environmental friendly ones are now made of paper (and that's a good thing!). Here they are assembled on the tail fin and the struts. I also try a new way of doing the rigging. It's always very fiddly to attach the rigging when everything is in place, and I've never quite come to terms with EZ Line. If you make a mistake they are very unforgiving. When in contact with CA glue they often curl, and it's hard to get a good stretch. And when the glue doesn't set properly ... you have to start over. So for this project I use fishing line painted black with a permanent marker. This is the upper wing before painting. The line will probably get stuck in the paint, but I'll get to that hurdle soon enough. Hopefully I'll be able to do some serious airbrushing in the next couple of days. Stay healthy! Get the vaccine if you haven't already, so you can keep on modelling. /Torbjörn


.thumb.jpg.cfc129272ffec824439b15e6013d5952.jpg)