Search the Community
Showing results for tags '1/16'.
-
Another really nice Gecko kit. This one is fun. Time to start weathering this big ol' sucker-it's way too clean.
-
Hi folks…! I’ve been distracting myself with a series of kits – interwar stuff, 1/72, and even an hairyplane so it’s now high time for another armour scratchbuild. I’ve decided on something a bit different (although it’s still covered in rivets) and have plumped for a WW2 tankette. I saw Bovington's one recently and was charmed by it. The wealth of funky paint schemes is also a great incentive. It’s tiny, so I’ve made my mind up to jump to 1/16 scale for a fresh set of challenges. Unusually for my projects, there’s quite a lot of reference stuff online, including plenty of drawings, so I loaded one into CAD and modelled up the main panels. I then flattened these into 2D and added some details, ready for printing out and cutting the parts from 0.75mm plastic card. Despite working in CAD for over thirty years, I continue to resist the lure of 3D printing, so it’ll be a build of plastic card and nail caviar as usual. That said, I’ve no real idea how to tackle the tracks as yet – maybe I might dip my toe in the printing world after all…. I’d also like to do a figure for this but I’m not sure that an internet search for “1/16 Italian tankette driver” will pull up many results, so he might end up being another scratchbuilt element of the project. Wish me luck!
-

1/16 scratchbuild figures - WW2 Italian tankers
Model Mate posted a topic in Figure Work In Progress
Hello everyone, and Merry Christmas! I’m only an occasional visitor here, from the mud ‘n rivets section and there’s been some truly inspirational work going on here recently – nice! I finished my latest vehicle scratchbuild a little while ago – a 1/16 Italian tankette… I’d planned from the outset to team this up with some figures, and due to the lack of 1/16 Italian tankette crew figures out there on the market, plus the fact I really want to scratchbuild the lot, I’m planning to sculpt a couple of chaps to keep their little tank company. The basic armatures are done, using “milli-green” (milliput + greenstuff 50/50 mix) on copper wire. I’m cheating a bit with heads, hands and feet. For my last sculpt (a pair of WW1 troops) I sculpted their faces, but I’ve a feeling that Shrek and his brother might undermine the realism next to the tankette for this one, so I got some nice 1/16 resin heads and hands. The boots were copied from a pair of Tamiya Germans, which I bought to practice paint as well as pinch body parts. So before I get stuck into the Fimo, I decided to do a bit of paint practice using these two. I’m happy that I can convey a reasonable sense of reality on vehicles using various, long-honed techniques – washes, dry-brushing, paint chipping, pastel mud and so on, but figures require a whole different set of skills that I simply don’t possess, or at least I’m not very good at. Figures always let the side down a bit for me, and that has to change. I painted the more aggressive of the pugilists with a variety of Vallejo model colour and model air paints, but as usual, he ended up looking a bit “plastic” (ironically?). The face isn’t too bad I guess, and it is a very old, basic kit, but despite a wet palette and some retarder, I really struggle with blending colours and this is most obvious on faces. After a bit of reading on Planet figure, I decided to give oils a crack. I use a black, brown and pale yellow oils a lot when weathering vehicles and I really like the way they handle; long drying time and almost infinitely thinnable. The debit card took a hammering, and I got this lot from Windsor and Newton. I’ve got a load of cheap oils, including a few from the Winton range, but I’ve found that there is a significant difference between these and the “artist” range, which explains the massive cost difference I guess. I also got some fine detail Liquin – a medium that reduces drying time, whilst also improving blending capabilities and translucency. I probably didn’t need all of these new colours; once on the palette (jam jar lid) and mixed, I reckon I probably only needed half of them – oh well; my plan is to take away all the excuses and see if I can improve my results. I’ve also got a small set of DaVinci brushes (very nice) to further this aim. The first thing to try was a subtle touch of oil washes on the first chap to see if this added a bit of depth and improved the acrylic face, and I think it helped a little. I also beefed up the clothing shadows and highlights using burnt umber and naples yellow respectively, and these have really helped to de-plastify him overall. And so onto man two. I prepared his face by undercoating him with Vallejo flesh, painting his eyes using the same acrylics, and adding basic shadow and highlights, again using acrylics. And finally, the oils. Blending is a joy – I can keep fiddling with it for ages. He’s got more than a touch of the “Christopher Lees” about him – a bit pale and cadaverous (and his duelling scar is a bit rakish), but he’s wearing winter garb, so I reckon a Mediterranean tan would be out of place anyway. There’s a far-away look in his eyes that I quite like. Next to fella one, I think he’s a big improvement, and although there’s a bit more practice needed, I’m really happy with the progress.- 17 replies
-
- 12
-

-
- Scratchbuild
- 1/16
- (and 1 more)
-
Hey fellow Tiger Junkies, I just got the new Andy’s Hobby Headquarters 1/16 Tiger 1. It’s a massive kit of course and planning to do it right OTB. I must admit, I’m a Tiger junkie. I’ve build at least 25 various versions of the tank or more over the past many years. I couldn’t help but snatch this one up as soon as Andy released it. Having watched Andy for maybe 5-6 years on YouTube, I have always respected his progression as a business owner. He’s not a breakthrough modeler, BUT he’s great to watch, he does good reviews and he bloody loves modeling. Anyway, it’s really a Takom product that he helped in development and marketing using his channel. Nice plastic. Little flash. Crisp lines. Having built several takom kits over the years I knew it would be a tidy kit. Which it is. Overall well detailed and reasonably good directions. This is not my first go round with 1/16 scale or with a large tiger. If you’ve never built 1:16 you don’t know what you’re missing. Here’s a quick comparison of size. In 2 days and about 12 hrs of work I finished the lower hull, road wheels and tracks. Yah, like all tigers it was a bitch to get just this section done. It’s like being on a manufacturing line at Ford. But now that this repetitive work is done, the fun can begin. Overall the build so far had been relatively easy. The wheels are not glued in place so painting should be easier. But I will not go full crazy detail with every wheel. Life is too short. I’ll black coat most and then color with my chosen base. I have not chosen which version I want to build yet, but leaning towards.....yah, I’ll let you know. Short update. Sorry for the lack of good photos. Had to make dinner. I’ll have more soon.
- 20 replies
-
- 10
-
-
Plans are to do a bust representing a soldier of the unit named in the thread title. Ljubljana is the capital of Slovenia but during WWI the lands fell under the Austro-Hungarian Empire. Brief history based mainly on a Slovene pdf article https://www.planinskimuzej.si/wp-content/uploads/2017/02/Ob-stoletnici-vojaškega-gorništva.pdf The regiment was initially raised in 1901 as standard infantry but in 1911 became a mountain unit. The recruiting center was based in Laibech - German historical name for the Slovenian capital Ljubljana. Nationalities of the recruits was about 86 % Slovenes and 14 % Others. Until Italy declared war the unit operated on the Russian front but by the end of 1914 were down to barely 500 men. From the summer of 1915 to the end of the war the unit saw continuous action on the border of Italy. Also referred to as the Isonzo front it would consist of 12 major battles.
-
This kit was given to me as a birthday present by my girlfriend several years ago (she is a big fan of the GOT books & TV show). I typically build 1/35 amour though & have zero experience with painting figures, so it has been sitting at the back of the stash since. I'm in the mood for something quick & simple so I thought I'd finally give this kit a try & hopefully learn some new skills too. The kit is quite simple with just a single sprue & a base, I expect it will only take few a hours to build & then a few days to paint. So knowing me I should be finished some time next year... 😅
-
A bit of stamina required to finish this kit....five weeks into the build. Zimmerit was tricky with the supplied scrape style tool which I combined with vallejo putty. Lucky to purchase this kit off a fellow modeller for a very reasonable pirce....there are a lot of parts and box is like a mini suitcase. I absolutely love Trumpeter kits, a huge fan!
-
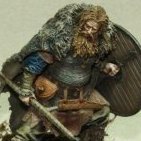
I have several F-104s in the stash and decals for a couple of Danish and Norwegian options, but I fancied something different. I'd seen this kit in my LMS and this seemed the perfect moment to indulge. He's a generic Viking from the 9th century, a time when they were just starting to make their prescence felt in what is now the UK mainland - although their history and impact on European geopolitics would last a lot longer, but that's a tale for another day. He comes in a box, which has a suitably active painting on it: He has parts, the black ones are for his base. Several others are optional. I may miss the arrows poking out of his shield and go with the bearded axe as his only weapon. The knife is a sign he is a free man and not a Thrall. He should also have an arm ring in there somewhere but it could reasonably be under his armoured t shirt. Instructions have a simple picture construction/painting guide on one side and a parts diagram and paint list on the other. Also included is a print of the box art wich is a nice touch. There are no decals, so painting the shield is left as an exercise for the builder. I have a few designs for inspiration, including my own two (the first I just liked the design, the second is my senior cat, Tolv) My cats will be following, they're Norwegians and love this kind of thing. That's Tolv from the shield at the top. Horologists will be happy about that, that's where Twelve should be I have several other GB builds on the go, but I'll try to fit this one in round them. Andy
- 38 replies
-
- 13
-
-
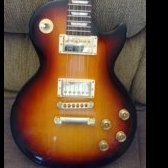
Hi folks My latest OOB build. Nice kit, plastic tracks work well. All the hatches can be posed open, but there's no point really unless you're an ace scratch builder as there's nothing inside. Finally, here's a few next to its big cousin for comparison purposes: Regards J.A.
-
After just completing two Tamiya motorbike kits, here is something completely different. I was lucky enough to have been given two old Bandai kits by a friend. They are both 1/16 scale, one is a Mercer Raceabout car and the other is this Traction Engine. There are excellent builds of both of these kits elsewhere on the forum which I encourage you to have a look at. After quite of bit of research on the internet, I have found that the Pendle Princess kit has been released by other companies apart from Bandai, but I think the original was by Bandai. To the best of my knowledge my kit is a Bandai version. Before I go any further I want to apologise to any Traction Engine enthusiasts for the naming mistakes that I know I will make. I know nothing about Traction Engines so if this is a “Showman’s Engine” rather than a Traction Engine, that is my ignorance. After the Tamiya kits where everything fits well and detailed down to very minute information, this kit could be a nightmare. I’ve spent some time inspecting everything and there is a lack of locating lugs/pins and a wealth of flash, ejector pin marks and general sink holes. Also the colour is going to be a problem, similar to many males, I am partially colour blind, and although I can see as many colours as a normal sighted person, they don’t always register correctly in my brain. So with little help in the instructions, lots of pictures on the internet (often conflicting with each other) and my colour blindness, it could all be very interesting. So, no build so far, but I have washed everything and ready to go!! How regular I get to this build is uncertain as I have resurrected a wooden, plank on frame ship (HMB Endeavour) that I commenced a while back. So I’ll be swapping between the two as I can get bits done. Just to start with, here are two pictures, one of the box lid and one of the instructions front sheet, which has a brief history. Any help, particularly with the correct colours, comments and general conversation, will be gratefully received. Wish me luck ....
-
Hi Folk's Figure's don't feature much for me but needing a quick build for our first Blitzbuild of the year I took a punt on one of Tamiya's kit's. It took around four hour's over the two twelve hour slot's allowed to complete and was great fun,thank's for looking in.
-
Built some time ago, this shows it pre-weathering (primarily achieved by driving around the garden). I've also added squadron markings since then. Several mods to the interior and electronics. External mods include the front equipment rack and opening drivers hatch (for the control switches) It's in the uniquely coloured NZ MERDC camo.
-
I've been working on this one for the last couple of months, but it's a loooong term build, so I've still got a long way to go with it! It's the 1/16 kit from Model Airways. Here's some of the progress I made so far Putting together the wing ribs (each one needs capping with strips of wood): These are then pinned into position: Leading edge and wing tips are added next: Then the trailing edge, and compression bars are added So far the only modification I made was to replace the compression bars with wooden parts (including brass mounting points for all the internal rigging), and reshape the wingtip to match the plans properly (shown below- you need to do this to avoid problems with joining it to the leading edge).
- 93 replies
-
- 2
-
-
- 1/16
- Sopwith Camel
- (and 1 more)
-
I have had this beast on my bench for months now and I have been taking pictures of the progression I have been making on it. The only problem is that I haven't uploaded them so I have over 100 pictures that need to be shared. I have been doing my best to make the tank as historically accurate as possible thanks to the book.
-
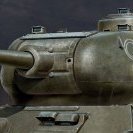
Something different I built this week. Needs some weathering, mostly dust. It's big, almost as big as that 1/16 King Tiger.
-
Hi everyone The first work in new year. ICM 1/16 SWAT Team Leader. The figure is executed for the customer. Cheers Martin
-
I have been working on the Trumpeter Tiger II for almost half a year now (yes I have pictures of the progress). But I've run into a problem with the Turret basket, on the real Tiger II there is the diamond plating at the bottom of the basket and in the kit the basket is bare. I also noticed that the diamond pattern around the turret basket is also incorrect and they are missing the diamond pattern for the drivers' feet. I am curious as to where one could acquire the correct diamond pattern and size. I have been looking around and couldn't find anything that is correct.
-
Up for RFI is a 1/16 scale plastic kit of Leonardo Da Vinci's submarine design based on sketches in his notebooks. Of note is it is unclear if this was used as there was mysterious sinking of Turk ships during a campaign involving Leonardo, wether it was his submarine or his diving suit that was used is not known from what i could find out on the web. Heres a link to the WIP thread The model is a snap fit kit but i did glue mine. Hand painted in Vallejo acrylics with a black wash to enhance the grain effect moulded ito the plastic made it a very enjoyable build. The dive planes had handles to angle them, rudder was steered by rope through a pivoting handle up front and propulsion was by moving pedals up and down with your feet, almost in a walking motion which raised and lowered a pair of flippers through a wooden gearbox at the rear. So heres some photos of the finished build; Bow Stern Rear gearbox, with flippers and pedals. Forward controls for dive planes and rudder, the pilot would lie prone on the chest pad. This kit is widely available sold by many manufacturers such as Italeri, Revell, Doyusha, Edu-toys and so on. This example was from i believe a polish source. All the best Chris
-
Hi guys, This is going to be the first in probably a very long set of updates over the next god knows how long. After getting back into the hobby as an adult last year I've finally got myself up to where I want to take on a big project, until now the most difficult model I've built was MENGs terminator, which was more work than difficult. I wanted a challange, something to sink my teeth into over a long time and boy did I get it. After looking around for an internal detail kit for a quite a while I finally settled on the 1/16th panzer 4. I went for the ausf f2 variant, personally I dont really like the way the sideskirts look, and based off how they attach thought it could have been a real pain to sort out any minor warping, plus the colour scheme of the f2 is naturally a desert yellow, which is probably my preferred pattern. The kit comes, in a flipping gigantic box; and, just to ram it home, there is absolutely no space spared inside there; I cant help but feel its slightly optimistic of trumpeter to include a catalog of kits in here, but i suppose the stash gods exist for a reason. The kit is absolutely beautiful, going over all the sprues I'm blown away at the detail they've fitted into every inch of this kit. From the (slightly daunting) amount of wonderfully molded ammo to the masses of PE; (this is less than half of it, those packets are double sided and theres more. In total the PE alone probably weighs about 500g). It really doesnt hit you just what you've gotten into until you actually look at it next to some other tanks; Both of those are 35th scale, although chosen to slightly mess with the perspective. Currently my livingroom is literally overflowing with sprues; This is about half the total sprues, most of the rest are still in the boxes you can see top right but whats not layed out is ammo, track parts and other similar pieces that I wont be needing right now. Thus far I've completed the engine; Although I'm not happy with the little vent things at the back, theres some putty work to be done on that joint (or maybe not, looking at where those pieces go they pretty much go flush against a wall so you'll never see them. I'll have to think about it), and started on the transmission; This is probably the first PE bent piece I've ever been happy with. There are 2 (actually 3) things worrying me so far about the kit. 1) The PE bending, its not something I'm particularly good with but since most of the PE parts here are substantially bigger and tougher than the stuff you get on 1/35 or 1/350 I think its a great learning opportunity, 2) Figuring out exactly what order to paint everything (more on this later), and 3) figuring out what to paint things. The instructions are a little unclear on colours on the engine for instance. It gives some colour callouts for some pieces, but not an overall colour and theres no colour guide for the internal pieces at the back of the (50 page) instruction booklet which is disappointing. I think that the base colour of the engine should be the red/brown iron oxide primer colour based off their instructions but that doesnt seem right to me. Weathering the internal parts is also going to be a challange, I want a used not destroyed look, but frankly I have no idea what techiques to be using on an engine, hairspray chipping doesnt seem particularly right, so maybe just painting it as a new engine and giving it a nice black oil wash+various engine stains, diesel stains sort of products would work. The paint is something to think about too, the instructions default to mr hobby, but I've never used their stuff and its a little difficult to get over here. I tend to use tamiya or vallejo paint, but given large parts of the inside are an off white colour and I've had big issues spraying both their whites I might look elsewhere. I think AK interactive have a set of german interior paints? Thats really stuffI'm open to suggestions on. So yea, this kit is going to take me months, but so far its been really nicely fitting, nicely made parts, the instructions are very clear, aside from paint callouts, Plan so far is to leave the top of the hull off. I'm thinking I might display it like andys hobby headquaters did his tiger. Put the upper frontal plate on, leave that huge piece of the upper hull in picture 4 off, then have the turret either in that part of the hull or off and next to it, thats something to decide a very, very long way down the line though. Thanks for the read, Mike
-
Trumpeter 1/16 Tiger II Here is my Trumpeter Tiger II finally completed after almost 3 1/2 years. This project was a huge challenge, with lots of firsts for me. The base kit was modified with lots of aftermarket and scratch built items to increase the detail / accuracy. I won't go into detail about the build as it can all be found HERE. Just want to say a quick thanks to all those that followed the build and all the encouragement to get this build finished 1 by Matt Tullier, on Flickr 2 by Matt Tullier, on Flickr 3 by Matt Tullier, on Flickr 5 by Matt Tullier, on Flickr 6 by Matt Tullier, on Flickr 9 by Matt Tullier, on Flickr 4 by Matt Tullier, on Flickr 8 by Matt Tullier, on Flickr 7 by Matt Tullier, on Flickr 10 by Matt Tullier, on Flickr 1 by Matt Tullier, on Flickr 2 by Matt Tullier, on Flickr 3 by Matt Tullier, on Flickr 4 by Matt Tullier, on Flickr 5 by Matt Tullier, on Flickr 6 by Matt Tullier, on Flickr 7 by Matt Tullier, on Flickr 10 by Matt Tullier, on Flickr 12 by Matt Tullier, on Flickr 13 by Matt Tullier, on Flickr 14 by Matt Tullier, on Flickr Cheers
-
Anyone seen any more previews of Trumpeter's 1/16 Jagdtiger? I think it's due out soon?
-
Finally some progress on the huge King Tiger! I started this almost a year ago! But found I was getting too short on time, with commission builds:-( I've restarted it now and i'm going to see though to completion ....somehow. This KT is going to be based on Abt 503 or possibly 101 from France 1944. This will have a Zimmerit finish. Some progress pics below: The hatch mechanisms, although quite a delicate fidel, work quite well when finished. The build quality and fit on this model are very good considering the size of the molds. The 88mm L71: Dry fit to turret base
-
This kit I bought to practice painting faces on several years ago and it sat in my cabinet, headless for about 2 years. I finally decided I should take a crack at finishing it off so here's the result. I'm happy I managed to line the eyes up and it looks ok from 3ft away. My first attempts at a face looked like Marge Simpson after Homer had done her make up with the make up shot gun (for women with only 4/5ths of a second to get ready). It was brush painted with Vallejo and the base is an old trophy with some dirt from the back yard and grass tufts from MiniNatur.
-
Trumpeter's upcoming 1/16 German Sd.Kfz.186 Jagdtiger, is now available to preorder!