Search the Community
Showing results for tags '1/144'.
-
Hi All, Edit: Having written all of this it seems like I've done a mini kit review as we go as such so feel free to read or just skip to the photos. I couldn't resist picking up a boxing of Karaya's (Hasegawa Re-Box) Embraer 170 when I saw that they were going to release it. As I'm sure you will all agree the cost of some 'rare' kits on Ebay is quite ludicrous these days (I genuinely saw the Hasegawa 1/48 Sea King HAR MK.3 fetch £250) back in November and more recently some British Sea King decals go for £56) and anytime I saw the E170 get listed it would likewise reach bidding prices I felt outweighed what you were getting for the kit. In any case, I picked up the kit from Hannant's for a fairly reasonable price of £28.99, this still seems a touch steep in price when you consider how much you get for you money (especially when comparing the prices of Revell's recently released A300 Beluga at £36 or their A330 which according to Hannants will be even cheaper than the A300 Beluga.) But I think it's really important to support the smaller companies like Karaya who I admittedly don't know much about but if they keep on producing and re-boxing kits that you might deem a bit more on the unusual side then I'm all for paying a bit extra. Karaya have so far released 4 boxings of the E170 with a variety of markings 1) LOT 2) US Airways and United Express 3) Alitalia and Finnair 4) Limited Edition LOT Special Livery. I wouldn't be surprised if they released more in future such as HOP, Jet Blue, American Eagle, Delta, etc as the appeal to the American market might be fairly large. Bra.Z Models also produce the alternate wingtips not provided in the kit and a resin fuselage to convert the kit to the E175 which I might consider at some point in the future. In any case onto the kit: The kit is rather small in both size and parts so good for someone after a relatively quick build and or limited by storage capacity (for me both kind of apply!). Nevertheless I'm afraid this won't be an in-and-out job as I'm renting a small place with no real space for an airbrush, and certainly whilst I am finishing my training I don't have much time for anything other than basic construction on models. Also if you're a fan of having a 1/144 cockpit and clear windshield this isn't the kit for you! The fuselage is your standard plastic halves without any cut-out or separate piece for glass. I'm sure there's an expert caster and 3D printer out there who could make me very happy and make a cockpit and glass hint hint.....! Construction is relatively simple as you would expect although there are a few minor areas to watch out for which I'll attempt to highlight along the way. As you can see below I love how Hasegawa designed the kit to include a clever nose weight system involving a bolt which you glue into the nose. For some reason, the nut and bolt didn't tighten up properly (nothing that a few drops of super glue didn't solve) but you might be able to consider it an advantage as I was able to get more weight further forward and over the nose to ensure the model won't be a tail sitter. As I'm writing this I've realised that I am posing the aircraft on the stand that comes in the kit or I'll make my own making the nose weight redundant but it's still nice to have it in just in case I ever need to display the aircraft on it's wheels. The details on the kit are, on the whole, good although perhaps a touch uneven and soft in some areas so these areas were deepened with a razor saw or scribing needle where needed. The plastic isn't nearly as soft as Zvezda's kits which I like and makes scribing easier. The fuselage however is a touch disappointing in my opinion, fine panel lines are limited to the area around the wing root, tail, nose, windscreen and doors. The Karaya painting instructions clearly indicate the locations of all the panel lines that should be there on the fuselage but referring back to the Hasegawa instructions they aren't there. I'm rather confused as to why Hasegawa decided to omit them from the moulding process as the wings and fuselage look very odd paired up together, the wings having such good fine detail and the fuselage being so bare and boring. I may end up attempting to scribe them in but I hate scribing and am a touch afraid of getting it all badly wrong and the kit looking horribly asymmetrical as a result. On the subject of the cockpit windscreen panel lines, try as I might they wouldn't line up. Either the top or bottom lines remain offset by a minute amount. As you can see in the photo the area ringed in red is nicely aligned whereas the lower region ringed in black is offset by a tiny amount (zoom in to see this properly as I admit the photo doesn't make it obvious). Also I had to be really careful when sanding the seam line ringed in green to avoid wrecking the raised surface detail which could be considered to be a touch overscaled for a 1/144 model, however I know I'm being super picky and I don't mind at all (just letting you rivet counters out there know for future reference!) The instructions tell you to assemble the wings first before attaching them, the system is, in some way, similar to the Zvezda method rather than the older Revell system of building both wings and then glueing them into slots in the fuselage. Here I opted to ignore the instructions and put in the underside of the fuselage/wing-root piece which assisted the fitting and sanding process. Any gaps were large enough to fill with sprue-goo (see yellow arrows in the photo) rather than needing any plasticard, I could have used epoxy putty which might have made the smoothing process easier but on previous builds epoxy-putty has messed up and rescribing so this kit is a but if an exploratory project for me because I don't claim to be a pro by any means. I forgot to take a photo of this part but I have outlined the shape of the part in red in the photo below. When it came to fitting the upper wings the dry fit revealed that there was a slight gap between the wing root and where it met the fuselage part. I opted to place small pieces of plasticard on the wing parts instead of epoxy putty or sprue-goo as I wasn't too sow how much surface detail I'd lose in the clean-up and sanding. In hindsight, I'm not too sure if it was the best option as when I sanded them down to fit the profile of the wing and slightly back to make sure they weren't too thick but it has created a slight problem of the wing profile not matching up to the wing root but this should (hopefully) be solved with some sprue-goo and intricate sanding. Many thanks for taking the time to have a look and please let me know if you'd rather just see the photos and have a bit less of the explanation. Only thought was as this is a kit some people might not have made and might consider making having some reference material might be an idea. Cheers, Mark
- 3 replies
-
- 9
-

-
- 1/144
- Embraer 170
- (and 1 more)
-
Hello all, I have just completed this kit. A very easy build with some minor fixes only. Movability isn't ideal due to the heavy armour, joints are solid without using PC parts. You can find the WIP here :
-
Over in the Not My Comfort Zone GB I just finished up a 1/144 Zvezda Hawker Hurricane, the first time I've built in 1/144. I've built lots of 1/72 Hawker Hurricanes (see: Hawker Hurricanes around the World), including the only RAAF Hawker Hurricane: For this GB, I am going to use the Sweet kit to build a "mini me" version of the above using Shelf Oddity decals. This is the kit: The sprues (there are two kits in each box): The kit's decals, which I shouldn't need to use: And the Shelf Oddity decals (the set on the right are the RAAF ones): It won't be a long weekend here in Canada, but I think this is a manageable blitz build. Looking forward to it!
-
 a Golden Oldie in the form of Airfix's 1/144 H.P Herecles a kit I can say I have not set eyes on for over forty years and I can bet I never finished it. I saw it on E-bay for a reasonable £12.89 stuck it on my watch list and just had a message from the seller offering it for £9.it's the Special addition from a good few years ago but bagged still and a good set of decals.
 -
My next build (which again was part of a French group build project) is the F-RSIN 1:144 SNCASE SE.2010 Armagnac in the colors of Transports Aeriens Intercontinentaux (TAI). “Le Giant Oublie” Please raise your hand if you have heard of this device before. No one....? Oh, well, that's not surprising, since there is a reason this aircraft is nicknamed "The Forgotten Giant" Despite the difficulties France found itself in during the German occupation during WWII, the design of civil and military aircraft continued fairly uninterrupted. Design work on the Armagnac did not begin in earnest until 1945, when Société Nationale de Constructions Aéronautiques de Sud-Est (SNCASE) was selected as the prime contractor for the SE.2000. It was intended that the aircraft would be suitable for North Atlantic flights with a cruising altitude of 4000m powered by four 2100-hp Gnome-Rhône 18R engines. However, it was soon realized that the wartime design was outdated, so the concept was scaled up to a pressurized cabin for 64 passengers for transatlantic flights and 107 for shorter routes. A bigger aircraft was clearly too much to ask for the Gnome-Rhône 18R engines, so the SE.2010 Armagnac would be powered by four 3500-hp Pratt & Whitney R-4360 Wasp Majors. In this form, the SE.2010 Armagnac first flew on 2 April 1949 and production of 15 definitive Armagnacs (eight for Air France) was started. Source: Wikimedia Commons However, by this time sleeper aircraft with bunk beds had begun to fall out of favour, and Air France felt that without this option the aircraft would become very large and canceled the order. Despite this, SNCASE decided to continue production and built nine aircraft, the first four for TAI. The Armagnac was taken into service on December 8, 1952, but it soon became clear that the aircraft was not very economical. The four aircraft were returned to SNCASE and stored in Toulouse. Nevertheless, the aircraft still got a chance when the outbreak of the Indo-China war created a need for more capacity for flights to France. Seven aircraft were therefore assigned to Société Auxiliaire de Gerence et de Transports Aériens (SAGETA) for flights between Toulouse and Saigon via Beirut, Karachi and Calcutta. Source: Wikimedia Commons A maximum of 160 passengers could be transported with a crew of five. In total, only nine were built and the aircraft served until 1959. The resin kit is from F-RSIN and is actually very nice. Decals are also from F-RSIN, but the cockpit and passenger windows are made by me. For the wire antennae I use AK rigging for the first time (instead of one of my girlfriend’s hair) and I have to say that it works great and I will use this for future projects as well. The display bases are also made by me. Anyway the pictures: All in all this was a great and accurate kit to build. Shame that Laurent from F-RSIN has decided to discontinued it. Thanks for reading and see you next time!
-
Never built a submarine before and only built a very small number of ships. Hoping to change that as have a few in the stash and have seen some great work here on BM. But as they say start small and simple. So here is the kit. A relatively recent boxing from ICM and a slightly larger scale than some I was looking at. I did check out the Eduard PE but it is almost twice the price of the kit and this is meant to me a soft landing into marine modelling. 😉 Here are the sprues: A relatively low parts count which is I understand normal for sub kits. Will be building OOB but may add some rigging etc. If I have time I may try a sea scape but that would really be out of my comfort zone. A bit of history thanks to Wikipedia (https://en.wikipedia.org/wiki/Type_II_submarine): The Type II U-boat was designed by Nazi Germany as a coastal U-boat, modeled after the CV-707 submarine, which was designed by the Dutch dummy company NV Ingenieurskantoor voor Scheepsbouw Den Haag (I.v.S) (set up by Germany after World War I in order to maintain and develop German submarine technology and to circumvent the limitations set by the Treaty of Versailles) and built in 1933 by the Finnish Crichton-Vulcan shipyard in Turku, Finland. It was too small to undertake sustained operations far away from the home support facilities. Its primary role was found to be in the training schools, preparing new German naval officers for command. It appeared in four sub-types. The defining characteristic of the Type II was the small size, its surfaced displacement being between half and one third that of the Type VII, and one third to one fourth of the Type IX's (depending on the variants used for comparison). Known as the Einbaum ("dugout canoe"), it had some advantages over larger boats, chiefly its ability to work in shallow water, dive quickly, and increased stealth due to the low conning tower. However, it had a shallower maximum depth, short range, cramped living conditions, and carried fewer torpedoes. The boat had a single hull, with no watertight compartments. There were three torpedo tubes, all forward, with space for two spare torpedoes inside the pressure hull. Although the boats technically had a deck gun, it was a 20mm weapon best used for defense against aircraft. Space inside was limited. The two spare torpedoes extended from just behind the torpedo tubes to just in front of the control room, and most of the 24-man crew lived in this forward area around the torpedoes, sharing 12 bunks. Four bunks were also provided aft of the engines for the engine room crew. Cooking and sanitary facilities were basic, and in this environment long patrols were very arduous. Most Type IIs only saw operational service during the early years of the war, thereafter remaining in training bases. Six were stripped down to their hulls, transported by river and truck to Linz (on the Danube), and reassembled for use in the Black Sea against the Soviet Union. In contrast to other German submarine types, few Type IIs were lost. This reflects their use as training boats, although accidents accounted for several vessels. These boats were a first step towards re-armament, intended to provide Germany with experience in submarine construction and operation and lay the foundation for larger boats to build upon. Only one of these submarines survive; the prototype CV-707, renamed Vesikko by the Finnish Navy which later bought it. As always all comments welcome. Dave
-
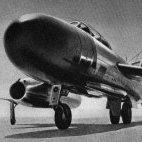
Evening all. Latest off the bench is another of Revell's 'brail scale' Lightnings. Once again built completely OOB with only the pitot tube added from brass rod plus decals from 144th.co.uk (highly recommended) I chose to model the dark sea grey low viz scheme, but for some variety went with the high demarcation line that appeared on some aircraft during the later days of service. Paints were Tamiya and Xtracrylix with my trusted W&N varnish to finish off I've also posted up some photos of its stablemate for comparison 😁 The Binbrook flightline is growing...... Comments much appreciated, thanks very much for looking IMG_20230414_203928 by Binbrook 87, on Flickr IMG_20230414_204139 by Binbrook 87, on Flickr IMG_20230414_204110 by Binbrook 87, on Flickr IMG_20230414_204208 by Binbrook 87, on Flickr IMG_20230414_204002 by Binbrook 87, on Flickr IMG_20230414_203637 by Binbrook 87, on Flickr IMG_20230414_203950 by Binbrook 87, on Flickr IMG_20230414_203916 by Binbrook 87, on Flickr IMG_20230414_203744 by Binbrook 87, on Flickr IMG_20230414_203840 by Binbrook 87, on Flickr IMG_20230414_203827 by Binbrook 87, on Flickr IMG_20230414_203723 by Binbrook 87, on Flickr
- 16 replies
-
- 40
-
-

-
Second finish for the year is another of Bandai's lovely Star Wars kits. Built OOB but I didn't use the kits panel decals so I could do a fair bit of chipping work. Painted with Tamiya acrylics and the exhaust stains done with MIG powders. A basic black oil was in the pipe work bays and around the edges but again not to heavy and stark. The detail in the gunners bays is completely lost one assembled but has been detailed anyway. I used the open canopy parts rather than the clear parts for the same reason. I have a base in progress but it wont be ready for this months model club tomorrow but will post when ready. As usual all comment welcome. The detailed gunners bays.
-
Started this little project Sept last year but then gave way for all other 1/48 and 1/72. Finally got everything else done and completed this 5th aircraft. Simple kit with very less parts, cockpit is simple and leave some room for modeller to improve, I did the basic addition and not in details. During the build I accidentally broke the plastic pitot hence changed to a metal one - BUT, I still managed to fell it down from my hand to the working table and blend it. WIP is here : Together with the F-22A Hope you like it, thanks for viewing. Comments are welcome. Regards Ernest
-
Another 1/144 kit from Trumpeter which I previous completed the F-22A. F-16 has much less parts compared to the F-22A, partially because it comes with NO weapon. Much simpler in design of the kit. It has a 2-part cockpit, the ejection seat and the cockpit ! The panel lines are detailed in this scale but not deep enough. Covered the back of the seat with a thin plastic card as it might be seen after the build. Applied German grey on the inside of the fuselage and around the cockpit. Added other parts to the airframe - noted that most of them are in good fit except the nose cone does fit well but have a huge (in its scale) step between the front fuselage and the cone, need to sand it down. Test fit the canopy too, seems all good. Added a bit of color in the cockpit, dry brush enamel silver, and add a few of different color on the instrument panel and side panels. Also apply a layer of Gaia green color on the seat. Also fit a small piece of transparent green cut off from plastic file folder to make the HUD. Next, I cut a few very thin (less than 1mm) masking tape and make the harness, and brushed blue and silver. It is then time to close the canopy. Applied green stuff putty under fuselage where the wings joint and also in front of the canopy. After rounds of sanding, scribed the panel lines and installed pylons
-
My third finish of the year, it still needs a pitot tube and a couple of aerials but otherwise I'm calling it done. This one fought me all the way. The fuselage was twisted, the air intakes didn't go together (so I filled the intake area and painted them on), half the brass aerials were missing, which is why they aren't on yet, and the undercarriage was so out of scale that I snapped it off and built the model in-flight instead. That being said, now it's done I'm happy with it and it really does show the graceful lines of the Valiant. The only addition to the kit is the cta decals as the kit decals weren't correct for the scheme. thumbnail_IMG_2189 by tony_inkster, on Flickr thumbnail_IMG_2188 by tony_inkster, on Flickr thumbnail_IMG_2187 by tony_inkster, on Flickr thumbnail_IMG_2186 by tony_inkster, on Flickr thumbnail_IMG_2185 by tony_inkster, on Flickr thumbnail_IMG_2184 by tony_inkster, on Flickr
-
Evening all Last of my shelf of doom completions.... Roden's nice AC-47 Spooky Gunship. From what I remember (it was started about 3 years ago!) it was a nice kit to put together, the only problems being the decals which were horrendous! I think most Roden kits suffer from this problem? As was my standard practice back then it was brush painted with vallejo paints, with weathering from Flory wash and Windsor and Newton satin varnish to finish. Not totally happy and probably could do much better these days but at least it looks like a Spooky! Hope you enjoy. Thanks for looking IMG_20230322_213531 by Binbrook 87, on Flickr IMG_20230322_213554 by Binbrook 87, on Flickr IMG_20230322_213644 by Binbrook 87, on Flickr IMG_20230322_213254 by Binbrook 87, on Flickr IMG_20230322_213228 by Binbrook 87, on Flickr IMG_20230322_213316 by Binbrook 87, on Flickr IMG_20230322_213458 by Binbrook 87, on Flickr
-
Due early May https://modelsua.com/boeing-rc-135v-w-rivet-joint-c-135-1-144-roden-349
- 31 replies
-
- 10
-
-
-

Platz 1/144 Hellenic Airforce F-4E Phantom
Tjeskow posted a topic in Ready for Inspection - Aircraft
Hellenic Airforce F-4E Phantom II (AUP) -
Just 2 in fact! So continuing on with the airliner SOD* clearance here are my next projects. Both are Minicraft kits, maligned by some, I have built a couple and find them OK. First is Singapore Airlines jet which made it tot eh decaling stage when the decal setting solution discoloured the gold in the cheatline. Here is is before my blunder After sanding most of the decal away and after repainting the fuselage Second is a BA jet, G-YMMM, the one that had a fuel starvation problem on approach to Heathrow and landed short of the runway. It's at the priming stage at the moment. I'll be using Xtradecal sheet for this one. * Shelf of Doom (or should I say Tub of Doom)
-
Put the finishing touches to the AT-AT today, as usual with a Bandai kit it built up very well very quickly. Made it quite dark and dirty by pre-shading with black and white before using XF80 as a blend coat. Painted with Tamiya acrylics, weathered with Flory Dark Dirt wash with some oil paint streaks. Made a base as an experiment, RFI below.
-
Good day everybody, this is a placeholder for a maybe second contribution to the SSDGB, depending on how well my build of the Crusader will go. I intend to build this plane as the SAR/firebomber as shown in the boxart. Content of the box: We'll see if this will get started during the GB. Best of luck to all of you!
-
After completing Bandai's X and B wings along with Darth Vadar's Tie Fighter I wanted to do more of their excellent kits and the AT-AT was ideal choice and its poseable as well. I haven't seen any builds on here so here's the sprues. x2 of D sprue. Completed the head in 20 or so minutes, it has a detailed interior but nothing can be seen now its together. Onto the legs next.
-
 My apologies for being late on parade chaps, I have been wrapping up a build for the Century Fighters GB (finished yesterday). My first entry for the GB is this Revell Airbus A319 which will be finished in British Airways centenary markings when sporting BEA's Red Square retro scheme. Here are the box and contents photos along with the 26Decals sheet. by John L, on Flickr by John L, on Flickr by John L, on Flickr by John L, on Flickr by John L, on Flickr Time to get on with it now. Cheers. John
 -
I think it's time to build another airliner. In the late 1990s BA painted a small number of its aircraft with a Poppy scheme to coincide with Remembrance Day; usually this had a poppy and "Pause to Remember" applied to the fuselage but G-BIKW was (as far as I know) unique as the poppy was applied to a plain white tailfin (this was after its "Ndebele" World tails had been removed but before the current "Chatham" livery was fully applied). Here is a link to the scheme So, to be built from the Zvezda kit (which has the correct Rolls Royce engines) with 26 Decals. Unlike some other Zvezda airliners this kit has no option for dropped flaps or slats, so should be a relatively quick and straightforward project. It will probably be another week or so before I get started as there are still two F-15E to finish. Mike
- 26 replies
-
- 11
-
-
- Special Scheme
- 1/144
- (and 1 more)
-
.thumb.jpg.04f42ec97a3b546c5de06bd10d3455fb.jpg) Finally completed what began as a fall project of building a pair of 727s; it stretched into winter, and just now finished in spring. This was a first for me…building two models at once. Proved to be quite a challenge that was not only time consuming, but pushed the limits on space! My workbench just isn’t large enough for more than one-at-a-time, so new rule…just one…finish it…start another. No more “two-fers.” Here’s some history and photos posed in the bright sun and “in the hangar.” First is the somewhat historic Northwest Airlines 727-51 (-100), N467US, that became infamous during the only unsolved incident in aviation history…the D.B.Cooper hijacking on 24 November 1971. After jumping from the deployed rear air stairs of the airplane, Cooper was never seen or heard from again. Only remnants of the $200,000USD was ever recovered, found by a small boy buried in a river bank nearly completely deteriorated, but still clear enough to read the traceable serial numbers as the bills from the ransom. The incident led to a new mandated installation of the “Cooper Device,” a small vane that attaches to the rear fuselage, activated by airflow from the slipstream preventing the rear air stairs from being deployed in flight. The Airfix 727-100 is completed in the original livery as she rolled out in 1965. During the years leading up to the hijacking in 1971, she went through the paint shop at least twice as Northwest changed and updated the livery. She was sold to Piedmont Airlines in 1978; then in 1982 she went to United Technologies Flight Dynamics testing navigational equipment. In 1984 she was sold to Key Airlines for which she operated daily charter flights from Nellis Air Force Base to Tonapah Test Range, northwest of Las Vegas. She was retired and stored in Greenwood, Mississippi in 1985 then finally scrapped in 1996. The Minicraft 727-200 is of N272US, an airplane that really has no “distinct” or famous career. She served at Northwest first following her delivery in 1969. She was leased to Pan Am in 1988, returned to Northwest in 1989, then retired and stored in 2007 at Smyrna, Tennessee, where she still stands on her own gear as a parted out hull to this day. Both 727s were primed with Tamiya gray primer, painted with Tamiya TS-26 white and Alclad black base and polished airframe aluminum. Tamiya XF-8 dark blue was used for the cheat line on the -100, and Tamiya TS-49 bright red was used for both tails. Corogard on both models is an airbrushed mixture of Testors Modelmaster Metalizer Non Buffing aluminum and Testors Modelmaster Flat Light Ghost Gray. Wings, wing fairings, and horizontal stabilizers were airbrushed with MRP Boeing gray. Livery decals on the -100 are from Microscale; on the -200 are from Draw and 26. Windows on both are from Authentic Airliners with details from Nazca. Nose gear on the -100 is from Authentic Airliners, while the main gear is SAC metal struts, Authentic Airliners wheels, and scratch made doors. Nose gear on the -200 is from the kit; main gear are modified from the Airfix kit, with Brengun wheels and scratch made doors. Both airplanes received a brushed on clear coat of Future to finish. Hope you enjoy!
Finally completed what began as a fall project of building a pair of 727s; it stretched into winter, and just now finished in spring. This was a first for me…building two models at once. Proved to be quite a challenge that was not only time consuming, but pushed the limits on space! My workbench just isn’t large enough for more than one-at-a-time, so new rule…just one…finish it…start another. No more “two-fers.” Here’s some history and photos posed in the bright sun and “in the hangar.” First is the somewhat historic Northwest Airlines 727-51 (-100), N467US, that became infamous during the only unsolved incident in aviation history…the D.B.Cooper hijacking on 24 November 1971. After jumping from the deployed rear air stairs of the airplane, Cooper was never seen or heard from again. Only remnants of the $200,000USD was ever recovered, found by a small boy buried in a river bank nearly completely deteriorated, but still clear enough to read the traceable serial numbers as the bills from the ransom. The incident led to a new mandated installation of the “Cooper Device,” a small vane that attaches to the rear fuselage, activated by airflow from the slipstream preventing the rear air stairs from being deployed in flight. The Airfix 727-100 is completed in the original livery as she rolled out in 1965. During the years leading up to the hijacking in 1971, she went through the paint shop at least twice as Northwest changed and updated the livery. She was sold to Piedmont Airlines in 1978; then in 1982 she went to United Technologies Flight Dynamics testing navigational equipment. In 1984 she was sold to Key Airlines for which she operated daily charter flights from Nellis Air Force Base to Tonapah Test Range, northwest of Las Vegas. She was retired and stored in Greenwood, Mississippi in 1985 then finally scrapped in 1996. The Minicraft 727-200 is of N272US, an airplane that really has no “distinct” or famous career. She served at Northwest first following her delivery in 1969. She was leased to Pan Am in 1988, returned to Northwest in 1989, then retired and stored in 2007 at Smyrna, Tennessee, where she still stands on her own gear as a parted out hull to this day. Both 727s were primed with Tamiya gray primer, painted with Tamiya TS-26 white and Alclad black base and polished airframe aluminum. Tamiya XF-8 dark blue was used for the cheat line on the -100, and Tamiya TS-49 bright red was used for both tails. Corogard on both models is an airbrushed mixture of Testors Modelmaster Metalizer Non Buffing aluminum and Testors Modelmaster Flat Light Ghost Gray. Wings, wing fairings, and horizontal stabilizers were airbrushed with MRP Boeing gray. Livery decals on the -100 are from Microscale; on the -200 are from Draw and 26. Windows on both are from Authentic Airliners with details from Nazca. Nose gear on the -100 is from Authentic Airliners, while the main gear is SAC metal struts, Authentic Airliners wheels, and scratch made doors. Nose gear on the -200 is from the kit; main gear are modified from the Airfix kit, with Brengun wheels and scratch made doors. Both airplanes received a brushed on clear coat of Future to finish. Hope you enjoy!- 54 replies
-
- 67
-
-
-
- 1/144
- Northwest Airlines
- (and 1 more)
-
I thought I might try a new challenge and go down from the big scale of 1/72 to 1/144. So I dug out this Dragon Tornado from the attic. They do a weird cockpit with Mr Blobby crew, so the whole cockpit and ejector seats had to be scratch built. I have to say 1/144 is a very unforgiving scale! Too tall nose wheel or skew whif pylons are all too easy errors to make. The canopy was not all that good so had to use filler to fair it into the spine. Anyhow tell me what you think? You might recognise the 56(F) Squadron markings It's an old scratch built RAF hanger in the background and an Oxford Diecast landrover Andrew
-
After I got over the worst of the mojo meltdown which hit me about eighteen months ago I decided to concentrate on straightforward models until I felt my confidence was fully back. As a result my 2022 output is mainly OOB builds although the modified Airfix Boeing 737 is an exception. The year’s work should have included a Boeing 787 but at a very late stage I managed to confuse plastic cement and decal solvent and the replacement titles which Ray Charles kindly agreed to send me appear to have got caught in the postal strikes. Never mind, it should give me a head start for next year. I hope you enjoy my collection of 1/144 civilians and I’ll see you in 2023. Dave G Alitalia Vickers V.785D Viscount F-RSIN kit with Classic Airlines decals. In RFI here Balkan Bulgarian Tupolev Tu-154M Zvezda kit with Two Six decals. In RFI here Braathens SAFE Boeing 737-500 Daco Skyline kit with mixed Liveries Unlimited and Lima November decals. In RFI here Iran Air Airbus A320 Revell kit with F-DCAL decals. In RFI here Air Europe/British Airtours Boeing 737-200 Adv Heavily modified Airfix kit with mixed Classic Airlines and Flightpath decals. In RFI here Loganair Short SC-7 Skyvan Eastern Express kit with Classic Airlines decals. Not in RFI SAS Star Alliance Boeing 737-800 Zvezda kit with V1 decals. In RFI here EasyJet Boeing 737-300 Daco Skyline kit with Scaleliners decals. Not in RFI ("Double sided" livery from 2000 when EasyJet were moving from telephone to internet booking)
-
EGNT Newcastle Airport Main Terminal Pier 1/144 Firstly I must say I'm not sure if this project belongs in the diorama or civil aviation thread but I'd thought I'd appeal to the small number of airliner fans as I'm going to need some expertise on the way. Some of the aircraft I'm going to make are going to be conversions and from some dodgy kits (minicraft). Newcastle Airport is a very small airport and it's only terminal is served by a pier surrounded by a handful of aircraft. Despite the expansion of the airport itself the pier has looked the same for the last 30 or so years which has hosted a few eras of civil aviation and numerous different types of aircraft. This give me an idea of building the whole pier which would give me a choice of what era I want to exhibit. Some include:- late 1980s - Wardair 747-100/200s, Britannia & BA 737-200s early 1990s - Britannia 767/757s, Caledonian L1011s or DC10s, BA 757 & a320s (landor) early 2000s - Flying Colours & JMC 757s, Monarch a330s, Air2000 a320s 2010 to now - this is the era I'm going with, there will be a few discrepancies for sure but this diorama is going to coincide with the outgoing Thomas Cook 757s in the old livery and when easyjet introduced the bandana livery and I'm toying with the idea of at least one easyjet in the old livery. This may be too early to introduce the easyjet a320neo but I've got the kit so what the hell. here's a rough look at the set up.... Stand 3 - this is always reserved for BA and is only 1 of 3 air bridges. This stand can accommodate the whole a320 family but I'm going for a bog standard a321 by Zvezda Stand 4 - This side of the pier is mainly for domestic routes but can change depending on availability. Stand 4 will accommodate a Easyjet a319 in the old or new livery. I haven't been able to get a Revell A319 kit yet so I'm going to take apart an old a320 kit. Stand 5 - Easyjet a320neo by Zvezda Stand 6 - Easyjet a319 (need to find a cheap Revell) Stand 7- The airport is now dominated by Jet2 the 737-800 is now the most common jet. The zvezda 737-800 is the obvious choice. (red and silver livery not that jet2holidays horror show) Stand 8 - Another 737-800. With the sight of old TCX 757s it will be Thomson and not TUI. Stand 9 - also stand 30 depending on the size of the aircraft. This is always the Emirates 777 spot and the A330 before that. However its also common to find the TUI dreamliner here or before that First choice or Thomson 767. I've got an old zvezda 767 I'm busy tearing apart so I thought I'd go for the latter. Also for the sake of a balanced diorama I thought the Emirates would be too big! This will have an airbridge. Stand 10/11 - Stand 10 and 11 are primarily for slightly larger narrow body sized aircraft so the 757 is a good fit. I haven't decided if these are going to be TCX or Jet2 or a combination of both. The kits I have bought is the well criticized Minicraft C32 kit of hell (I'm going to need some advice with these). If I go with Jet2 I'm going for scratch built winglets and the red and silver livery. The TCX will be the sunny heart blue livery. Stand 10 has an air bridge. Stand 12 - KLM 737-900 or AF a318. To be honest I fancy making both but I'm leaning more toward the 737-900 as I may be sick of airbus by the time I've done BA and 3 EZYs. I believe no kit exists for the 737-900 apart from Authentic Airliners which is not available but I'm up for doing a conversion. I've also been given some advice to avoid the Eastern Express A318 kit and do a A319 conversion instead. Although this stand is often reserved for KLM/AF, I'm going to have to check that this stand can accommodate and aircraft the size of the 737-900. Most often you'll see the 737-700 or the Cityjet RJ85 parked up. in this example the furthest Easyjet on the left is in the wrong place. This is where the BA A321 shuttle will be Stands 1 and 2 exist but will likely be out the picture unless I decide to make the whole terminal! more content to follow...........
- 94 replies
-
- 11
-
-
I managed about the same as last year, with 3 being rescued from the Shelf of Doom (all my 1/144 completions) which were my last 3 finished for the year, and one a strip and repaint of an older build. 5 were RAAF subjects for my club's delayed RAAF 100 display and a number of others for GBs here and elsewhere. Here they are in no particular order. 1/72 Airfix Ilyushin IL-28 Beagle, Finnish AF 1/72 Airfix North American RA-5C Vigilante, RVAH-12 USN 1/72 Hasegawa McDonnell Douglas F/A-18A Hornet, 77SQN RAAF 1/72 Hasegawa Lockheed P-3X Orion, Swedish AF (What-If) 1/72 Italeri Aermacchi Macchi MB-326H, 2OCU RAAF 1/72 Matchbox Hawker Siddeley HS-125-600, 32SQN RAF 1/72 Matchbox Hawker Siddeley HS-125-600, Finnish AF (What-If) Refurb. 1/72 MPM Lockheed 5 Vega D1-1A, 3CU RAAF 1/72 Dora Wings Percival Vega Gull, 1CU RAAF 1/72 Revell Mikoyan MiG21 F-13 1/144 Airfix Boeing 737-26Z Adv, RTAF 1/144 Minicraft Boeing 737-376(SF), Australian Air Express 1/144 Revell Boeing C-40A (737-700), VR-59 USN