


Bullardino
-
Posts
216 -
Joined
-
Last visited
Content Type
Events
Profiles
Forums
Media Demo
Posts posted by Bullardino
-
-
Thanks a lot, I really appreciate

-
Thanks a lot, guys. I really appreciate
-
Hi all, I've been away for a long time, but in the meantime I managed to almost finish this model.
It's still missing some detail on the base and a figure that a friend will paint for me and I will add later.
And this is the result:
Hope you like it...
-
The tracks look very nice, were they difficult to assemble?
-
Looking very nice
-
Welcome, we're building the same kit
-
Sorry, I had missed the tarp part
Very nice result on the kangeroo, and nice turret too on that M4A1
-
Nice choice and great progresses
Looking forward to seeing the hairspray technique applied.
-
Very nice, David. How did you make the tarp?
-
Oh, I suppose I'm a little disappointed. I was hoping to read some great new progress
I guess I'm a little bit spoiled by you two (Garfield included)
-
Nice progress, Tony.
-
Wonderful job on that second tank
-
Nice progress -- is there any internal detail to go in the fighting compartment or turret? I also notice that the air scrubbers are very different in shape between the Dragon and Tasca kits...
Cheers,
Ian
No internal detail at all, unfortunately. But I will make it closed, so it isn't a great issue
The air scrubbers are provided in two different shapes, one with a "house roof" on top and four straps to close them, and the one I used. The instructions say that the overall sand one used this type, so I decided to stick to them, as I didn't have any picture that could say they were wrong.
-
A little progress:
-
Oh, I can sense the old magic, my friend. Another stunning piece of literature, let's see some awesome plastic model
-
(un)luckily we don't have those heat issues in the UK but I do have to tidy the garage this weekend so I can get back to my AB!
Cheers,
Ian
The sun gets directly in the room I work in during all afternoon, and this makes thing quite hot
This helps by drying oils in half time, but also makes a nearly impossible task to stay there until dawn
-
I don't think I'll have the time. My deadline is july 26th, as in that date I'll be moving to the holiday house and will not have bench time anymore until mid september.
Groundwork, sandbags, barbed wire will come at a later stage.
Nice picture, looking forward to seeing it in 1/35
-
I've heard only good things about the Tasca Shermans, so looking forward to watching this build up. May even have to get one myself at some point!
Cheers,
Ian
I hope to have some bench time on it tonight, yesterday it was T-34 time
The idea is to complete hull and turret as soon as possible, my mancave is becoming too hot to work in during the day and this will become even worse in the next weeks, so I have to speed things up.
-
I do have a dio planned for my Sherman -- it'll be sitting next to an abandoned Italian Semovente with the British crew having a good look over it. The Semovente is now in the painting stage.
Thanks for the link -- that is a nice model!
Cheers,
Ian
Nice idea the Semovente.
My idea is to depict a real scene happened to my grandfather. During the battle he was wounded to an ankle and couldn't move, so he stayed put in a trench and let the allies pass. When the tide turned and the italians regained his position he was taken to an hospital and then back home. He told us that a tank had passed by his side (obviously he couldn't tell what tank it was and I was too young to investigate further), hatches closed and the driver/commander didn't see him (or pretended to). I dunno yet if I'll put his figure in the dio...
-
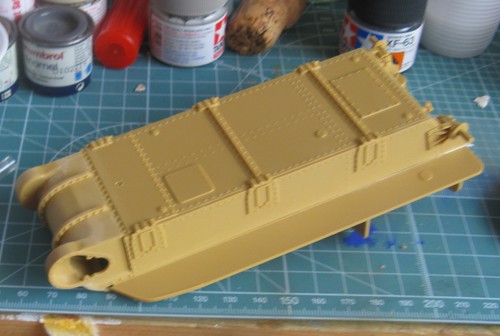
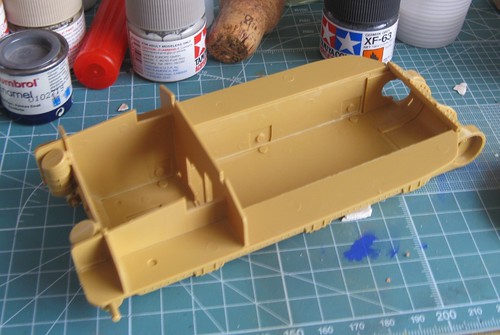
First step. I started from the hull, as I'm already dealing with the T-34 wheels.
The fit is perfect and the parts need only a little cleaning before assembly. If this is the way it will go together, this will be a fast and straightforward build.
-
Not sure yet! I'm building this as a vehicle from the Warwickshire Yeomanry - the Dragon painting instructions show this as an overall sand colour, however the “Codename Swallow: British Sherman Tanks at Alamein” illustrates the vehicles as having camouflage. One of my Club members has some detailed Sherman painting guides we're going to review, so I should have a better idea in a couple of weeks, though I'm very much open to suggestions! How are you thinking of finishing yours?
Cheers,
Ian
I think I will go with the overall sand C Squadron, 3rd Hussars, 9th Armoured Brigade, 2nd New Zealand Division, one of the options out of the box. I'm still a novice at colour modulation, and I don't feel enough confident to try a camo. I will give it a battered look, given the harsh conditions and the hard battle. I'm thinking of a small base with a sand dune, some sandbags and barbed wire in a corner, reproducing the winning push of the allies.
The idea is to ideally achieve a finish like this: Link to external forum, but using the decals from the kit.
-
Cheers for the info. Interested in the Lifecolor paint.
They just released an Israeli paint set that has it, along with three pigments and two other colours.
Lifecolor IDF set. The right one should be sandgrey 01.
-
It is nicely detailed and the fit is pretty good, but as usual the instructions are somewhat lacking. Dragon should really look at other manufacturers and do something about their instruction sheets!
I know, the T-34 I have on the bench is a Dragon one, and unfortunately not one of the last out. It still has those horrible photo instruction sheet where it can be difficult to find even what has been glued in that stage.
No particular reason other than I don't think the VVSS bogies lend themselves to painting the road wheels separately as there is so much construction in that area. HVSS bogies are different and if doing them I would leave off the wheels and paint them separately. For the VVSS bogies I'll be spraying the whole model first, then hand paint the rubber in a dark grey as part of the detailed painting stage.I prefer adding them at a later stage to have full access to the hull, so to weather it without having to dodge the bogies.
Are you going to paint it overall sand or with a splinter camo?
-
Thank you. I was blind not to see this option.
Welcome to the bannered users


 but I do have to tidy the garage this weekend so I can get back to my AB!
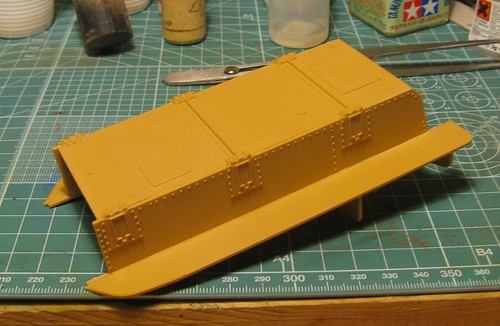

T-34/76 Mod. 1941
in Ready for Inspection - Armour
Posted
Thanks Joachim.To be honest I stole it from a friend armor builder who used it for a panzer IV, so you won't be the first to steal
All my fellow armor builder kept telling me that I should raise the base to make tha tank more visible, so I lent the idea and built a box out of forex, painted black and added pictures from my references