


Ernie
-
Posts
181 -
Joined
-
Last visited
Recent Profile Visitors
1,848 profile views


Ernie's Achievements
")
New Member (2/9)
762
Reputation
-
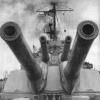
Here is the USS Portsmouth finished. I am very happy to move it to the display case and claim another finished kit!
- 33 replies
-
- 13
-

-
Calling this one done! It is nice to be able to move it to the display shelf.
-
Thank you for the reply. I am happy with how this is coming along, I think I had a vision in mind of how this was going to look, and I have not quite achieved that, so there is that bit of reconciliation between I am happy with how it looks, but is doesn't look like I expected it to look, if that makes sense. It will certainly go on the shelf with my others, that have a special local connection!
-
Over the weekend, I was able to get the various masts painted up and added to the top of the sail.
-
The past couple of weeks have been spent working on the fuselage halves getting them ready to go together so I can detail the cockpit. Firstly, the sprue goo that filled the cracks in the fuselage and the poorly fitting doors. The openings for the round windows had some flash in several of them so I used a rolled-up piece of 600 grit sandpaper clean the flash out of the window openings and make the round. The rear interior of the fuselage was sprayed with matt black to hide the lack of detail. Many of the clear round windows had deep sink holes in them, the best way to fix that would be sand them flat, but that would have eliminated the flange that holds them in place in the fuselage openings. The front of the clear windows protrude substantially beyond the surface of the fuselage. So, that was another thing........ I glued the windows into place and decided to deal with one issue at a time. Each window was placed into position and secured with liquid cement on the inside of the fuselage. When this dried, I ran a bead of superglue around the window on the outside to make sure it was securely glued into position, and to also fill any gap that might exist around the window. I used a glass file to file down the excess window above the fuselage, these will remove the excess material fairly quickly without leaving deep scratches like a course sander would. The windows were then finished off with micro sanding pads to give them a nice, polished finish. That was a nice solution for one issue, next was the sink marks on the back sides of the windows. With the front of the windows nicely polished, those sink marks were very visible. I thought about solutions for the sink marks, finally settling on bending light, or unbending it really. I thought if I could fill the sinks with a material as clear as the plastic and level with the back side of the window it might refract the light more evenly make the sink marks less visible. I messed around with different materials and methods before settling on some clear UV resin borrowed from my daughter. The resin needed to be applied evenly and smoothly level with the back side of the window to work most effectively. Now, it didn't work 100% on the worst windows, but it did make a huge improvement on all of them, and I am very happy with how they turned out. The same windows as the previous picture, as close to the same position as possible, you can still see a very small mark in a couple, but generally a vast improvement over what they were, so very happy with that. Now, I should dig out the Evergreen strip and add a bit of extra detail to the cockpit !
- 19 replies
-
- 10
-
-
After a couple of flat coats, the model looked better. Good enough to continue at least. I am still not totally happy with the paint work I did on the upper hull, but I'm at that point where I can live with it and get the model finished and on the shelf. Anyway, it is now mounted to its display base, a nice piece of Bolivian Rosewood (building these subs are a good way indulge in some nice exotic wood from around the world). Masts and prop should be all to finish this off!
-
This weekend I took this one out of its storage box and having not looked at it for the past couple of months, tried to objectively evaluate the model to try to understand what it was that I did not like about it. It took only a couple moments to zero in on the way the panel line wash I used just did not come out well on the deck sections, particularly on the tops of the diving planes and the bow section of the deck. These areas have a slight non-slip texture molded on them and trapped the wash. I am not entirely sure why, maybe I did not get good coverage when I initially applied the gloss coat before applying the decals and wash? I don't know. I masked the deck area off and applied a very thin layer of the deck color again using an extremely thinned out mixture of paint to thinner until I obliterated the excess wash residue. I did the same to the tops of the diving planes on the sail, but without the masking as I felt these parts might be too delicate to tolerate the masking. This all seemed to work and after another coat of gloss to harmonize everything I am much happier with how it looks.
-
Thank you, Sir, very much appreciated. So far it seems the repair is successful, and I am proceeding as normal.
-
So, this build got off to a somewhat unexpected start; when I got the kit, the box was in pretty rough shape, but the kit was sealed inside its plastic bag and seemed to be complete, so I put the contents of the box in a pencil box which I use to store stuff to keep it safe. It would seem at some point the kit was crushed, and the fuselage halves had been cracked in several places. I checked the canopy, and it seems to be undamaged (the canopy would have been a deal breaker as I have no way to replace that), so I took a stab at fixing the fuselage halves. I glued the cracks from the outside and reinforced the inside of the fuselage with sprue goo, then taped the halves together to keep them aligned while everything dried. The fuselage doors didn't seem to be a great fit, so they were glued in place and sprue goo applied. I had not planned to add detail to the troop compartment, so this is not a huge deal, and so far it seems the repair has worked, so onwards we go.
-
Excellent! That will be an interesting conversion to follow, good luck with your build.
-
I think you are correct that it is the only glider released by FROG. It is a cool aircraft and to date I do not think there is another in this scale.
-

Mikro Mir 1/350 Project 661 Papa Class Submarine
Ernie posted a topic in Work in Progress - Maritime
I started this kit as the first new build of 2024! Hopefully we'll be off to a good start here 😁 The Papa, eventually known as the K222 was the fasted submarine of the Cold War with a submerged speed of 44.7 knots. While it was very fast, it was also very noisy and thus easy to track. However, NATO had nothing that could keep up with her and would have to follow from afar. And a set of 3D printed props from Ebay to help spruce things up a bit!- 1 reply
-
- 6
-
-
I will attempt to build the GAL Hotspur glider. This is the Eastern Express issue of the kit; the box was kind of tattered, so I stored the kit in a pencil case to protect it and keep it all together. I have added a set of new roundels as the kit decal sheet is not great, and some spare seats to put in, again just to try to spruce the cockpit up a bit.
- 19 replies
-
- 14
-
-
Excellent!! Your hairy stick paint work never fails to impress!
-
I ordered a box too after I first saw his video, basically 3 tiger kits for $30.00 each is hard to pass up! Plus the extras and the 1/35 and 1/16 Carius figures.