


MattBlack33
-
Posts
507 -
Joined
-
Last visited
Content Type
Events
Profiles
Forums
Media Demo
Everything posted by MattBlack33
-
 I used: http://paperbrick.co.uk just as a test until I could buy some but it came out quite well so I kept it. The inside details look a bit garish, but I hope once the roof is on it'll tone down a bit but still show the detail.
 -
No, I was tempted to do the all grey version, but I'm doing XR727 with the green/grey camo scheme.
-
New to WIPs - Airfix 1/72 Tucano
MattBlack33 replied to MolarDoc's topic in Work in Progress - Aircraft
I'll be looking forward to seeing that. I had a go at casting metal figures in my teens and got some quite promising results but nothing scratch-built. It'll definitely need strengthened gear, it barely stands on its own two without the extra weight. I seem to remember seeing some reference pictures of a Tuc. engine. If I can remember where I'll let you know. -
Cheers Stu, I think it'll start coming together once the green goes on
-
DONE - 1/72 RAF Typhoon & Russian Tu-95 Bear intercept
MattBlack33 replied to Dermo245's topic in Work in Progress - Aircraft
Looks great, another build I've enjoyed following. The bottom picture does look quite glossy, but I don't know if that's the flash/lighting as the top picture looks spot on. I'd be tempted to leave it as is. -
Had a bit of time to have a play this evening. The outer brick wall has now gone on the crew quarters. For some reason in the picture below the top looks a bit creased but I can assure you it's flat as a pancake. I've allowed myself some artistic license with the windows, but they don't look out of place so I'll keep them. The frames are made from card strips, they'll be painted to match the shed once I manage to mix up the hideous green colour the RAF decided to paint it! One from above. The posters on the wall are an 11 squadron badge (above the door) outlines of Russian aircraft (just in case the pilots forget) an airfield map and a Lighting intercepting a Bear picture/poster. I'm assuming it's some sort of office, whether this is accurate or not is another matter...Once the floor is in and it's attached to the base I'll add some wiring, furniture and other details. I fear they'll just fall off if I add them now as it still requires a lot of handling. It's all coming together nicely. Now to work out these bloody doors! Thanks for looking.
-
Not Another Patrol (Tank added)
MattBlack33 replied to David Mooney's topic in Work In Progress - Dioramas
Superb! Those black and white shots look fantastic. Very atmospheric indeed. -
New to WIPs - Airfix 1/72 Tucano
MattBlack33 replied to MolarDoc's topic in Work in Progress - Aircraft
Hi MD, good to see you're back at the bench with this, I was enjoying watching your progress. You'll have to remind me, were you thinking of putting a detailed engine in the open access panels? The reason I ask is that I worry that using a metal seat might not work as a counterbalance as the front seat is too close to the fulcrum to cancel out the weight in the tail. Perhaps casting a metal engine block would work better? Unless you've already worked this all out...in that case, disregard the above! -
They seem to do a wide variety of lighting at reasonable prices. I was thinking about getting these: http://www.smallscalelights.co.uk/viewcategory.php?groupid=64 I was also thinking about putting one or two lights inside of the crew bungalow too.
-
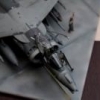
For those of you interested I've updated the thread in the Diorama section with the shed progress, here's what the aircraft looks like as of today. Priming, Tamiya Primer from the can, Xtracolor Night Black for the canopy area. I usually paint the gear wells prior to painting the airframe, however as I have added some etch detailing in the wells I'm going to mask off the wings and paint the u/c etc afterwards. First coat of RAF Dark Sea Grey (Xtracolor). As with my Harrier, I found the grey to be too dark so I lightened up the panels with DSG and a touch of Humbrol 130. Obviously there had to be a paint-related drama (as is tradition). I managed to spill paint from the airbrush cup over the rear of the fuselage. Luckily I had appropriate cleaning materials to hand and managed to save it! *sigh* Comments and questions welcome!
- 89 replies
-
- 2
-

-
- Airfix
- Lightning F6
- (and 3 more)
-
So I've been peer pressured by Sean into posting a few pictures so here is today's update from the building site: This is what she looks like with a bit of cladding on. As the posts above I'm still playing with a few ideas to sort the doors so I've used my excellent MS Paint skills to simulate where they'll be. And a few pre-cladding. The black dots are guide holes for the lighting wires. I've been looking at lighting options today too. I'm between Woodland Scenics lighting range (thanks for the picture, Danyel) (nice but expensive) or http://www.smallscalelights.co.uk/index.php which are within budget but requires a bit of construction. Thanks again for everyone's expertise and advice. You're all making this a fun build!
-
Airfix 1/72 EE Lightning F6
MattBlack33 replied to DAG058's topic in Ready for Inspection - Aircraft
Nice couple of builds you've got there. I'm on with the F6 at the moment and having the same experiences re: flash, sinking and ejector pins. Looks like you've overcome them admirably -
The curtain pole idea sounds like a really good idea, I'll give that a try. I think I'll steer clear of the brass for now though, there're 14 individual leaves on each door so I think the weight will start to build up even after one side. Plus I'm trying my hardest to keep costs down as I'm not sure how it's going to turn out and don't want to start ploughing too much into it for it to fall apart the first time I switch the lights on! Go for it! The Q-shed building has been a lot of fun, and passes the time between coats of paint on the aircraft that I want to display on it! I really wanted to post some pictures today, but I don't want to post any while the cladding is half finished That makes perfect sense. Another technique added to the to-try list I hear what you're saying about replicating scale skew-wiffery. There's been a few times where I've had to straighten up beams etc because it looks like poor workmanship on my part rather than a defect of the actual thing!
-
Ive not done any railway modelling for about 20 years so I feel really out of the loop with what's available in that realm so thanks for that, there's a lot of useable bits in there, it might be a good buy! Thanks for Looking. I did have a quick look thinking there may have been a OO TMD/loco shed set or similar that I could use, but the ones I've seen are too small or the roller door style so I decided on the scratchbuild route. That might be the best approach. The problem I was having with the card/paper was that it was bending in all the wrong places and it looked really out of place against the straight lines and edges of the iron cladding sheets. I think strengthening it with plasticard and using the paper as a hinge is a a great idea. So simple too. I'll let you know how I get on. I had a feeling you'd have a solution, bar side!
-
Thanks everyone for their kind words! I've finished the cardboard skeleton this week and have begun the cladding process. It's quite a relief that my plan is actually working out! I'm not going to post any pictures just yet as I ran out of cladding material halfway through so a trip to the LHS is required (unfortunately they don't open on a Sunday). Thanks to StuartP's pictures of the real thing I've been able to draw up some semi-accurate metalwork plans so once the cladding is on I can start the detailing process. I do have a question regarding the doors and how to replicate them in 1/72. I've tried folding paper and card into a concertina but it just doesn't look right. I want them to be pulled open as in the image in my first post so if anyone has any suggestions im happy to give them a go!
-
I'm not sure about that, my Q-Shed is small beer compared to this! I've just posted a question in my thread (not to hijack your thread) that I'd like your opinion on.
-
Wow these look great! Thanks for the picture, I didn't know Woodland Scenics did lighting sets. I asked about scale lighting at my LHS (who incidentally stock a lot of the WS lines) and they recommended doll's house lighting.
-
That Lightning picture always makes me double take, it looks so realistic.
-
This is gorgeous. The natural light really sets it off, good work! If this is the standard of diorama in this new section I've got a feeling I'm going to enjoy it!
-
I've had this idea for a while, but it completely went out of my head when this GB came up and I can't justify doing it now as my time is quite precious at the moment. How about a 1:48 helicopter such as a Merlin or Sea King being downscaled to a 1/72 mega-copter? Obviously there would have to be a lot of scratch and kit-bashing but I think it would look amazing if it could be pulled off. Alternatively, how about a 1/48 jet such as a Raptor, Harrier, Mig 22 being downscaled to a 1/72 medium bomber. If anyone would like to give these a go if be very interested to see how you get on. I guess this has evolved into a veiled request...
-
Yes, I think it only appeared yesterday so still only three threads on there so far. I only moved mine because it's still early days so it wasn't much work and I liked the idea of it being separate to the Lightning build. Here's the link to the new thread: http://www.britmodeller.com/forums/index.php?/topic/234987148-raf-binbrook-1970s-q-area-building-diorama-and-desk-lamp/
-
For those of you who have seen my builds that I have shared on the forum probably know by now that I'm a fan of a good old diorama. I love to see an aircraft in an operational setting with work going on around it, but as of late I'm running out of space quicker than I'm building. What to do? Stop building? Sell my kits on eBay? Turn the dioramas into some sort of functional appliance? The first suggestion is out of the question, I love modelling and am not about to stop while I still have a few square feet of space free. The second suggestion is also a non-starter, I might not be 100% pleased with all of my builds, but I spend my precious time building them and want to enjoy them for as long as possible (*cough* and they're not good enough to sell *cough*). Erm, turn them into a functional appliance, let's give that a go... This idea may sound a bit mad, but I think if I can pull it off it might be quite special. I've been meaning to build a Lightning for a while and have been fostering a growing love for the aircraft with a particular interest for the quick response interceptor role they had thoughout the Cold War. I've also seen some of the Lightning RFI and WIPs as well as Bar side's HAS build and they've really inspired me. 'Tell us where the functional appliance bit comes in, you fool!?' I hear you all shouting at your monitors. Well, the following pictures made me think: can I make something similar in 1/72 scale that not only acts as a cool diorama during the daylight hours but also acts as a super cool desk lamp when the sun goes down? The original Binbrook Q Area, picture reference from the Save the Binbrook Q Area Facebook page https://m.facebook.com/pages/Scramble-Scramble-ScrambleHelp-save-the-RAF-Binbrook-Q-area/310070375768814e After a bit of planning, deliberation and help from some of BM's finest, I came up with the following plan, which would meet my needs to save space, light my desk and display an aircraft in an operational setting. I plan to include the aircraft just outside of the shed with some ground crew and equipment on and around them. The shed itself will be a facade and as per the image above, I will attach three lights which will act as the 'useful' part of the diorama and illuminate my desk. The shed and ground equipment will be a mixture of Flightpath (Houchin power unit and RAF diorama accessories) and scratch building. The Lightning build can be found in the Work in Progress section.From the plan above I have created the cardboard 'skeleton' for the Q-shed facade. It looks rough and ready but I've got some 1/72 (1/76?) iron cladding sheets that will cover the cardboard sins. Once I had a physical sense of how big the main area is going to be I started drawing out other details. I've been able to shave off a few inches to save on more space. I'm loving the Lightning build, but I'm considering another aircraft for Q2. The ones I've considered are listed in the picture, but if anyone has any other suggestions I'd love to hear them. I know the Typhoon never flew from Q sheds like this, but I thought it'd look quite cool to have a 'then and now' comparison. Im also wondering what 1/72 support vehicles are out there. I thought an RAF landie would look good, but if there are others available I'd like to hear about them! The bungalow begins... The front 'room' will be furnished with a few bits, maybe a figure or two. The rear section will house the transformer and lighting switch/wiring. I'm planning to wire the lights at the front of the building within the door mechanism. A couple of other views, figure for scale. This is where I'm up to. I'm currently drawing up the plans for the doors and door mechanism as well as awaiting the lighting wiring and bulbs so I can get that worked out and wired up. Any tips, tricks, comments or queries are greatly appreciated. I'm flying blind on this one!
- 80 replies
-
- 11
-
-
For those of you interested/following the thread, I'll be moving the diorama base build to the newly instigated Diorama area and keep this thread solely for the Lightning
-
This is a great idea! I think I'll move my Binbrook diorama buildings over here from the aircraft WIP thread if that's appropriate?
-
Really nice, great job!