


MattBlack33
-
Posts
507 -
Joined
-
Last visited
Content Type
Events
Profiles
Forums
Media Demo
Everything posted by MattBlack33
-
 They're just thinned black acrylic paint. I put a small blob to the edge of the access port or panel and dragged it away from the airflow with a cotton bud Cheers, Tim. At first I thought I'd overdone it, but looking at it with fresh eyes it doesn't look too bad. Time for some ordnance methinks!!
 -
Very nice, the decals really bring it to life. Really enjoying seeing this come together.
-
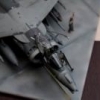
Bit of weathering last night. I'm trying to make it look as beaten up and as 'used' as possible. Apologies for the blurred one. This is how it's going to be posed in-flight.
-
Thanks, Dag. Nice quick build, no pressure to get it "right". I might have to do a couple a year just to keep the mojo up!
-
Point noted! I never thought of doing over wing 'winders
-
I did try and start off that way, but I don't have the talent and skill that you have!
-
No matter how many parts I get it never seems to be enough! I'm going to have to start my own appeal like the Bruntingthorpe QShed if it carries on like this! This weekend I've done nearly all of the cladding but I ran out of angle beams so I couldn't finish the roof sections. Bits to do before the big paint: 2xmain roof panels and support beams 2x 'doors' Guttering Lighting Crew quarters Lighting Roof edging and guttering Glazing Furniture etc. Once all the above is done I can start 'dressing' the dio and adding figures!
-
Bit of NMF to lighten things up a bit. Airframe aluminium highlighted with chrome. The shed has taken priority so I'm moving quite slowly with this!
- 89 replies
-
- 9
-

-
- Airfix
- Lightning F6
- (and 3 more)
-
Hi all! I thought it was about time I made a start on this seeing as I chose a new aircraft to get it done quicker! I've built a Vampire twice before so I know how it all goes together. It's one img those kits that you can throw all the bits in a box, shake it and it come out fully built! I've forgone the building process as I've not made any modifications yet. I'm starting with a NMF then adding the camo over the top. By doing so I'll be able to simulate a bit of paint chipping (and give me a bit of practice with the old Alclad). Alclad gloss base to start: Airframe Aluminium all over, panels highlighted with chrome. Maskol added to some areas to simulate chipping later. I wanted a pretty rough looking threshold between the lower NMF and camo so I've used some Blu Tac rather than tape. Three stages of camo. All Humbrol enamels all painted freehand, again to simulate the rushed job the crews did to get it camouflaged! I decided against the digital scheme for this reason too. Gives it a more rustic feel! So begins the decalling stage. Xtradecal "Gulf Special" set. With the jets being smuggled to Africa aboard boats, I thought it'd be fitting for it to be part of the "Sky Pirates". Couple of daylight pictures. Next, the ordnance. I've got a centreline fuel tank, TILAD pod, 2x rocket pods, and 2x Mk10 LGBs, perhaps a couple of sidewinders for the wingtips. Fully loaded! Let me know what you all think!
-
Looking great so far. I'm going to make a start on my own F106G soon so it's nice to see the PE going in and hear how nice the kit is to build! Keep up the good work!
-
How frustrating! Hopefully you'll sort those issues, judging by your "magic hour" pictures, it'll all be worthwhile!
-
And for my next trick it will be a.....Swedish Harrier
MattBlack33 replied to Black Knight's topic in What If III Group Build
Nice! Considering the utility of the harrier, it's surprising that they haven't been used more prominently by the Scandinavians. I'll be looking forward to this! -
I wouldn't be too sad, I'll be building it at some point
-
Thanks guys. I think it'll start to look much better once the roof is on and the green paint has been added. LHS are awaiting their most recent order of building materials so it's on hold for a bit
-
Absolutely spot on, thank you so much for that. I'm only planning to model the front two rooms, but it's really interesting to hear what everything else is to put it into context. I've seen a few pictures of the quarters and shed as they are now and have no idea what everything is/was. Do you have fond memories of doing Q stints? I'd be really interested to hear about your experiences.
-
Here's the original RFI: http://www.britmodeller.com/forums/index.php?/topic/234983509-airfix-172-vampire-from-the-mind-of-a-child/ you can judge for yourself the ridiculousness of it all Camo scheme shortlisting (obviously not vamps, but some of these schemes have my eye): Or What do y'all think?
-
And just like that my amateur archeology skills were undone like a pair of cheap sandals! Looks like I'll be sewing some 1/72 grass seeds next time I'm at the bench thank you for sharing the picture too. I don't suppose you remember what was in the front two rooms of the crew quarters? (ie the ones with the windows overlooking the taxiway)
- 89 replies
-
- 1
-
-
- Airfix
- Lightning F6
- (and 3 more)
-
Very nice! What camo are you thinking? I'd say the 8 engine variant would be the better option, but that's only because I don't think you can improve on perfection
-
That's all the convincing I need!
-
Hi Tweeky, thanks for the pointers I really appreciate your feedback. My research on the Binbrook Q Sheds has revealed something different to what you're saying above and has, in places, come from people who have actually worked on the shed personally. I'm happy to hear what you think about the below as for all I know you could also have experience working at Binbrook too and I'd really like to get your perspective Regarding there not being concrete in front of the crew quarters I disagree. The satellite picture shows a distinct change in grass hue (as indicated in my image) in comparison with the rest of the grass alongside this route. Furthermore, this image: shows a concrete-like structure on the ground underneath the grass. The arrow on the satellite image indicates the location of a door which would suggest that the crew quarters did have an element of concrete surrounding it which does not appear on the satellite as it has become overgrown in the 20+ years since its last use. The longer grass (indicated in green) would suggest that there was also a more established strip of grass up against the brickwork (the grass here is able to grow longer as its roots go straight into the soil and not onto concrete as the grass in the red area does). Regarding the fuelling, I was told that fuelling occurred on the main pan and the aircraft were armed and fuelled prior to being towed to the shed. Again, I'd like to hear your opinion on this. i have some great reference photos of the wooden guide rail and will be including this when I get back to the build here's the one I'm using for reference: With regards to the other points, the equipment will be stored in the shed, admittedly not at the back right as per real life, the ailerons are down due to a hydrolics malfunction (the annoyed pilot is stood talking to one of the ground crew who is calling over someone to assist him), and the aircraft are outside the shed for function rather than form as I don't have the space to build the entire shed I'm toying with the idea of having the Landie as an RAF police vehicle responding to a call out that a group of schoolchildren had jumped the crash gate and made their way toward the shed to get a closer look EDIT Here's an picture that shows at least some sort of activity occurring out front
-
This is what she looks like at the moment: For those following this thread but not the shed build thread, you can see I've moved away from the cardboard skeleton idea and overhauled the shed completely. Thanks, Adrian. This is about as big as it gets for now, it's testing the limits of my desk space as it is! As you can see from the pics above I've done away with the mirror idea, I couldn't find the materials to achieve what I wanted in the end. I've got myself the Alclad to do the NMF of the underbelly and chrome of the nose ring, I just haven't got round to doing it! I'll probably whack some gloss black on it today so at least it'll be halfway there.
- 89 replies
-
- 3
-
-
- Airfix
- Lightning F6
- (and 3 more)
-
That was lucky! I found it fiddly, but I've heard a few people have had nightmares with it.
-
These will be the last few pictures for a while as I'm awaiting some crucial structural bits to finish the roof and a few other details. At the halfway stage I'm already thinking about figures and scenarios to populate the diorama. I should really do a bit more on the aircraft at some point!
-
Nice to see this one getting going don't know if you know already, but people who've done this kit recommend fitting the air intakes before the cockpit to get a better fit. I fell foul of this on my Red Arrows version.
-
Thanks guys. Another reason for the change is that I don't get chance to do much Whiffing, so I thought I'd do more than just changing the camo scheme and do some airframe mods too. The Tiff can wait