


MattBlack33
-
Posts
507 -
Joined
-
Last visited
Content Type
Events
Profiles
Forums
Media Demo
Everything posted by MattBlack33
-
That's come up a treat, great work as usual! Looking forward to seeing her all lit up.
-
Thanks, Giorgio. If I make another I think I'll incorporate a few more scratch-built elements, the Trumpeter seat is very basic. It looks okay to. Me for now though
-
No problem, glad it was of some use.
-
Thanks, Snapper. I'm really pleased with how it's coming along.
-
Looking really good so far. In my search for reference pictures I found this. I don't know if you've seen it or may find it helpful, but I thought I'd share it anyway. http://www.clubhyper.com/reference/f105walkaroundfm_1.htm
-
1/72 B-52D, Linebacker II, 1972. Finished 16/12.
MattBlack33 replied to DaveJL's topic in Vietnam II Group Build
I remember from the kit I made in my teens, I think I used masking tape over the wing roots to cover the gap (this was long before I discovered filler!). It didn't look too bad, honest! In all honesty I don't have the space for one. My LHS has a few smaller scale versions that I think I can get away with for now. I'd like to do a B52 and Vulcan in 1/144 as a Cold War tribute pair. -
1/72 B-52D, Linebacker II, 1972. Finished 16/12.
MattBlack33 replied to DaveJL's topic in Vietnam II Group Build
I seriously need to get one of these!! -
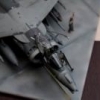
Seeing as my Lightning is at the 'aerials and armament' stage, I thought I'd make a start on this bad-boy over the weekend. Apologies for the lack of step-by-step pictures, but here is where I'm at. Seat with PE belts and detailing, and (largely hidden) Miliput seat cushion. Painted with Humbrol enamels and acrylics. Dry-fitting of the tub and fuselage halves. Fits together quite nicely. All I need to do is the other seat and finish off the other smaller boxes etc in the tub. I must say, the PE sets for this kit are incredible. Great quality and plenty of it! It can be quite fiddly in places, but worth the effort and every penny!
-
RAF jet fest. Part 1 - Lightning vs Starfighter.
MattBlack33 replied to RMP2's topic in Work in Progress - Aircraft
Yes! I do like this very much! -
Looks absolutely fantastic, it seems to have come on really quickly. It makes me wish I'd kept some of my earlier, teenage attempts to have a go at my own restoration project.
-
Those ladders have turned out really nicely, they really look the part. Not sure about your ground crew's dance moves though....
-
Thanks, Mr B! Oh, you shouldn't have done that!! I'd not heard of them before...this could be dangerous for my bank account! I've got a Flightpath diorama set for the tow bars, LOX, ladders and other smaller bits for the shed interiors, but I might have to try some of the Aircraft in Miniature bits for some of the bigger equipment.
-
I wondered if I could airbrush some details on the back wall, as you said it only has to give the impression of greater depth. I'd love to make it a lot deeper! I think at some point I'd like to build a full-size shed, but for now I'm limited with space so I guess this one is a bit of a prototype. Is it spray mount or something? I know what you mean but I can't remember the actual name. I'm hoping my last lot of gluing will sort the curling issue. I'm not sure about the Landie now. I had a conversation with Tweeky (in the Lightning build thread) who said that there was a car park behind the shed so there would be no reason for a Land Rover to be out front. I know the dio isn't the most accurate, but at the moment it feels like I'm only including it for the sake of it! I'm wanting to do a Harrier in a woodland hide so I might save it for that instead.
-
No thanks, Stu. I managed to get a couple of sets from someone on here but thank you for the kind offer!
-
That's a great idea, I didn't realise you could get spare tyres and for such a reasonable price!
-
Don't worry about it, Kirk, I have no idea what I'm doing so any criticism is good criticism! I did think about the picture (even if it was a photoshop creation). I mocked one up in MS paint, and ran into the problem you described with the perspective being 'right' from only a few select angles. From where it is on my desk, and when the jet is on the diorama it's not as noticeable as it is in the pictures. I think I'll just have to be creative with my lighting and photography when I share pictures I don't know what to do about the slabs. My next plan is to go round each slab individually with some superglue and flatten them down with something heavy. It's annoying as I tried to avoid the peeling by only putting on light coats of paint (and use glue underneath sparingly) so they didn't get too saturated which didn't work failing that I might peel them off and make some plasticard replacements.
-
A quick update today, another step closer to completion. We now have a roof on Q1 and Q2! It's all glued in place and awaiting a coat of paint.
-
I had a closer look at the picture you're talking about and can see the fence you're talking about. Any pictures of the shed when it was operational would be fantastic. Don't go out of your way though, what you've posted so far is above and beyond what I was expecting when I started this project. I'm really enjoying hearing about your experiences. Did every pilot and crew member in the squadron have to do a Q stint on rotation? It sounds like it was the place to be! How often would there be a Q scramble? For some reason in my mind I had imagined it was quite frequent, but hearing that there were two while you were on Q makes me think otherwise now. The reason I asked about the FOD guard was in the picture you posted earlier had one fitted and I have a Flightpath one I'd like to use. If it wasn't fitted, would there be one spare in the shed somewhere (just so I can get my money's worth).
-
The PE parts and paint arrived for this today, so hopefully I'll have something to show for it by the end of the week! Time to start planning the diorama!
-
1/72 B-52D, Linebacker II, 1972. Finished 16/12.
MattBlack33 replied to DaveJL's topic in Vietnam II Group Build
*heavy breathing* -
Great save, looking good! What figures did you go for in the end?
-
Wow, I don't even know what to say other than I really appreciate the information and the time you've taken to share it! This has really helped me imagine the sheds as working, living environments. Although the pictures I've seen give an idea of what they were like, they only give you half the picture. I hope I can do the place justice with my diorama. I do have a few more questions if you don't mind answering them? Would the tow bars be stored in the shed alongside the aircraft? What (if any) insignia/writing would you find on the FOD guard? What sort of trolley was the chicken-poop trolley? Where was the barbed wire? I've seen one picture of it to the left (looking out of Q2) but would it have been to the right too (as in the grass area I've put on my diorama). Finally...would there have been any "aircraft armed" signage around? I know some of the modern Qsheds have these on the grass outside the shed so I was wondering if the old sheds had these too? I've read somewhere that people have gotten into trouble for walking across the front of an armed aircraft when they've been lucky enough to have a look around. Again, I really appreciate the information you've posted, it's been really helpful and I hope it'll be helpful to others reading it too! Best wishes, David
-
1/72 RAF Typhoon & Tu-95 Bear Diorama
MattBlack33 replied to Dermo245's topic in Ready for Inspection - Aircraft
Loved watching this come together. Great diorama and a well deserved reward. -
I knew you wouldn't disappoint, looks great!
-
Thanks RMP. I've just got myself the Flightpath RAF dio set, it's got some great bits in it. There's a set of ground crew that PJ Productions do. There's a 1/72 and 1/48 set although the 1/48 set has one less figure: http://www.hannants.co.uk/search/?search_direction=asc&search=Ground%20crew&manufacturer_id=8166 The pilots are Revell, but these may be traded out for PJ Prod. pilots too, I'll see how things go Here's how the shed is going if anyone is interested? http://www.britmodeller.com/forums/index.php?/topic/234987148-raf-binbrook-1970s-q-area-building-diorama-and-desk-lamp/page-3
