

MDriskill
-
Posts
1,139 -
Joined
-
Last visited
Content Type
Events
Profiles
Forums
Media Demo
Everything posted by MDriskill
-
Here are two drawings that recently appeared on Pinterest. They are low-res scans of original factory GA sections of the C.200 and C.202, originally drawn to 1:5 scale (NOTE: here the C.200 profile appears at a slightly larger scale than the C.202 one). I've highlighted the fuselage structural datum lines, which correspond to the engine thrust line, in red. The blue lines are located at the front face of frame 0 (firewall); front face of frame 4 (cockpit enclosure); and rear face of frame 18 (tail cone attachment). The number of fuselage frames and their spacing appears to be the same on each aircraft, though of course the cross-section shape of each one is very different. It also appears to me that all flying surfaces are located the same with respect to the datum line. It would be very interesting to see and compare the corresponding drawing for the C.201! My take (pure eyeball-based speculation!) would be that its fuselage section shapes were identical to the C.200 below the datum line; but that everything above the line - between the rear of the engine cowl until frame 14 or 15 in front of the fin - was significantly changed. I also note that its sliding canopy appears to be identical to that used on early C.200's...no need to re-invent that particular wheel.
-
Take a look at the Italian-made "Sky Models" and "Tauro Models" ranges. The SM sheets, if not literally generic, famously cram so many subjects on each one that they are quite useful for "grazing." Below is a Tauro sheet, and the SM sheet for the C.200. On my recent C.202 build, I discovered the 1/72 SM C.202 sheet (one of their earlier efforts) had some accuracy issues with fonts, colors, and sizes of some items. But still pretty impressive, and their later sheets seem better done. I have similarly chock-full SM sheets for the C.205, G.50, and CR.42. Aeromaster and some others have also done random Italian fighter sheets in 1/72. The recent-ish re-releases of the Hobby 2000 (ex-Hasegawa) C.202, and Italeri C.202 and C.205, also have excellent decals (Cartograf in each case IIRC).
-
Thanks Graham! Still waiting for my copy of the book...I'm guessing the photo you describe is this very interesting one, which also recently popped up on Facebook...?
-
FW 190 Focke Wulf Monogram in 1 /48
MDriskill replied to Dieda's topic in Work in Progress - Aircraft
LOVED that kit as a kid, built several and it turned me into a lifelong Fw 190 fan (and still the ONLY 190 kit that makes it impossible to mess up the gear strut angles, lol). I don't recall ever having a problem with the canopy fit. The rear glass in your photo doesn't look like the correct original Monogram part. -
Thanks! New to me, and most impressive.
-
Does the new book shed any additional light on the previous lengthy - and ultimately fruitless - debate on recon cameras? 😑 https://www.britmodeller.com/forums/index.php?/topic/235111487-recce-macchis-c200-and-c202/page/2/
-
Again...I said the C.200 and C.202 wings were similar, not identical. My main point was that the 202's fuselage structure evolved in a more straightforward way than I had previously realized, which actually left all flying surfaces located identically in respect to the fuselage datum. The primary diffs in the C.200 and C.202 wings were a change from "pointy" to "rounded" airfoil profile, done by changing the detachable stamped LE section; and revised aileron balance weights, making an offset in the 202's aileron hinge line. The basic internal structure, plan geometry, dimensions including unequal spans, were not changed. Some late 200's actually had the 202 wing. The rounded LE (and minor revisions to the root fairings) and aileron details are obvious, and again point out that the core bits were shared all along. I've been a Macchi fan for many years and have a good library. It will be interesting to see if the book fills any gaps.
-
Graham, my intent was to show that the C.200 and C.202 evolved in an orderly way, with even more basic structural and geometric similarities than are generally realized; not that they shared every single small detail. And that the C.201 prototype appears to fit in rather nicely. My post clearly failed to make that point - which in any case was an irrelevant side excursion from your original question - so I took it down. Thanks for your comments on the new book. I'm impatiently waiting for my copy to arrive.
-
I don't know the answers to your questions, but here is the book: https://kalmbachhobbystore.com/product/85058?gad_source=1&gclid=EAIaIQobChMIuKO38_fMhQMVKJ5aBR0wRQYqEAQYASABEgJiavD_BwE
-
(Never mind)
-
Photos from Michael O'Leary's Building the P-51 Mustang. A really excellent book, with many previously unpublished factory archive photos. Early Allison-engine airframe: Two shots under a P-51B wing. The filled area underneath did not extend as far aft as on top: I am not qualified to question "Mr. Eduard," but of course the entire wing was not puttied; and any access hatches, removable sections, etc. in the sealed forward portions would also have visible gaps.
-
Very nicely done!
-
There's a good detailed build of the 1/35 Border Fw 190A-6 here that should answer most of your questions: https://forum.largescaleplanes.com/index.php?/topic/97808-border-135-fw-190a-6-nowotny-double-chevron/#comment-1420206 As noted above, there are some ridiculous misprints on the instruction sheet...apparently done by someone who didn't know a Focke-Wulf from a Messerschmitt! But the kit itself is outstanding. There are some very minor surface-detail inaccuracies from some slight confusion between variants (discussed in the linked thread). But the kit's shape accuracy, level of detail, and engineering are excellent.
-
I really love this scheme! But...how "real" is it? Is it based on a photo or other reliable documentation?
-
I agree that Osprey can be hit or miss - especially the older titles. But they've steadily improved, and the four authored by the Millman / Olsthoorn team are absolutely exemplary in research, writing, and graphics. Another extremely well researched and superbly illustrated book on this "family" of fighter aircraft is the "AeroDetail" monograph on the Ki-100 by Giuseppe Picarella, who oversaw the restoration of the only surviving example, at the RAF Museum. (And Mr. Picarella's new two-volume set on the Mitsubishi "Babs" must be seen to be believed...WOW.)
-
Total shot in the dark from a non-expert here, but I notice the SBS set includes the engine. Could the diff be there instead of the cowl? Arrangement of the little intakes between the cylinders, cowl braces details, etc.?
-
Thanks much for this info! It coincides with perhaps the best of all Matchbox kits, IMHO.
-
Caudron 635 Simoun (Heller 1/72)
MDriskill replied to AC87's topic in Ready for Inspection - Aircraft
That's beautiful! One of the best Heller kits and you've done a wonderful job with it. -
Here is a proper Hamilton Standard logo: And this terrible fuzzy image is from the Kora decal sheet of Italian prop logos that I mentioned. The instructions describe them as "FIAT-Hamilton" on the left, and "Piaggio" on the right. SO...I vote for FIAT-Hamilton on your S.73 photo! No doubt the small script near the propeller blade in the logo was different; the lower line must have referred to "FIAT" instead of "Nash Kelvinator," for instance. Wikipedia says the S.73's engines were Piaggio P.IX's, copies of a French Gnome-Rhone design. https://en.wikipedia.org/wiki/Piaggio_Stella_P.IX . Various Alfa radials (copies of the Bristol Mercury and Jupiter) were often used on similar types of aircraft.
-
I am only guessing as I know nothing about historic Italian propeller production, but I'd guess it was more likely the actual manufacturer of the prop in Italy, even if they were working under a Hamilton Standard license. Then again, for a pre-war civilian airliner like the S.73...who knows.
-
Giampiero nailed it! The propeller was a Piaggio design, the P.1001. The light color on the front of the blades was called "Celeste," on Macchis typically a blue-gray color, and the blue-and-white oval is the Piaggio logo. Later on props were finished in black though. The C.202 Folgore also used the P.1001. The C.205 Veltro used the P.2001, which looks very simiilar but had slightly wider blades. (If you are working in 1/72 scale, look at the 3D printed P.1001 from Airone Hobby. MUCH better than any kit prop, really a great boost on a model.) You will sometimes see this same prop with the airframe manufacturer's logo on the prop blades - Macchi (below) or Breda. Kora makes a nice small decal sheet with Italian propeller logos, in 1/72 and 1/48.
-
I appreciate the kind words on the gear jig. To be honest it's been a while since I did it, and I've forgotten most of the particulars! I might try again with a simpler, more compact design, and keep better track of details as I go.
-
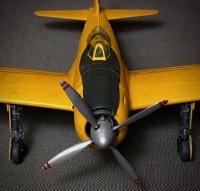
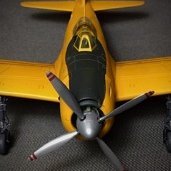
Like most oldsters I'm not a social media buff...but if your interests include WW2 Italian aircraft, there are Facebook discussion groups worth exploring. They get a lot of posts from Italy, and new-to-me photos appear regularly. These three superbly clear photos of a brand new Macchi C.200 (note the empty white octagon on the rear fuselage apparenty awaiting its 1st Stormo "Archer"), from the "Regia Aeronautica" FB group, are an example. They are the best pics of a wartime Saetta I've ever seen.
-
I took photo-copies of Arthur Bentley's drawings, and cut them up to use as templates. It has supports only at the wingtips and rear fuselage joint, and thus doesn't interfere with any intermediate protruberances, so theoretically should work with any reasonably accurate 1/72 Fw 190A or D kit. It holds the model upside-down (lets you see the strut sockets, and check strut cover door angles); and sloped a bit nose-down (keeps the vertical bits more compact than if the model were supported horizontally). In retrospect...well, I over-thought it somewhat! I would take a simpler approach next time, but it worked well enough.
- 23 replies
-
- 10
-

-

-
That is absolutely true! And nothing looks worse than an Fw 190 with the gear struts at the wrong angles. And it might be the very worst point of Eduard's 1/72 kits. The strut sockets are a very loose fit, so you are completely on your own to get things right. I ended up making a jig for mine.