

Kallisti
-
Posts
5,119 -
Joined
-
Last visited
-
Days Won
1
Content Type
Events
Profiles
Forums
Media Demo
Everything posted by Kallisti
-
Oh yes the Second Empire comic is great, some good humour in it as well... pink daleks...
-

1:200 Heller Smit Rotterdam, Ocean-going Tug
Kallisti replied to Kallisti's topic in Not My Comfort Zone GB
The only red bits are the dark 'hull red' under the waterline. I feel this red plastic will be tricky to prime - I hate red plastic -
Having finaly completed the DeLorean from Back to the Future II, my next build is my entry for this GB. My main problem with finding a subject to build for this GB is I have a habit of building weird sh... stuff quite frequently, from Sci-Fi to Tokyo Harbour Ferries to cars to construction machinery to dioramas. There isn't much that isn't within my comfort zone, so I had to look hard to find something, but looking through the stash I finally did! My build for the "Not in my Comfort Zone FB" will be a ship, namely the 1:200 scale ocean-going tug Smit Rotterdam from Heller: This kit was originally bought as it was a companion scale to my Oil Platform build from a few years ago, but at 14" long this is a large model and the Oil Platform itself is large enough (20" wide, 10" deep, over 3 ft tall!!!) As a result it has languished in the stash for a few years, hence the dusty state of the box There are some lovely pics of the original vessel, showing some lovely weathering opportunities: A potted history: Smit International is a Dutch maritime salvage and towage company founded in 1842 by Fop Smit with a paddle steamer tug called Kingerdujk which was the only vessel of its type at the time. They operate a fleet of floating cranes, barges and tugs. In the 70s they commissioned two powerufl ocean-going tugs, the Smit Rotterdam and the Smit London. At their launch in 1974m these were the most powerful tugs in the world, each having 22,000 hp to call on. Their role was towing oil rigs and platforms into place and heavy salvage operations. They were eventually scrapped in 2013/4. The inevitable sprue shot: The instructions are on two large sheets of paper stapled together and comprise two sides of building instructions one side of colour call outs and a 4th side which is multi-lingual instructions of building tools and how to apply decals. Looking a the sprue parts, one thing caught my attention that didn't look right - the forward deck: That does not look right, and when you compare it with the instructions: Oh dear! Doing a test fit and you see the major problem: I have no idea how long I've owned this kit, let alone where I bought it from. I'm going to have to scratch build a repair in some way, but getting the shape right might be tricky! The solution however came to be after a little research. This is NOT an expensive kit - I found another one on Amazon for £25 so that will be arriving on my doorstep hopefully tomorrow. I will then use the HOPEFULLY unbroken part from that kit to enable me to create a repair for this kit. I can then sell on the spare kit at some point in the future if I don't want to build the sister ship. Looking forward to this, something different and I always like that
- 21 replies
-
- 13
-

-

-
1-72 Round 2 Space:1999 Hawk Mk IX Number 2
Kallisti replied to Kallisti's topic in Work In Progress - SF & RealSpace
Now, I thought originally I had completed this build but it turns out I wasn't quite accurate. Following links from somewhere - you know the drill you have no idea how you ended up on the page, but I ended up on http://www.videoaviation.com/ which had lots of nice stuff and this immediately sprang to my attention as a possible addition to the Landing pad diorama - 1/72 A/M32A-60 Generator Cart https://www.videoaviation.com/product/1-72-a-m32a-60-starter-cart-dual-set/ So I ordered a set and it arrived on Saturday. you get two kits in the package - here is one of them The instruciton sheet is small but its not a complex kit Here is the second kit, partly built and with primer drying I'm thinking I'll paint it white and orange to fit with the general colour scheme -
1:24 Back to the Future II De Lorean - Aoshima
Kallisti replied to Kallisti's topic in Work In Progress - SF & RealSpace
As promised more pics - after the sucesss of the paint job, the sindscreen transparency got glued in using glue and glaze plus a clamp, then the body got attached to the chassis. I think spent half a day very carefully painting the blue, red and yellow wires down each side of the body, deliberately trying to make them look a little rough and dirty as they appeared in the movie. I then gave them a wash with Flory dark dirt to belnd the bright colours in. Some more pieces to be added to the rear of the car Decals for the rear light and number plate added The final assembly took place earlier today, but waiting for everything to dry properly before photographing more... -
1:24 Back to the Future II De Lorean - Aoshima
Kallisti replied to Kallisti's topic in Work In Progress - SF & RealSpace
Well after the disaster of earlier in the week, I buckled down, stripped the paint back and then painted it again, this time doing the light grey first, then black then the aluminium and it came out MUCH better! While waiting fir paint to dry, I worked on the plethora of small pieces that need to be added to it ready for the next stages of assembly More progress soon! -
The Comet Miniatures Dalek kits are not quite so expensive and a bit easier to build... i've done two so far: Had a look at that link about the history of the props, bloody hell that is comprehensive!
-
Love it! Watching this now - I've built two Comet Miniatures Daleks but never even sought out a Sevans.
-
1:24 Back to the Future II De Lorean - Aoshima
Kallisti replied to Kallisti's topic in Work In Progress - SF & RealSpace
Oh well, that didn't go to plan the masking tape ripped off the underlying paint and/or gloss coat when it was removed Its now been stripped back to bare plastic and this time I will paint the grey and black first and aluminium last! You live and learn and repaint...- 21 replies
-
- 10
-

-
-
After all this time its probably best to contact Tony at [email protected] to be certain.
-
1:24 Back to the Future II De Lorean - Aoshima
Kallisti replied to Kallisti's topic in Work In Progress - SF & RealSpace
Having investigated the magnetic floaty things, I'm afraid its a "No thank you Mrs Doyle... I said NO THANK YOU... I said.... oh bugger..." The inside has been assembled and painted with decals and so on The window transparency has some items in the roof as well and here is the body being masked after getting an initial coal of Mr Color Aluminium. I put two coats of Gauzy shine enhancer of it to protect it from the masking tape, so fingers crossed!- 21 replies
-
- 11
-
-
Watching this come together from plastic card and rod was fascinating, its a beautiful piece!
-
Nothing fancy though, no floating on magnets or anything like that
-
I've had this kit in the stash for years then last year while trying to break myself out of the failure of the modelling mojo I made a start but gave it up because of lack of aforementioned mojo. Now, a few months later and the mojo is as strong as its been for a while so I've been picking up a some of these shelf of shame items to finish off! This is the Aoshima version which comes with folding wheels! Here you can see how far I got last year, the chassis is done, with its complex folding wheels mechanism and I'd made a start on the interior The folding legs mechanism was VERY stiff and I was scared I'd break it, but then I found the little packet of grease they provided in the kit and that did the trick! Here is the upside down chassis with the wheels in their driving position... and here in flight position... I've been very tempted to try one of these electromagnet 'floating' bases but I think that is a bit too toy like More on this,,, in the Future!
- 21 replies
-
- 14
-
-
1-72 Round 2 Space:1999 Hawk Mk IX Number 2
Kallisti replied to Kallisti's topic in Work In Progress - SF & RealSpace
RFI thread is up, over here : -
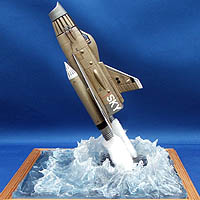
A few weeks ago I went to the stash with the intention of building another of the smaller scale Hawks from Space:1999 to sell on eBay. I've sold a couple before and they go well. However on opening the box I realised I'd bought the Paragraphics PE cockpit set at some point in the past, so started building it with that in mind. I had some coin battery holders I picked up from eBay and one of these fitted perfectly to provide the small amount of power needed for 4 tiny Surface Mount LEDs to light the instrument panels. I then tried to make pilots from some figures from the Airfix Astronaut set, but these didn't fit. So I was left with an open cockpit and no pilots so this must mean its at a landing pad somewhere. There has always been a debate about where the landing gear for this would be and some have suggested it is launched from a launch rail on some sort of carrier ship... cue lighbulbs going off... So a few weeks later we have this... WIP topic here: Photos: Yes, yes I know in the world of Gerry Anderson there is likely to be some sort of complex, hoist/list/moving platform/slide that delivers the pilots to the ship, but frankly, I couldn't be bothered with that, so its just a ladder This is partly scratch built with some kitbash parts left over from F-16s, Saab Viggens, Hawegawa diggers, Gloster Javelins and half a Kinder egg The main gantry was originally built for the 1:48 3D printed Babylon 5 Starfury space dock I built last year but was never used after I changed the design, so that was a useful starting point. The maintenance platform is intended to fold down out of the way when the Hawk has to launch or be recovered. The red grapple arm is supposed to hold the Hawk securely in place in case the carrier ship needs to manoeuvre, and also to help guide the ship in to land. Here is the landing pad without the Hawk This shows the red grapple arm well, made from left over pieces from a Hasegawa digger kit. The battery pack which incorporates an on/off switch The rear engine mounting is held on by a small magnet: I just have to be careful handling the engine to avoid damaging the thin support struts!
- 12 replies
-
- 37
-
-
-
Get your modelling stuff moved downstairs When I had my hernia operation a few years back I couldn't manage the stairs for a week or more but had thankfully moved all that I needed (PC and monitors etc) downstairs in advance. Couldn't sleep in the ed for several weeks even after being able to navigate the stairs as whenever I rolled over in the bed it was agony! Couldn't do that on the couch! Wishing you a speedy recovery!
-
1-72 Round 2 Space:1999 Hawk Mk IX Number 2
Kallisti replied to Kallisti's topic in Work In Progress - SF & RealSpace
Test fitting the gantry to the base and checking the fit of the access ladder - yes I know I'm sure they probably had some sort of lift/hoist mechanism to get them up there, we are talking Gerry Anderson shows here, but frankly I can't be bottomed to make it and with the Hawk: The walkway and gantry need some decals and there is some weathering to do of the blast deflector but otherwise this is basically finished. Next post will be RFI pics -
Fantastic stuff, love it!
-
1-72 Round 2 Space:1999 Hawk Mk IX Number 2
Kallisti replied to Kallisti's topic in Work In Progress - SF & RealSpace
Since the last post,. lots has happened... The maintenance platform has had a railing added and painted. This was done using plastic rod for the uprights and fine steel wire for the horizontals - you can't see too many of the major issues I had getting the CY glue to bond to what i wanted it to bond rather than my fingers, tweezers or ANYTHING but what it was supposed to! and here it is after painting This still needs some decals on it to complete that stage. Progress has been made on the rest of the base with painting and decaling: Next will be the final assembly of everything, watch this space!!! -
After an almost 4 year absence, we have found a new venue and can finally re-launch Modelfest. Date: 20th August Location: Hart Leisure Centre, Emerald Avenue, Fleet, Hampshire, GU51 5HS For trader enquiries, please contact Tony Andrews, the Modelfest coordinator: [email protected] We're back!
-
Yes the UFO Interceptor idea is decent but executed badly, you need more than 3 of them because the tactic to attack a spaceship flying at near the speed of light is not to shoot AT it but to lay down a field of shrapnel for it to fly through. The missiles on there are supposed to be nuclear but a nuclear explosion in space, in a vacuum is so much less damaging that one on the earth where you get the interaction with the atmosphere and overpressure blast waves in the air. What they should be using is the Napoleonic era cannister shot and to be honest you don't need one large missile for that, lots of smaller micro-munitions that spread a field of ball bearings - or even sand in an area would utterly destroy a vehicle travelling at a significant fraction of the speed of light.
-
Yes the original has some rockets in the the nose either side of a cannon. No missiles at all.
-
1-72 Round 2 Space:1999 Hawk Mk IX Number 2
Kallisti replied to Kallisti's topic in Work In Progress - SF & RealSpace
Lot has happened the last two days. The base has had a lot of greeblies added plus a treench cut into it that will be covered over with some parts that are actually airbreaks from a Javelin to form a sort of slotted drai cover with pipes and features visible underneath, plus a blast deflector that can be raised on pistons into the correct position and various other bits and bobs Next I wanted to create a maintenance walkway around the Hawk so that it will be accessible for the maintenance crew. First I drew out the support gantry onto a sheet of paper then placed the hawk over it and drew around that to be able to work out the shape of the walkway. I then flipped it over to create the other side and used this as a temple to cut out pieces of platicard from a diamond pattern sheet I had This supported underneath by some plastrust girders. In practice this walkway would fold down out of the way of the Hawk when it was landing or taking off but I'm not including that mechanism at present, I may add hints of it later... The landing platform had support structures built for the walkway and here I'm test fitting it to make sure it fits and doesn't block things In this last one, you can see the drain covers in place. A coulple of extra holes have been added to allow various pipes and conduits down from the landing gantry. After this a handrail was added around the outer edge of the walkway. Next stage is to start painting...- 22 replies
-
- 12
-
-
1-72 Round 2 Space:1999 Hawk Mk IX Number 2
Kallisti replied to Kallisti's topic in Work In Progress - SF & RealSpace
I did look to see if I could incorporate the Airfix Girder bridge pieces (I've got 2 Airfix and 3 Dapol kits in the stash ) but at this scale they look too clunky
