

Kallisti
-
Posts
5,121 -
Joined
-
Last visited
-
Days Won
1
Content Type
Events
Profiles
Forums
Media Demo
Everything posted by Kallisti
-
Great weathering, just looks superb!
-
Go on then, I'll bite - I've got a new Academy F6 so this will be an interesting build, never done a Hunter before...
-

The Thousand Mile War - Amchitka, Spring 1943
Kallisti replied to Bertie McBoatface's topic in Work in Progress - Aircraft
Now that is cool! If you learn something then the day hasn't been a waste! -
Like the sound of those piccies, I've got a Chally 2 in my stash that I'd love to put the bar armour on - Accurate Armour to a set for £60. Back on topic - the original post's picture appears to have vanished, has it been taken down?
-
and we're back! After a sojourn building Mustangs and almost ruining a poor girl in a chainmail bikini, we return to Babylon 5 and to the wiring up of the lights... second set of lights now installed, almost ready to close up the engines on the lower wing...
-
Thanks
-
Sara and the chainmail bikini (finished a year later!)
Kallisti replied to Kallisti's topic in Figure Ready for Inspection
Thanks for the ideas, but I did exactly that this time - I used very thin paint using a wide soft brush but I started with the wrong colour - I stupidly put the dark flesh tone on first then when I tried to go over it with the lighter tones they looked terrible, plus the very watery paint seemed to clog up all the delicate detail and it did not look good at all. dry brushing the chainmail was going to be my solution as well. My plan now will be after I get the airbrush, lay down the initial skintone with the airbrush in thin coats, possibly add some of the grosser contrasting tones again with thin coats to avoid the sharp contours and then return to the brush to finish off the highlights and lowlights with wash-like paint, then deal with the clothes using the brush. Of course I'll have to get the airbrush and learn how to use it first, but that is doable I don't want to "ruin" Sara -
Sara and the chainmail bikini (finished a year later!)
Kallisti replied to Kallisti's topic in Figure Ready for Inspection
I've been thinking about this for a couple of days after I managed to ruin the paint. It was hard work stripping the paint and it hasn't been entirely 100% successful. I re-primed her yesterday and this has shown a large number of places where small spots of paint remained from before, usually in the nooks and crannies so I can't afford to make another mistake. This makes me realise I can't do this with a brush, so I'm going to suspend work until I get an airbrush which should be sometime in the next couple of months. I'm expecting a minor windfall form my job sometime soon (company got bought by a bigger company and share options being converted into cash woot!) So once I have an airbrush I will feel much more confident about doing the lady justice. In the meantime, I'm going to put the lizard on display on his own... -
Tamiya RAF Mustang III - 112 Squadron, Italy 1944 Build thread here
-
Thanks guys (and gal), well I think I can finally call this a wrap! I've really enjoyed this build - been wanting to build a Mustang for a while and this was a perfect encouragement to get one and do it. I'm really pleased with how its come out - this is the first model since I came back from the wilderness where I've used spray matt varnish to finish it off and I was blown away by how good it looks! I'm now goign back to revis some of my earlier models (in particular the Tamiya 1:32 Spitfire in my avatar) to matt them down! So enough waffle here are some photos and I'll put the 4 best into the gallery in a minute or 10... Had to put in the oil leackage - it is a Merlin after all
-
The Thousand Mile War - Amchitka, Spring 1943
Kallisti replied to Bertie McBoatface's topic in Work in Progress - Aircraft
You can do it - your legion of fans are urging you onward!! Forward to the sunny uplands!! -
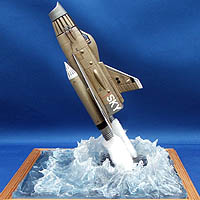
Nearly there! Just a quick one to be goign along with - if things work out, I shall be finished tomorrow... Decals and matt coat in place, just attached the bombs and u/c spinner almost complete but realised I'd forgotten the yellow tips! Need to do a little more weathering on the tyres to get it in place on the base plus add a flat spot. All that left is pitot tube, open cockpit door, radio aerial and dorsal light
-
Sara and the chainmail bikini (finished a year later!)
Kallisti replied to Kallisti's topic in Figure Ready for Inspection
I made a start on Tuesday and managed to make a complete mess of the flesh paint - so she was soaked in some isopropyl alchohol last night and has been "stripped" this evening to start all over again! Oh well at least I didn't ruin her with alcohol! -
My knees go weak at seeing these builds you produce! Amazing and inspiring!
-
1/24 Leyland DAF DROPS with King Trailer
Kallisti replied to Okdoky's topic in Work in Progress - Armour
Bloody hell this is an impressive build, totally blown away by the level of detail you are putting into this. As a side note, I was given one of those Ferrari sound generators for Xmas, but I use it to play my iPod through my car stereo since my car stereo doesn't have an aux input They are quite fun little toys! -
Don't forget the blobs of chewing gum that always got stuck in the toughs of the floorboards...
-
Sherman M4 Single Type Group Build
Kallisti replied to AnonymousDFB1's topic in Group Build Chat 2020
I'll bite - I've got the Revell Calliope Sherman in my stash... -
Sara and the chainmail bikini (finished a year later!)
Kallisti replied to Kallisti's topic in Figure Ready for Inspection
The lady is primed and ready to go! I'm pleased with the joints - the joins on her upper arms are not easily detectable as they've blended with the natural patterns in that area. The other joints are also pretty much invisible. Now comes the bit I'm most nervous about - painting her without an airbrush! I've not plucked up the courage so far, mind you I've been a bit preoccupied with a certain Mustang build as well, but that is coming to a close soon so I'll be able to concentrate on her a bit more... -
Grr, was putting the decals on this afternoon and all was going well (apart from the roundels being on the rather thick side and not settling over the aileron actuators properly) until to came to adding the sharkmouth. Up to that point the decals had been quite loose on the surface for a while, so I thought I'd have plenty of time to get the alignment right. So the sharkmouth goes on, Microsol blue underneath to give it some adhesion like the rest had been and now to move it into the exactly correct position as its slightly crooked.... er move you bugger... I said MOVE... no luck the damn thing had stuck fast almost immediately! I had to soak the nose in warm water and tease the decal off with a soft brush... leaving some of the colour behind in the process. Needless to say I was somewhat annoyed... Was able to reseat the decal in the proper place and with liberal use of the Microsol got it to conform to the curves properly. Then had to go over and touch up the missing colours. Its okay not but a bit messy - I'll have to use some oil leakage to hide some of the mess. Its really bloody annoying!
-
I think those instructions were written before Tamiya released XF-71 which is labelled as Cockpit Green (UN) but the 1/32 scale Spit instructions use that for the interior green so I'm assuming this is the same as Interior Green...
-
While the Klear has been drying, I took a little diversion to build a base. Now we're in Italy and I found a lovely photo of some of the airstrips in Italy, and its pretty rough and ready, so I took one of my old picture frames I picked up cheap at some charity shops in Bracknell (where thee entire town centre appears to consist of charity shops!) and added a layer of claycrete, landscaped to provide a nice flat bit and a couple of small humps on either side. A thin smear of plaster of paris was painted over the flat part to even it out but still keep the surface irregular. Once dry, artists acrylics were used to paint it the right colours. MiG pigment was then dusted over the flatter area while the paint was drying to give the surface a dusty texture. There are some plaster rock outcrops and some extra small rocks and branches, plus a light scattering of static grass with a selection of grass clumps added to give it texture. In the middle are two wheel chocks scratch built from balsa and cotton. In the corner is a small fuel dump under a tarp. which also includes a BUCKET!!! Having looked at the pictures, I think the jerry cans look much to clean, so I'll have to dirty them up a bit. Now thats complete I can return to sorting out the decals!
-
Lots of progress over the last two weeks but only one photo to summarise: Camo paint was done using Tamiya rattle cans AS-30 (Dark Green 2 (RAF)), AS-31 (Ocean Grey 2 (RAF)) and AS-32 (Medium Sea Grey (RAF)) which were originally bought for the 1:32 Spit I did at the beginning of 2011 and have showed sterling service for a couple of other builds last year. After all that dreid, its has had panel lines picked out with a pin wash, then its first coat of Klear. Canopy frames have been painted both inside and out, undercarriage has been weathered and brake line added although it still needs to have a flat spot added to the tyre. Spinner has been assembled with the scratched prop blades and two bombs have been prepared. I'll be adding another Klear coat tomorrow once I'm sure this one is dried and cured. I've begun work on the base as well. This will be a rough scrub-like airfield in Italy, with some fuel barrels and maybe an RAF figure or two. I'm saving the pilot figure that comes with this for the Revell Mosquito I plan to build at some point in the near future, but doesn't come with any crew. I want to portray it flying to avoid the well known problems with the undercarriage, but I then need a pilot and navigator... this sorts one of those out! Back to the Mustang... Decals will go on over the weekend I'm hoping. Next time I'll hopefully be able to show some progress on the base. Currently its just an old picture frame with a layer of claycrete coloured with yellow ochre and Burnt Sienna artist acrylics. Edit: Here is another photo that shows the panel lines a bit better...
-
Thats actually a later era rather than earlier - I remember leather trimming on bus seats from way back when, but when they got refurbished they got an all-over tartan seat. By the way, did London Country buses have a green tartan seat and inner paneling or is my memory playing tricks?
-
THAT way...
-
Wow thank you everyone, I feel honoured! There were some fantastic builds and the whole experience was really enjoyable! I would liek to claim the Eduard 1/48 Sopwith F.1 Camel, sounds like that would be in interesting build! Thank you to MadNurseGaz and kev1n for hosting
